By Michael E. Haskew
On D-day, June 6, 1944, the British 3rd Infantry Division was the first to land on Sword Beach. Its objective by the end of the day was the capture of the French city of Caen.
As the day wore on, however, that objective was to prove elusive.
One of the largest cities in Normandy, Caen was a communications hub and the center of a major road network. Located on the River Orne, the city was connected to the English Channel by the Caen Canal. Its seizure would anchor the Allied left flank and deny river and canal access to the defending Germans. As long as Caen remained in German hands, these barriers might present major obstacles to inland expansion of the D-Day beachhead.
General Bernard Law Montgomery, commander of Allied ground forces in Normandy, envisioned the capture of Caen within hours of British ground forces storming ashore at Sword, the easternmost of the five D-Day landing beaches. However, stiff German resistance from the veteran 21st Panzer Division, the 12th SS Panzer Division Hitlerjugend, and the 716th Infantry Division had slowed progress toward Caen to a crawl and proved that Montgomery’s insistence that the city could be captured on D-Day had been wildly optimistic.
A week after the Normandy landings, Caen remained firmly under enemy control despite numerous efforts by British forces to take the city in a direct assault. However, while Allied troops continued slugging their way inland against fierce German opposition, an opportunity developed for Montgomery as the U.S. 1st Infantry Division pushed southward from Omaha Beach, forcing the Germans to pull back and opening a gap west of Caen between the 352nd Infantry Division and Panzer Lehr, a crack German armored division.
Montgomery’s staff then modified its plan for the early ground phase of the Normandy Campaign, dubbed Operation Perch, hoping to take advantage of this recent development. A strong pincer movement might outflank Panzer Lehr and envelop Caen, forcing its stubborn German defenders to abandon the city or potentially be surrounded. While the 51st (Highland) Infantry Division attacked in the east, the 7th Armored Division, the famed “Desert Rats,” which had found glory with Montgomery’s Eighth Army in North Africa, would swing southeastward and capture the town of Villers-Bocage, just over 27 kilometers southwest of Caen, along with nearby high ground identified on maps as Point 213.
On June 10, the reimagined Operation Perch got underway with the advance of the 7th Armored Division, while the 51st (Highland) Division stepped off the next day. Some early gains were made east of Caen, but a powerful counterattack from the 21st Panzer stopped that British thrust cold, pushing the Highlanders back to the banks of the Orne. However, the prospects for the western pincer’s success remained good.
As the 7th Armoured Division advanced, Major General Fritz Beyerlein, the capable commander of Panzer Lehr, recognized the predicament his division faced and ordered a heavy counterattack that bogged the western drive down near the town of Tilly-sur-Seulles. On the morning of June 12, Lieutenant General Miles Dempsey, commander of the British Second Army, traveled to 7th Armoured headquarters to meet with Major General Bobby Erskine, the division commander. Erskine suggested that Panzer Lehr might still be outflanked if 7th Armoured disengaged from the battle at Tilly-sur-Seulles and swiftly advanced toward Villers-Bocage from further west.
Hours later, the 22nd Armoured Brigade, the vanguard of the Desert Rats, was on the move toward Villers-Bocage with the tanks and armored cars of the 8th and 11th Hussars covering its flanks. As darkness fell, Brigadier Robert “Looney” Hinde, leading the brigade, called a halt to the advance after reaching the Caumont-Villers-Bocage Road, just five miles from his objective. Early on June 13, tanks of the 4th County of London Yeomanry and soldiers of Company A, 1st Battalion, The Rifle Brigade rolled into Villers-Bocage, scattering the few German troops they encountered as large numbers of French civilians emerged from hiding to welcome them.
Brigadier Hinde was aware that a German counterattack was likely. Control of the road network emanating from Villers-Bocage was tactically significant for the enemy as well, so he ordered the tanks of A Squadron, County of London Yeomanry and Company A, The Rifle Brigade to occupy Point 213. About 1.6 kilometers northwest of Villers-Bocage, the high ground commanded the approaches to the town and National Highway 175 toward Caen.
Although his tankers were exhilarated by the rapid run to Villers-Bocage, Lieutenant Colonel Viscount Arthur Cranley, commanding the 4th County of London Yeomanry, was worried. German reconnaissance vehicles had been spotted, and enemy soldiers were seen making a hasty getaway in a staff car. Soon enough, the enemy would be coming back. Occupying the exposed position at Point 213 would invite a counterattack.
Cranley left four tanks of his regimental headquarters in Villers-Bocage before heading out to inspect A Squadron’s new posting. B Squadron took up positions west of Villers-Bocage and guarded the intersection along the road to the village of Caumont.
The leading elements of the 4th County of London Yeomanry and the accompanying infantry reached Point 213 just after 9 a.m. Most of the British armor and infantry halted along the road, waiting for orders to deploy and consolidate their hold on the high ground. More than two dozen tanks and halftracks lined the road along with numerous troop carriers. Sentries were posted, but their field of vision was limited due to the terrain and thick woods in the area.
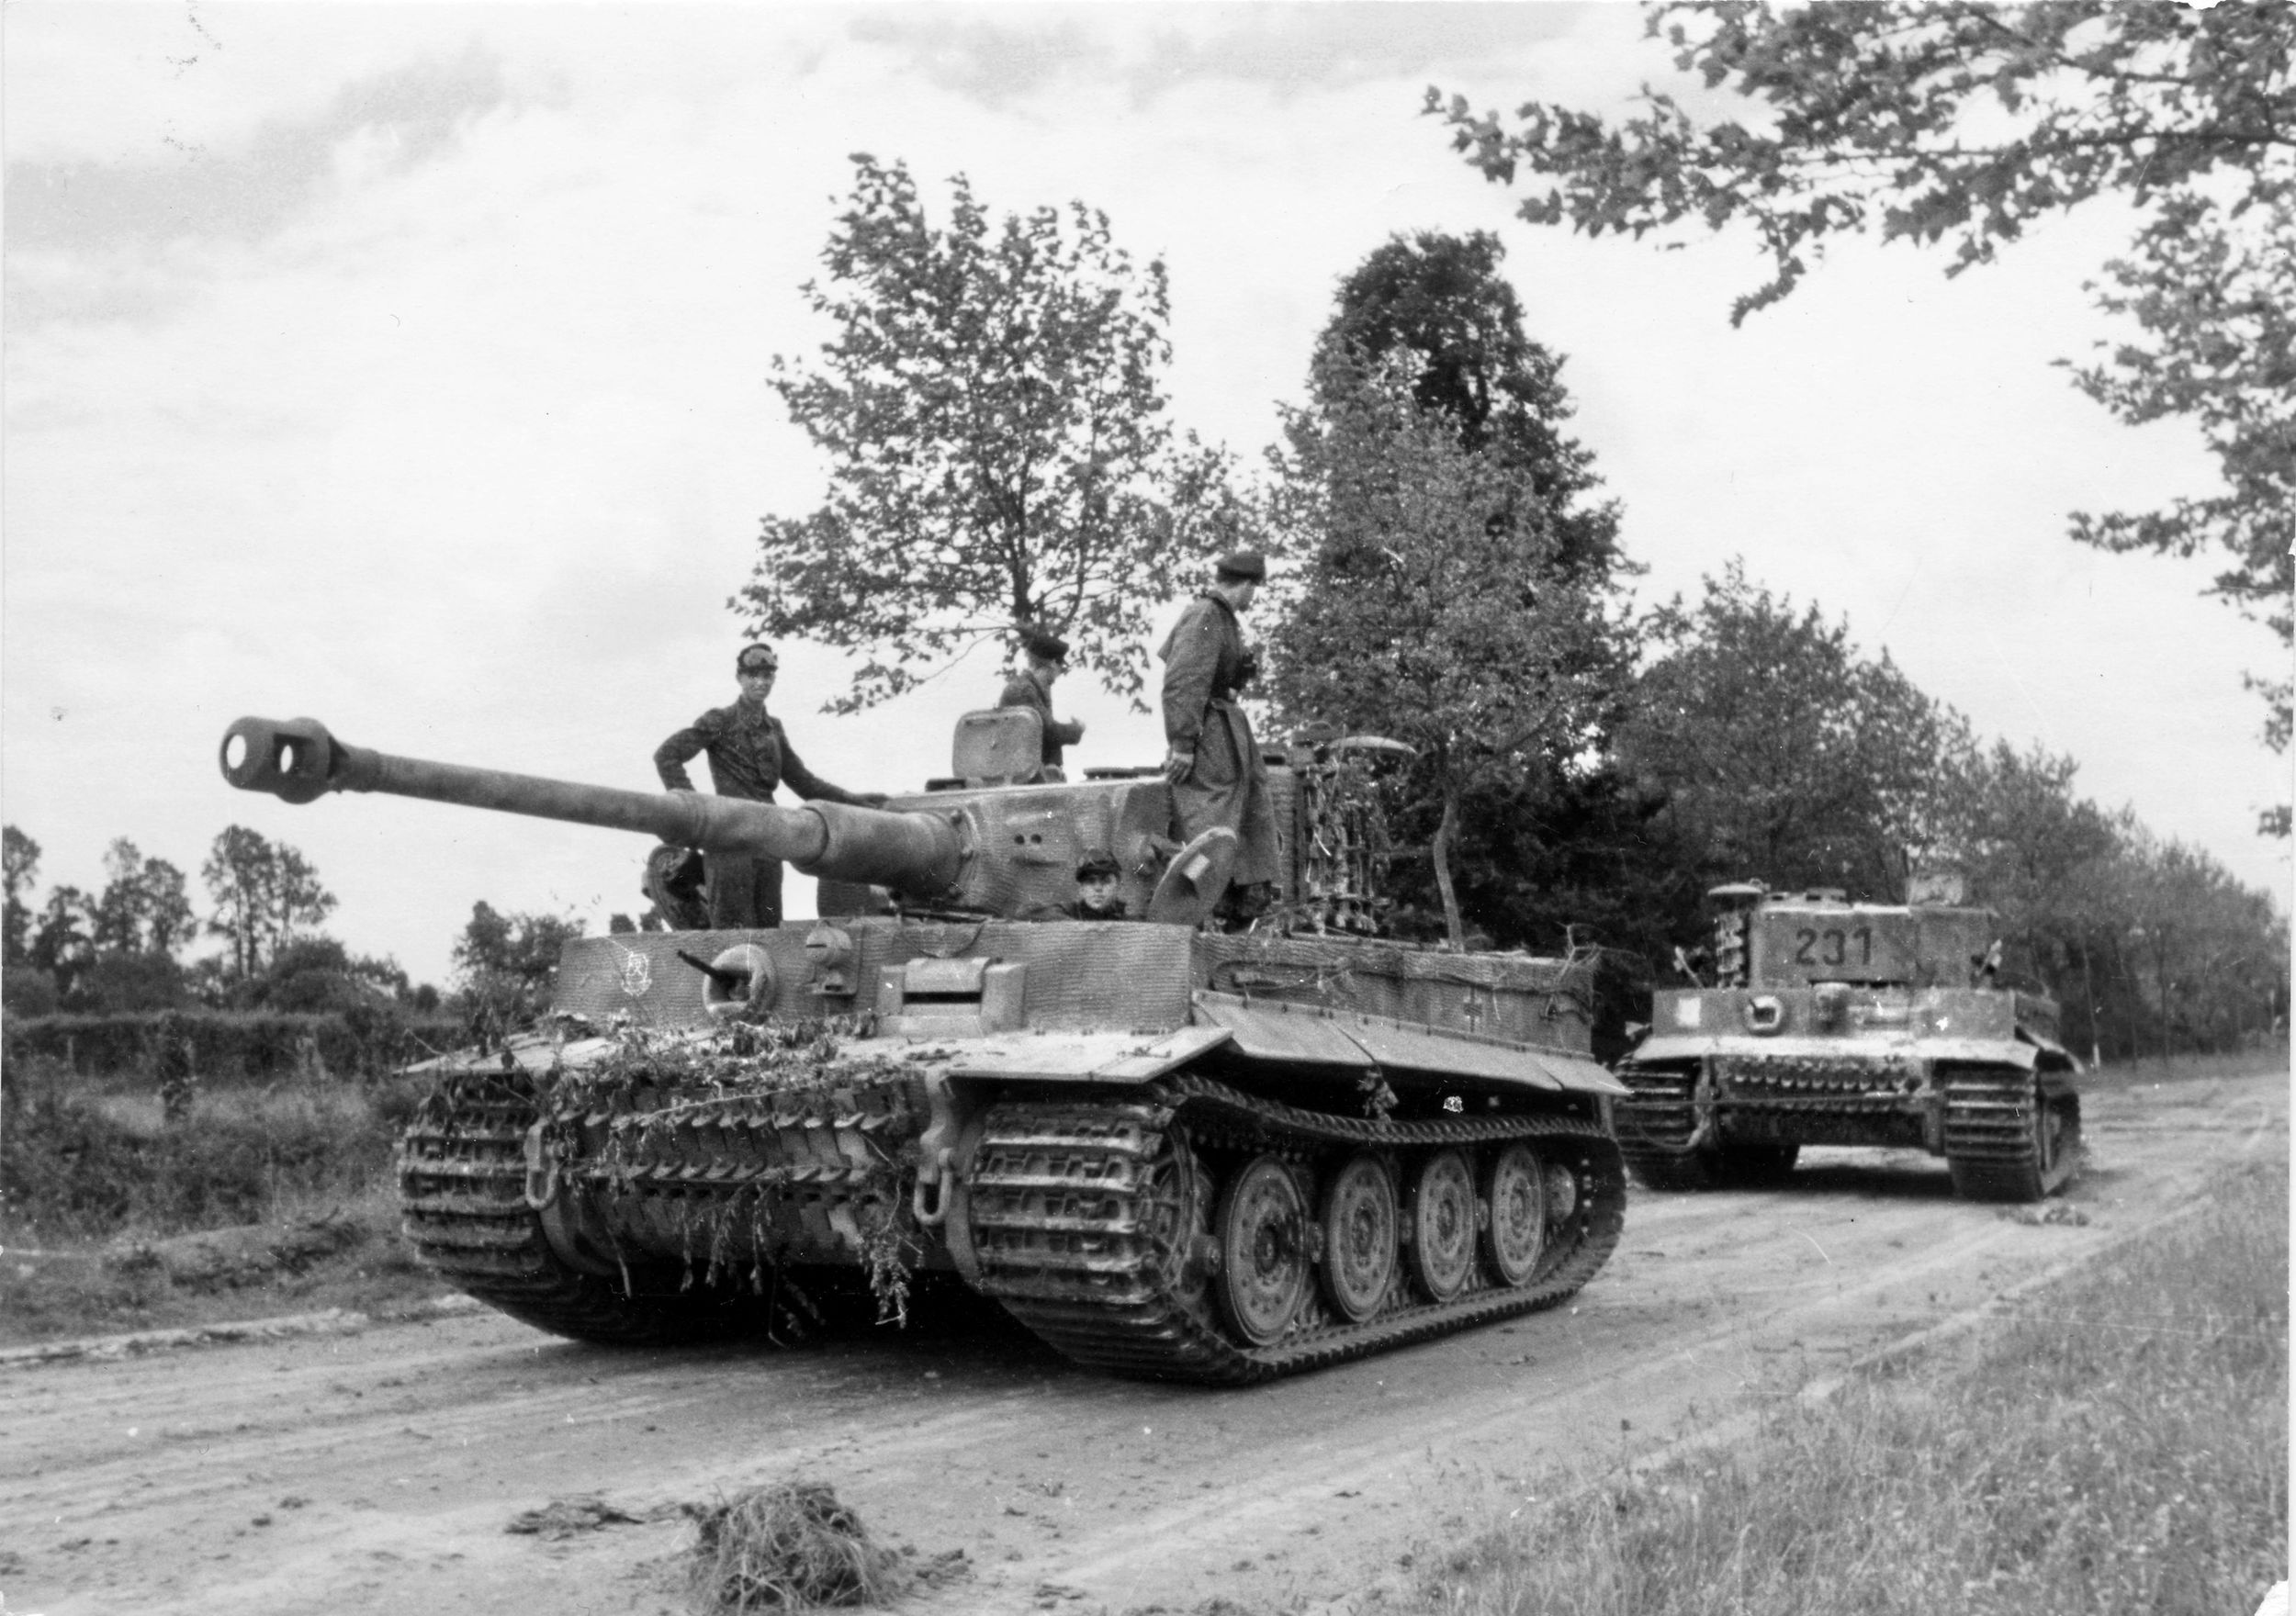
Relatively few German armored formations were alerted on D-Day or in its immediate aftermath. But one of these, the 1st SS Panzer Corps, had headed toward the fighting early on June 7. Allied fighter bombers shot up the columns several times along the route, and the corps lost a significant number of armored vehicles. By the morning of June 13, SS Heavy Tank Battalion 101, its last uncommitted reserve advancing from Beauvais, had been reduced from an original strength of 45 tanks to fewer than 20.

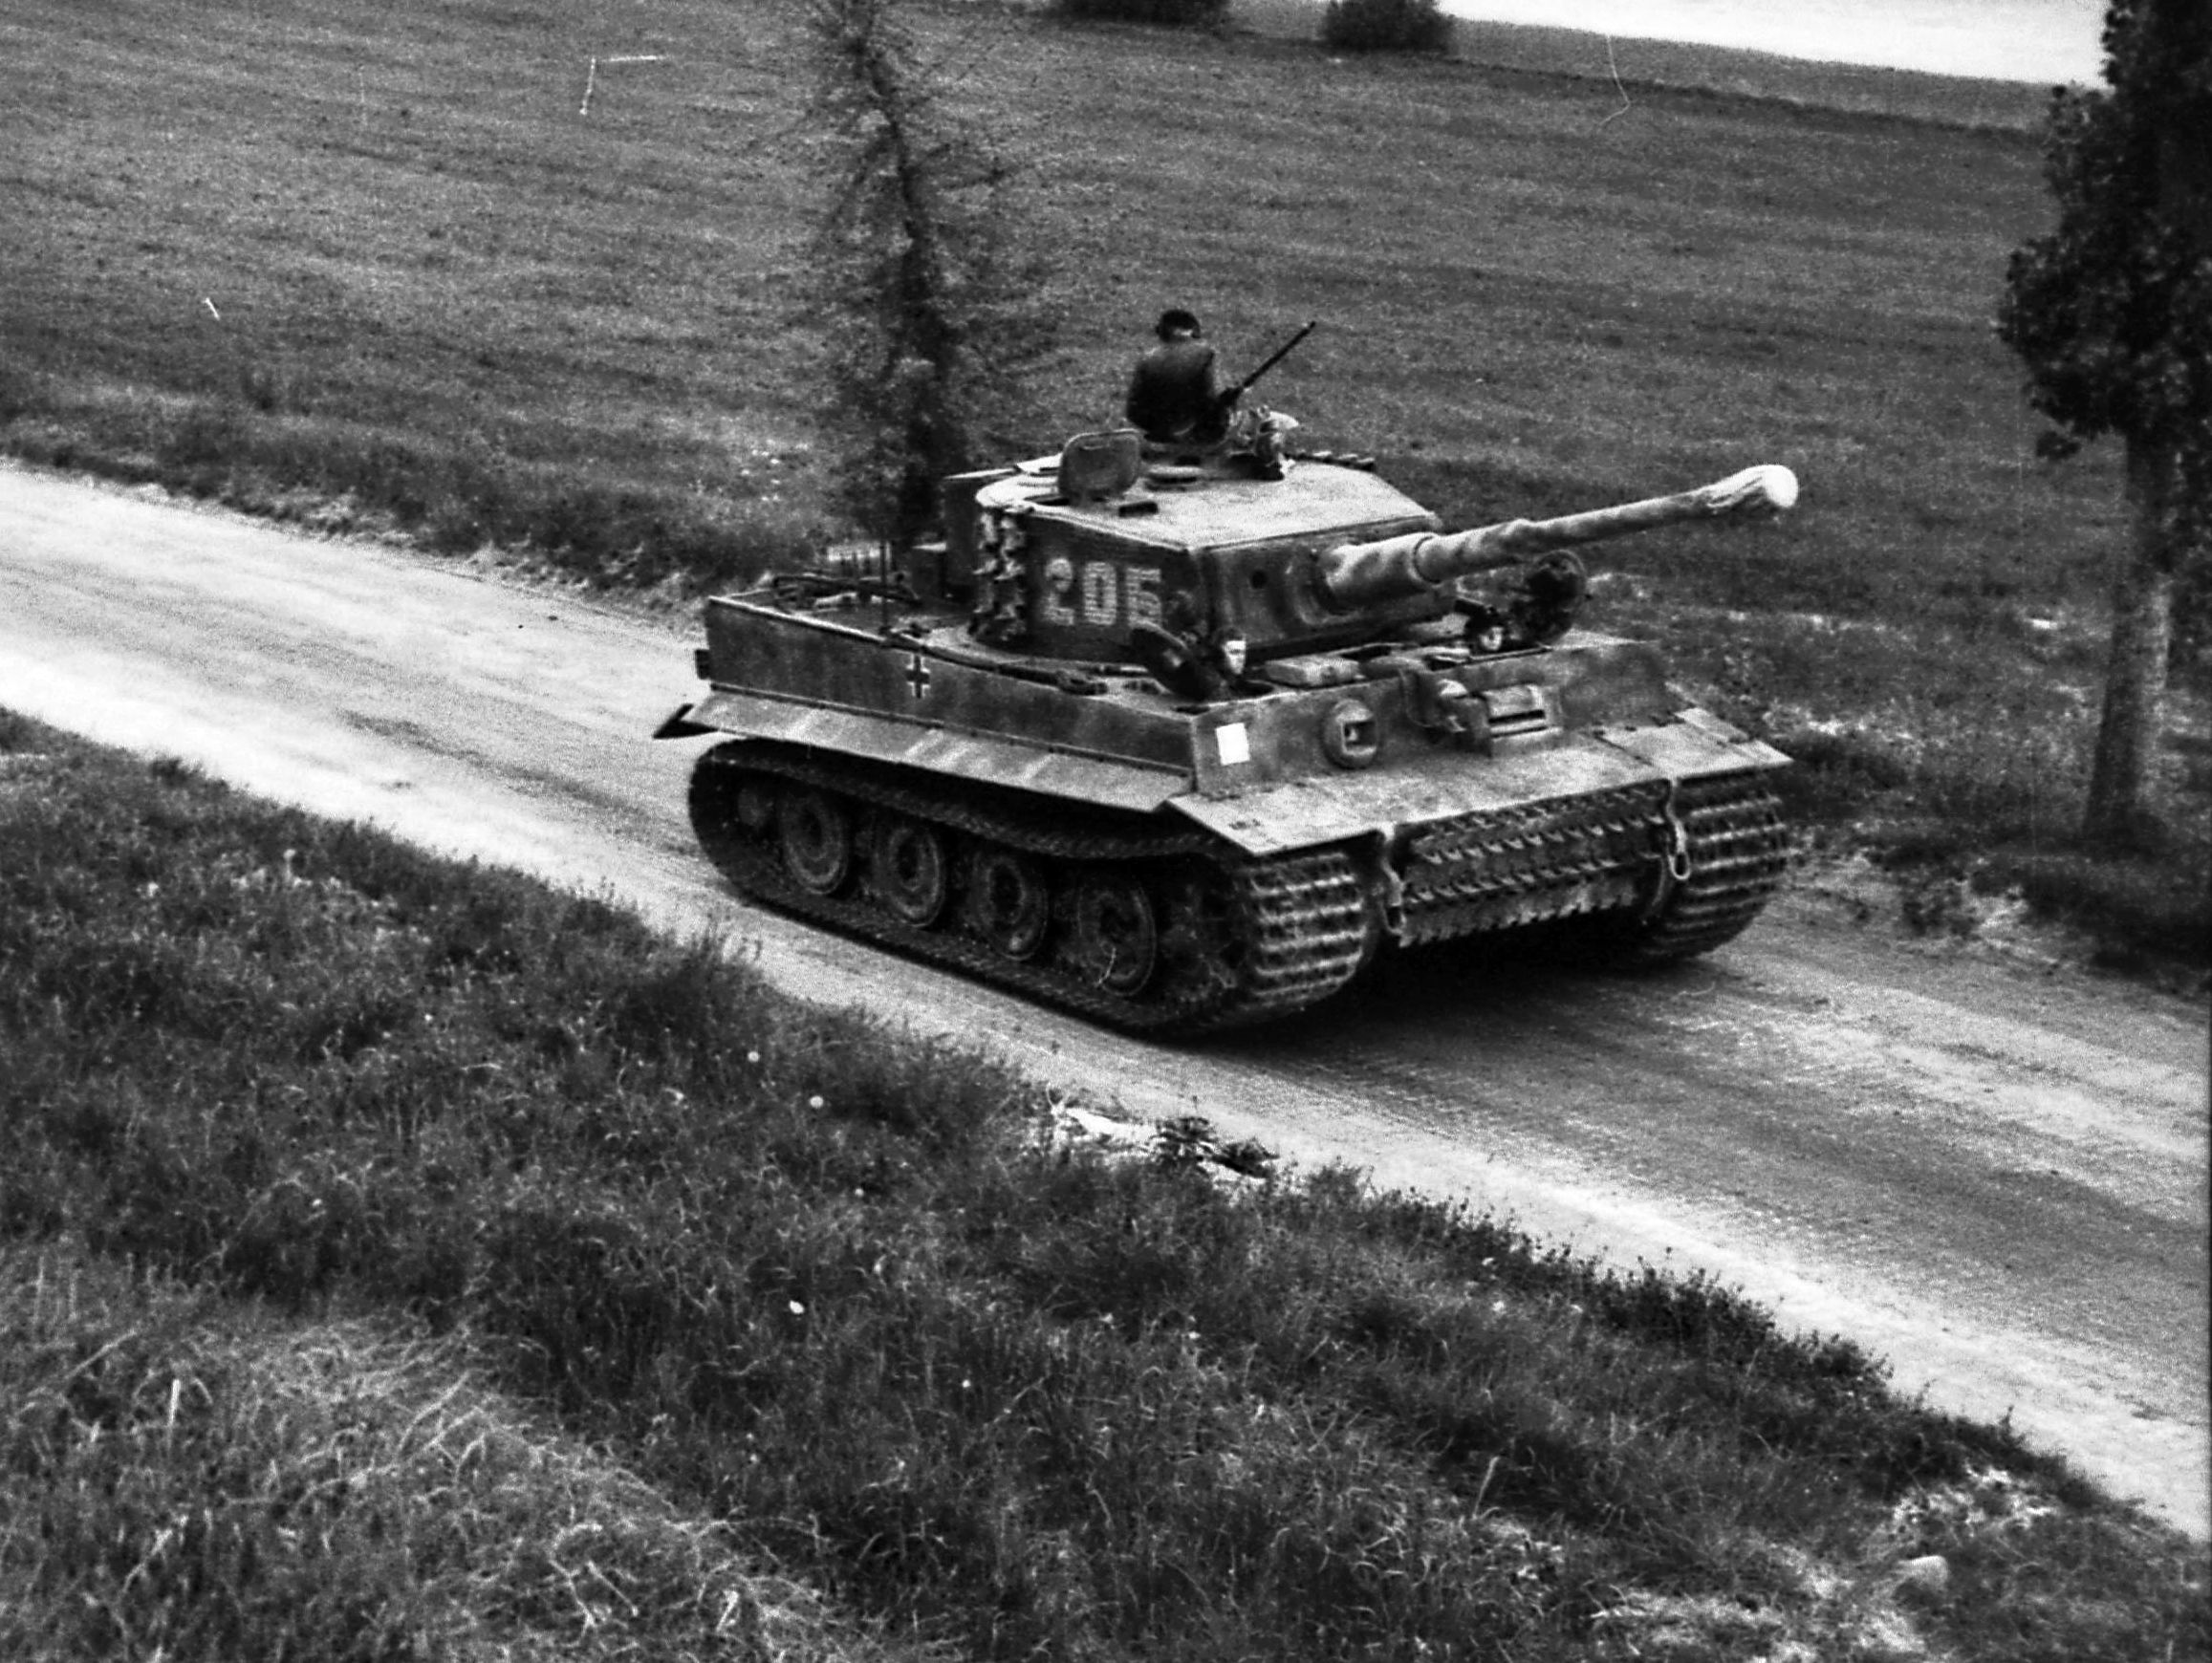
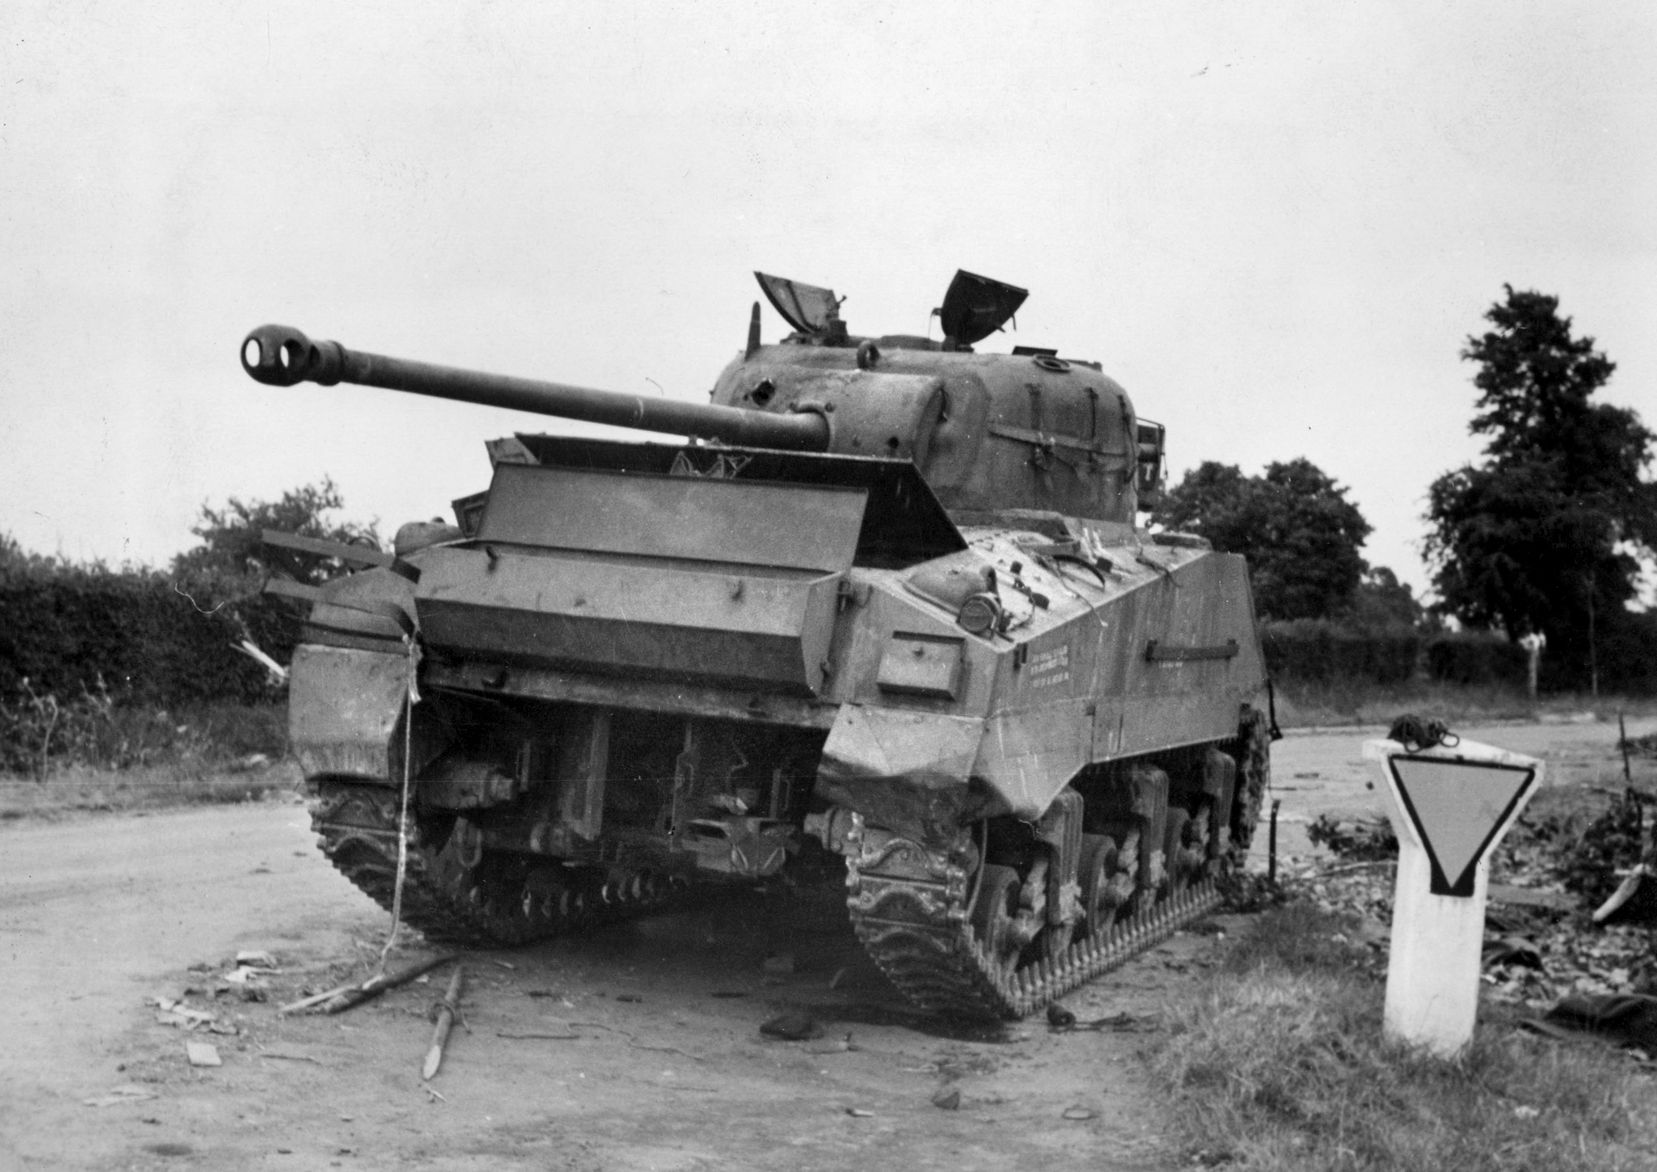
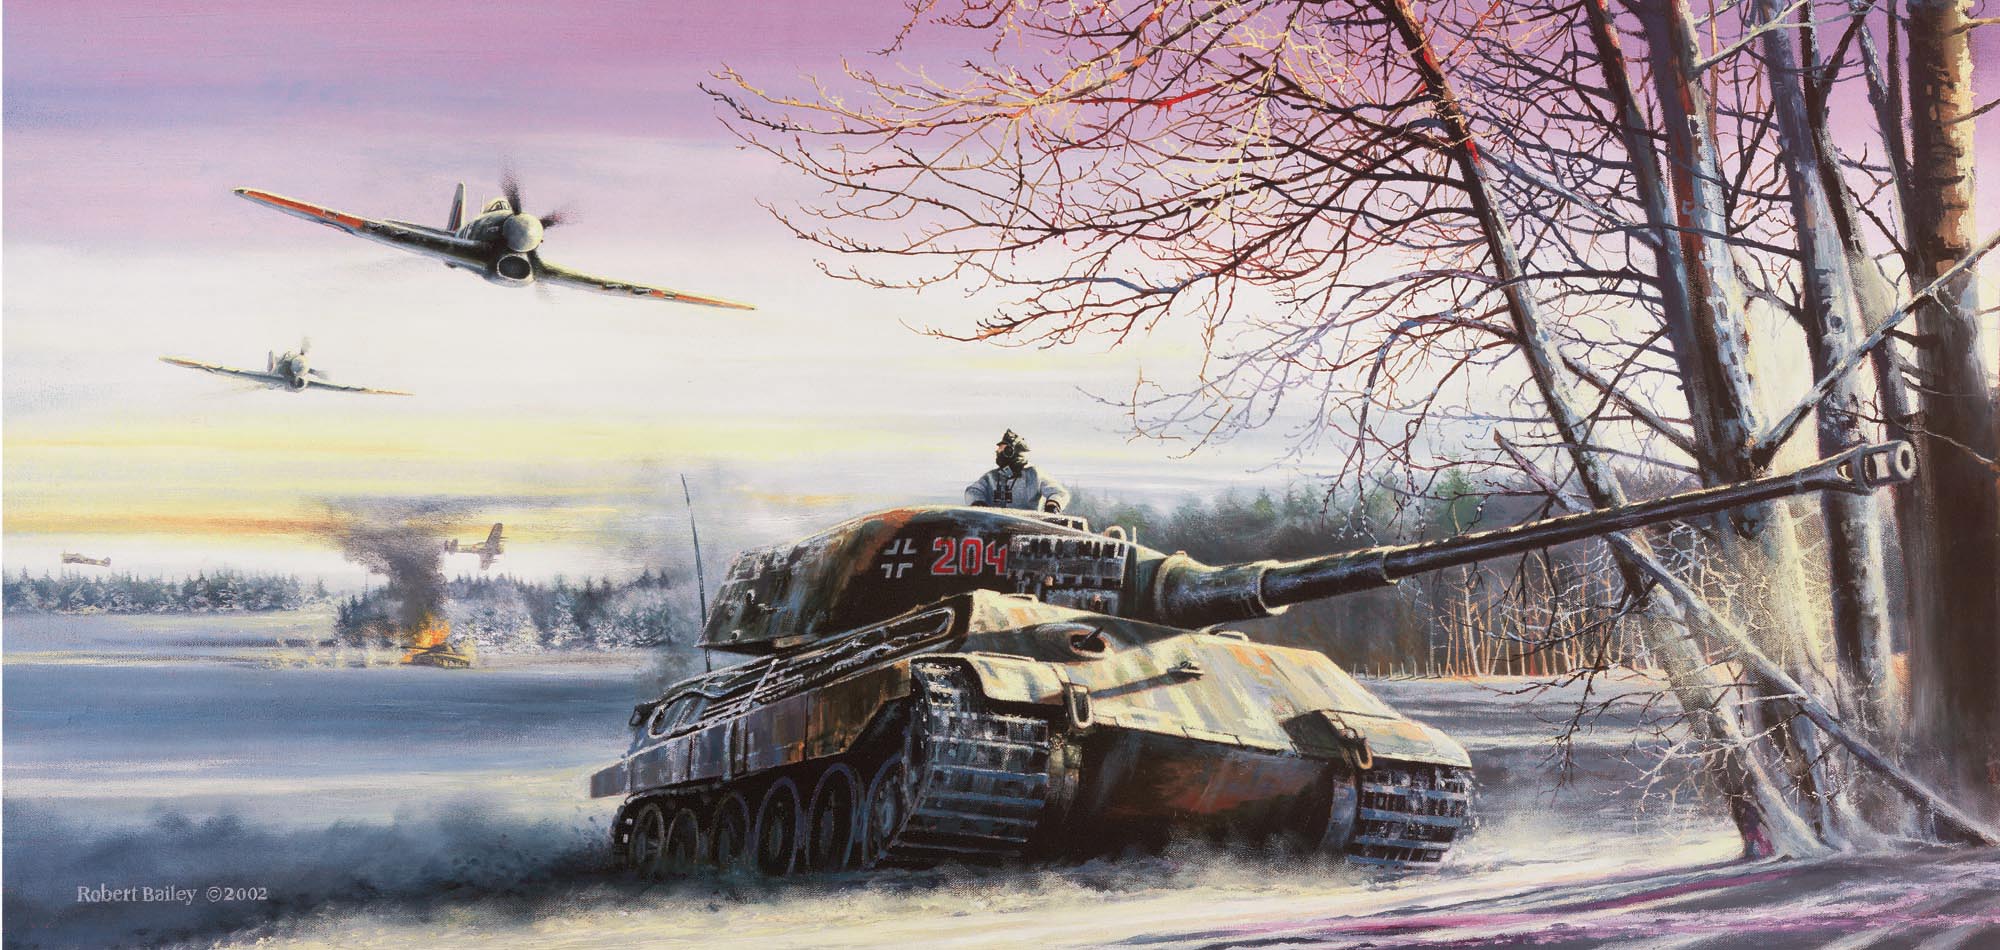
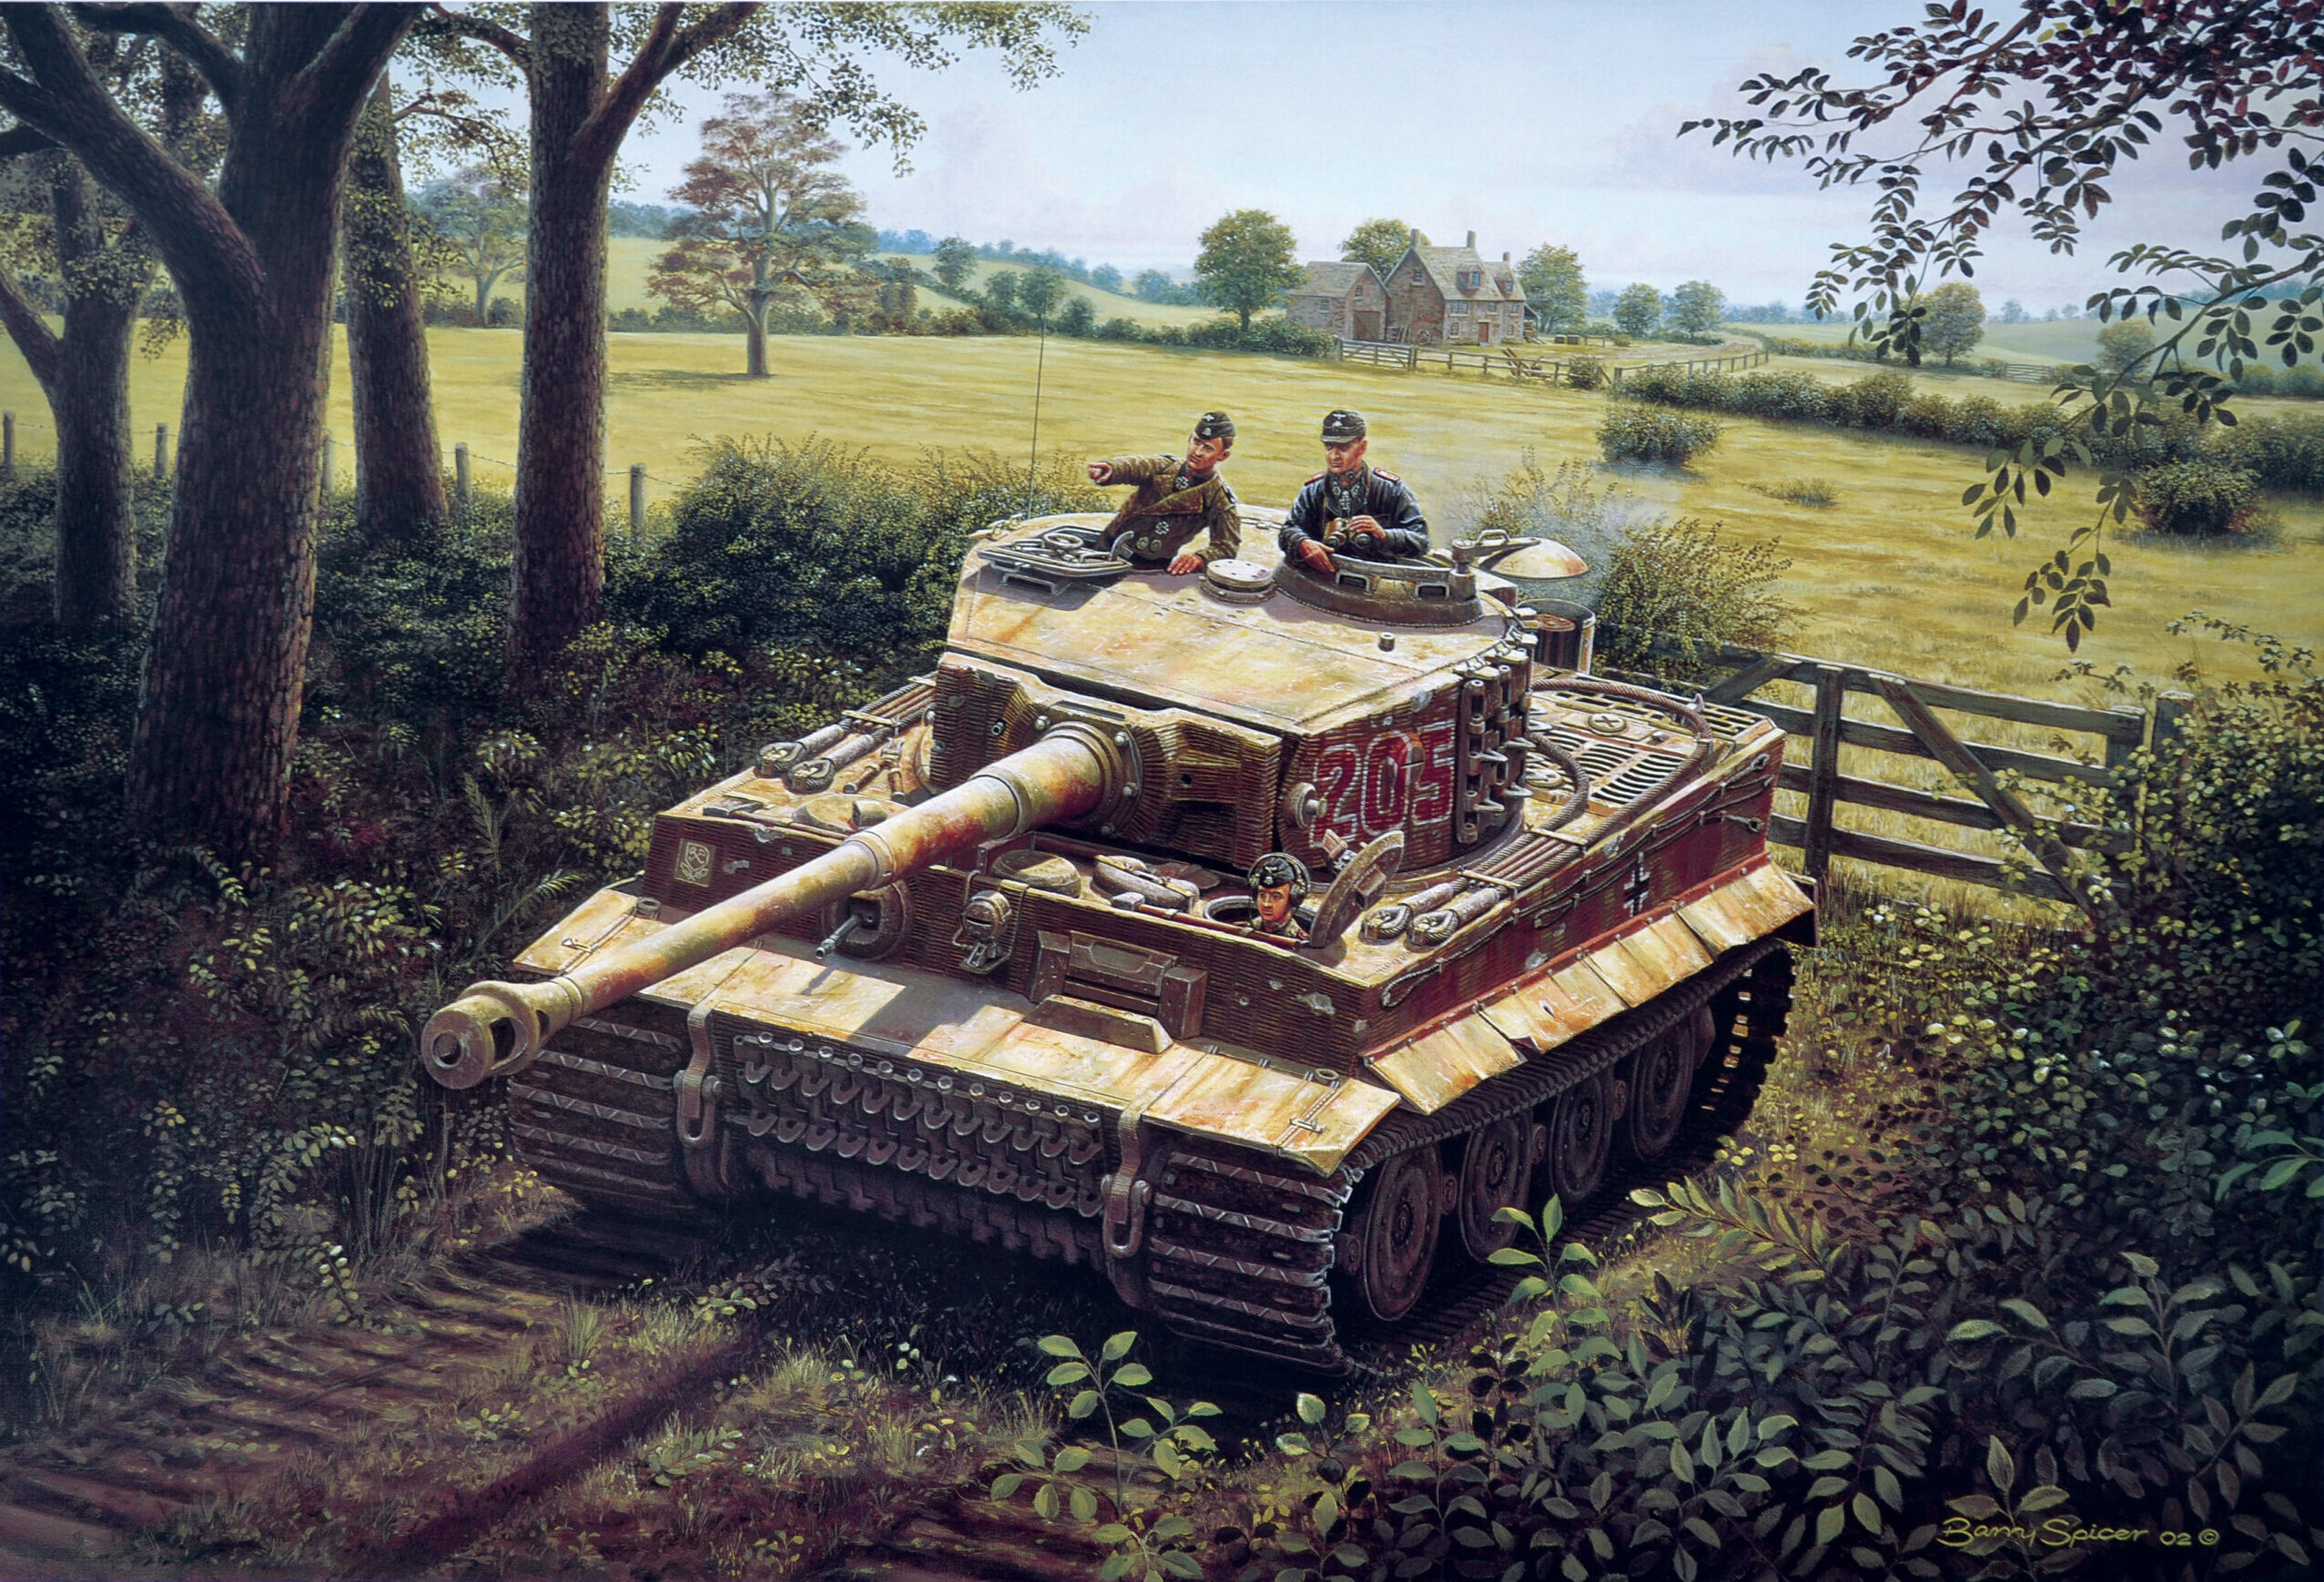
Most of the German armored battalion’s vehicles, however, were the 56-ton Tiger I heavy tank, mounting a high-velocity 88mm cannon that was superior to the 75mm and 17-pounder (76mm) guns of the new British Cromwell and Sherman Firefly tanks in the field. Plagued by mechanical difficulties, the Tiger was nevertheless a daunting foe in combat. Hits from Allied shells were often deflected harmlessly away by its thick armor plating, and the range of the formidable 88mm weapon allowed the Germans to engage targets at standoff distances.
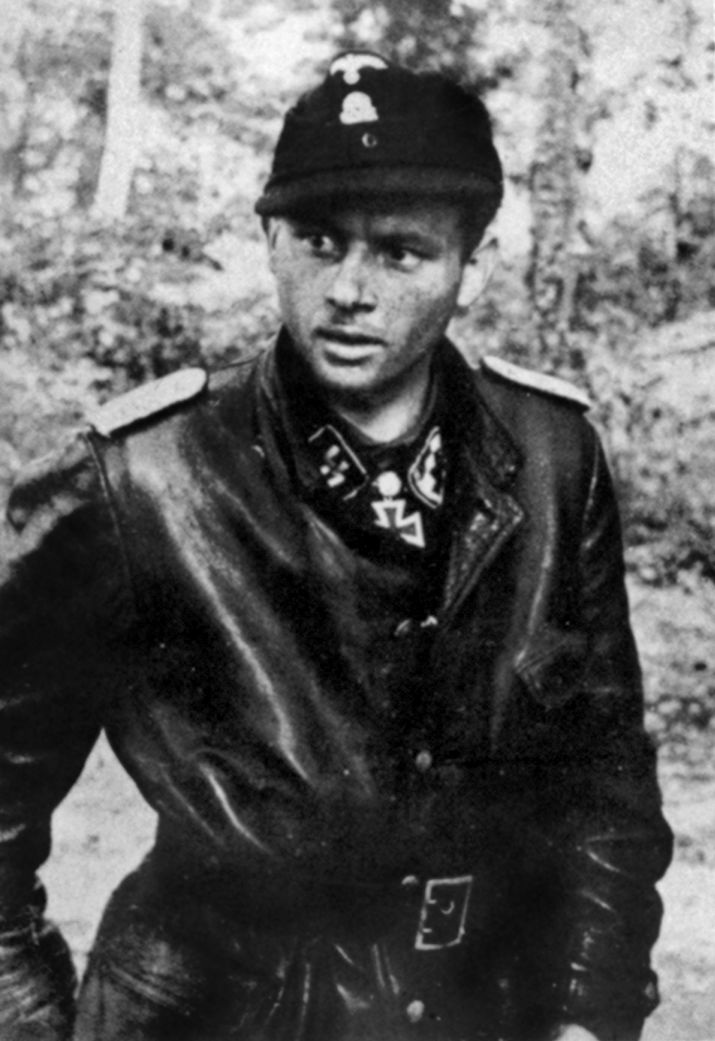
On the morning of June 13, two companies of Tigers from SS Heavy Tank Battalion 101 had reached the vicinity of Villers-Bocage, the 1st Company, under SS Hauptsturmführer (Captain) Rolf Möbius, and the 2nd Company, led by Obersturmführer (First Lieutenant) Michael Wittmann, who was already a leading panzer ace and holder of the Knights Cross with Oak Leaves. Wittmann had amassed well over 100 tank and armored vehicle kills on the Eastern Front.
While accounts vary as to the actual strength of the two panzer companies and the details of the engagement that followed, the ensuing battle contributed to the growing legend that was Wittmann—possibly even exaggerating his role in the one-sided brawl at Villers-Bocage.
Wittmann’s Tiger company took positions along a ridge south of Point 213 in support of either Panzer Lehr or the 12th SS Panzer Division, and the young Tiger ace was astonished when British armored vehicles appeared in Villers-Bocage. He later remembered, “I had no time to assemble my company; instead I had to act quickly, as I had to assume that the enemy had already spotted me and would destroy me where I stood. I set off with one tank and passed the order to the others not to retreat a single step but to hold their ground.”
At the moment the British tankers and infantrymen on the road to Point 213 were ordered to resume their advance to the high ground, three Tiger tanks, those of Wittmann and SS Oberscharführer (Company Sergeant Major) Jürgen Brandt and SS Untersturmführer (2nd Lieutenant) Georg Hantusch, were spotted moving perilously parallel to the British column, partially concealed along a path adjacent to the highway but screened by a tall hedgerow. Apparently unable to resist a potential fight, the two other German tankers had ignored Wittmann’s order and moved forward with him.
The other two Tigers attacked the British armor at Point 213, and Wittmann emerged from a wooded area onto National Highway 175, where he destroyed a Cromwell at close range and then blasted a Sherman Firefly, its blazing hulk blocking the British column. He turned and worked his way down the line of armored vehicles strung out along the road like ducks in a shooting gallery. In rapid succession the Tiger’s 88mm gun and its two 7.92mm MG34 machine guns destroyed eight halftracks and four troop carriers.
Leaving a trail of destruction on the highway, Wittmann then rolled down the Rue Georges Clémenceau toward the eastern edge of Villers-Bocage. Three M5 Stuart light tanks of the 4th County of London Yeomanry Reconnaissance Troop, their 37mm guns no match for the thick armour protection of the Tiger, were stationed at the intersection with the road to Tilly-sur-Seulles.
No doubt, the reconnaissance squadron leader, Lieutenant Rex Ingram, knew that his situation was perilous. Nevertheless, he ordered the driver of his 15-ton Stuart into the road— directly in the path of Wittmann’s oncoming Tiger—in an attempt to delay the German tank’s advance into the town. A single 88mm round caused the British tank to erupt in flames. The Tiger shunted the blazing wreck aside and blasted at least one more of the light tanks.
A few yards beyond the road junction the four Cromwells of the regimental headquarters came into view as Wittmann directed his lumbering Tiger down the main avenue in Villers-Bocage. Several Cromwell crewmen were actually thought to have been outside their vehicles when the Wittmann attack occurred. The first Cromwell, commanded by the regimental executive officer, Major Arthur Carr, took a damaging hit and attempted to back out of the line of fire. Two more British tanks, commanded Lieutenant John L. Cloudsley-Thompson and Regimental Sergeant Major Gerald Holloway, were brewed up.
While Cloudsley-Thompson’s crew tried to exit its burning Cromwell, Captain Pat Dyas, the regimental adjutant, reversed his tank and backed into a garden out of Wittmann’s line of sight. The action had developed so rapidly that Dyas’s gunner, away on a nature call, had no time to return to the tank. Dyas was in position to deliver a kill shot against the Tiger, but he sat motionless and unable to act as the Nazi behemoth rumbled past.
Continuing down the Rue Georges Clémenceau, Wittmann spotted two observation post tanks of the 5th Royal Horse Artillery as they backed around a corner into the Rue Pasteur. The Sherman observation tank commanded by Major Dennis Wells was quite defenseless. It mounted only a wooden decoy gun rather than a real main weapon. The accompanying Cromwell was probably unarmed as well. Captain Paddy Victory continued backing his Cromwell into a side street behind the Sherman at the rear entrance to the Hotel du Bras d’Or. Just seconds later, Wells’ defenseless tank was blasted by an 88mm shell from Wittmann’s Tiger.
As he tried to avoid a similar fate, Captain Victory’s transmission gears locked up. Wittmann’s Tiger rumbled past, and for a fleeting moment the crew of the Cromwell hoped that they had remained unseen. It proved a forlorn hope as the Tiger stopped, reversed just a few feet, and then pumped an 88mm round into the British tank just below its turret. After the crew bailed out, Captain Victory returned to the disabled Cromwell and destroyed its interior to the best of his ability before slipping away.
While Wittmann was busy shooting up these hapless British tanks and heading steadily westward toward the center of Villers-Bocage, Lieutenant Charles Pearce jumped into a scout car and drove like mad to alert B Squadron to the presence of the marauding Tiger and the unfolding debacle on the other side of the town.
Captain Dyas, meanwhile, began looking for Wittmann through the streets of Villers-Bocage. He spotted the Tiger just as Wittmann crossed paths with a Sherman Firefly of B Squadron commanded by Sergeant Stan Lockwood, the first British tanker to hear Lieutenant Pearce’s alarm. Lockwood turned his Firefly from the Place Jeanne d’Arc onto the Rue Georges Clémenceau. With Wittman in his sights, the Firefly let loose a 17-pounder shell that slightly damaged the big Tiger. Startled by the concussion, Wittmann’s driver swerved into a brick wall, causing its collapse on top of Lockwood’s Sherman.
Dyas immediately sensed an opportunity and roared forward in his Cromwell, firing two 75mm rounds that hit the Tiger but failed to penetrate its armor. In seconds Wittmann turned the tables. The Tiger’s turret swung around, its cannon belched flame, and the resulting hit killed the Cromwell gunner and driver. Dyas was blown clear, stunned but remarkably uninjured.
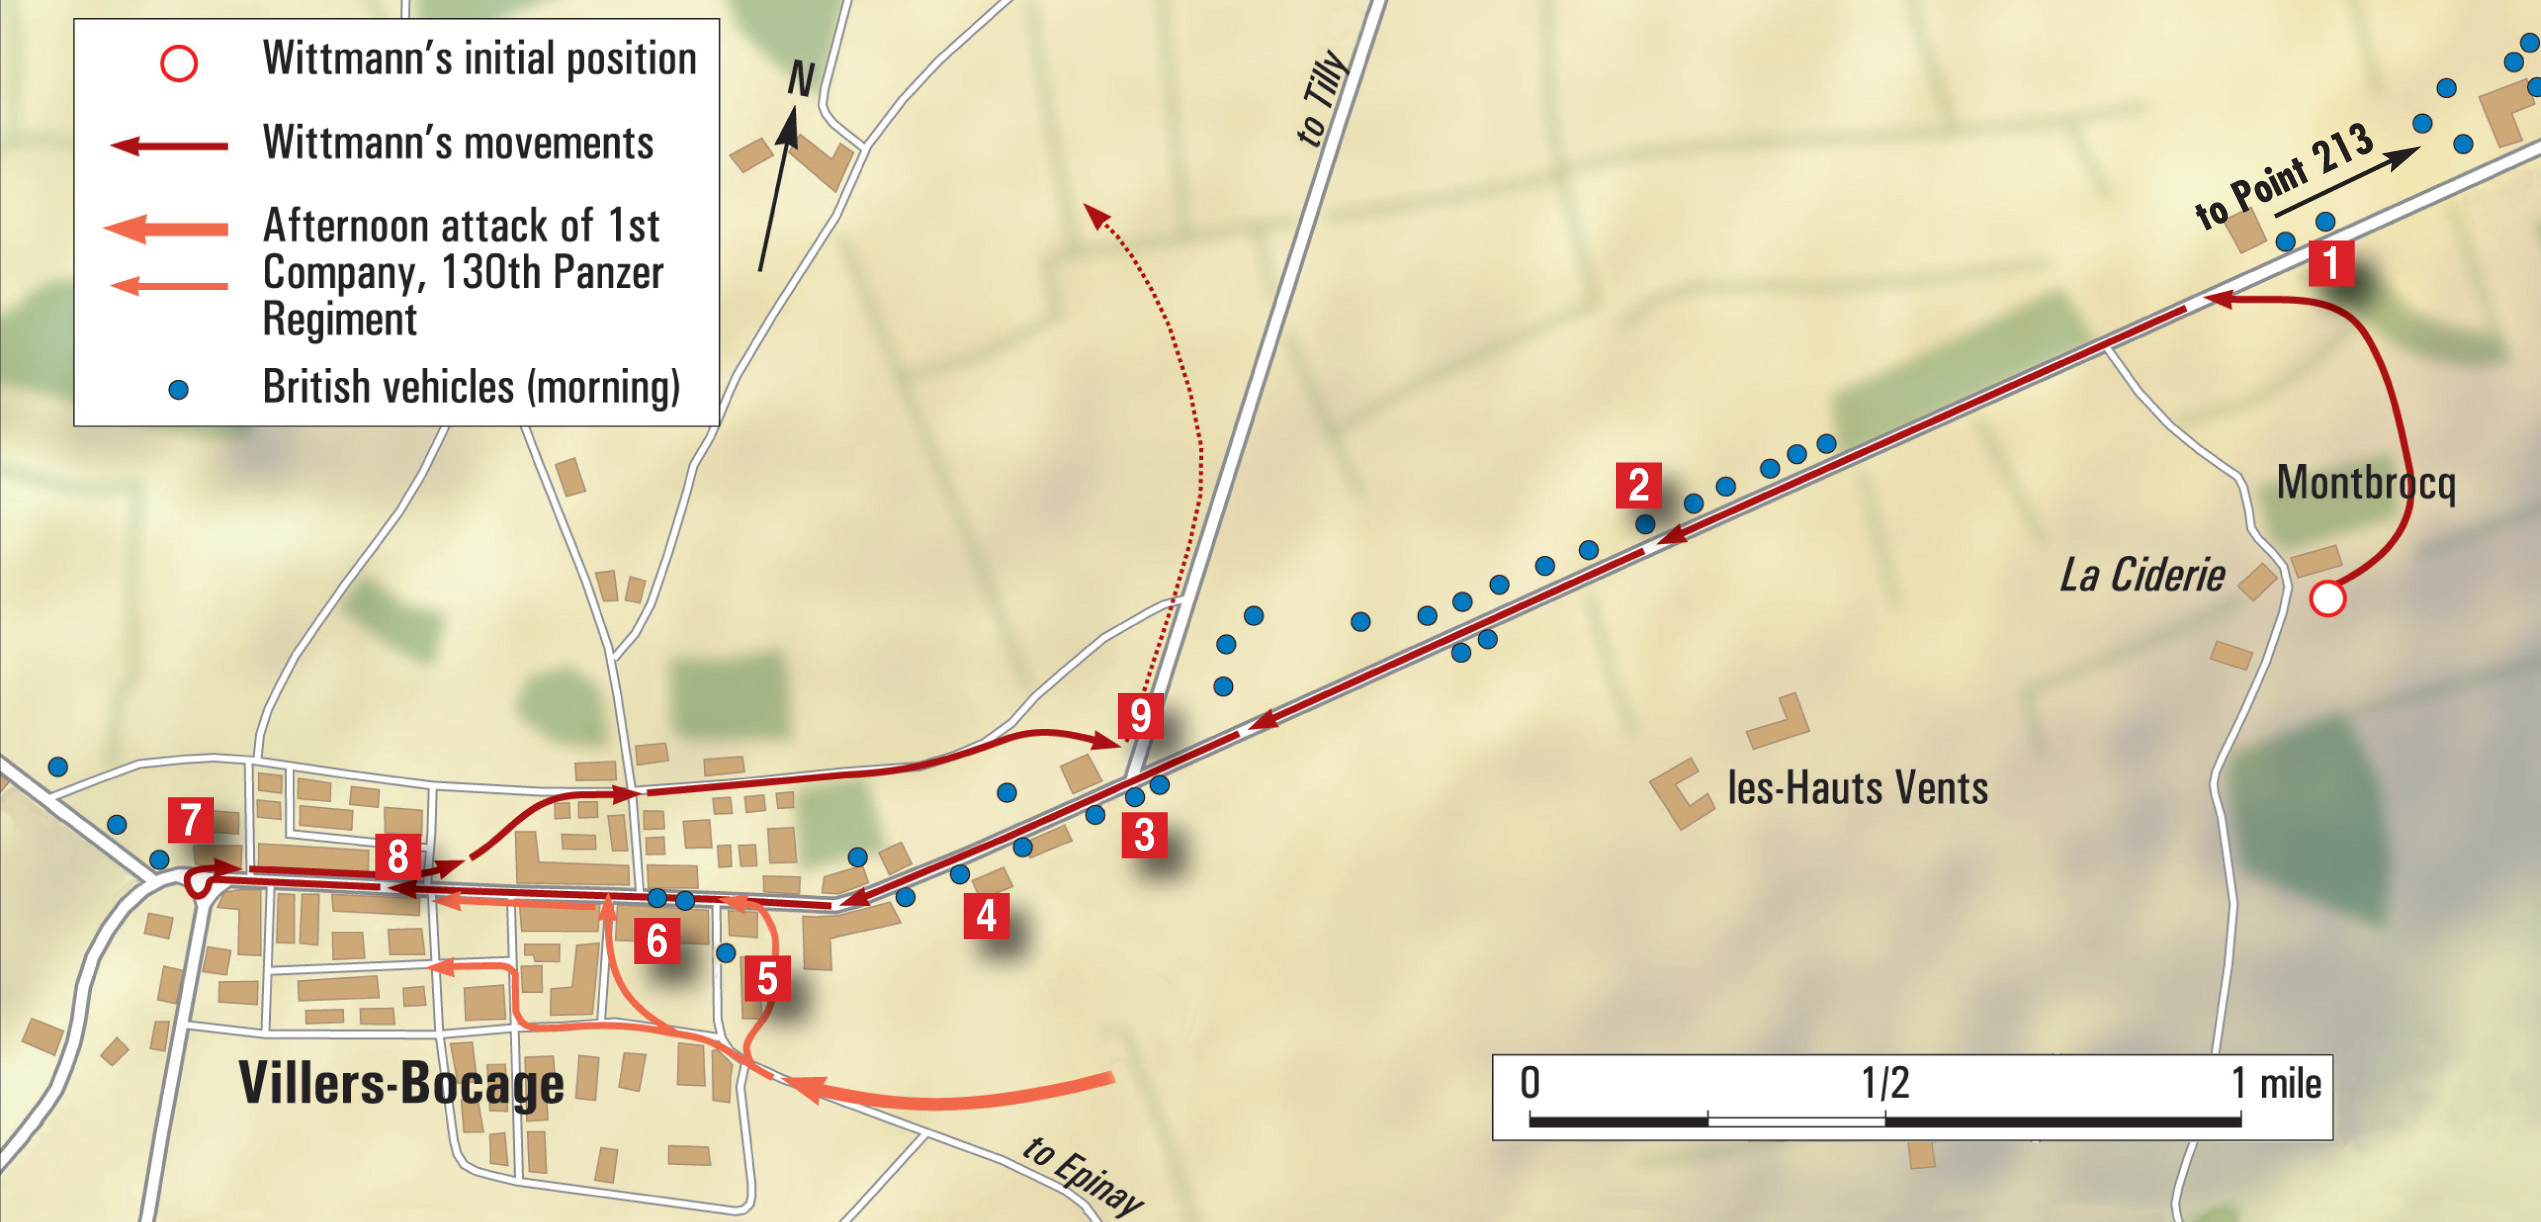
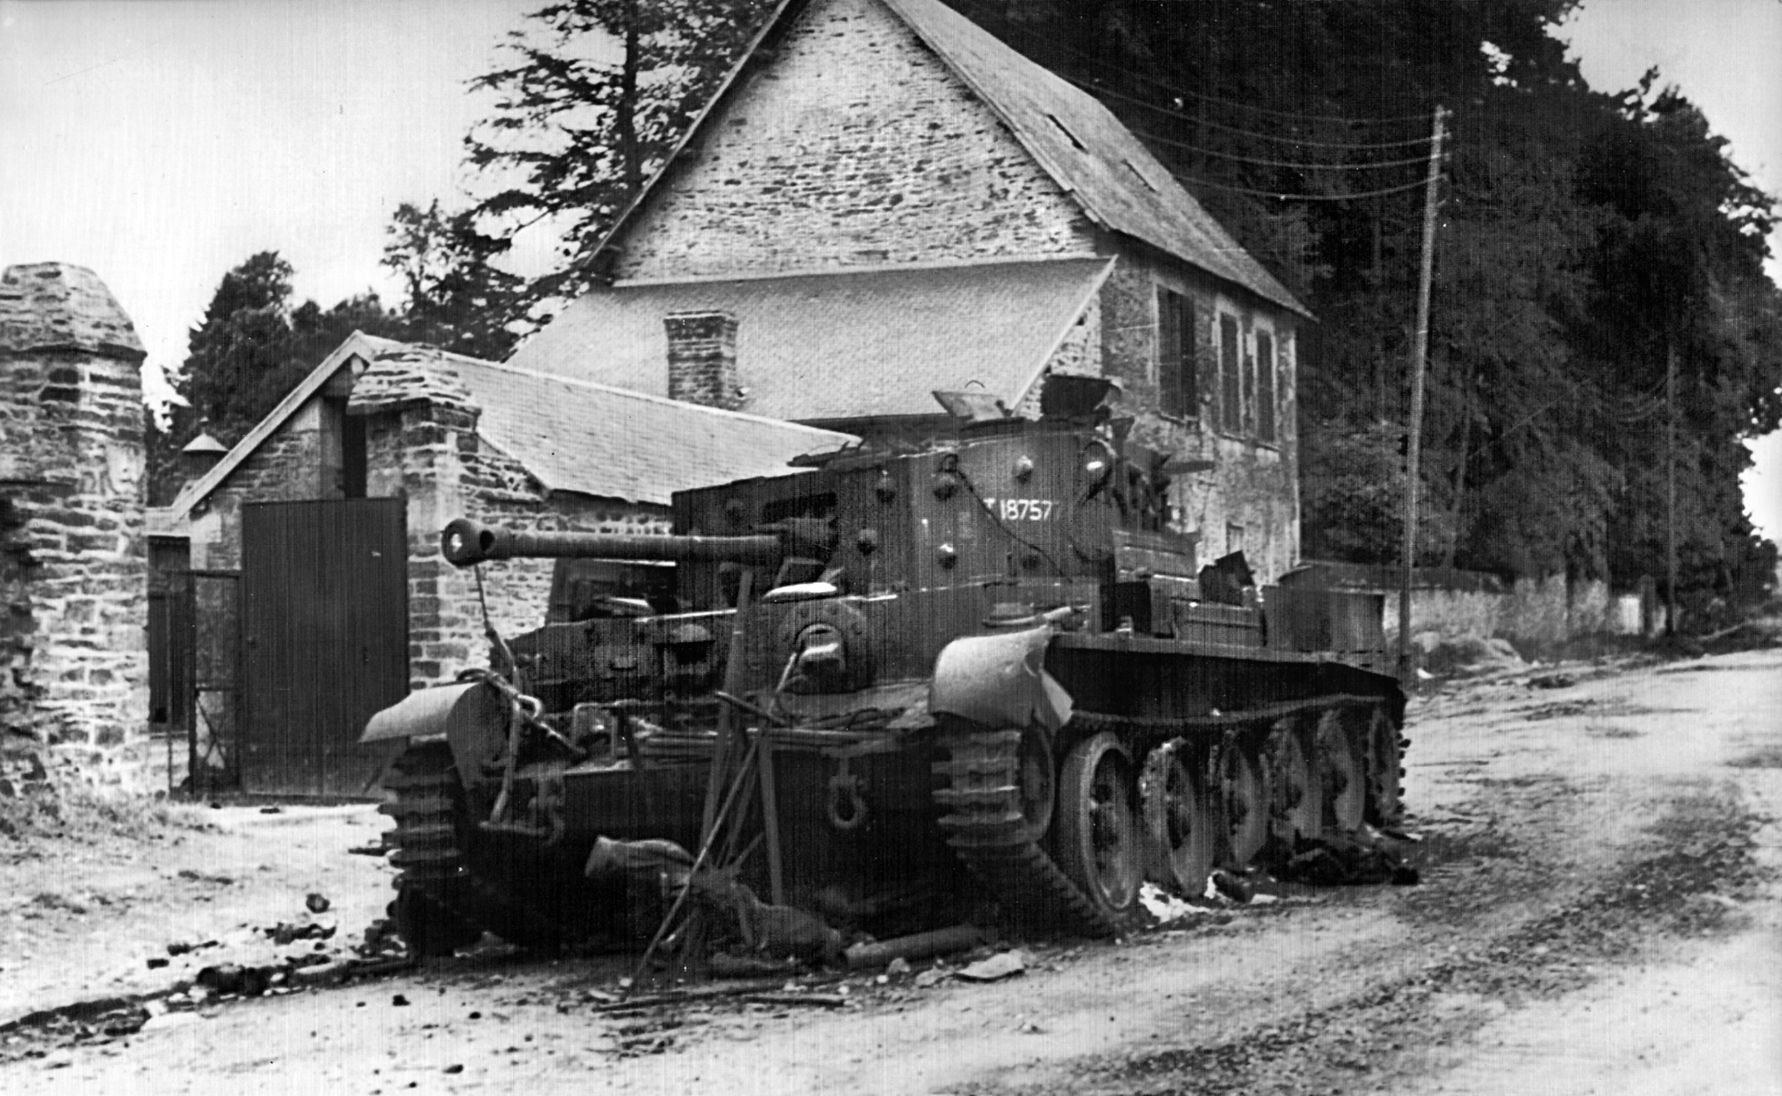
Wittmann was now aware that more tanks of B Squadron would be closing in quickly. He reversed direction down the Rue Georges Clémenceau until a crashing shell brought the Tiger to lurching stop in front of the Huet-Godefroy clothing store. A single well-placed round from a 6-pounder antitank gun had accomplished what numerous British tanks had failed to do. Fired from an alley between the Rue Jeanne Bacon and Boulevard Joffre, the antitank round disabled a drive sprocket. Wittmann and his crew abandoned their Tiger, expecting that it might be recovered later. They made their way seven kilometers on foot to Panzer Lehr headquarters at Chateau d’Orbois, where Wittmann described the situation around Villers-Bocage to the officers present.
While Wittmann was devastating the British armour in Villers-Bocage, Brandt and Hantusch drove on to Point 213 and unleashed more devastation. Less than an hour later, a third Tiger commanded by Unterscharführer Kurt Sowa joined in the attack. By 10 a.m., reconnaissance troops and more armored vehicles of the 4th Panzer Company, SS Heavy Tank Battalion 101, reached the scene. Within half an hour, the Germans were rounding up scores of dazed British prisoners and consolidating their hold on National Highway 175 between Villers-Bocage and Point 213.
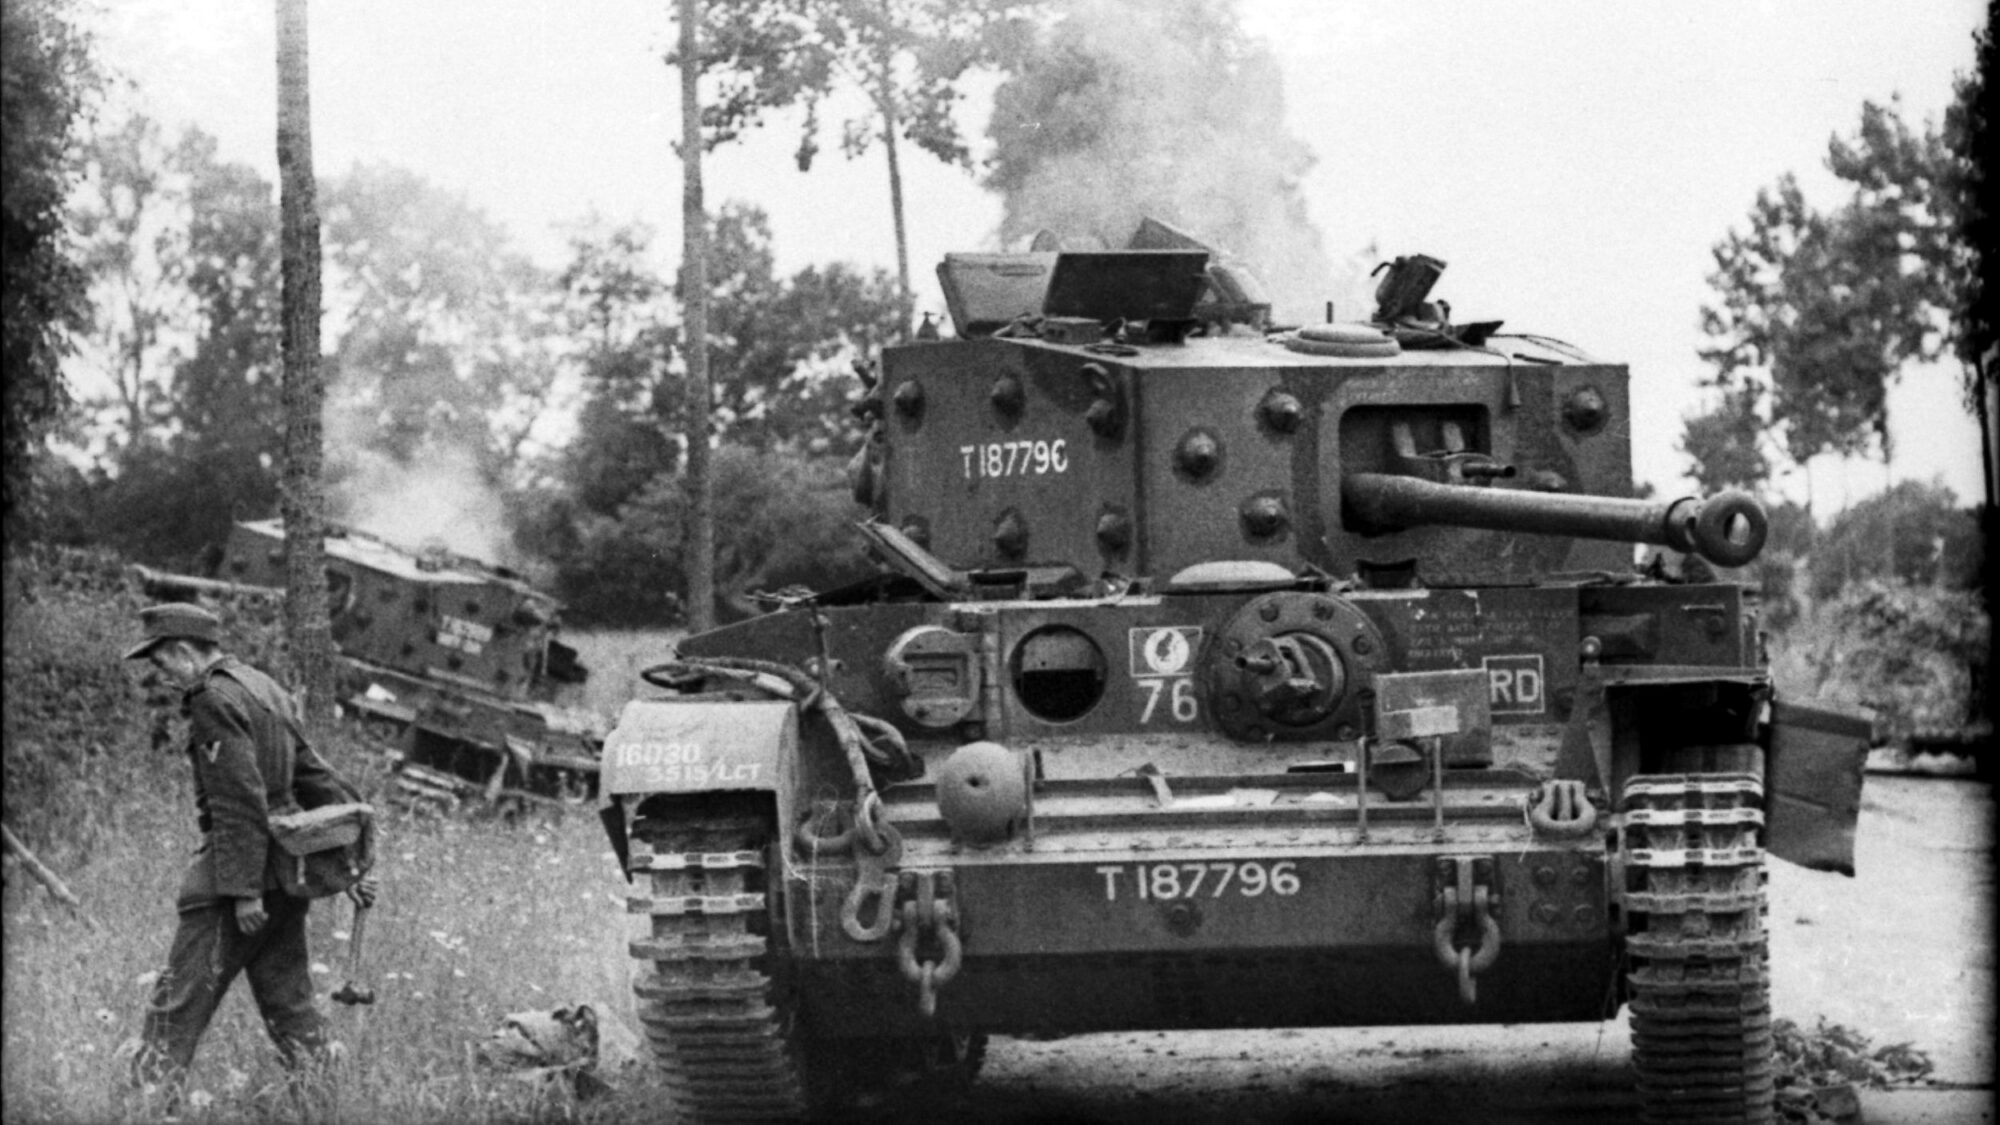
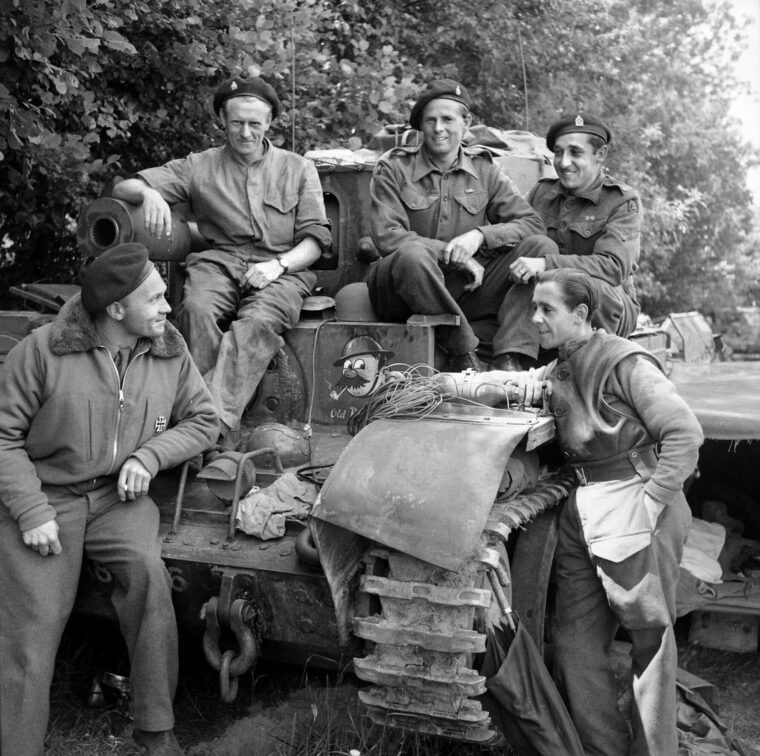
The tally of destruction on the dreadful morning was appalling. Twenty Cromwells, four Sherman Fireflies, and three Stuart tanks had been destroyed along with numerous troop carriers and other vehicles. The Fireflies of B Squadron, 4th County of London Yeomanry prepared for a renewal of the fighting, while the 1/7th Battalion, Queen’s Royal Regiment also took up defensive positions in Villers-Bocage. Anti-tank guns studded the British cordon.
Although they had sustained substantial losses, the British still menaced the flank of Panzer Lehr, and there was hope at the headquarters of the 7th Armoured Division and its parent XXX Corps that the 50th Infantry Division might break through at Tilly-sur-Seulles, supporting the drive through Villers-Bocage and perhaps even to Caen. However, the vigor of the morning Tiger assault had shattered the spearhead of the British offensive and the nerves of many men who survived the onslaught. Now, the initiative was squarely with the Germans, and they looked at the potential for a solid local victory.
A short time after Wittmann’s arrival at Chateau d’Orbois, Captain Helmut Ritgen was moving to block British routes of advance north of Villers-Bocage with 15 PzKpfw. IV tanks of the 2nd Battalion, Regiment 130, Panzer Lehr. Ritgen ran into intense fire from concealed antitank guns, lost one PzKpfw. IV, and was ordered to regroup near Villers-Bocage. Subsequently, he sent four tanks roaring in from the south while 10 more renewed their advance along Rue Georges Clémenceau. The British claimed a pair of PzKpfw. IVs from each group. Around 1 p.m., Panzer Lehr’s armor tried to take the town again, losing two more PzKpfw. IVs in the process.
The 1/7th Battalion, Queen’s Royal Regiment held the railway station and other key positions in and around Villers-Bocage and offered stiff resistance. British and German infantrymen fought street to street and house to house before the defenders pulled back along the edge of town. A British roadblock in the center of Villers-Bocage concealed several 6-pounder antitank guns, at least one Sherman Firefly, and several Cromwells waiting for any German tanks to roll toward the town square.
While the initial Panzer Lehr forays into Villers-Bocage were rebuffed, Wittmann sped back toward Point 213 and conferred with Möbius prior to a renewed effort against the town by the Tigers of 1st Company, SS Heavy Tank Battalion 101. Möbius moved his Tigers into Villers-Bocage on the Rue d’Evrecy and linked up with the active elements of Panzer Lehr near the town marketplace.
The Germans decided to send their tanks in from several directions, but by the time they got organized the British were waiting in ambush. As the lead Tiger trundled down National Highway 175 into the town, a Firefly unleashed a 17-pounder shell that missed. Quickly, a 6-pounder gun found the mark and knocked out the big tank.
Three more Tigers came immediately into view, and they veered away, attempting to outflank the British. The fight developed into a bushwhacking melee reminiscent of something from the American Wild West. One of these Tigers fell victim to an anti-tank gun while an infantryman destroyed another with a PIAT (Projector, Infantry, Anti-Tank) spring-loaded, shoulder-fired weapon. A second shot from a PIAT disabled the last of these three Tigers.
Still, another Tiger came on, its commander well aware of the action to his front. He stopped short of the British trap in the town square. An opportunistic Firefly crew took a shot at the Tiger through the windows of a corner building, and the round glanced off the German tank’s gun mantlet. The Tiger began churning down the street, but a Cromwell slid into firing position from behind and blasted the Nazi tank with a shot to its vulnerable rear. At the same time, the Firefly that had spooked the Tiger took out another PzKpfw. IV.
Outside the city limits of Villers-Bocage, other units of the 7th Armored Division beat back German attacks along a north-south line in the vicinity of Amaye-sur-Seulles and Tracy-Bocage.
While some historians have doubted the presence of elements of the 2nd Panzer Division at Villers-Bocage, others say that as many as two panzergrenadier battalions fought in the town on June 13, pressing the infantry of the 1/7th Battalion, Queen’s Royal Regiment until the tanks of B Squadron cut down the German infantrymen in heaps with their machine guns.
By 6 p.m., the Germans had nearly reached the 1/7th Battalion headquarters, and the British reluctantly began to withdraw from the town. A barrage from the 5th Royal Horse Artillery and the heavy guns of the U.S. V Corps, covered the British pullback. The Germans harassed their movement until well after dark.
In the darkness, Hinde reinforced a defensive box on high ground at Point 174 a mile west of Villers-Bocage, and Panzer Lehr along with the few remaining Tigers of SS Heavy Tank Battalion 101 hit the strongpoint the next day. Artillery of the U.S. 1st Infantry Division helped to beat back the initial German thrusts, but simultaneous attacks in the afternoon succeeded in breaching the defensive box, rendering artillery support useless since British and German troops were intermingled. Just as the German assault threatened the 22nd Armoured Brigade headquarters, it was finally beaten back.
Hinde remained confident that the 22nd Armoured Brigade could hold its salient at Villers-Bocage, but the 50th Division remained tangled with Panzer Lehr, unable to provide any support. Thus, the 22nd Armoured Brigade pulled back and joined with the Allied line north and west, ending the British bid for control of Villers-Bocage.
After the battle, the capabilities of the British field commanders, including Brigadier Hinde, Major General Erskine, and Lieutenant General G.C. Bucknall commanding XXX Corps, were discussed at higher command level. The tactical deployment of the 22nd Armoured Brigade was questioned, and the troops of the 50th Division were not the only potential reinforcements available to send to Villers-Bocage. None of these commanders made a formal request for support from the 50th Division or any other units that might have intervened.
Dempsey and Montgomery must also bear some responsibility for the shellacking. Both senior commanders seemed uncharacteristically detached, failing to assert strong leadership and decision making during the fight. Within weeks of the failed offensive, Hinde, Erskine, and Bucknall were relieved of command. Dempsey later admitted, “The whole handling of the battle was a disgrace.”
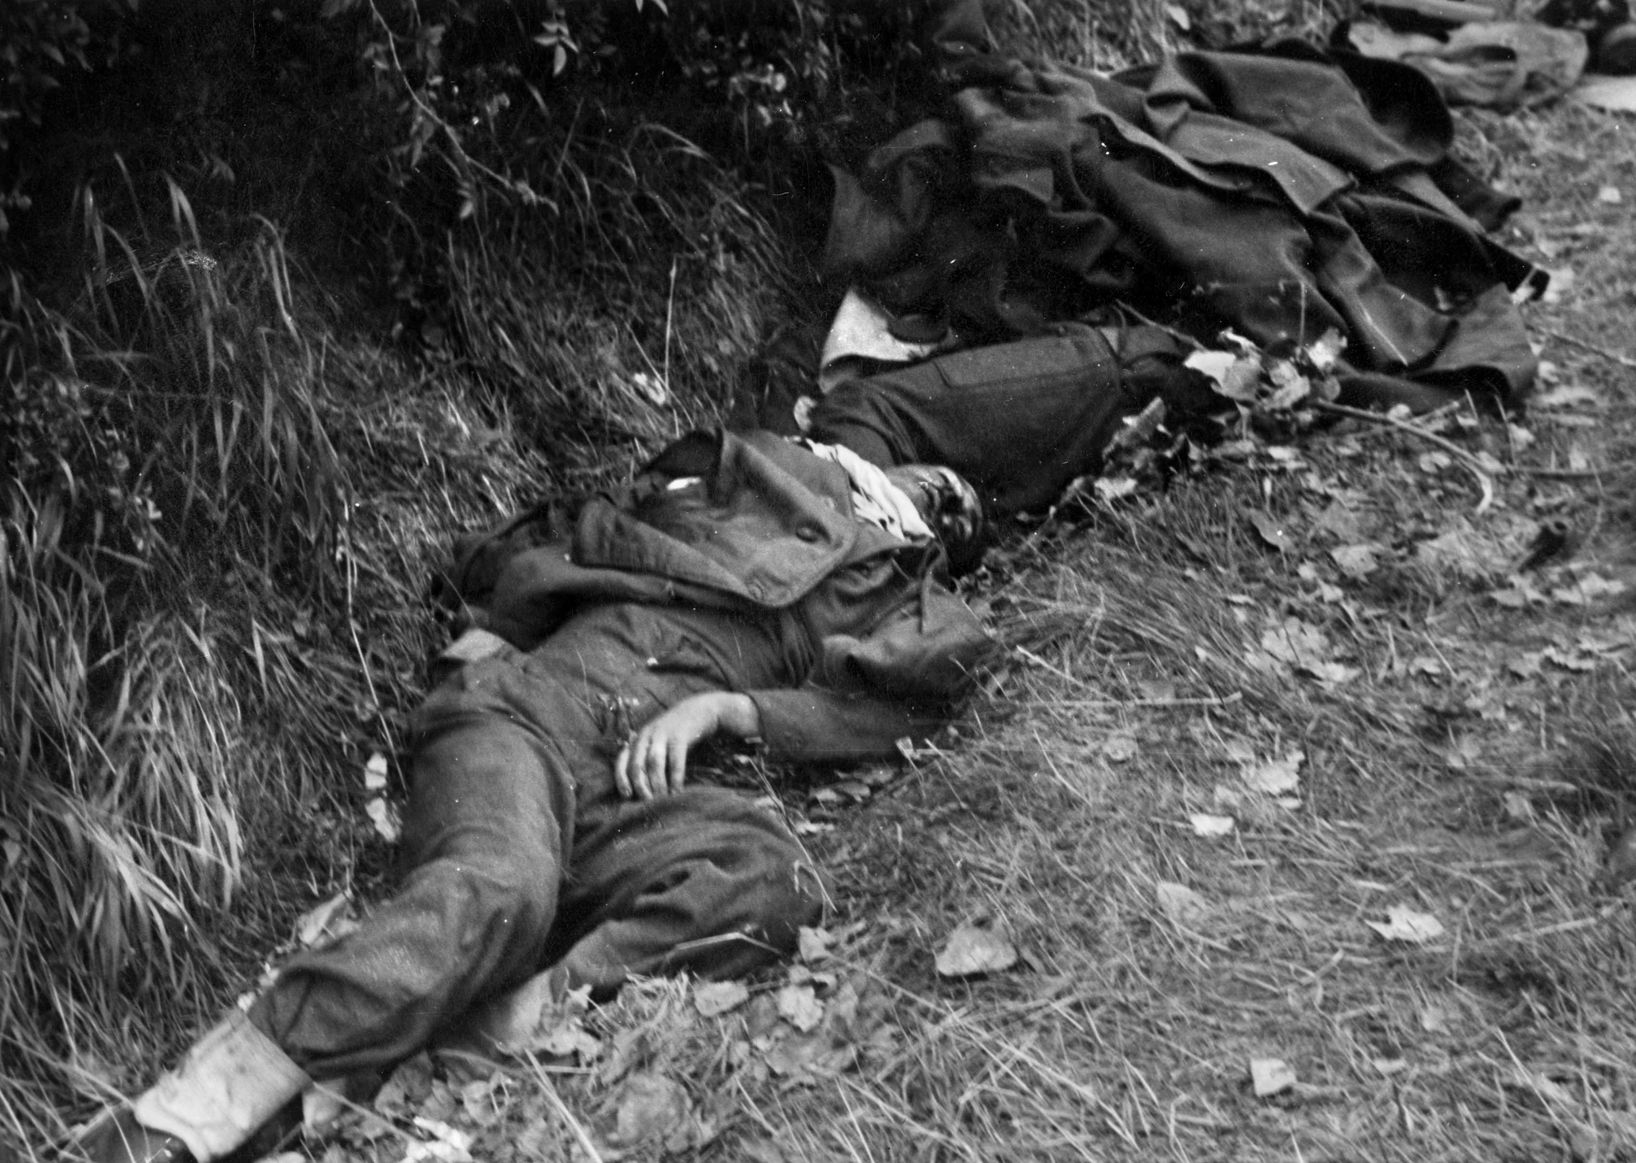
Casualties were heavy on both sides with 217 British dead and the loss of more than 40 tanks and armoured vehicles. A Squadron, County of London Yeomanry lost all 15 of its Cromwells, Fireflies, and Stuarts. As many as 15 German tanks, including six irreplaceable Tigers, were destroyed, and though dozens of Germans were killed, the exact number is unknown. British forces hammered away at Caen for two months before capturing the city, and Villers-Bocage remained in German hands until the first week of August.
Lieutenant Wittmann was decorated for his rampage at the French village but died in combat on August 8, 1944. He was 30 years old.
Michael E. Haskew is the editor of WWII History Magazine. He has been researching and writing on military history for more than 40 years and has written numerous books and articles on a variety of topics. He resides in Chattanooga, Tennessee.

Join The Conversation
Comments
View All Comments