By Alan Davidge
The year 1942 started disastrously for Britain, just as 1941 had ended badly for the United States. Japan’s entry into the war not only devastated the U.S. Navy at Pearl Harbor, Hawaii, but threatened the future of British territories in Asia. Malaya was the first to fall and, by February, the Japanese had taken Singapore and now had their eyes on Burma. As well as lowering morale at home, this committed Britain’s sparse military resources to a war on a distant front.
The battleship HMS Prince of Wales and battlecruiser HMS Repulse were also lost during an early Japanese encounter in the Gulf of Siam, weakening Britain’s sea power significantly. But it was in the waters of the Atlantic that the greatest threats lay for the nation.
After losing the Battle of Britain, Hitler shelved his invasion plans and decided to starve Britain into submission instead. German U-boats began tearing the heart out of British merchant fleets as soon as they left the safety of American harbors, and when joined by warships such as the Bismarck, the situation became even more desperate.
Fortunately, the Bismarck was eliminated in May 1941, but by early 1942, the heavily armored German battleship Tirpitz was completing trials off Norway; the prospect of an enhanced enemy presence on the surface as well as below the waves to destroy merchant shipping was driving even Prime Minister Winston Churchill into the depths of despair.
Added to this was the news that the formidable Kriegsmarine battlecruisers Scharnhorst, Gneisenau, and Prinz Eugen had managed to slip out of the harbor at Brest in northwest France, where they had been confined by the British Royal Navy, and sail up the English Channel to join the Tirpitz off the Norwegian coast.
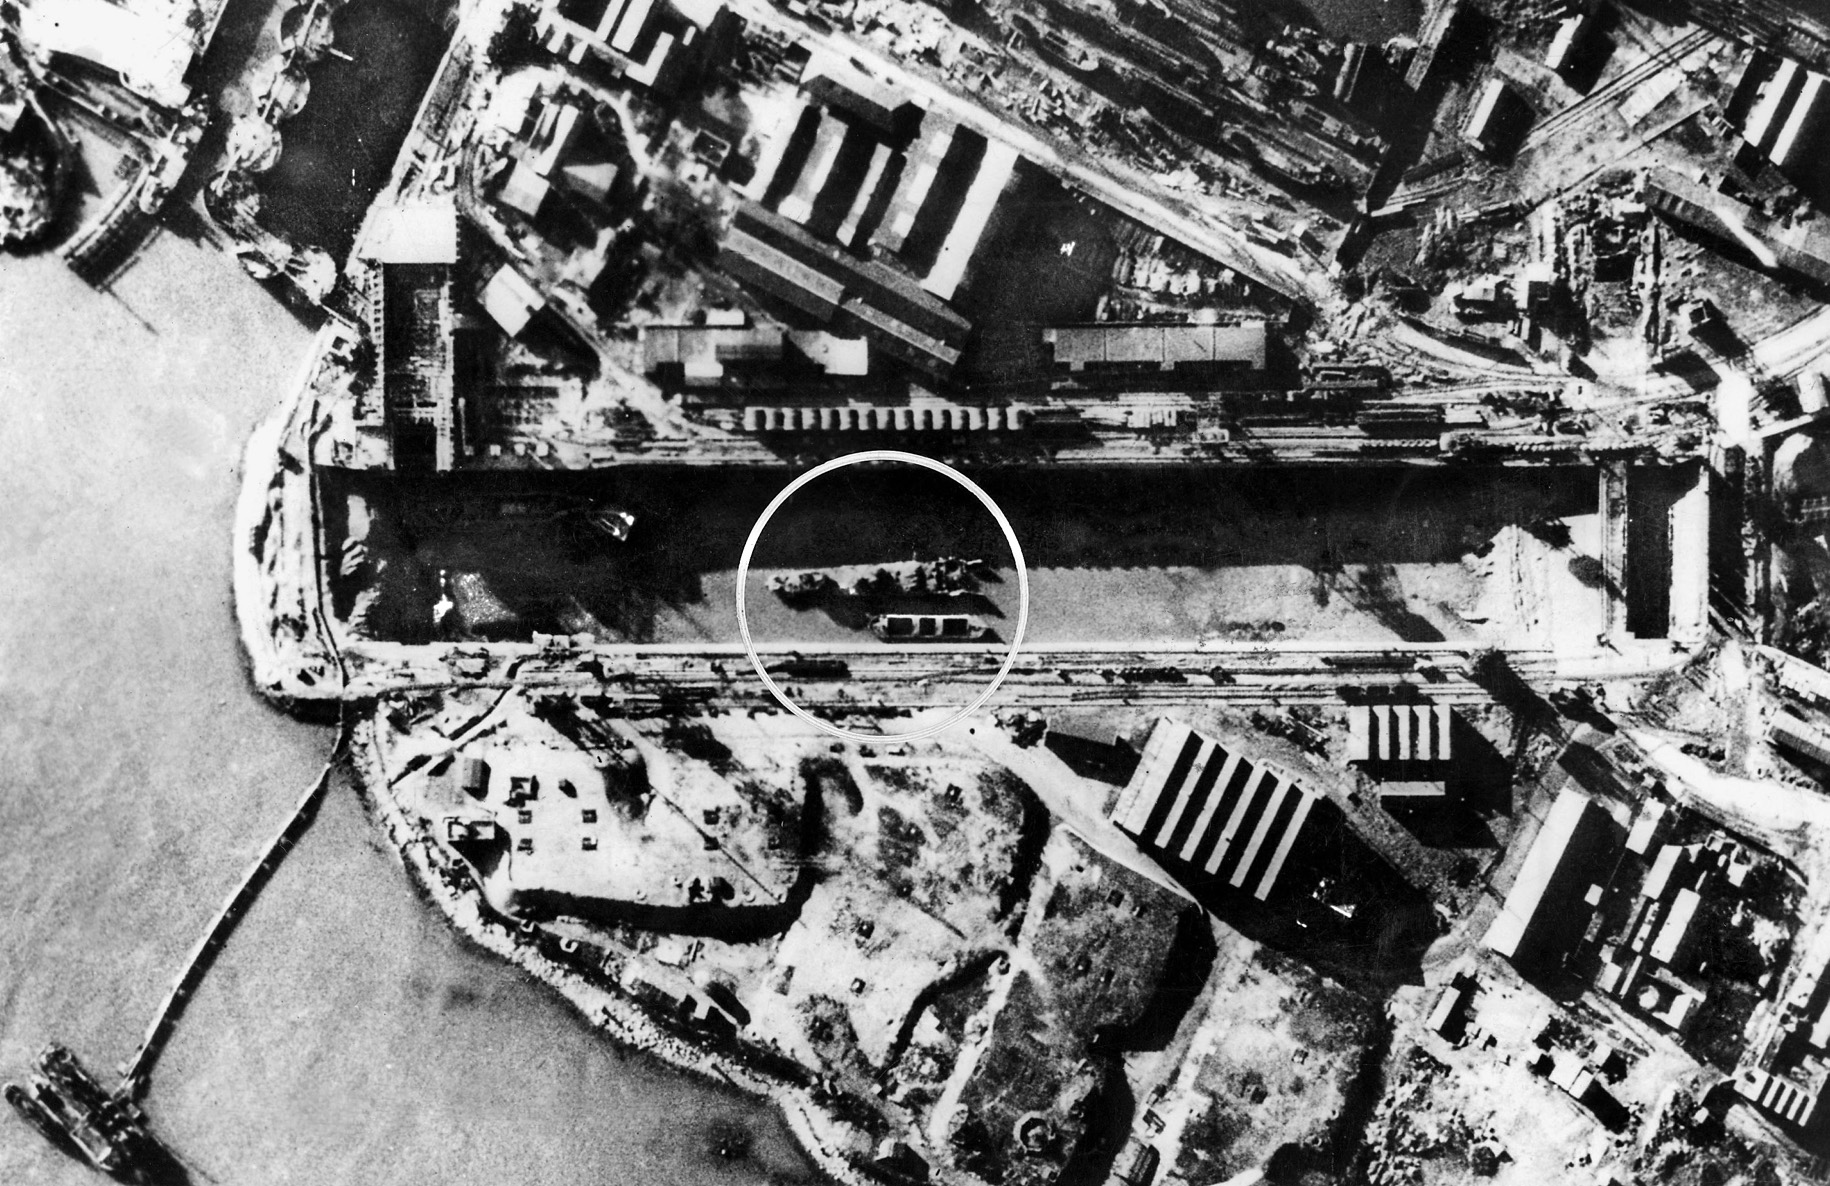
The Bismarck had been destroyed while aiming for the safety of St. Nazaire and its Normandie dock, constructed in the 1930s for the huge French liner of the same name. If the Tirpitz were to sail into the Atlantic, this would also be the only dock large enough to accommodate her.
On January 25, 1942, Churchill wrote, “The destruction or even crippling of this ship is the greatest event at sea at the present time. No other target is comparable to it.” Two thousand tons heavier than the Bismarck, and packing eight 15-inch guns, she was the largest warship ever to be built in Europe. The presence of this huge beast off the Norwegian coast was also tying up Allied resources that could have been used to guard the Atlantic convoys.
The first proposal to attack St. Nazaire came from the Admiralty in August 1941, when the Tirpitz was located in the waters of northeastern Europe and was seen more as a threat to the Soviet Baltic fleet rather than Atlantic shipping.
It found its way to Combined Operations, which was at the time engaged in small-scale raids on selected targets in Nazi-occupied Europe—most of which only served to irritate the Führer. But some, such as Operation Claymore in the Norwegian Lofoten Islands in March 1941, did considerable damage and took hundreds of German prisoners. These Norwegian raids caused Hitler to believe that Britain would invade Europe through Norway. By tying up key German strategic resources along the European coastlines, these raids weakened the German defense.
The key threat of St. Nazaire at the time was its U-boat base and its access to Atlantic shipping. Proposals to mount a raid on the port were considered in detail, but the practical and navigational problems that would be involved caused them to be shelved.
Fast-forward to January 1942. Churchill had appointed Lord Louis Mountbatten three months earlier as Chief of Combined Ops, with instructions to increase the number of offensive raids. The Admiralty subsequently asked him to reconsider an attack on St. Nazaire. The previous plan had been set aside largely because the only entry into the Loire Estuary was a deep-water channel on the north side under the noses of German gun emplacements. It had since been discovered that a ship of modest draft should be able to negotiate the shallows in the center of the river at high tide.
Mountbatten knew that a successful raid on St. Nazaire could be of huge strategic importance to Britain; it equally appealed to his sense of high adventure. The file was reopened, and Combined Ops was now center stage. The key players were John Hughes-Hallett, the Navy adviser, Brigadier Charles Haydon representing the Army and Commando units, and RAF Group Captain Alfred Willets. Their partnership would require a unity of purpose that took precedence over their individual branches of the armed services.
It is important to note that the decision to mount the St. Nazaire raid—dubbed Operation Chariot—was not only about the exclusion of the Tirpitz from the Normandie Dock, although for years this has been the popular view, repeated by many historians. In April 1942, two weeks after the raid, General Sir Alan Brooke informed U.S. Army Chief of Staff General George Marshall: “We were executing a number of raids on the enemy-occupied coastline from Norway to the Bay of Biscay in order to force on the enemy a feeling of insecurity and uncertainty.”
This gives a more likely explanation, and as Mountbatten was determined that a raid should take place, the Admiralty’s (and Churchill’s) Tirpitz-phobia provided an excellent opportunity to obtain support.
Intelligence had come from aerial reconnaissance, local French sources (at great personal risk), and some via the diplomatic bag from the American embassy in Paris, and it showed that St. Nazaire was a place where raiding parties could do some serious damage. The U-boat pens would provide a choice victim.
Gun positions and bridges also invited destruction to ensure that the enemy did not gatecrash this orgy of vandalism, but it was the Normandie dock that captured most attention as the top prize for the raiders.
Built for a ship of 85,000 tons, its concrete, sliding-lock gates, or caissons, were 35 feet thick; if they could be destroyed, thousands of gallons of water would come flooding in and essentially make the dock tidal. The demolition of its associated pumping house and winding gear would cause further havoc. A successful raid would put it out of action for a very long time.
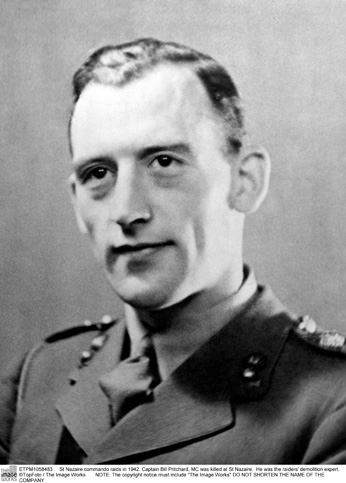
Captain Bill Pritchard from the planning team came up with an idea to ram a ship full of explosives containing delayed-action fuses into the dock’s southern caisson. It would, however, need to have a sufficiently shallow draft to negotiate the route identified through the middle of the estuary but be strong enough to strike a heavy blow at the caisson. If an old destroyer could be found, it would be worth the sacrifice. A second destroyer would give support to the raiders and transport them home afterwards.
So far so good on paper, but the enemy needed to be caught unawares. To achieve an element of surprise, a synchronized bombing raid was suggested. Guns and searchlights would be pointed skywards while the real danger to the Germans would be sailing up the river.
The St. Nazaire planners now had something to capture their imagination, but the Admiralty, on receipt of the plans, began to lose enthusiasm. Sacrificing an old destroyer might be bearable, but releasing a second one was out of the question.
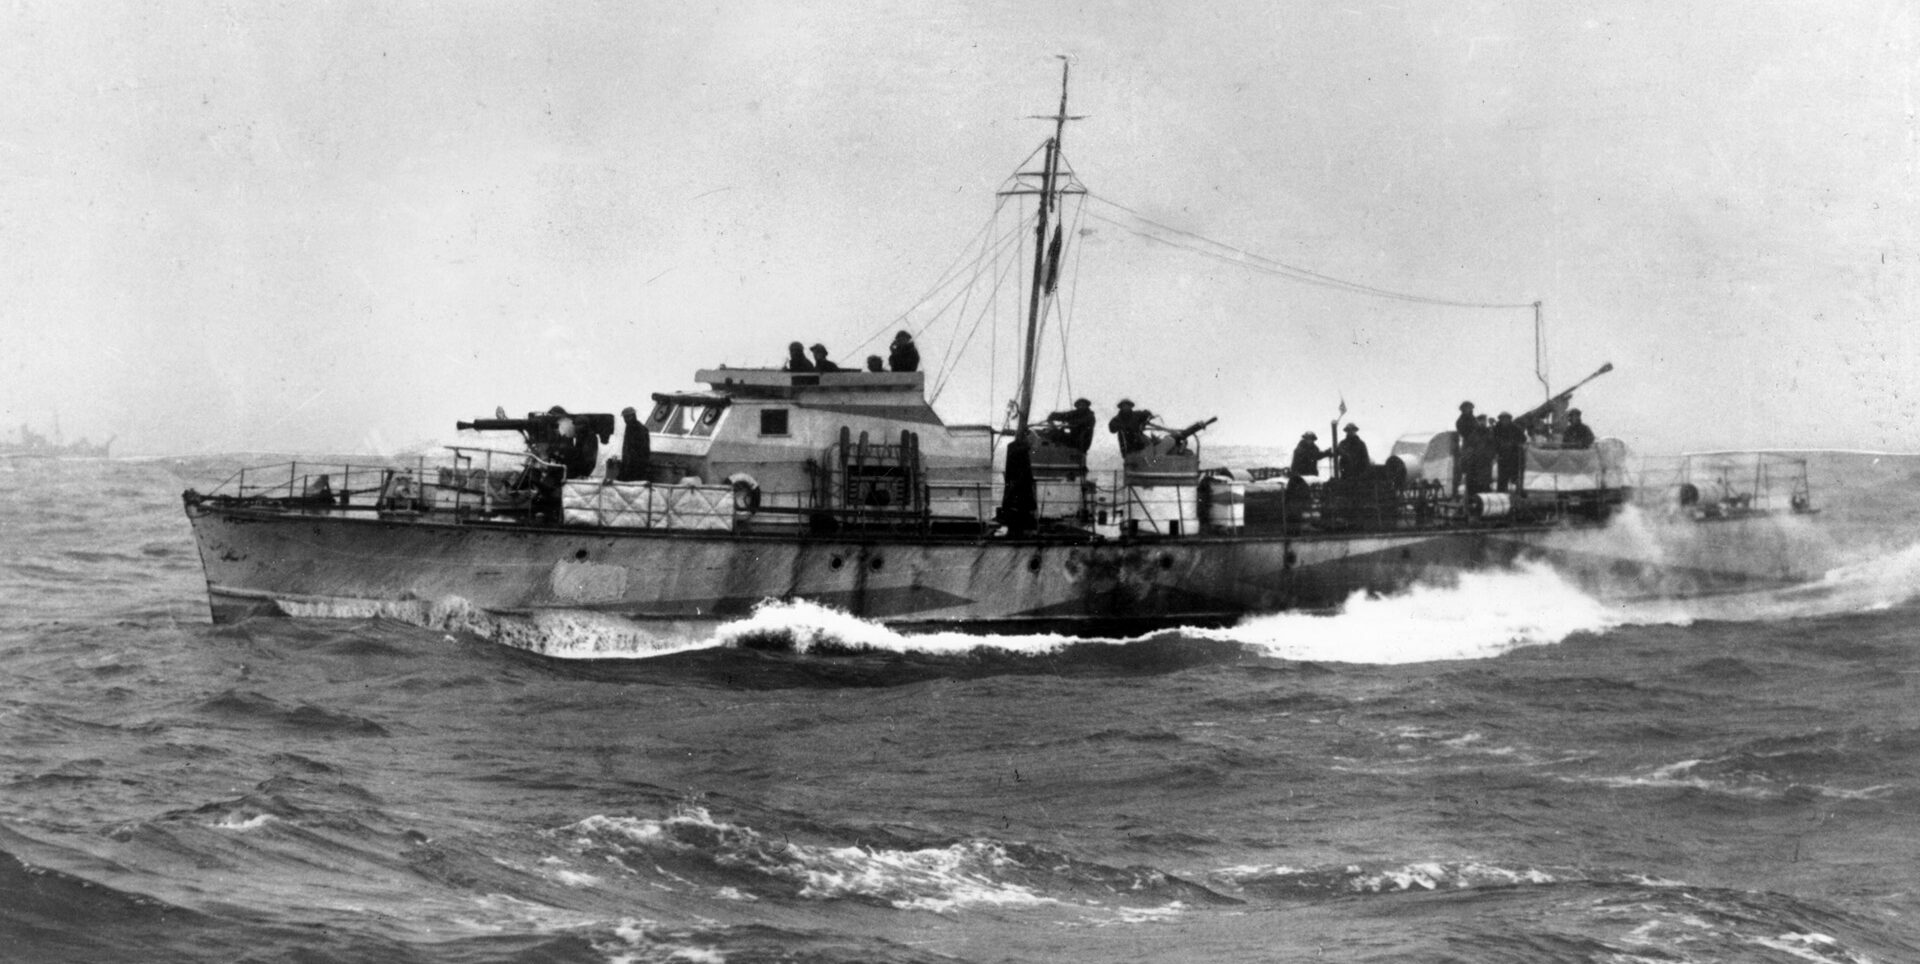
This was where the concept of Combined Ops started to break down, and even the diplomatic skills of Mountbatten, a naval man himself, failed to convince them otherwise. The function of the second destroyer, they suggested, could be fulfilled by a fleet of the armed Fairmile motor launches currently operating around the British coast.
The Fairmiles were made of mahogany and ran on petrol. Their range was limited, requiring additional petrol tanks to be strapped to their decks. If this little fleet lost the element of surprise—and at some point it had to—the raid could end up looking like the 4th of July.
Their armaments consisted of twin WWI-vintage light Lewis machine guns for protection against air attacks and a Hotchkiss three-pounder gun dating from the Boer War to take on the shoreline and riverside batteries. The weakness of their firepower was noted and a concession was made: the Hotchkiss would be replaced by two Oerlikon guns, effective against air and coastal attacks and firing 20mm half-pound explosive rounds at 470 per minute.
These guns would be all that the Fairmiles had to counter the batteries on the way back out the mouth of the river. Hughes-Hallett, the naval adviser, foresaw the dangers and remarked to Mountbatten, “We may lose every man.” Mountbatten replied, “I’m afraid you’re right, but if they do the job, we’ve got to accept that.”
The vulnerability of the flotilla meant that the diversion plan involving the RAF for bomber support had to be super-effective. A force of around 350 bombers was requested, initially to target the docks and then the town while the troops were ashore.
The chiefs of staff approved this audacious plan, and so did Churchill. He and Mountbatten had both enjoyed a privileged, aristocratic upbringing and were expected to follow in the footsteps of their heroic ancestors. Churchill’s exploits in the Boer War showed he could live up to these high standards. Mountbatten’s track record was not as illustrious, but his personal charm and family connections would keep him afloat even after his disastrous management of the Dieppe Raid six months later.
For the ordinary men who were about to find themselves on this highly hazardous adventure, however, there would be no portraits on the walls of stately homes or verses by the poets of the day. If things went wrong for them, there would be a small concession for war widows and little else for the families of single men. Fortunately, Churchill and Mountbatten were to find a group of willing combatants, thirsting for action and prepared to stare death in the face in order to give Hitler a bloody nose.
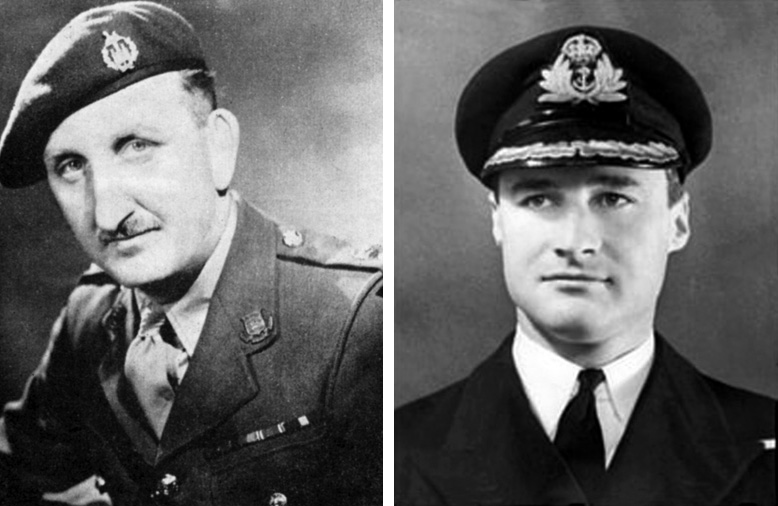
Leading Chariot required a remarkable sailor and an experienced Commando. Robert Ryder was the Navy’s choice. Awarded the Polar Medal for pioneering work in the Antarctic, he had also survived a U-boat attack in the Atlantic, which left him clinging to a piece of debris for four days before being rescued. He sounded like someone who could be relied upon when the going got tough.
Lt. Col. Charles Newman, from the Essex Regiment and now responsible for No. 2 Commando, was chosen to lead the Commandos. Educated at an independent school and a civil engineer by profession, he joined the territorial army and as a young man gained honors as a boxing champion. He had also distinguished himself in a raid in Norway in 1941.
Newman was physically as tough as his men and a good leader who could not only demonstrate coolness under fire, but humanity and humor when the situation allowed. To his men, out of earshot at least, he was always “Charlie.” (This assessment of him can be confirmed by the author, whose father served with Newman in the Essex Territorials.)
With the raid scheduled for March 28, Newman and Ryder had to get acquainted fast and synchronize their planning. Hand-picked groups of Commandos, including kilted Scotsmen (the “Ladies from Hell” were not going to be left out of this job) who began specialist demolition training, which was an area of expertise that they enjoyed adding to their repertoire; but when they received special training in hand-to-hand nighttime street fighting, they realized they were being prepared for a very special mission.
Newman’s deputy was Major Bill Copeland, a works manager from a factory in northern England. This mixture of social classes defined the Commandos. They were selected for their personal qualities and toughness, not their backgrounds, unlike the British officer class. A troop could contain factory workers, journalists, coal miners, engineers, and city bankers who collectively gave the appearance of smart, regular soldiers, but their methods and tactics were those of ruthless guerrillas. Much of their personal discipline was self-imposed and there was great mutual respect between officers and men.
A demolitions expert from the Royal Navy, Lieutenant Nigel Tibbetts, was identified to work with Pritchard, and by an enormous piece of luck it was discovered that the King George V dock in Southampton was built to the same plan as St. Nazaire, so the troops trained there and became so familiar with their demolition targets that they could lay their charges in the dark.
The planners continued to pursue the Admiralty for a destroyer and the RAF for a guarantee of bombing support, but they were told that instead of the 350 bombers requested, they would have to make do with 60, organized into two separate groups that would first bomb the docks and then the town.
On March 2, it was announced that the sacrificial destroyer would be HMS Campbeltown, formerly USS Buchanan, a WWI American destroyer transferred to the Royal Navy in return for allowing the U.S. to set up bases on British Caribbean islands under the “Destroyers for Bases Agreement” in September 1940—a deal that had taken place in Britain’s darkest hour. President Roosevelt went as far as he could to support Britain without breaking his promise not to involve his country in another European war.
By March 13, most of the raiders were ready to sail from the port of Falmouth, but full details would not be revealed until the last moment. The number of vessels provided for the raid had also increased. In addition to the original motor launches, there was now a motor gunboat for an HQ ship, four more launches for additional Commandos, and four launches equipped with 18-inch torpedoes to play an offensive role. Two destroyers would also accompany the flotilla for protection en route to the mouth of the Loire and stay in the Atlantic to accompany them home.
The motor launches would carry 15 Commandos and a crew of 12. The HQ ship was Newman’s and Ryder’s base for them to lead from the front. It was equipped with radar and depth-sounding equipment; amongst its crew were a navigation expert and someone who could signal in German. It also boasted a Vickers pom-pom gun for protection.
This ship, to be known as MGB 314, did not have the capacity to complete the full trip and would have to be towed from the start of the journey. The final ship in the pack was Sub-lieutenant Micky Wynn’s MTB 74, a faster vessel containing two torpedo tubes mounted high on deck where they could be fired over torpedo netting if necessary.
On the evening of March 18, Newman briefed his 39 officers on the raid with a map and scale model, but St. Nazaire was still not mentioned by name. The next morning, the remainder of his commandos were put in the picture.
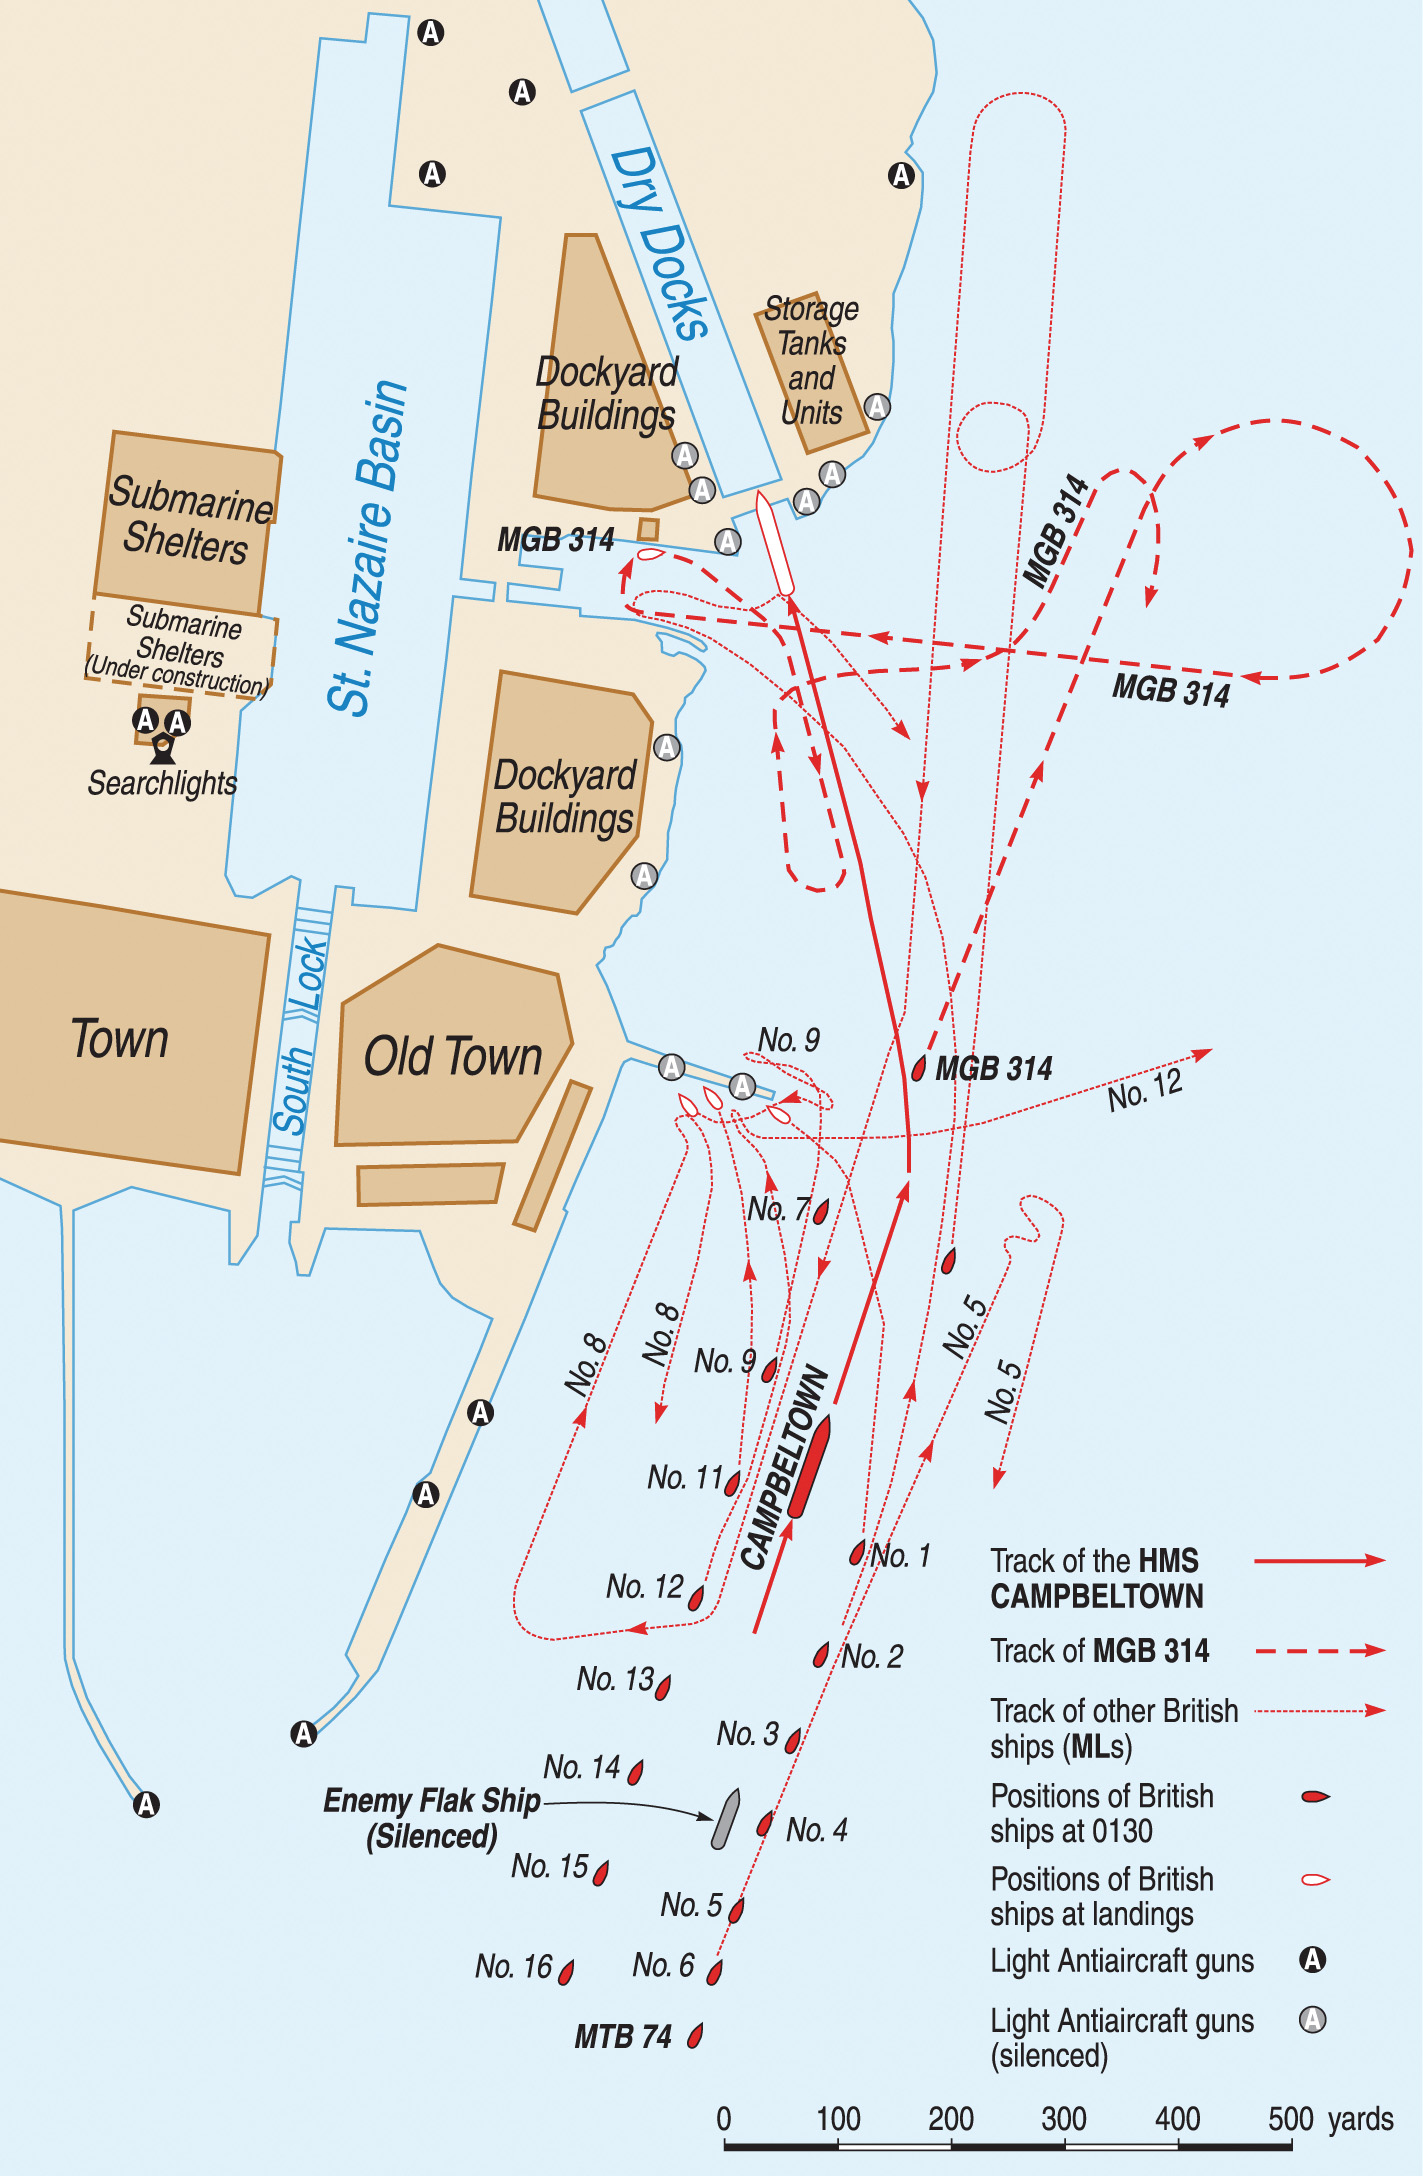
The plan was to sail up the river with two columns of Motor Launches (MLs) following the Campbeltown, one on either side. The Commandos were divided into three groups: One would travel in the MLs on the port side and land on a jetty known as the Old Mole; Two would travel in the starboard column and land a little further along at the dock’s Old Entrance; and Three would travel on the destroyer itself and exit via the dock gate (caisson) as soon as it had been rammed by the ship.
They would then begin destroying the pumping house, winding gear and other mechanisms that allowed the dock to function. The caisson was the raiders’ primary objective, but the three groups would try to destroy a total of 24 targets before heading home. The delay fuses on the Campbeltown were designed to go off when everyone was out of the area. The depth charges concreted under her bows would make a very big bang!
Each group was given detailed instructions on the actual demolitions. With so much equipment to carry, their only weapon was their Colt pistol, so they were each assigned a protection team, armed with “Tommy guns” to keep the enemy at bay while the charges were being laid.
Newman was to set up his HQ near the Old Entrance, where the demolition teams would report back as soon as their tasks had been completed, then get down to the Old Mole and board the MLs waiting to take them home. Lt. Col. Newman had been beaming with excitement when he described the mission, referring to it as the biggest job yet done by the Commandos, but he ended the lecture on a much more serious note.
Before leaving London, he had been briefed by Mountbatten on the likelihood of returning from the raid. He was confident of its success, but the chances of getting out of the estuary once all the German defenses had been awakened was anyone’s guess. At this late stage, any man who wanted to step down would be allowed to do so without Mountbatten or Newman thinking the worst of him. This was greeted with a stunned silence, a pause for it to sink in, then a spontaneous cheer which meant that everyone was on board. The die was cast.
In contrast, Ryder’s briefing was very simple, involving only the two senior officers of each vessel who in turn would inform their men, but only after setting sail. Their role involved finding their way to the destinations where the Commandos would disembark and then bringing them home afterwards. They knew they could expect a hostile reception with searchlights and shore batteries. Two destroyers, HMS Atherstone and HMS Tynedale, would escort them to the Loire Estuary, but the raiders would be on their own till the return journey.
In the days that followed, further attention was given to the bombing support; the number of planes was increased to 62, but restrictions were placed on the pilots, who were given no flexibility in their method of attack. Crucially, for reasons of security, they were only provided with the briefest details of the raid, so effectively the coordination was minimal.
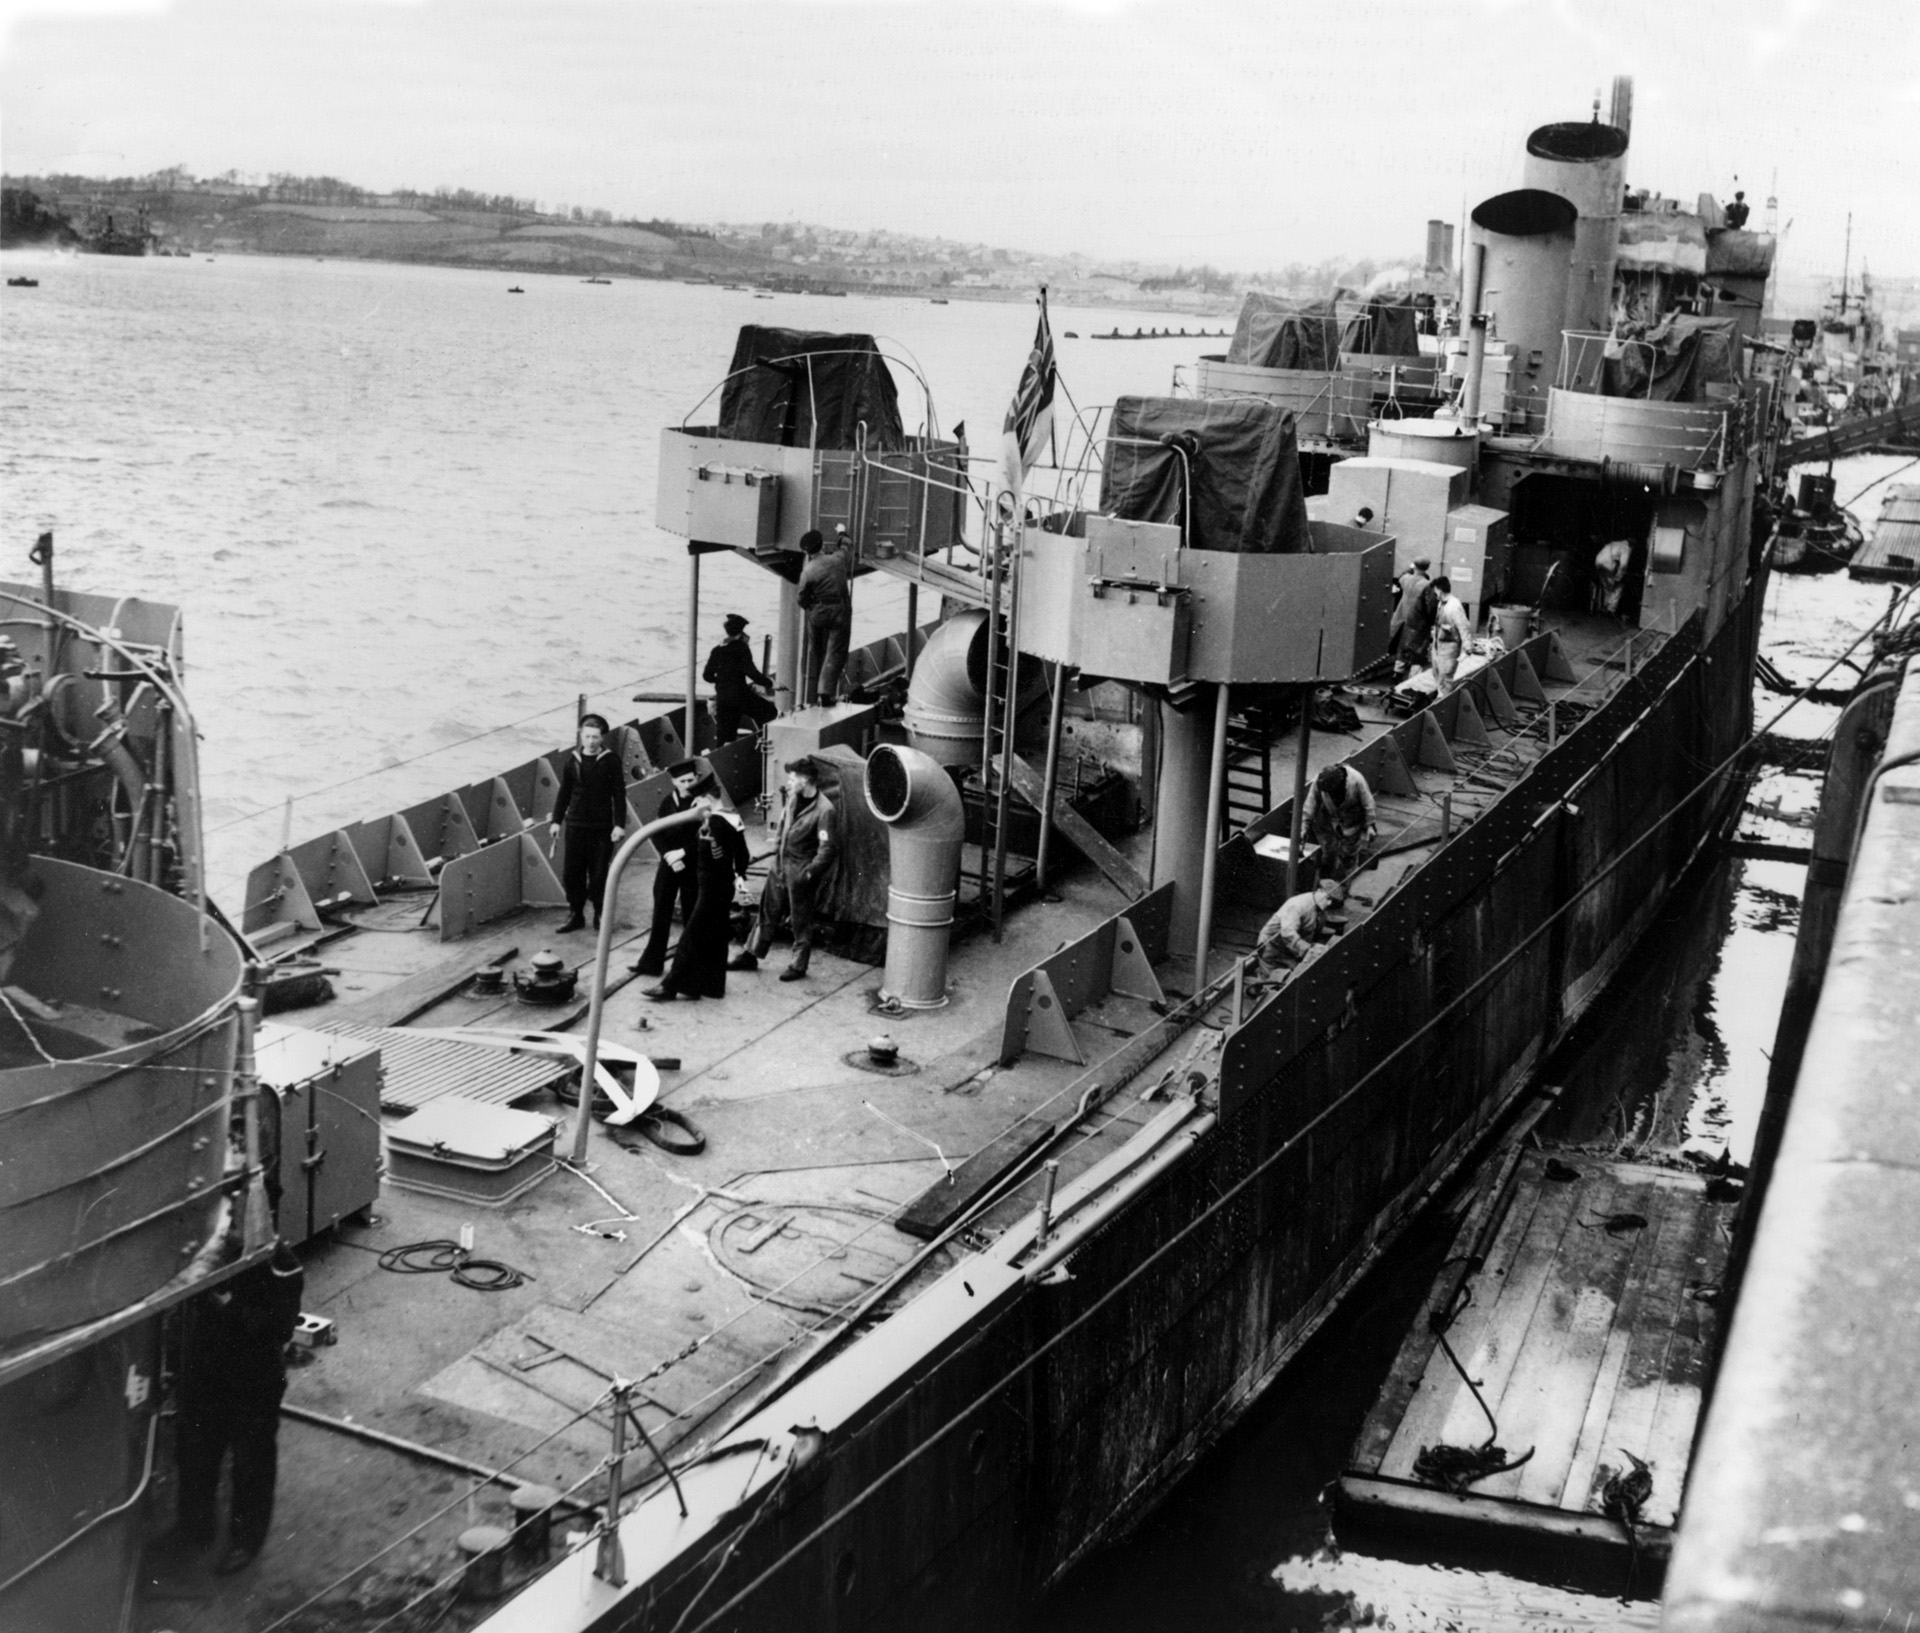
Campbeltown sailed into Falmouth harbor on March 25, with Ryder’s former colleague Lt. Cmdr. Sam Beattie at the helm. Her original four funnels had been reduced to two, cut back in the style of the German Möwe-class destroyer—a deception aimed to buy valuable time in the journey up the Loire. Less noticeable in the dark would be the armor plating around the bridge, wheelhouse, and the fences to protect the Commandos on the decks against enemy fire.
Her original guns were replaced by a 12-pounder and eight Oerlikons. Below the bow and totally invisible were 24 400-lb. depth charges, cemented into the structure of the ship, whose delayed action fuses would not be activated till 11 p.m. and should not be affected by the ramming of the dock at 1:30 a.m. They were timed to explode after the Commandos’ demolition work was completed at 3 a.m. If these failed, a second set was timed for 8:30 a.m. The ship would also be scuttled after ramming to ensure it stayed in position.
At 2 p.m. on the afternoon of March 26, the little armada set sail. It comprised 345 naval officers and ratings, 166 in the fighting parties from No. 2 Commando, and 91 in the demolition parties from the combined Commandos plus medics, liaison officers, and two journalists. They totaled 611, ominously replicating the 600 men who rode “Into the jaws of death, into the mouth of hell” in Tennyson’s celebrated description of The Charge of the Light Brigade. Once again, there would be “Cannons to left of them, cannons to right of them….”
Out in the Atlantic the force adopted an arrowhead formation traditionally used in a submarine sweep as a subterfuge. The HQ launch MGB 314 and Wynn’s Motor Torpedo Boat, MTB 74, were towed behind the destroyers to save on fuel. At 7 a.m. on the 27th, the Tynedale, which was flying German colors as part of the deception plan, spotted a U-boat, which subsequently sent up a recognition signal.
The destroyer attempted a reply but still continued towards it and opened fire. The submarine dived but was soon depth charged, causing it to surface. This time the guns hit their target and she dived again. Unsure of whether the sub was badly hit and hoping she had not seen the motor launches, Ryder sent the destroyers off in a different direction. This ruse paid off, as records show that the Germans concluded that the destroyers were sailing home after laying mines and no further action was taken.
After the destroyers rejoined the flotilla, it encountered a fleet of French fishing trawlers. Knowing that some French vessels had been infiltrated by Germans with radio transmitters, Ryder decided to sink two of them. Their French crews were brought on board and displayed some unexpected enthusiasm at their “liberation.” None of the trawler fleet carried German spies, so it was allowed to sail on unhindered. The French fishermen remained on the destroyers, and most took the opportunity to join de Gaulle’s Free French Forces in England.
At this time, in St. Nazaire’s docks and unknown to Ryder’s men, Admiral Karl Dönitz, Commander-in-Chief of the German submarine forces, was inspecting the U-boat pens and asking the flotilla commander how he would deal with an allied attack. He was informed that such an event was very unlikely, but Dönitz issued a warning to be vigilant.
The raiders sailed on a course that appeared to be taking them past the Loire but then turned back at 8 p.m. in the dark and headed for the estuary. They stopped and formed up in the order planned for the attack, with Ryder and Newman transferring to MGB 314. This launch led the column, with two torpedo-carrying MLs close behind. Then came the Campbeltown, followed by the columns of MLs on the port and starboard sides carrying Commandos. Bringing up the rear was Micky Wynn’s speedy little MTB 74, its torpedoes at the ready.
There was one more navigation check, a rendezvous with a British submarine, Sturgeon, waiting in the Loire to give a pinpoint chart position for the route up the center of the estuary. Sure enough, there she was, blinking away! The plan appeared to be working.
Although the Sturgeon’s signal was visible, the sky was murky. Just the weather for concealment, thought Ryder, forgetting that it would hinder the bombers. At 11 p.m., Nigel Tibbits on the Campbeltown activated the eight-hour pencil delay fuses. At 11:30 they heard the bombers approaching, as did the German antiaircraft teams. Searchlights! Gun flashes! Tracers! Shells! Bombs!
The sky was alight and the aerial diversion was beginning. However, by 12:30, as the ships entered the estuary, the bombing raid appeared to be petering out. In the dim light they could also see the grim remains of the Lancastrian, the ill-fated ship that was destroyed by dive bombers in June 1940 as it attempted to transport troops and French civilians to England as part of Operation Aerial, the post-Dunkirk evacuation.
Within 15 minutes, the Campbeltown entered the deadly shoals. Ryder used his echo sounder to check depth and radar to measure distances to the shore. She grounded twice in the mud and silt, slowed, but finally broke through into deeper water. Next to race the pulses was the sight of a small German patrol vessel, which fortunately had no radio to inform anyone who could query their passage.
The tension returned when it was realized that the bombing had stopped and the searchlights had been turned off. It was very quiet and dark. Unknown to the raiders, low cloud had caused visibility problems, and the proposed bombing of the town had been called off because of the likelihood of civilian casualties. (Churchill told Newman when they met after the war that he accepted responsibility for the shortcomings of the bombing raid.)
Everyone on board the ships was asking the same question: “Will we get away with it?” The answer from the men on the shores of the river was to be a firm “Nein!” Captain Mecke, in charge of the antiaircraft brigade, had noticed the odd behavior of the British bombers, taking their time, dropping single bombs, and flying in an unusual pattern. Suspecting parachute activity, he signaled all the command posts. By 1:15 a.m., separate observers had picked up the fleet in the middle of the river, and urgent messages were sent to the harbor commander to check if anything was expected.
At 1:22, a huge searchlight was switched on, revealing the flotilla in all its glory, but the Campbeltown was flying the Reichskriegsflagge and looked like a Möwe-class destroyer. German signal stations opened up their lamps to ask questions, and a Bofors gun opened up with some warning shots, revealing what was in store if the Campbeltown gave the wrong answers.
It was now time for Leading Seaman Pike to step forward. He had been hand-picked for the mission because he could signal in German and had memorized a German code book seized by No. 3 Commando on the Vaagso raid in Norway three months previously.
His reply was a little long-winded, playing for time, and mentioned the name of a known German torpedo boat. He then sent the message in German: “Proceeding up harbor in accordance with orders.”
For a moment, some searchlights were switched off, but then the Bofors started up again. Ryder asked for another signal to be sent: “Ship being fired on by friendly forces,” and the Bofors stopped. In an attempt to reinforce their identity, Ryder then fired a flare from a Verey pistol, but it was not the color that was currently being used. This tipped the scales. Only a couple of minutes from zero hour and it was game on!
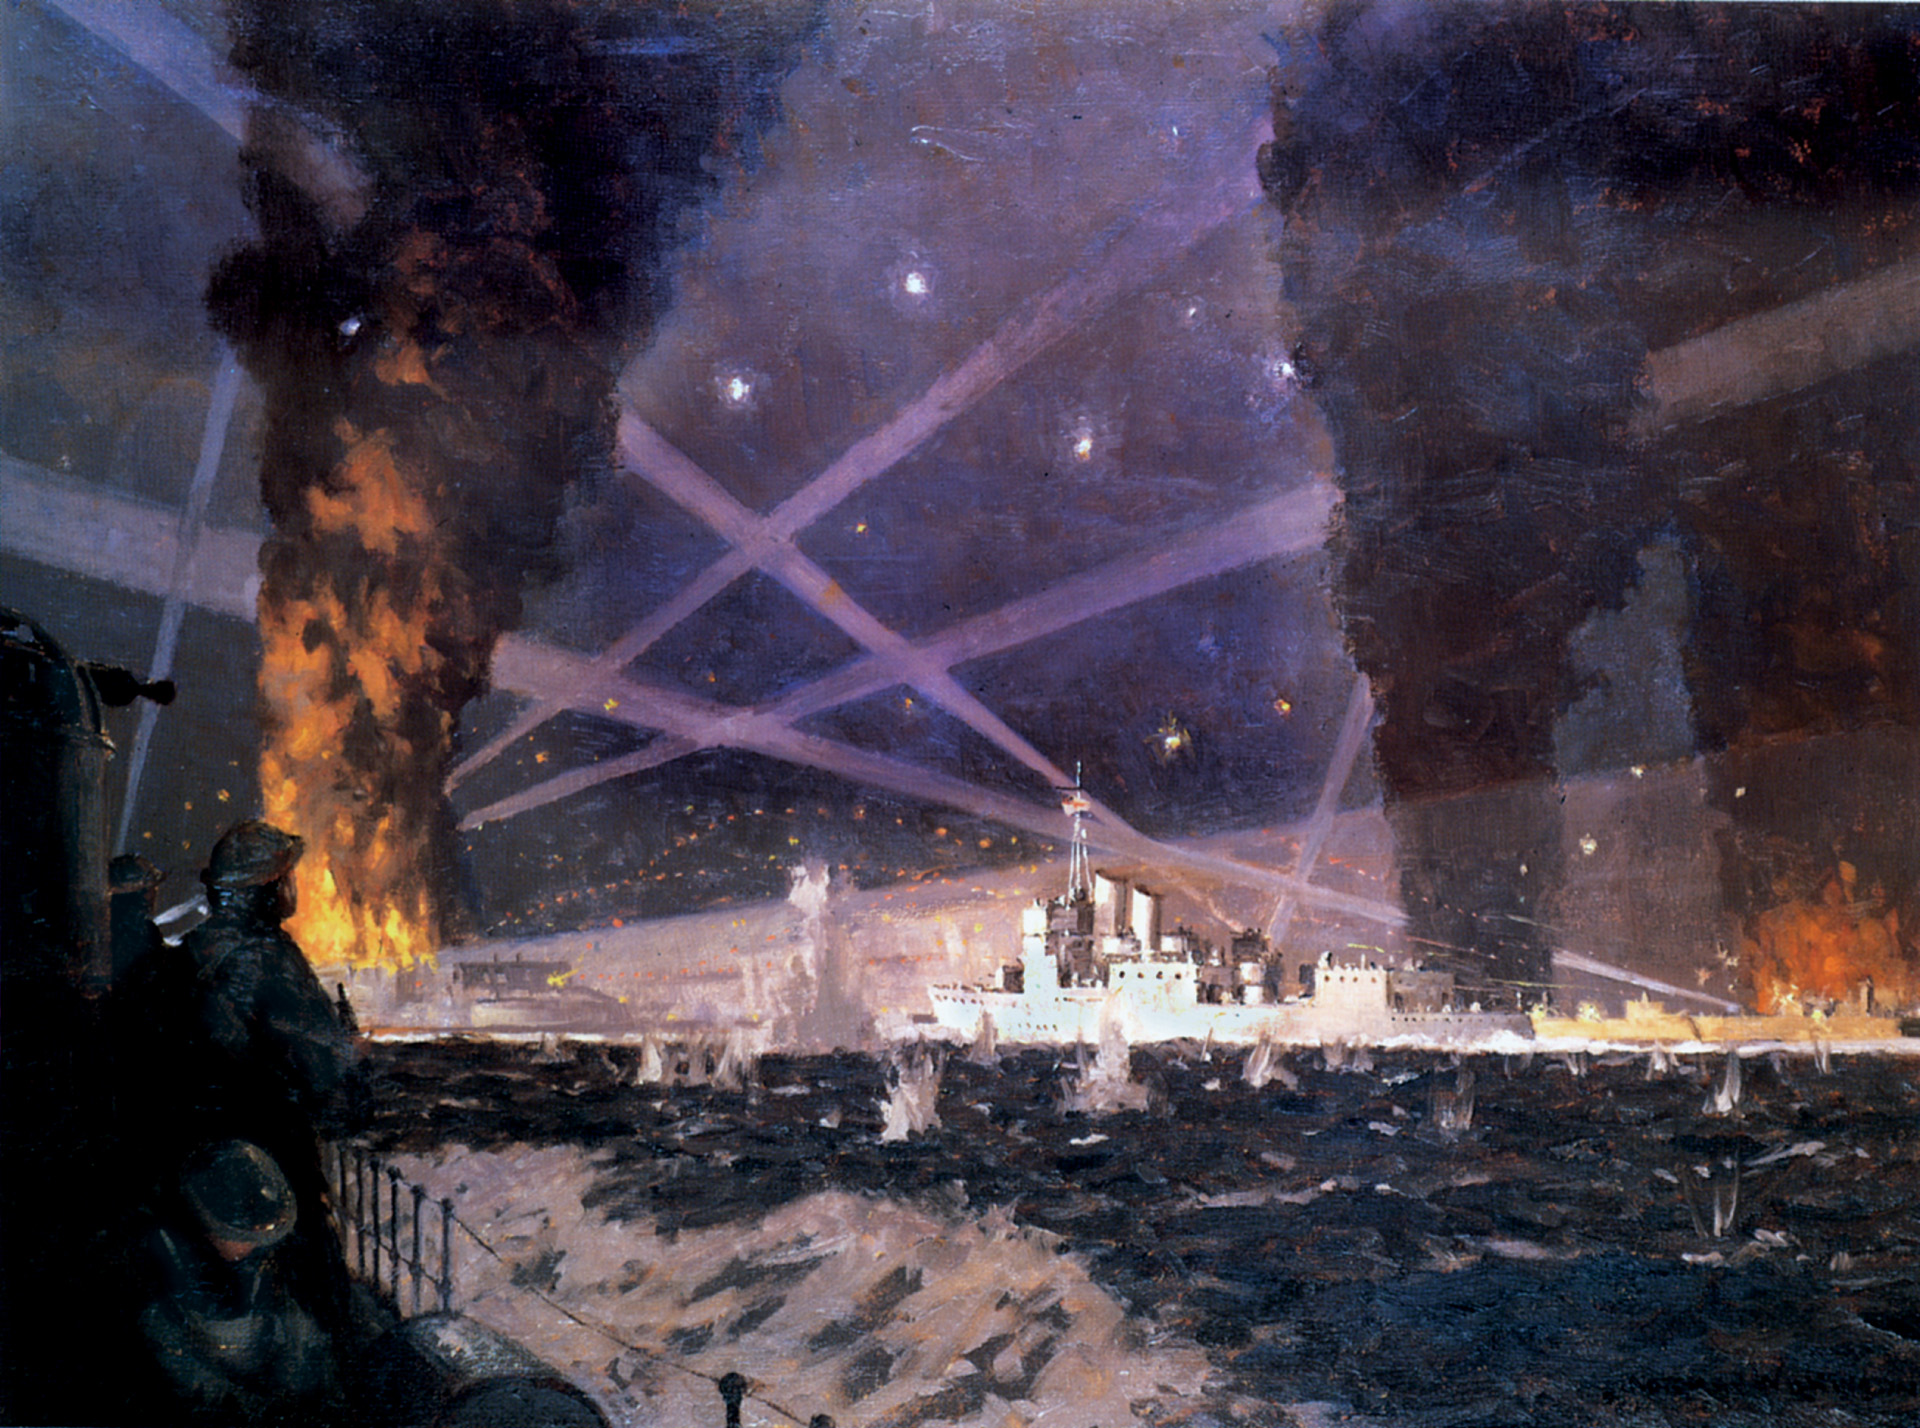
Down came the German flag, up went the white ensign, and all hell broke loose. The Germans were taken aback by the ferocity of the little fleet’s response, although all they had to aim at were the searchlights, gun flashes, and the sources of the multi-coloured tracers.
In the estuary, a German Speerbreche guard ship was taken by surprise, and Able Seaman Bill Savage on MGB 314 managed to knock out its deadly 88mm gun with 20 shells from his Vickers pom-pom before it could respond.
Both sides knew that for the next few minutes it would be all about the Campbeltown. She was peppered by every kind of German round and shell (“Stormed at with shot and shell, boldly they rode and well, into the jaws of death rode the six hundred….”).
For the moment, this drew the fire from the vulnerable MLs as Beattie raced her towards the gates of the Normandie dock. He almost ran into the South Entrance by mistake but corrected his course at the last moment and, when a searchlight showed up the lighthouse at the Old Mole, he realized his target was just a little further along the dock landscape he had studied so thoroughly.
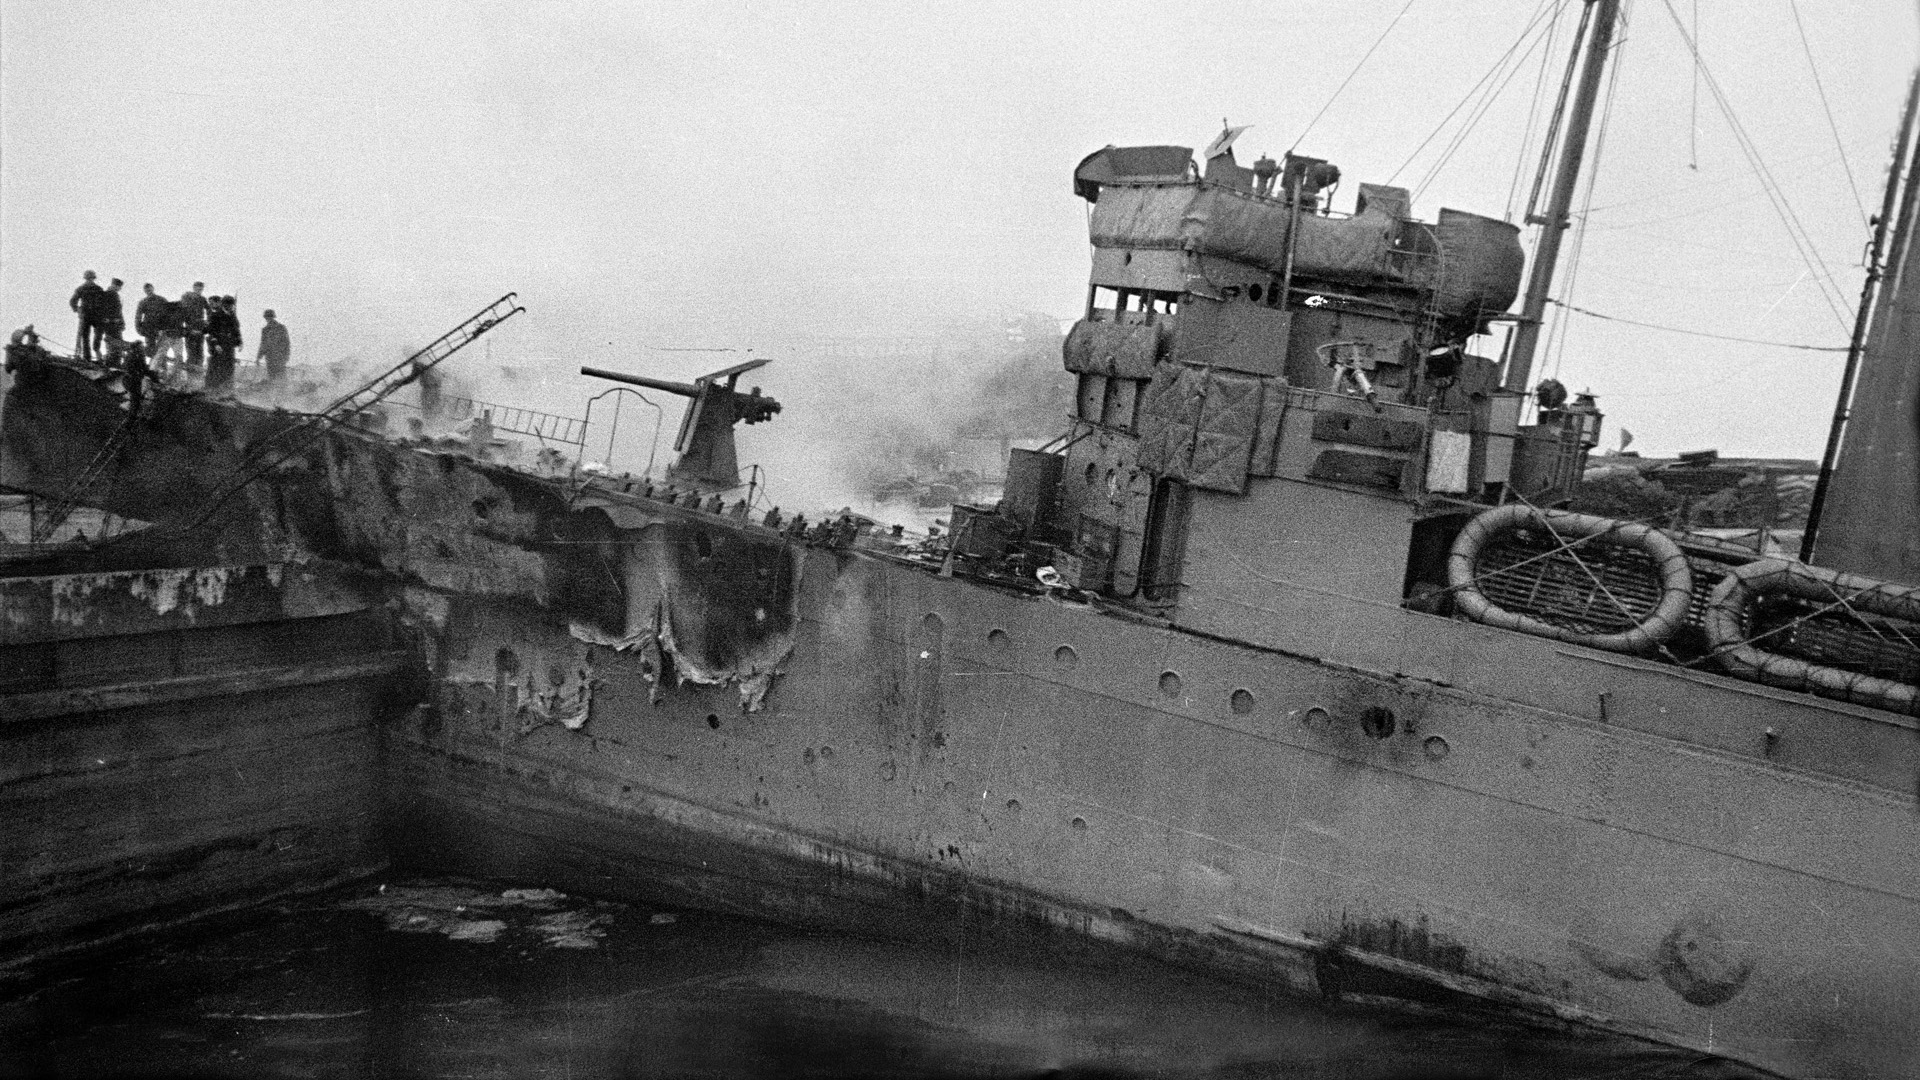
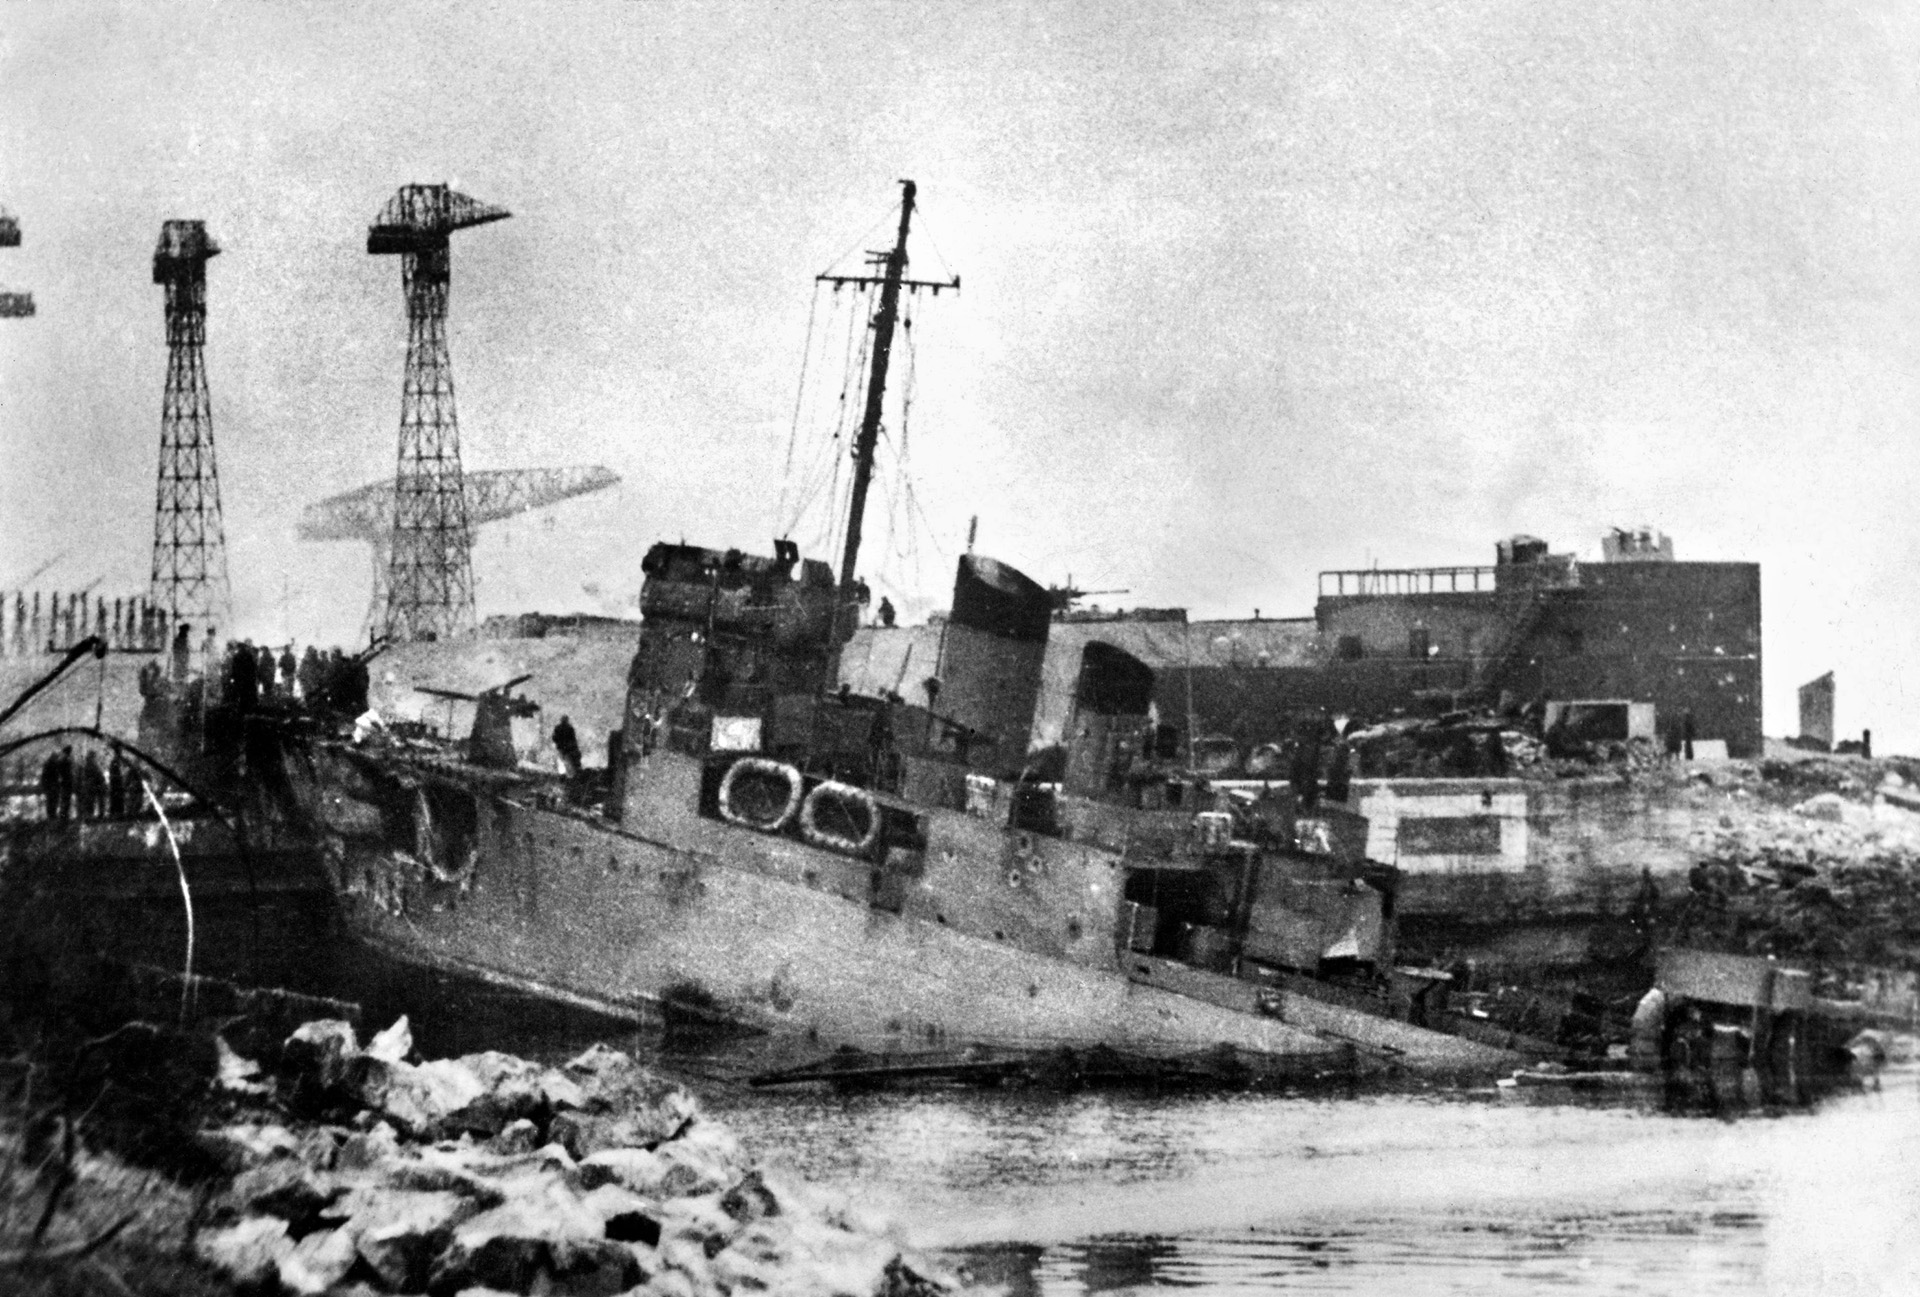
At 20 knots there was no stopping her, and all on board braced themselves for what was to come. Such was the force of the impact with the lock gates that the front of the ship crumpled back 36 feet, with its bow angled high upon the caisson. They had missed zero hour by only four minutes.
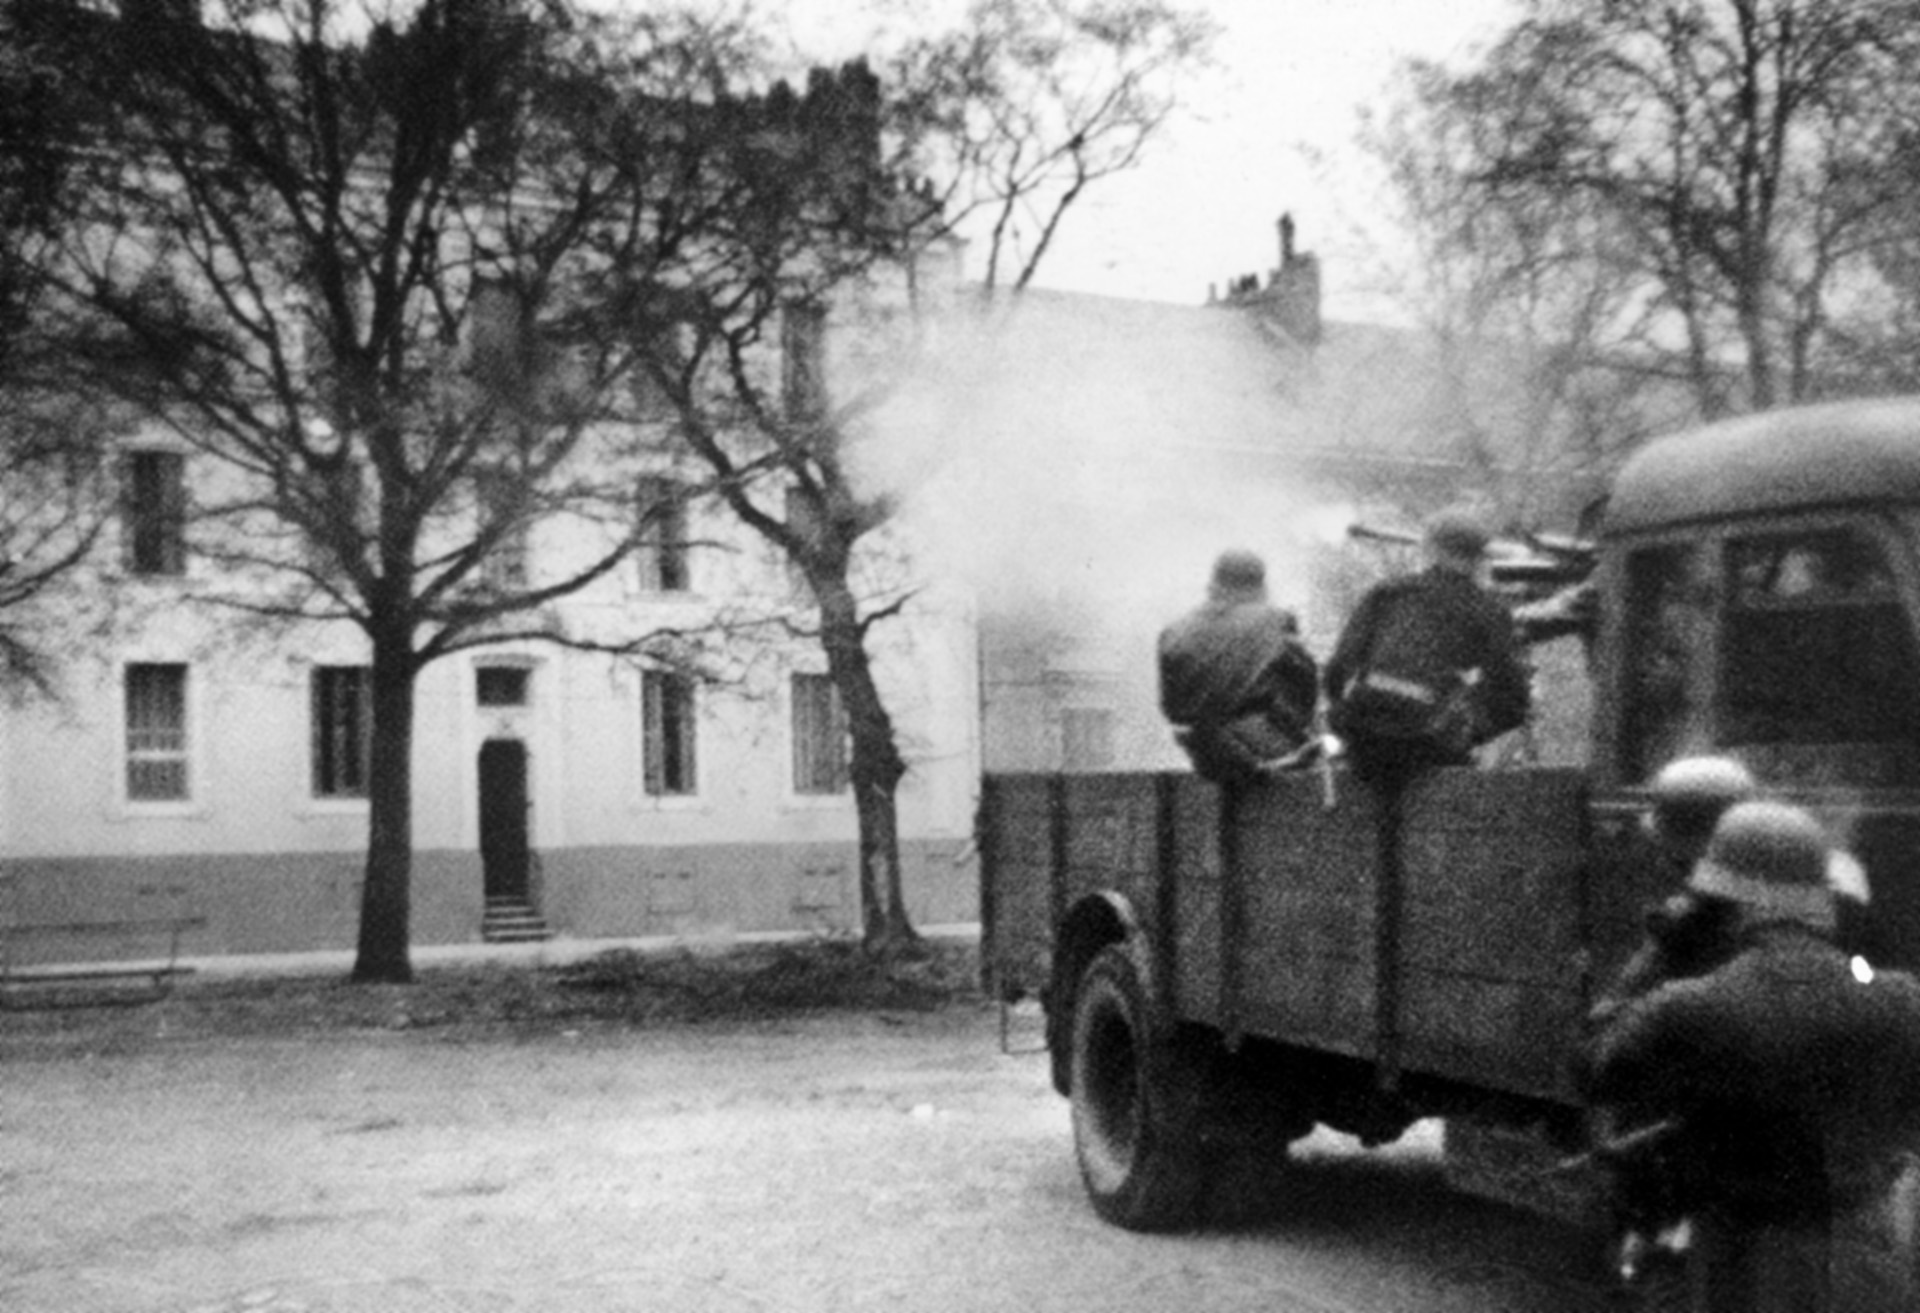
The assault teams with their Tommy guns and Brens scurried down their ladders as fast as possible. One of the first was Newman’s Essex Regiment comrade John Roderick. His group took their first objective, a light-gun position, in their stride, then launched a successful grenade attack to neutralize a bunker containing a 37mm gun before arriving at their third target, a Bofors that had already been knocked out by a ship’s gunner. Only its crew remained, but not for long. Within a few minutes another gun and searchlight were out of commission. Their orders now were to protect the perimeter, which they did against huge odds till it was time to withdraw.
Captain Donald Roy’s Scottish Commando group went kilted into battle off the port side of the ship, straight to their first objective: a rooftop gun position, which was swiftly neutralized. From there they raced to the bridge over the Old Entrance to the dock, a strategic point that they had to hold, under fire, for the demolition teams to cross when they had done their damage. There they were to hold fast, poorly protected and taking casualties.
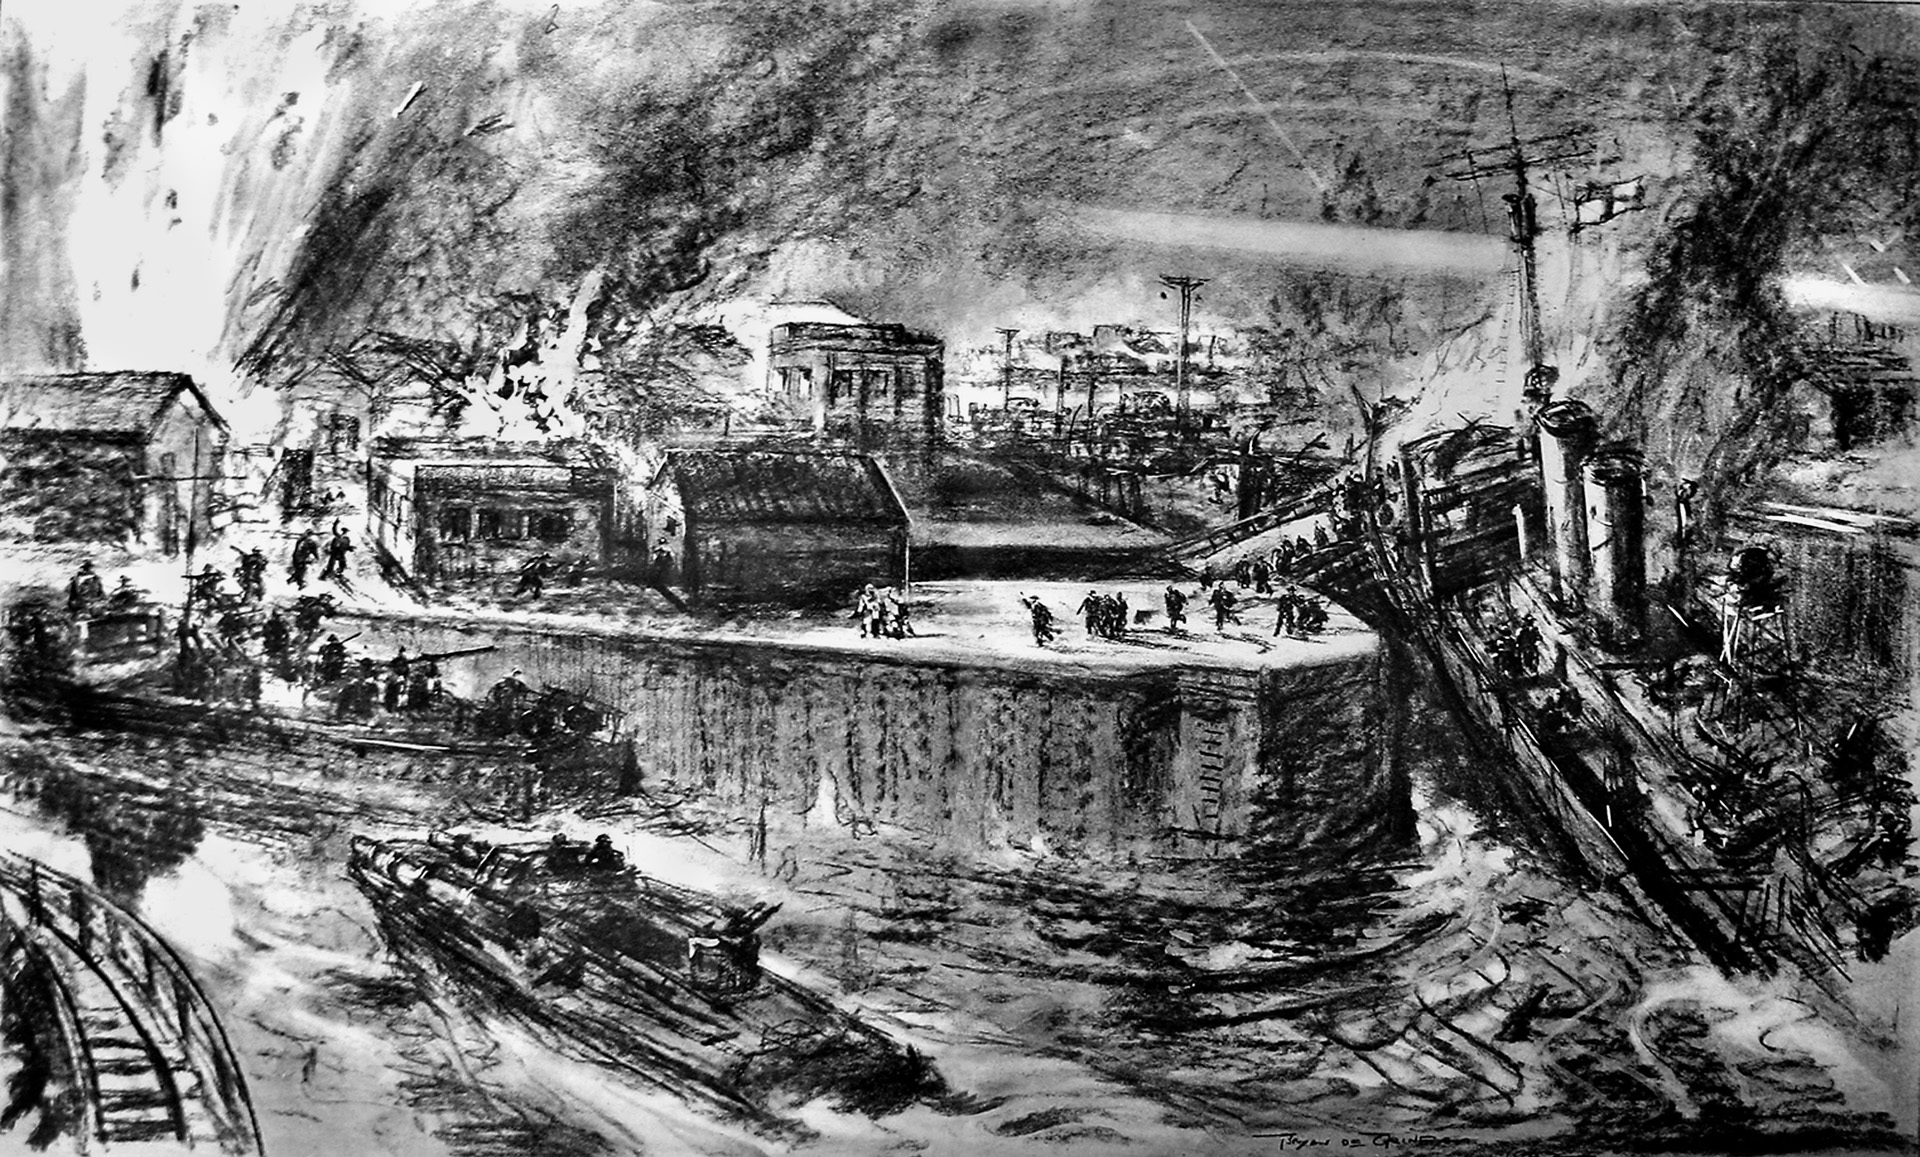
The early success of the assault teams had paved the way for the demolition gangs. On the shoulders of these men rested the neutralization of the mechanisms that controlled the Normandie Dock. At the southern end were the pump house and the winding house containing the machinery to move the lock gate. Charges were to be laid on the caisson itself in case the Campbeltown failed to deliver. The caisson at the northern end and its winding house would also be destroyed. These five targets were under the control of Pritchard’s close friend Captain Robert Montgomery.

Lieutenant Stuart Chant led the pumping-house party despite a leg wound. His team blew open the steel doors and descended 40 feet in the dark, leaving 150 lbs. of explosive attached to the pumps. Fortunately, the layout was identical to the Southampton docks where they had trained. Chant had barely limped back up the stairs when the charge went off, a satisfying roar heard by all the other teams and crewmen.
Their next objectives were the electric motors on the ground floor, which the previous explosion had severely damaged, so they simply smashed the oil pipes and set everything on fire.
Lieutenant Chris Smalley led the attack on the nearby winding house. Plastic explosives and cordtex were placed in position and the igniters were pulled, resulting in another huge explosion and fire. Task completed, the team withdrew and jumped into a launch that had just arrived at the Old Entrance, hoping to make an early exit, but Smalley was killed in the process.
The team tasked with destroying the main caisson if the Campbeltown had failed were now redundant, so they were sent to reinforce the demolition teams at the northern end of the dock. All of them came under heavy fire, but they managed to place a dozen underwater charges on ropes from the handrail.
A further attack, causing serious casualties, prevented more charges being laid, but the ones already placed were enough to blow a huge hole and send water gushing through.
All the teams, except for Smalley’s, withdrew to the bridge held by Roy’s men, which protected the route leading out of the dock and down to the Old Mole, where they expected to embark the launches that were due to rendezvous there. The bridge was swept by fire, but some managed to cross it via the structure below.
The men of Group Three had been lucky to travel by destroyer; for the two columns of launches following the Campbeltown, it was a different story. Group Two (starboard) were directed to land at the Old Entrance for more demolition. Group One (port) was to land and secure the Old Mole projecting into the river and neutralize the opposition that the men would face both during the completion of their tasks and, more importantly, when they tried to leave.
The Old Entrance presented challenges, but it was the 86 Commandos in Group One who had drawn the short straw. The Old Mole was only accessible by a flight of 25 stone steps unless the Commandos could scale it with their ladders. It was also much more exposed and heavily fortified with guns that needed silencing before landing became possible.
Just before the Campbeltown had hit the caisson, Ryder’s gunboat and the leading torpedo launch on the port side veered off to provide covering fire for the Commandos. By this time, the leading boat on the starboard side (Stephens’ ML192) had already been hit. All but five of the assault party were killed and four crew lost. Ironically one of the Commandos, Michael Burn, got ashore and reached his target nearly a mile away but had insufficient equipment to destroy it.
The next two starboard launches were hit, but one—Burt’s ML 2620—managed to land its party; unfortunately, they had to re-embark due to the intensity of the fire. Forced downstream, Burt reached the Old Mole, stopping to assist his friend Lieutenant Collier, whose port-side launch was ablaze. Collier, alone and seriously wounded on the bridge, shouted, “I’ve had it, Ted,” and told Burt to save himself. This delay gave the enemy time to finish off Burt’s vessel as well; the best he could do was to get the wounded onto a raft.
The same sorry fate greeted the rest of the starboard-side launches, until the final one, Rodier’s ML 177, managed to get into the Old Entrance at 1:40 a.m., where Troop Sergeant Major’s Haines’ assault party of 14 were able to disembark. Beattie then hailed Rodier to take on board 30 of the Campbeltown’s crew.
Full to the gunnels, Rodier could now take no further part in the evacuation and made haste to get home. By this time, Newman and his team had left the HQ ship to set up a working HQ on land. Ryder stayed behind, checking the Campbeltown’s scuttling was underway (it was going nowhere now!) and that Micky Wynn’s launch had arrived to fire his torpedoes at the outer lock gates of the Old Entrance. Wynn then filled up with the remaining Campbeltown crew and was ordered to head home.
At the head of the port column was Lieutenant Irwin’s torpedo launch. Six minutes after the Campbeltown struck, the launch received a direct hit and withdrew out to sea. Lieutenant Platt’s launch behind him, containing assault troops, was hit several times. Survivors tried to beat the strong current and swim for the shore while the wounded were put on rafts. Lieutenant Boyd’s torpedo boat came up after engaging rooftop positions and picked up some survivors. Sixteen men on Platt’s launch were killed or drowned. Boyd’s launch also started getting hit and was forced to retreat home on just one engine.
Next behind Platt had been the ill-fated Lieutenant Collier’s ML457, containing Pritchard and a demolition team tasked with destroying a bridge and lock gates at the far end of the South Entrance, plus young “Tiger” Watson’s protection squad.
Collier’s ML457 was hit soon after depositing the troops successfully at the Old Mole. Collier lost a leg in the explosion, the launch caught fire, and drifted into the river. It was at this point that Burt caught up with the mortally wounded Collier, who later died along with eight of his crew. The following four launches tried to land at the Mole, but the steps were out of reach and there was no way of throwing out a scaling ladder. They were hit, guns were put out of action, and they had no alternative but to limp off downstream.
While these tragic events were unfolding, Ryder’s gunboat had gained the shelter of the Old Entrance. As soon as he had seen Wynn discharge his torpedoes, Ryder set off down to the Mole to check on the others. What he saw filled him with horror. Five launches were ablaze, and the river was covered in burning petrol. Men who had an hour before prepared themselves to die with their boots on if necessary, taking the enemy with them, were burning in the water or drowning without having fired a shot.
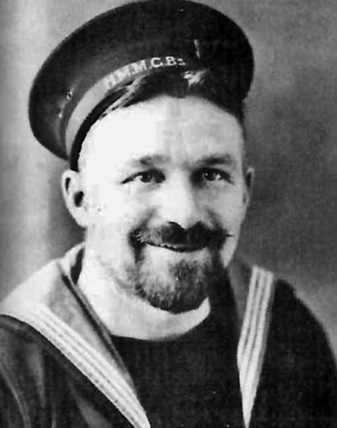
Ryder also tried to support Burt and Collier and came under fire but gained temporary salvation from Able Seaman Savage who, although completely exposed on the deck, successfully silenced a large concrete gun emplacement.
Back Ryder went to report the situation to Newman but was fired on from all sides. With Savage still firing and putting his life on the line, he too had no alternative but to leave and try to get his passengers to safety. Savage’s ferocity with his Vickers pom-pom gun was exemplary, but he eventually succumbed to multiple wounds; he was subsequently awarded a posthumous Victoria Cross. Without his gallant efforts, Ryder’s chances of survival would have been slim.
This was all happening while Newman was setting up HQ at the Old Entrance; he was soon joined by TSM Haines and his team, who had disembarked from Rodier’s boat. Coming under attack, Haines struck the opposition with first a two-inch mortar and then a Bren gun.
Firing to their left announced the arrival of the group that Collier had landed at the Old Mole. This included Philip Walton’s team to demolish Bridge D at the southern end of the submarine basin, supported by Tiger Watson’s minders and Pritchard to oversee the demolitions.
On the way to their objective, Pritchard found two small ships and took the opportunity, with his corporal, to put them out of action with plastic explosives. As they rejoined the others, Pritchard was killed and it was discovered that Walton, the team leader, had also been lost. Watson made two attempts to gain the bridge and demolish it himself but was recalled by Newman, who had assessed the impossibility of the task and wanted no more lives lost.
Encouraging for Newman, however, were the explosions from the pumping and winding houses, and the teams who had joined his HQ to report successful demolition. It was time to bring everyone back, which meant sending a runner across Roy’s bridge under intense fire.
Heading out towards the Old Mole, Newman and his men came face to face with the same inferno that greeted Ryder and realized they would not be sailing back to Falmouth. The contingency plan was to fight their way out of town, split into pairs, and try to get home via Spain and Gibraltar, a journey of over a thousand miles. A tall order, but it was later proven not to be impossible.
Initially, they would divide up into groups of around 20, but first they had to get out of the dock area and into the town—which involved crossing Bridge D, which fortunately had been spared demolition. Somehow the majority managed to run the gauntlet with small-arms fire spitting off its girders, but taking casualties all the way. After crossing the bridge, the survivors divided up and took their chances.
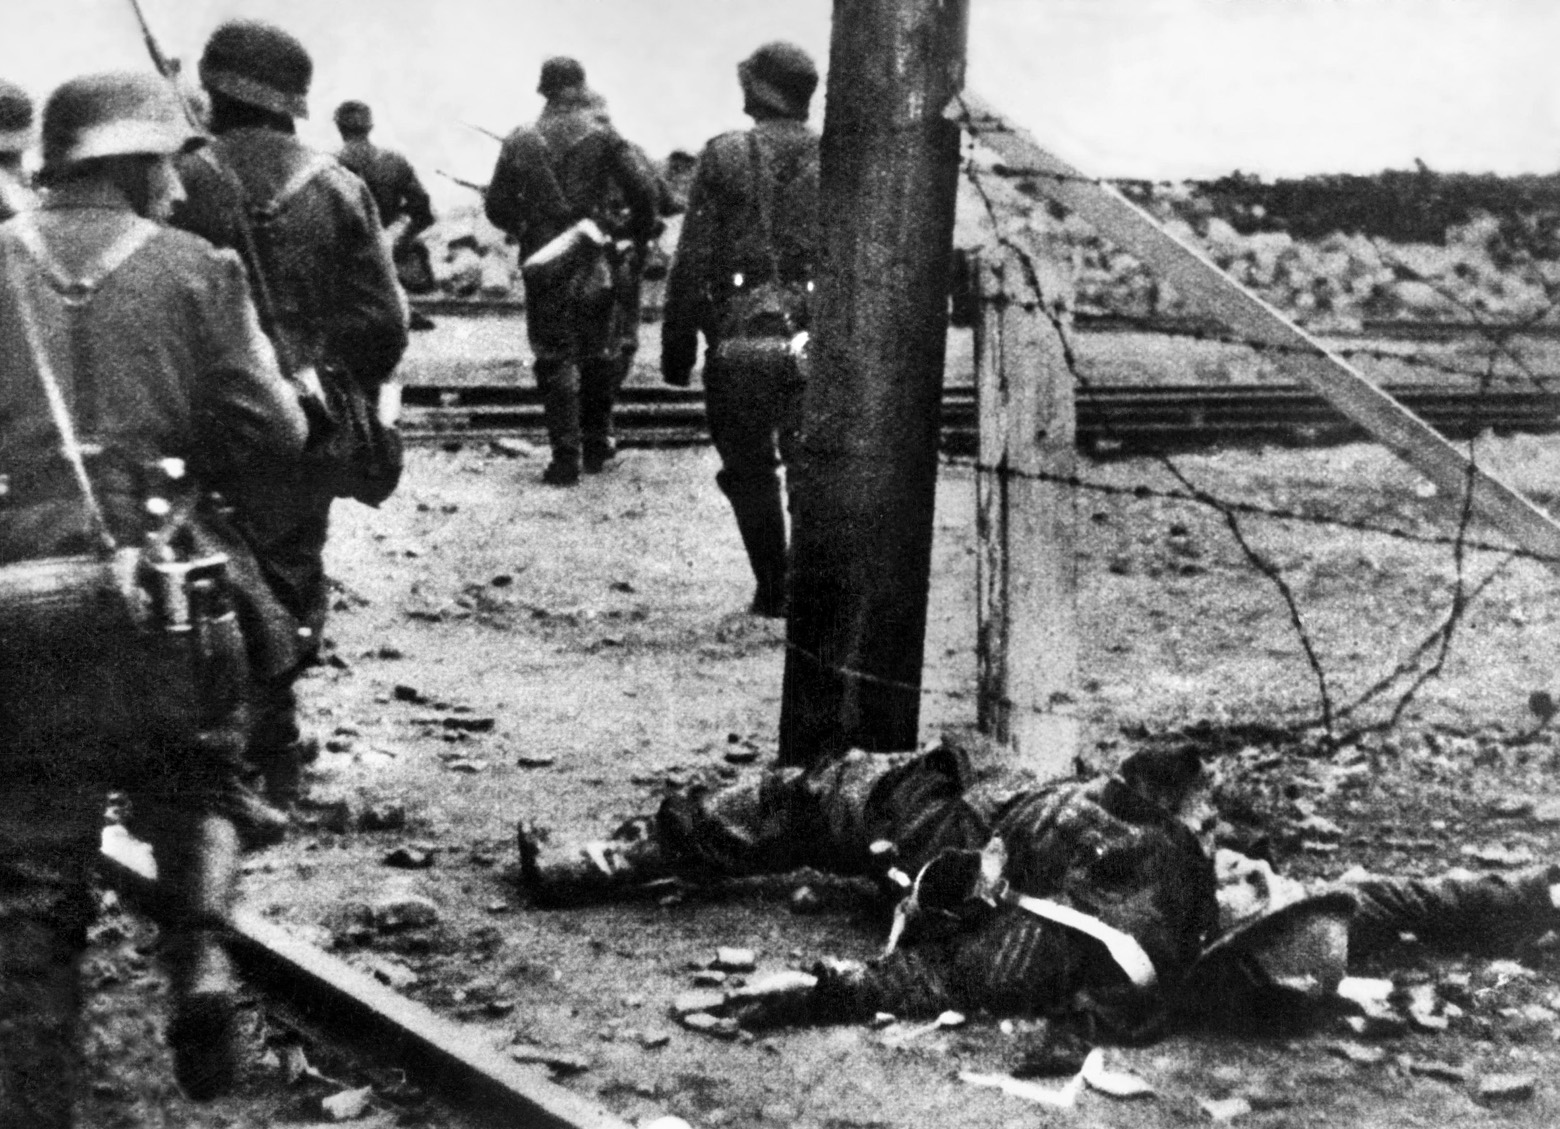
Newman and 15 commandos found a cellar for shelter, but only he and three others were not wounded. The sound of Germans outside meant he had to make a painful decision as a couple of grenades tossed down the stairs would have finished off the lot of them. He ran up the steps and surrendered.
Among the wounded in the cellar was 22-year-old Lance Corporal Harold Roberts—“Aggs” to his mates. A promising professional soccer player from Liverpool, he had joined the Liverpool Scottish at the start of the war before being accepted as a Commando and joining Captain Donald Roy’s troop. He was on the port side of the Campbeltown when it hit the dock and had raced off with his kilted comrades, taken on the guns on a warehouse roof, and held the crucial bridge with Roy and the others for more than an hour under fire.
Roberts now had wounds in both his legs and was staring at the certainty of capture or worse. The chances of ever being able to play soccer again were a distant fantasy.
As the remaining Commandos were being taken prisoner ashore, some of their comrades and naval crew were making a break for freedom down the estuary. Seven launches had been set alight or sunk, but the 10 that survived had hopes for their planned rendezvous with the two escort destroyers 25 miles out to sea.
Rodier’s craft, with Beattie, Tibbits, and a large number of wounded on board, initially avoided the coastal guns before the engine room took a 75mm shell, which killed Rodier and Tibbits and also started a major fire. Some escaped by raft, the remainder were thrown into the water, and a few clung on to the wreck of the Lancastria in the estuary, to be picked up by a German patrol boat in the morning.
Micky Wynn in his MTB, capable of 40 knots, was hopeful of a smart getaway and was approaching the open sea when he saw two men on a raft and stopped. A searchlight picked them out and they were immediately hit by a shell. Wynn was knocked unconscious but saved by his chief mechanic, Bill Lovegrove, who went back to search for him, lashed him to a raft, and supported him for 12 hours. Other crew members swam alongside but most succumbed to the icy waters. Late the following morning they were picked up by a German gunboat. Only four of the 36 on board had survived.
Lieutenant Ian Henderson’s ML 306 was one of the boats that failed to land at the Old Mole. It was returning with a full complement of 28 men on board when they ran into a pack of five German destroyers. They took on one of them, Jaguar, for an hour—a fight that was to be remembered for the courage of Sergeant Tom Durrant.
When his Bren gun, equipped for the raid with massive 100-round magazines, ran out of ammunition, Durrant took charge of the ship’s twin Lewis guns, having just seen their operator fall, and stuck to them despite being progressively riddled with bullets.
Surrender came inevitably, but honorably, and the survivors were treated with great respect for their courage. A week later, Charles Newman was contacted in a German POW camp by Jaguar’s captain, who told him about Durrant and suggested he be recommended for a bravery medal. After the war, Newman followed up the story, and Durrant was awarded a posthumous Victoria Cross.
Of the remaining small ships, three actually made it home to Falmouth, shooting down a German Heinkel 111 en route. Ryder’s gunboat was badly damaged but managed to rendezvous with the destroyers as planned, together with three other launches. All of these were in such a bad state, however, that it was decided to scuttle them.
Back in St. Nazaire, after the apparent end of Operation Chariot, the Germans were still trying to piece together the precise rationale behind the night’s events. Sporadic gunfire continued until daybreak—either pockets of Commando resistance or opportunistic Frenchmen trying to settle scores using hidden weapons.
The early morning saw British survivors being interrogated in several locations around the town. At about 10:30, Beattie was being lectured by an intelligence officer on the futility of his attempt to destroy the dock by simply ramming it. Then, with perfect timing, it happened: KABOOM!!!
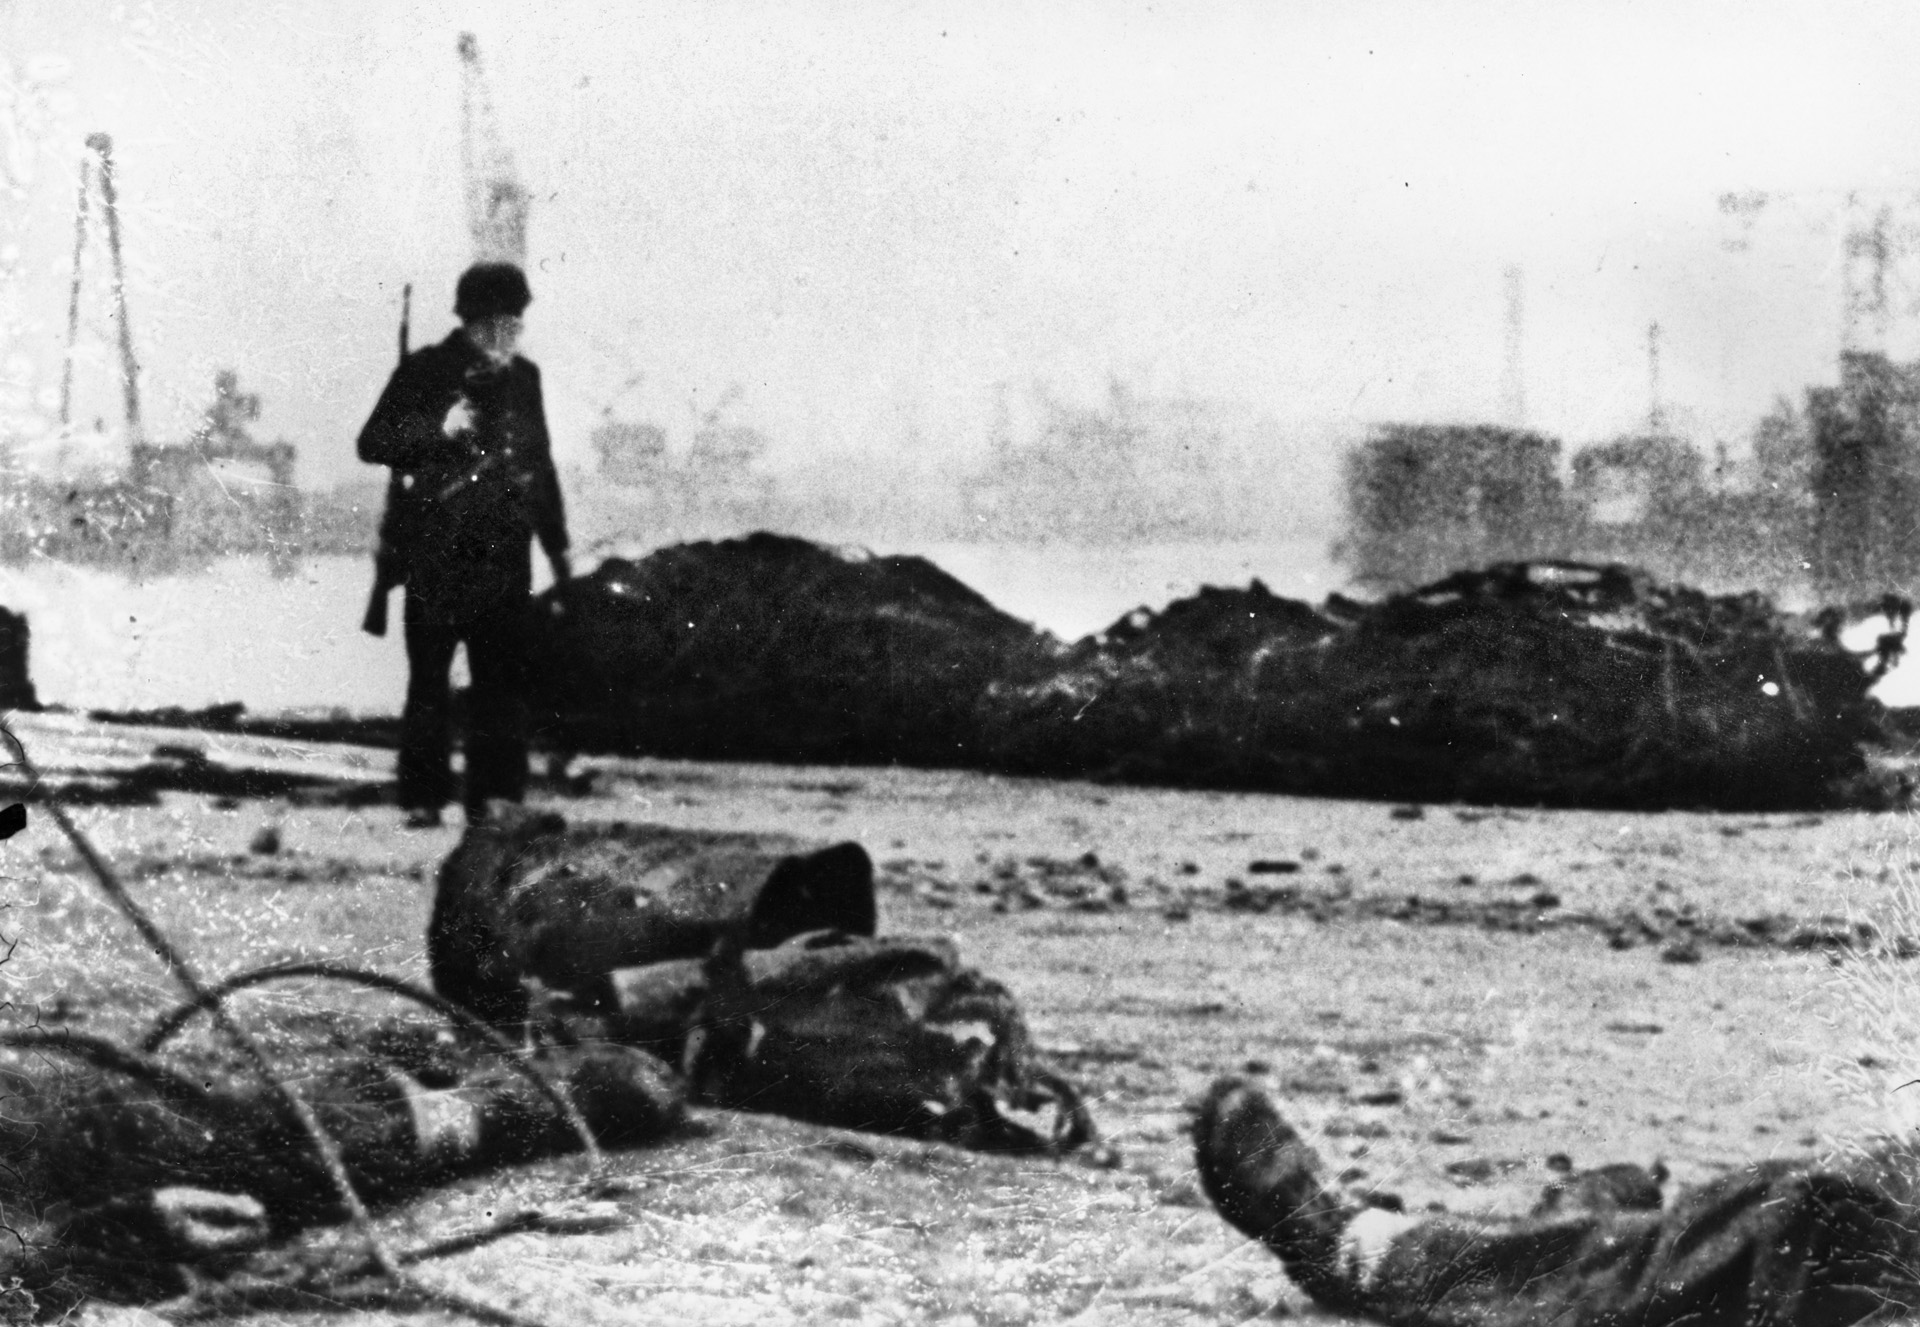
Even the wounded managed a wry smile as they realized that the delayed-action fuses on the Campbeltown had at last done their job. The amount of debris that fell all over the dock reinforced the decibel count. The 160-ton caisson had folded, and in rushed the waters of the Atlantic to reclaim a piece of French coastline, causing further damage to anything in their path.
Unfortunately, the Campbeltown had attracted the curiosity not only of the German military but also a few French civilians who had slipped past the guards around it. Estimates of how many people were aboard when it exploded varied from 150 to 350, many of them seeking souvenirs as well as military intelligence. Such was the blast that pieces of these unintended victims stuck to walls and hung from cables for days till the area was finally cleared.
Why the fuses detonated later than planned will remain a mystery. One story that circulated, without any real confirmation, told of one or more British officers being seen on board shortly beforehand—and even that Pritchard had only been wounded, not killed, the night before and had slipped aboard to strike a final blow before he expired.
The destruction of the docks did not end with the elimination of the perpetrators. Two days afterwards, the outer gate of the Old Entrance was blown up, causing complete mayhem and prompting more searches and street patrols. Then another explosion an hour later confirmed that both Wynn’s time-delayed torpedoes had made their mark.
Commando raids were indeed unnerving the enemy and making it wonder what would happen next, and where. Unfortunately for the local French civilians, the trembling finger of suspicion pointed at them. Panicked by an unseen enemy, many German troops exacted revenge among the innocent. Senior officers then threatened the mayor with the summary execution of 10 percent of his citizens if the attacks continued. Fortunately, there were no charges left to explode and no acts of revenge.
At the top of the chain of command, the Führer was incandescent, something that Churchill could only have dreamed of. Plans were shelved for weeks while enquiries were conducted for recrimination and to tighten up security for the future. As Hitler’s Atlantic Wall stretched from Norway to Spain, resources would now have to be spread even more thinly.
The remaining Commandos who were rounded up were sent after interrogation to German POW camps. In total, the number of men taken prisoner was 215 (another 228 successfully returned home). The wounded had a hard time in makeshift hospitals with few anesthetics, but Harold Roberts was lucky enough to find a German doctor who saved his legs from further damage, and he was then taken to Rennes in Brittany to be treated by sympathetic French surgeons. After the war he returned home and resumed his soccer career, playing for Birmingham City in the First Division of the football league.
Five Commandos, unknown to Newman when he optimistically suggested they return home via Gibraltar, followed his orders to the letter and, after a series of incredible adventures, rejoined their units back in England to continue and survive the war.
In his masterful account of The Greatest Raid of All (1958), Brigadier C. Lucas Phillips concludes with the story of Micky Wynn, who was repatriated from a POW hospital after losing an eye when his launch was blown up. As the war was ending in April 1945, he persuaded the Admiralty to sanction his involvement in the liberation of naval POWs, with some help from a Canadian tank commander, who allowed him to fly a white ensign from the lead tank. He rumbled into the camp at Marlag-Milag to free Bill Lovegrove, who had saved his life over three years earlier in the icy waters of the Loire.
In analyzing the outcome of the raid, one heart-wrenching statistic is the number of men who were tragically prevented from fulfilling their promise. The losses on that night amounted to 64 Commandos and 105 naval men. Around 75 percent of these deaths occurred in the naval battle, the majority of them on the two crowded launches of Rodier and Wynn during their withdrawal.
Apart from the Campbeltown explosion, the most obvious successes were achieved by those Commandos who had leapt off the ship and reduced key installations to rubble within half an hour. Groups Two and Three on the Fairmile launches should have been able to do the same, but their vulnerability meant that very few got off the starting blocks. If they also had enjoyed the protection of an armor-plated second destroyer, the results could have been very different. Once the element of surprise was lost, they were sitting ducks.
The heroics they displayed in just trying to stay alive and supporting their comrades, however, provide an indication of how successful they could have been if they had been able to land. Mountbatten’s callous predictions for the fate of these men had been very accurate. It may be seen as ironical by some that he met his own end in an explosion on a small boat at the hands of the Irish Republican Army in 1979.
Questions will always be raised about the diversion plan. Bad weather, especially low cloud, is so frequently a barrier to effective bombing operations that it should have been factored into the planning and a more flexible strategy prepared. By preventing the aircrews from using their initiative or detailing them of the operation taking place below for security reasons, Bomber Command ultimately diminished the element of surprise that the raiders relied upon.
But overall, the raid will always occupy a rightful place among the greatest battles of all time, with perhaps the one consideration so frequently applied that, “At St. Nazaire, there were no failures, only impossibilities.”
After the war, the people of St. Nazaire warmly welcomed back the survivors of the night raid for a series of commemoration events. The first of these was August 2, 1947. Despite the fact that much of the port and its town were still showing the scars of Allied shells and bombs, the party of 150 Charioteers, who may have been personally responsible for some of the damage, were generously addressed by Paul Ramadier, the French Prime Minister, with the words, “You were the first to bring us hope.”
A frequent contributor to WWII Quarterly, the British author lives in the Normandy region of France.

Join The Conversation
Comments
View All Comments