By David A. Norris
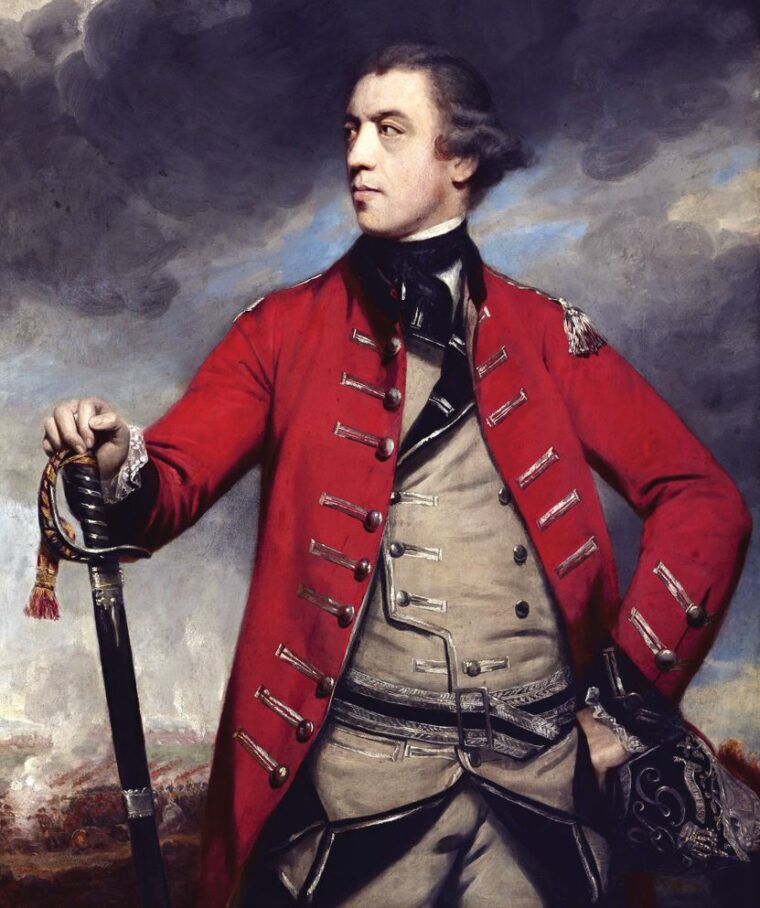
Four months earlier Major General John Burgoyne had left Canada with a large army. He intended to deliver a fatal blow to the colonial revolt that had begun on April 19, 1775. The bright summer days were just a memory now, as were Burgoyne’s hopes of ending the rebellion of the American colonies against King George III.
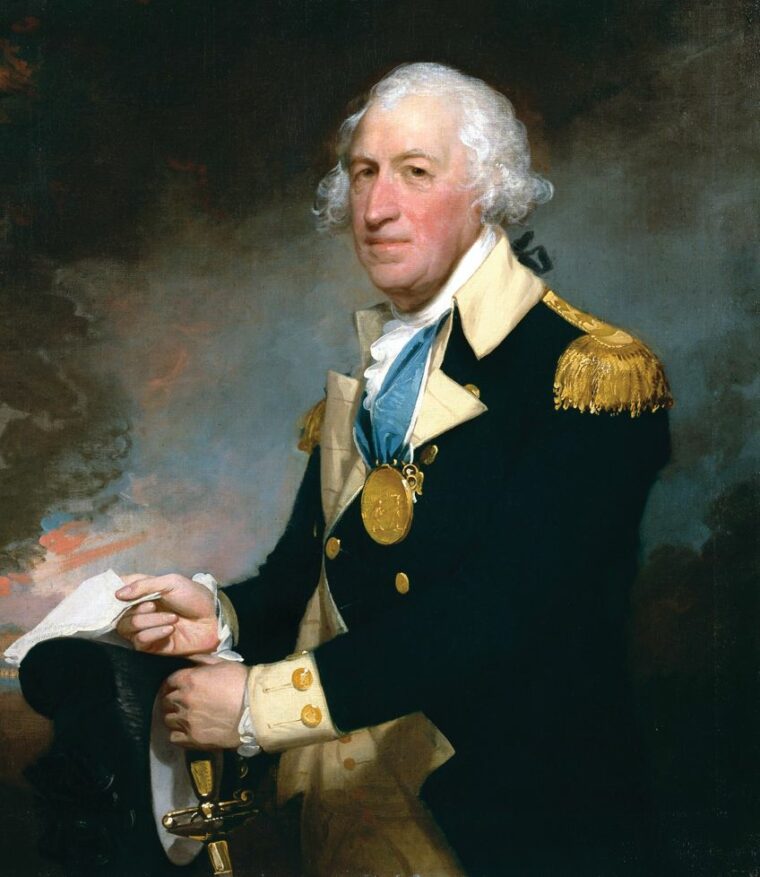
Burgoyne’s men marched from their camp on October 17, 1777, not to battle as they had so many times over the past four months, but to quietly lay down their weapons in the desolate ruins of an abandoned fort near Saratoga, New York. The failure of Burgoyne’s ambitious plan not only cost King George III of Great Britain an entire army he could ill afford to lose. The victory of Maj. Gen. Horatio Gates’ Continental army over Burgoyne’s Army of Canada at Saratoga convinced King Louis XVI of France to take the risk of supporting the United States, established the previous year, against the British. As such, the American victory at Saratoga precipitated a historic shift that ultimately would tip the balance of power in the American Revolutionary War in favor of the rebellious colonies.
After repelling an American invasion of British-held Canada, British strategy focused on New York. The British capture of New York City in August 1776 gave the Crown a base from which to control the Lower Hudson River. London hatched a new plan to end the rebellion formed during winter 1776-1777. The plan called for Lt. Gen. Sir William Howe to push northward along the Hudson River from New York City, while John Burgoyne advanced south from Montreal. Additionally, Brig. Gen. Barry St. Leger would lead another force eastward through the Mohawk River Valley. All three armies would unite on the Hudson at Albany, the largest town in upstate New York. New England, which was the center of the most fervent opposition to British rule, would be cut off from the rest of the American colonies.
Although a fine plan on paper, the new Hudson River campaign was flawed from the start by an administrative mistake in London. Orders were drafted for Howe to march up the Hudson to unite with Burgoyne at Albany. Such orders required the signature of Lord George Germain, Secretary of State for Colonial Affairs. When the orders were being written out, Germain, eager to leave the city for his country home, refused to wait until the papers were finished. Rather than sending the orders onward for Germain’s signature, a clerk simply filed them.
Quebec’s Governor Sir Guy Carleton knew of the plans, as did Burgoyne. Howe also knew of the invasion from Canada. But without direct orders for full cooperation, Howe focused on his own plan to crush the rebellion by taking the American capital of Philadelphia, and gave little consideration to cooperating with Burgoyne.
On June 14, 1777, Burgoyne’s expedition headed south from Montreal. Maj. Gen. William Phillips, although an artillery officer, served as second in command. After detaching a few hundred troops to remain in Canada, Burgoyne had 9,500 troops. The core of his army was its 7,600 European foot soldiers, of which 4,000 were British and 3,600 were so-called Hessians, that is, mercenary troops hired from small German principalities, as well as 500 artillerymen. Auxiliary troops included 600 Loyalist and French-Canadian militia, 500 Indian allies, and 300 support personnel.
Burgoyne’s Army of Canada was divided into three divisions. Brig. Gen. Simon Fraser commanded the Advance Division, Phillips led the Right Division with its two brigades of British troops, and Maj. Gen. Friedrich Adolph Riedesel commanded the Left Division composed of Germans from Brunswick and Hesse-Hanau. The militia and Indians formed up outside of the three divisions.
Burgoyne’s army boasted 138 guns, ranging from mortars and small field pieces to large 24-pounders. The large complement of artillery would furnish sufficient firepower for any battles or siege operations that might be mounted during the campaign.
Among the Germans were a number of dragoons serving on foot because of a shortage of available horses in Canada, although some of the British and Hessian infantry officers had horses. The lack of horses would hinder British supply lines throughout the expedition.
The British moved part of the way by water. They journeyed south on Lake Champlain on June 20. The lake, which ran north to south, stretched for more than 100 miles from southern Quebec well into the American colonies, dividing western Vermont from eastern New York. The Royal Navy’s Lake Champlain flotilla, led by the 26-gun, three-masted frigate Royal George, escorted the expedition’s 200 sturdy and shallow-draft bateaux.
Although he was aware of the menacing British army marching south from Canada, General George Washington, the commander-in-chief of the Continental Army, was more concerned about Howe in New York City. From his limited resources, Washington spared 4,000 men for Maj. Gen. Philip Schuyler to hold Fort Ticonderoga and the northern reaches of the Hudson Valley.
On July 1, the British landed three miles north of Fort Ticonderoga. At that point, they were about 100 miles from Albany and the Hudson River. American Maj. Gen. Arthur St. Clair commanded a garrison of 2,200 men at Fort Ticonderoga. Far away to the south, the civilian and military leaders of the rebellion regarded the legendary and massive stone fortress as the “Gibraltar of the North,” and believed it would block any invasion attempting the Lake Champlain route.
Originally built by the French, and rebuilt after its capture by the British in 1758, the fort had deteriorated from its wartime readiness. During the previous winter, shivering Patriot troops chopped up the abatis for firewood. Rather than sacrifice the garrison, St. Clair abandoned the fort on July 5, before the British could block his retreat.
The British pursued St. Clair and Fraser fell on the Continental Army’s rearguard at Hubbardton, Vermont. He encountered surprisingly steadfast resistance from the Americans, but won the sharp clash with the arrival of von Riedesel’s Germans. Although they drove away the defeated patriots, the British force was too battered to pursue them.
Carleton could send no reinforcements to Burgoyne, who also had to detach 1,000 men to hold Ticonderoga and protect his lengthening supply lines. Feeding the army by wagon and bateaux proved challenging and tedious, but the rugged and sparsely populated regions along their march simply could not provide enough food for the army.
Lieutenant William Digby of the 53rd Foot was one of the officers with a horse. He heeded Burgoyne’s advice to travel light. “[I left] my bedding behind and making use of a buffalo skin, with a cloak to cover me at nights,” Digby wrote in his diary. The lieutenant soon noted a new peril of the American wilderness. “The country around Skenesborough swarms with rattlesnakes, the bite of which is, I believe, mortal,” he said. “They alarm the person nearby with their rattles, which providence has wisely ordered for that purpose, and from whence, they take their names.”

Burgoyne divided his force in two. One contingent traveled down Lake George, which offered 30 miles of a water route for his bateaux, supplies, and heavy artillery, but at the cost of long portages through rugged country before and after passing along the lake. Without enough watercraft to carry all of his troops, the rest of his force had to move overland, well east of Lake George. The army would reunite near Fort Edward. This old French and Indian War post was on the Hudson, three miles below a sharp bend where the river turned southward. For the time being, old Fort Edward was home to Schuyler’s troops.
Schuyler knew that the British had to advance along a single rough road surrounded by forests and swamps. Directed by Thaddeus Kosciuszko, a renowned Polish military engineer, hundreds of soldiers burned bridges, blocked roads with fallen trees, and flooded the roadway where possible. Besides obstructing the intended route of the British advance, the Patriots also destroyed crops and took livestock, rendering the countryside largely barren to the invaders.
Schuyler hoped for reinforcements. St. Clair joined him from the north on July 14. From Washington’s army arrived major generals Benjamin Lincoln and Benedict Arnold. Schuyler sent Lincoln to Vermont to bolster forces menacing the British left and rear.
Burgoyne, as the Americans hoped, endured a slow and exhausting trip. For two weeks, the redcoats halted at Skenesborough to wait for the wagons to catch up before pressing on to Fort Edward. Digby recorded the ways in which the Americans had obstructed the British route. Along Wood Creek, they had “felled large trees over the river, which there turned so narrow, as not to allow more than one [bateaux] abreast, from whence were obliged to cut a road through the wood, which was attended with great fatigue and labor, for our wagons and artillery,” he said.
The British later slogged along a road “broke up by the enemy and large trees felled across it,” Digby said. On the night of July 28, there was another delay because of “a report that the enemy had poisoned a spring,” he said, adding that the surgeon of his regiment tested the water, and found it good.
A few miles to the west on July 28, the British bateaux reached Fort George at the southern end of Lake George. Burgoyne attached 150 Royal Navy personnel from the Lake Champlain vessels to his army mostly because he knew the sailors would be able to skillfully pilot the bateaux on the inland waterways. He placed Lieutenant John Schank in command of the naval contingent. Schank was assisted by 20-year-old Midshipman Edward Pellew, a veteran of the previous year’s battles on Lake Champlain. Pellew would go on to a legendary career as a frigate captain and admiral during the Napoleonic Wars.
One day after the landing at Fort George, Burgoyne’s column was at Fort Edward. Along the way most of their guns had been left behind, but they still had more than three dozen pieces. Bad news arrived in a dispatch received on August 3. Howe was not moving to support the invasion from Canada, and had sailed to attack Philadelphia. He left Lt. Gen. Sir Henry Clinton with enough troops to hold New York City, but not enough for a large expedition into the interior.
St. Leger, the third prong of the British expedition also never reached Burgoyne. He stopped to besiege a 750-man American garrison holding Fort Stanwix, some 100 miles west of Fort Edward.
Schuyler could afford to spare Arnold and 700 men to relieve Fort Stanwix. Arnold’s approach, along with carefully planted and greatly exaggerated rumors about the size of his relief column, dismayed St. Leger’s contingent of Indians. If they carried out their threats to leave, that would take away half of the British force, so St. Leger raised his siege and withdrew.
Hoping to replenish the reunited army’s shrinking store of provisions, Burgoyne sent Lt. Col. Friedrich Baum out on August 11 with a large detachment on a raid to seize food and horses for the Army of Canada. Although it supposedly was a secret expedition, and the detachment’s route was not publicly known, it was common knowledge in camp that Baum had orders to plunder the American supply depot at Bennington, Vermont.
At the Vermont border Baum ran headlong into a substantially larger American force under Colonel John Stark, which smashed Baum’s detachment on August 16 and mortally wounded Baum. They also defeated a relief force under Lt. Col. Friedrich Breymann.
Schuyler held his Continental army together over the course of the summer while slowing the British advance. He deliberately withdrew the American garrison from Fort Ticonderoga in order to save St. Clair’s men. His decisions, however, angered impatient politicians viewing the events from a distance who were desperate for a quick victory. Schuyler and St. Clair faced a court martial inquiry for alleged incompetence. Washington sent Gates to take Schuyler’s place as commander in the north.
Gates, a former British army officer, was a veteran of the French and Indian War. After leaving the peacetime army, he settled in Virginia and came around to supporting American independence. His pride led him into disputes over his seniority and status. Congress gave him command of the American army that made the ill-advised invasion of Canada in 1775. Before he could take charge, the army retreated into New York, and came under Schuyler’s authority. Removed from command, Gates and his associates pressed Congress to restore him. Congress consented, only to again remove him and give the army back to Schuyler. After the frustrating summer while Burgoyne advanced southward, Gates’ friends were able to get Congress to fire Schuyler once again.
Within a couple of weeks after Gates arrived to take command on August 19, reinforcements brought his army up to 10,000 men, including 6,900 Continentals. The Americans continued marching south.
Kosciuszko found an excellent defensive position on a hill called Bemis Heights, eight miles south of the community of Saratoga, and on the west side of the Hudson. High ground looked down on the Hudson and the road to Albany. The heavy forests would force the British to squeeze into the narrow road between the river and the American-held hill. Supplementing the works at Bemis Heights, Gates’ men dug a mile of earthworks arranged in a large L-shape to protect the hill, and bolstered it with 22 guns.
Burgoyne moved slowly for a few weeks, allowing supply wagons and bateaux to make their way toward him. When he was ready to press on to Albany, he had the choice of staying on the eastern side of the Hudson, or crossing to travel along the other bank. Albany was on the west bank of the river, as was Gates’ growing rebel army. Burgoyne opted for the western road. His army was ready to cross on September 11, but two days of heavy rain kept the army in place until September 13.
To get the army across the river Lieutenant Schank directed the construction of a makeshift pontoon bridge. The pioneers tasked with building the bridge lined up the army’s bateaux in a row and anchored them parallel to the river banks. They then placed planks atop the bateaux.
By this time, Burgoyne’s numbers had dipped to 3,800 British and 2,800 German regulars. His auxiliary forces at that point numbered 700 American Loyalists, 110 French-Canadian militia, 150 Indians, 150 sailors, and 300 camp followers.
Getting to Albany was impossible without pushing past the much larger American army, comfortably perched on a formidable defensive position. The British moved gradually toward the enemy. Pickets fought small, noisy clashes as enemy patrols pressing near their lines. A great alarm was raised on the night of September 15 when flames engulfed the tent of Major John Dyke Acland of the 20th Foot. The major’s Newfoundland dog had knocked over a table where the major kept a candle burning, and the candle rolled across the ground and set the canvas wall on fire. Acland was badly scorched trying to rescue his wife, Lady Harriet Acland, who unknown to him had managed to escape by slipping under the back wall of the tent.
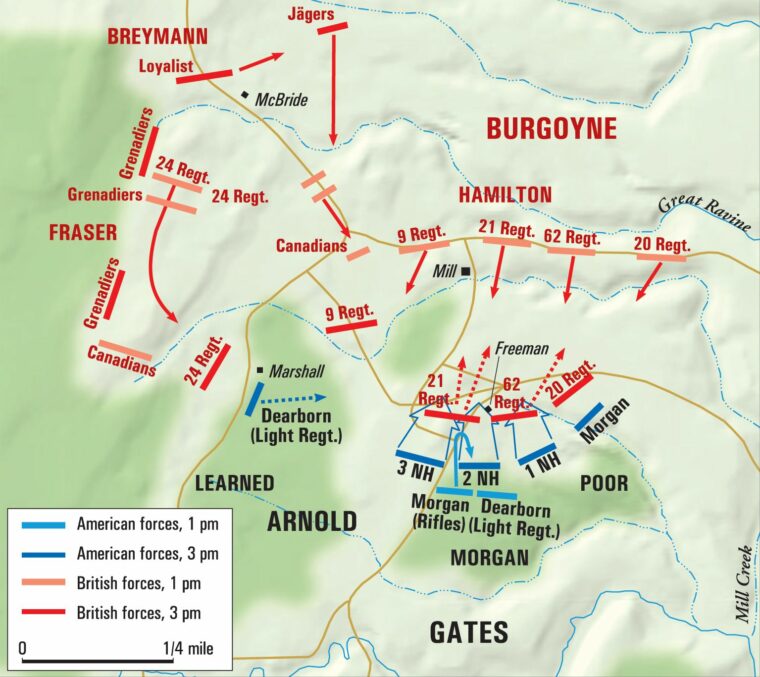
Burgoyne’s three divisions prepared for a major assault on September 19. Riedesel commanded the Hessians on the left along River Road, Burgoyne commanded the center, and Fraser led those on the right. Fraser had the key role in the British plans. To the right of the Continental works was an unfortified hill. If Fraser’s troops could secure that hill, which was higher than Bemis Heights, British cannons could drive the Americans off the heights, opening the way to Albany.
Gates was cautious in his moves and careful of the lives of his troops. He wanted to wait for the British to come within range of his lines. From their prepared defenses, and outnumbering the redcoats, the Continentals could expect to cost the British dearly as they repulsed the attack. But Arnold yearned to meet the British on the field. While Gates refused to order the whole army out into the open, he allowed Arnold to advance and confront the British with his division. [Ed. Note: There has been debate among historians, as well as some participants in the battle, regarding whether Arnold was actually on the field during this engagement. This debate began shortly after the battle and continues to this day.]
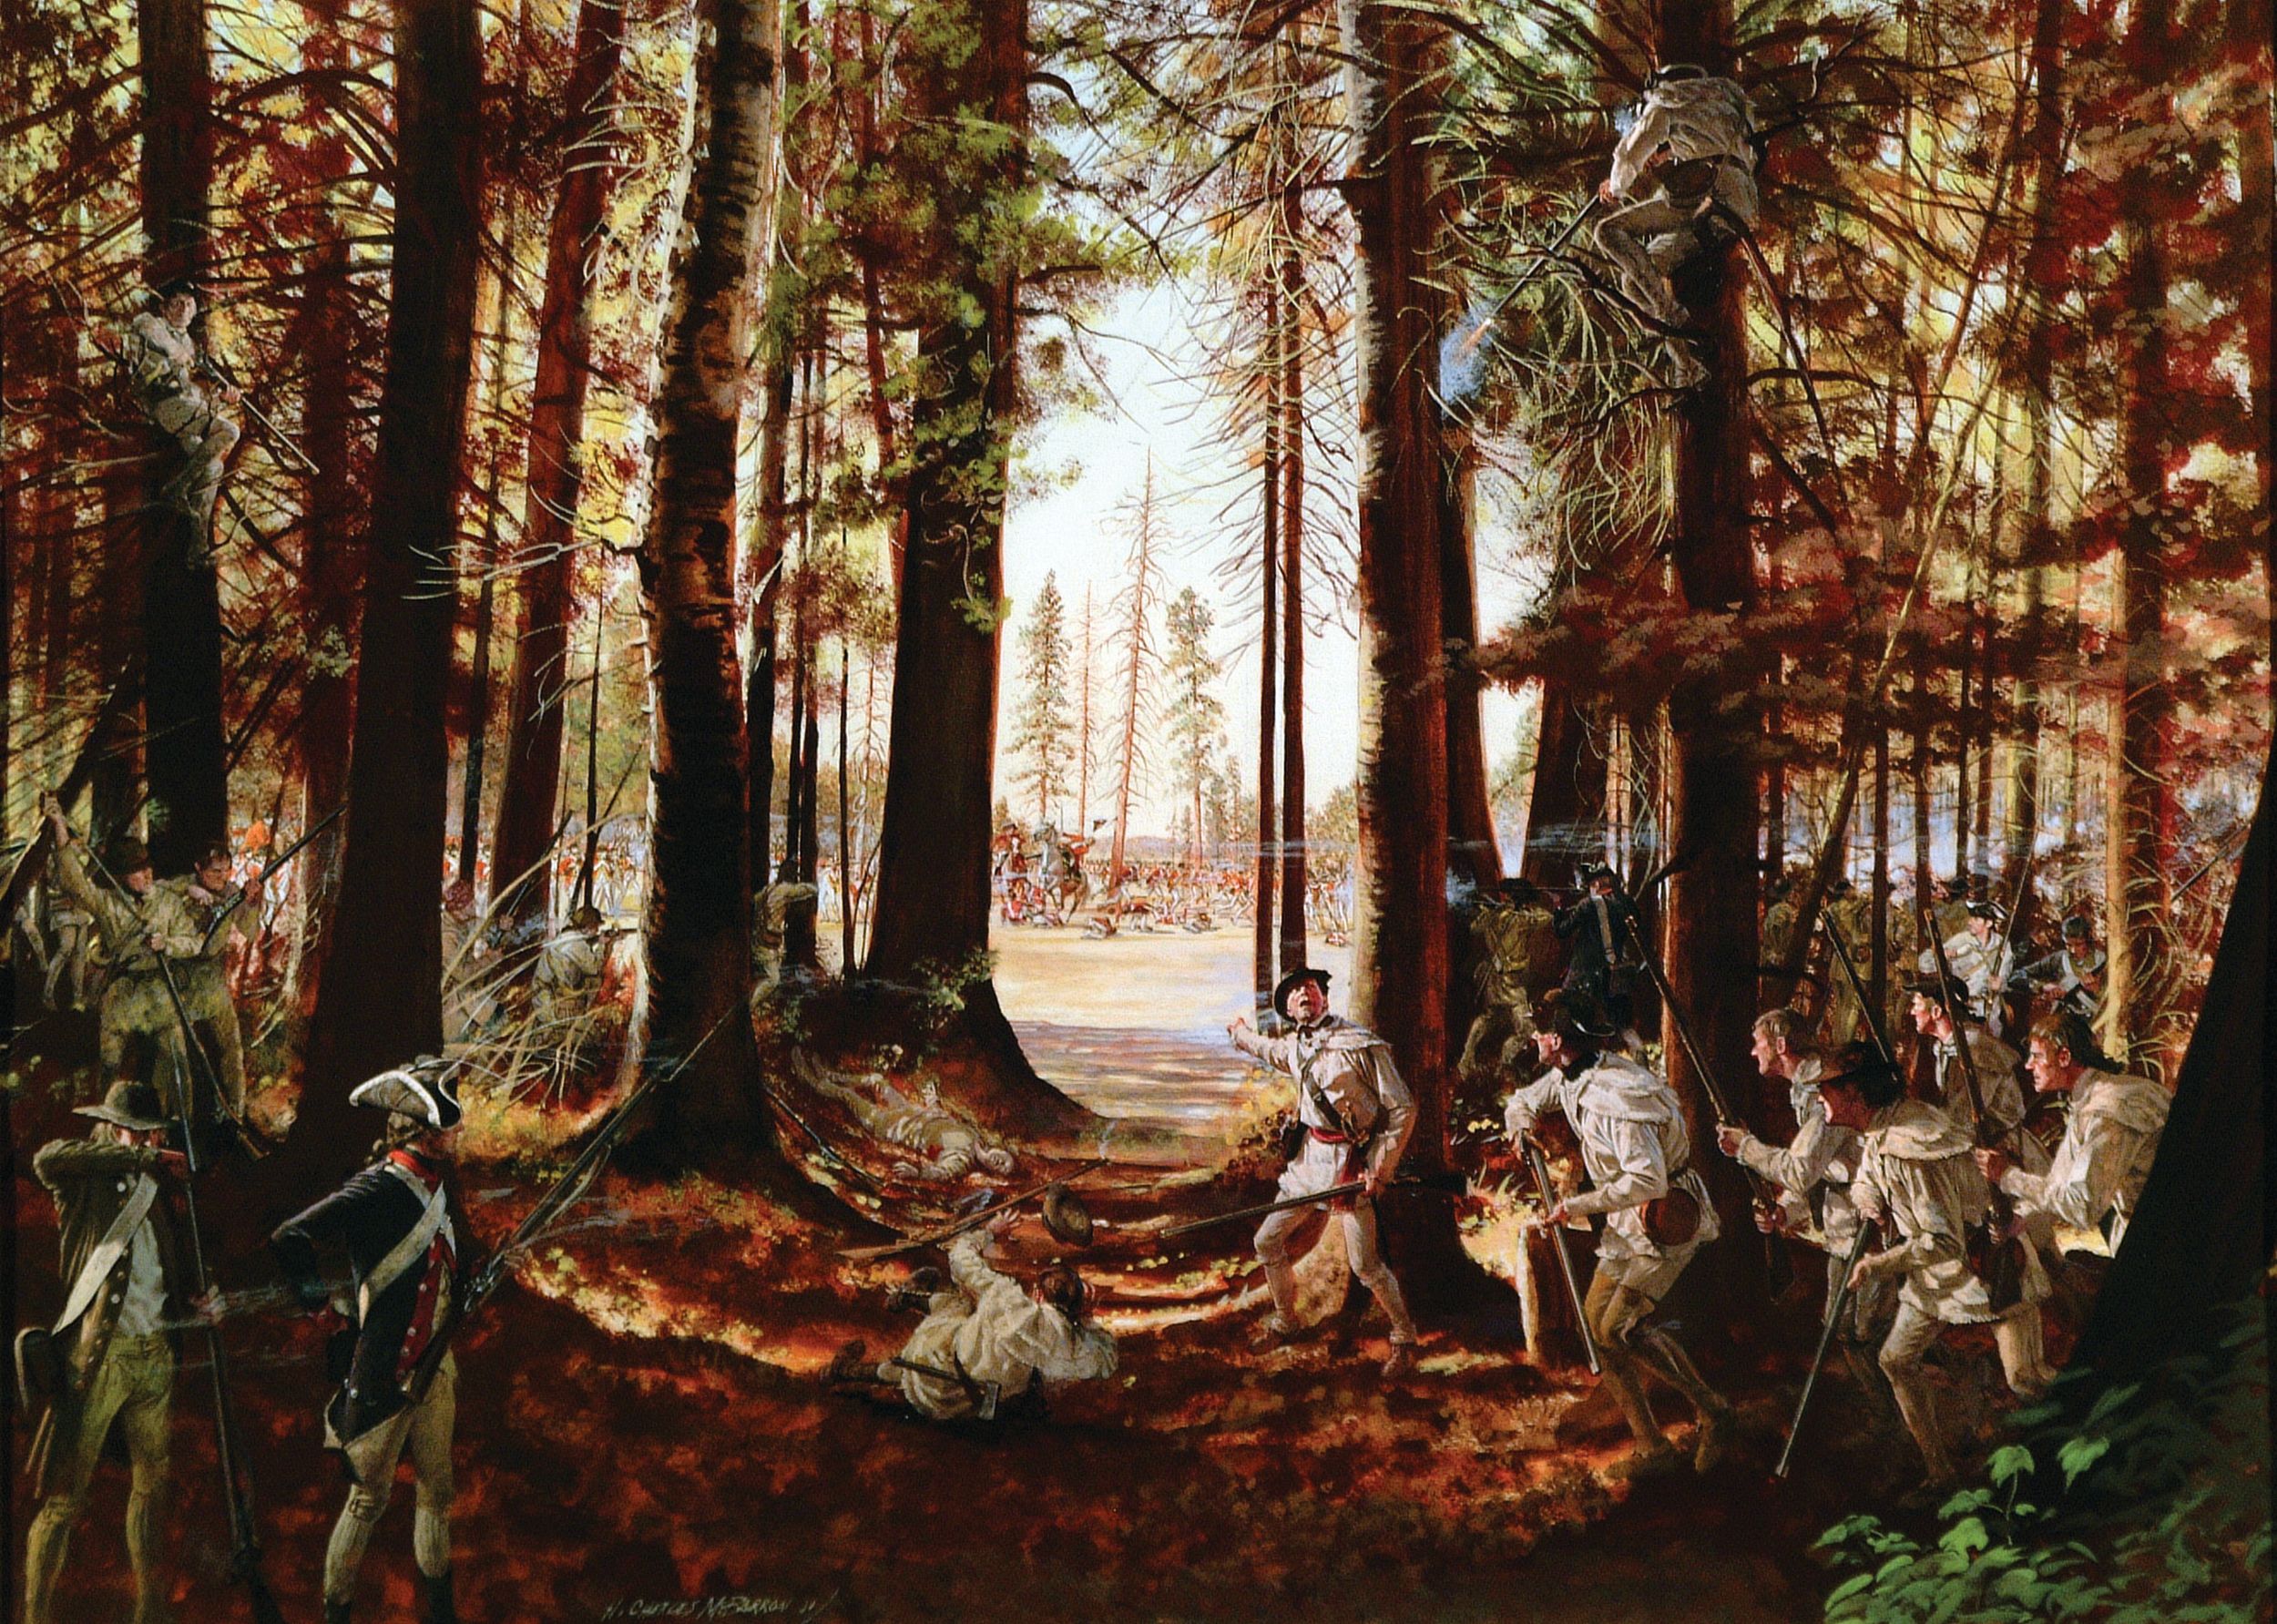
Colonel Daniel Morgan’s riflemen were the first to reach the enemy when they attacked Fraser’s right. The riflemen drove back a small force of French Canadians and Indians. Rifles had much longer range and far deadlier accuracy than smoothbore muskets, but could not mount a bayonet. It also took much more time to ram the tight-fitting rifle ammunition down the muzzle than to load a musket. A battalion of musket-bearing troops under Major Henry Dearborn was to accompany Morgan, protecting the riflemen with their quicker-firing, and bayonet-equipped, weapons.
Overconfident from their success, Morgan’s men ran into more of Fraser’s troops. Following their initial contact with the enemy, the riflemen were scattered and well ahead of Dearborn’s protection. Overwhelmed by greater numbers of British muskets, Morgan was driven back.
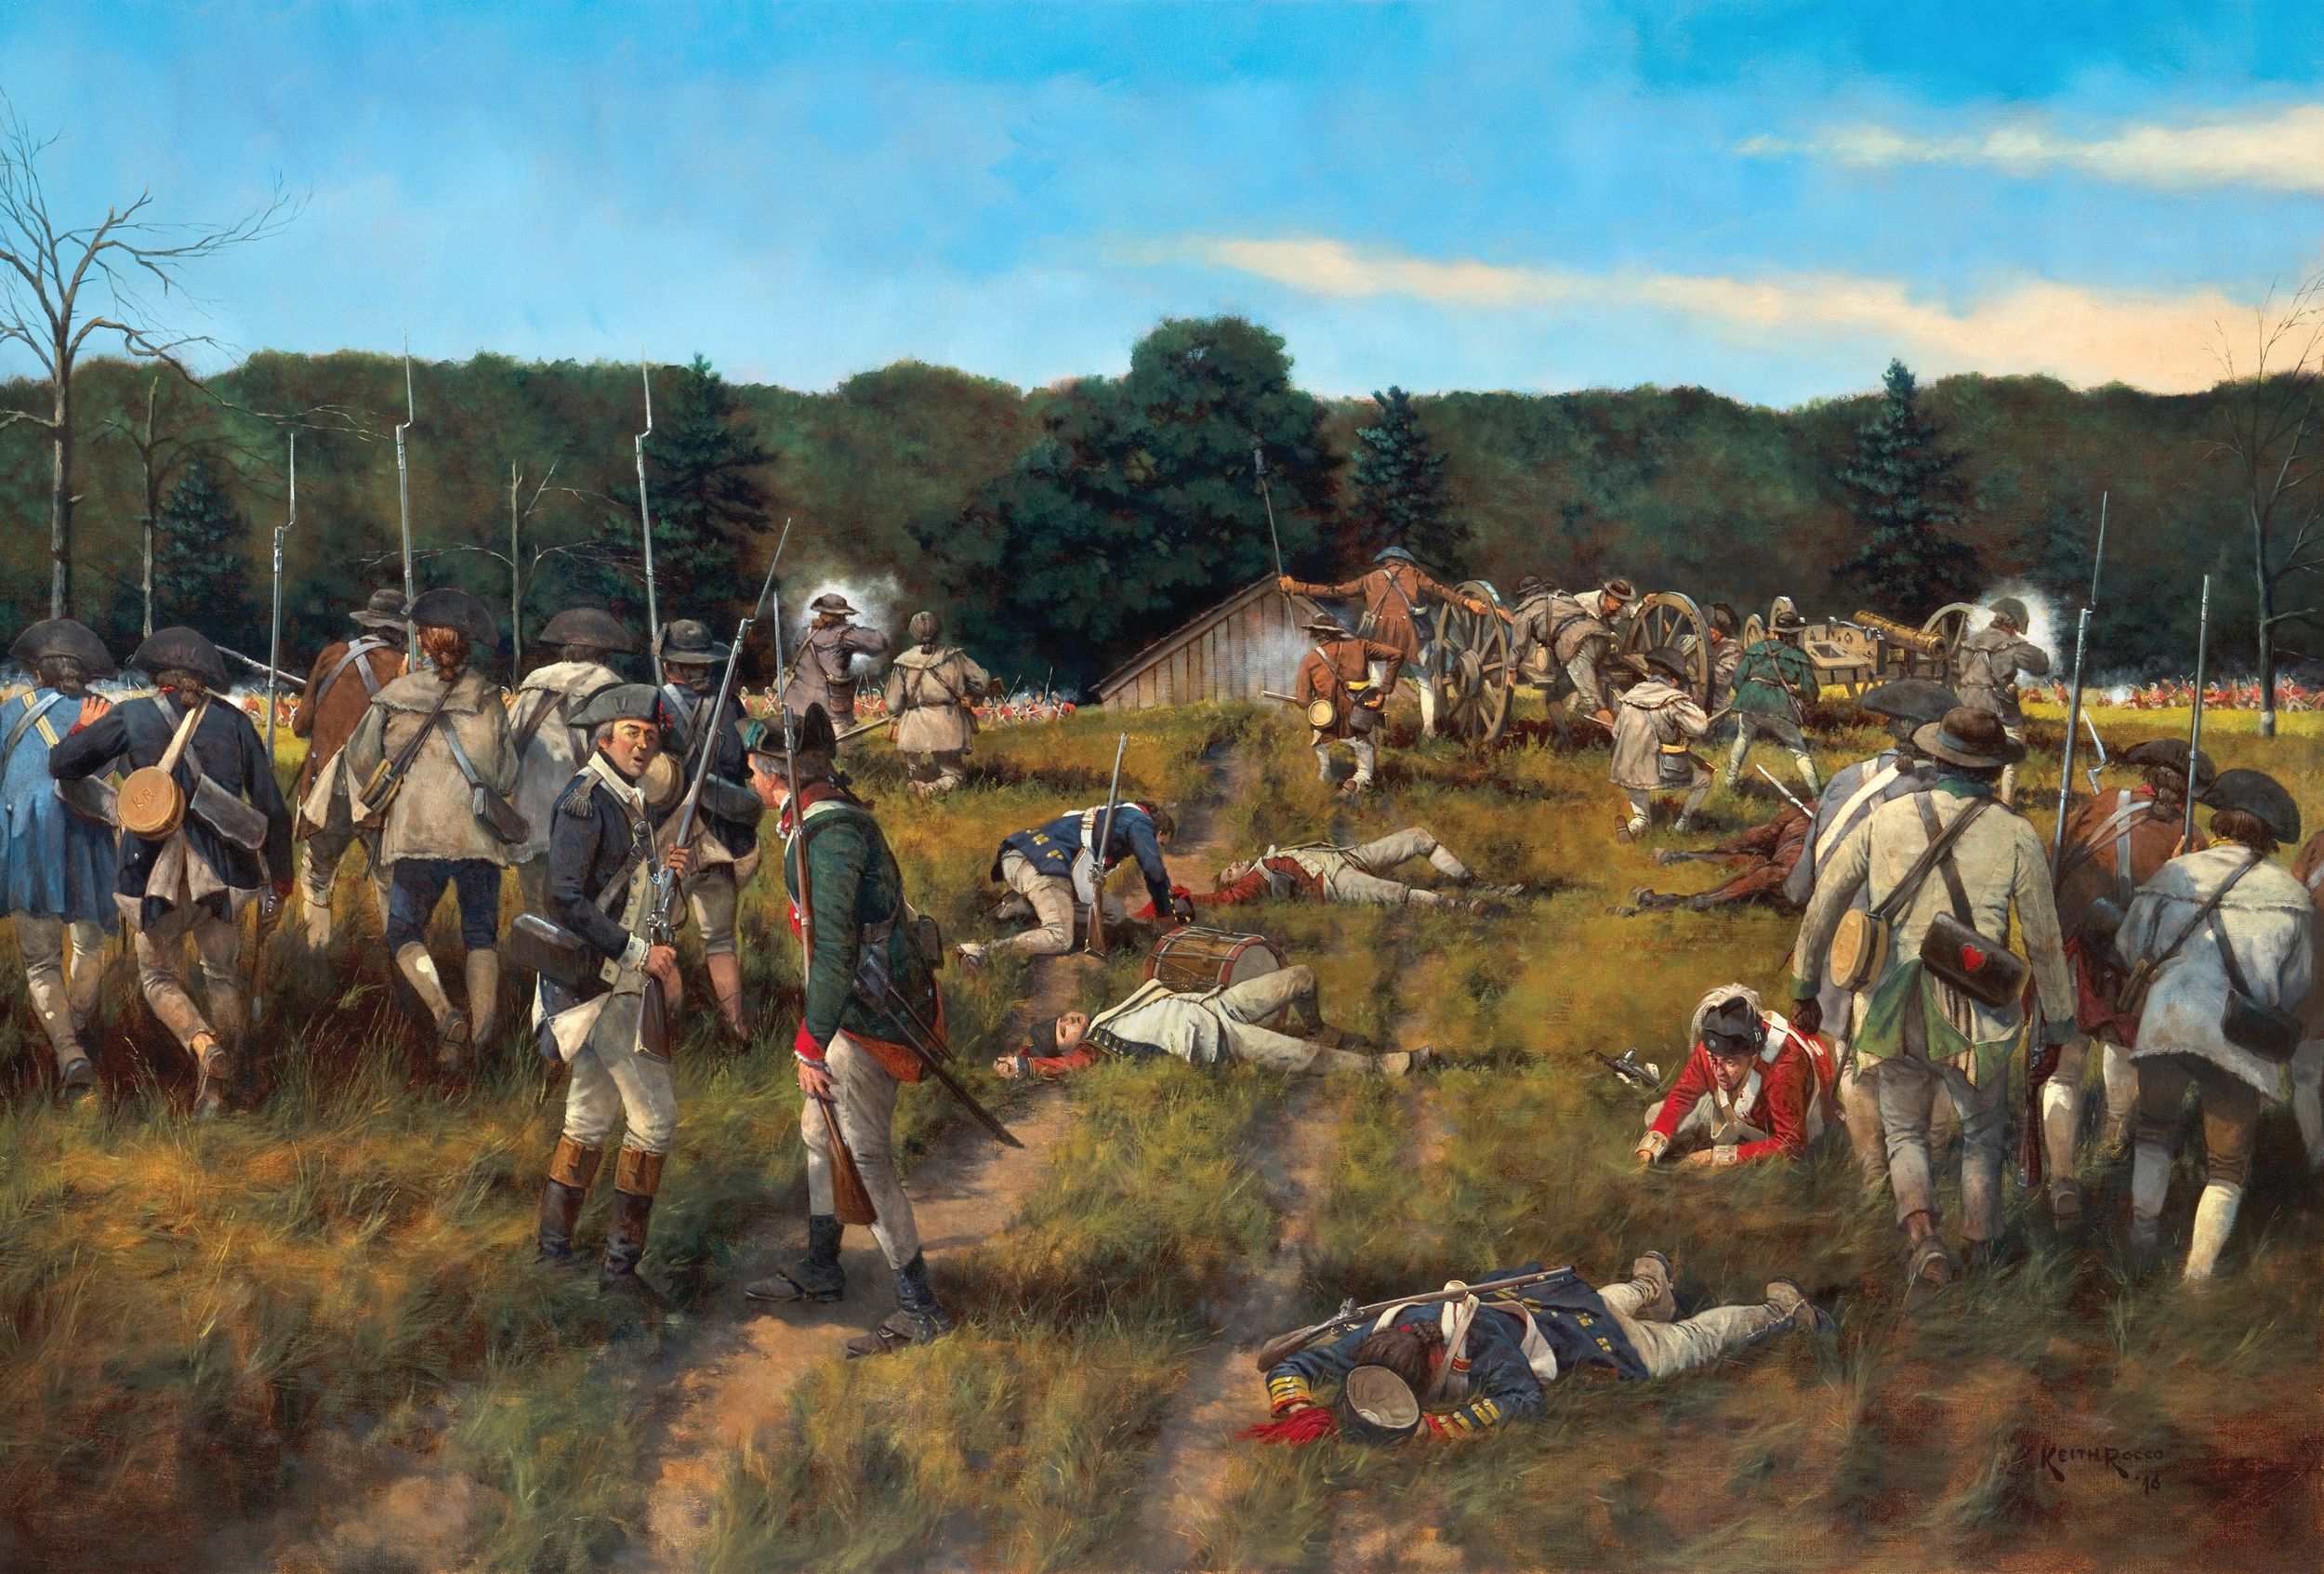
Burgoyne and Brig. Gen. James Hamilton pressed ahead in the center, reaching John Freeman’s Farm. One mile north of Bemis Heights, the Freeman’s residence was leased from Schuyler. The Schuyler family had owned land in the battlefield area for many years, and Schuyler himself lived on his estate just seven miles to the north of the battlefield. Freeman, as well as local tavern owner Jotham Bemis, whose name would be given to the hill held by Gates, were Loyalists.
Arnold rallied his troops. Fraser was separated from the rest of the British by several hundred yards. Pouring into the gap in the British line, Arnold’s troops fell upon Burgoyne’s force in the center. The 21st Foot, part of Hamilton’s 2nd Brigade, fell back exposing the neighboring 62nd Foot to the American attack. Phillips led the 20th Foot in a bayonet countercharge.
Burgoyne’s force teetered on the edge of disaster when Arnold pleaded with Gates to send forward more men into the heavy fighting, but Gates refused to risk any more of his troops.
Riedesel saved the center by throwing most of the left wing into the fray. The Germans and four cannons pounced on Arnold’s flank, saving Burgoyne. It was now late in the day and Lieutenant Digby’s men, barely able to see in the smoky gloom, nearly fired into an approaching German regiment. They had mistaken the dark jackets of the German troops for those of the Americans. The arrival of night put an end to the fighting.
Although the British held off the Patriots, their battered force suffered another 600 casualties. In contrast, Patriot losses totaled just 350. Nonetheless, the redcoats thought there were good enough prospects to renew the attack. On the day after the Freeman’s Farm clash, according to Phillips, Fraser felt the men were too worn out from the previous day’s fighting, and a day of rest would pay off with a much more effective attack. Oddly enough, a resourceful British courier was about to change the course of the campaign.
No word from either Howe or Clinton had reached Burgoyne since early August. This long gap in British communications ended when a courier sent by Clinton evaded the American patrols and reached the British camp late on September 20. Clinton’s message notified Burgoyne that he intended to attack Fort Montgomery, which was situated 100 miles south of Saratoga, on September 20, 10 days after he dispatched the message.
Elated by the prospect of Clinton’s aid, Burgoyne sent the courier back with a message imploring Clinton to create a diversion compelling Gates to detach part of his army. Meanwhile, Burgoyne refrained from renewing the attack on Gates. He planned to hold his position until October 12 in hope that Clinton’s maneuvers would favorably alter his situation.
Commanders often sent duplicate messages by different couriers to make sure at least one would get through. Couriers needed impressive patience and nerve to trek through long stretches of enemy-held territory. Something of their ordeals is seen in the story of one Sergeant Daniel Taylor. He was entrusted with a note from Clinton to Burgoyne, which was hidden inside a hollow silver bullet. Taken prisoner by the Americans, Taylor was brought before American Maj. Gen. James Clinton. His captors saw Taylor quickly swallow the bullet. A surgeon administered an emetic. Taylor vomited up the bullet, but managed to snatch it up and swallow it again. The courier refused to take another dose of the emetic until General James Clinton threatened “to hang him and find it with the surgeon’s knife.” Two days later, Taylor was hanged as a spy.
Burgoyne’s main camp held a reasonably strong position facing the Continentals, but his right was vulnerable. The British quickly constructed two new redoubts on the recent battleground, which they possessed after the September 19 clash.
The Balcarres Redoubt, which was the larger of the two works, was constructed of timber and earth and pierced for eight guns. Its walls included John Freeman’s house and barn. On the extreme right of the British defenses, the smaller Breymann’s Redoubt stood on a hill. The main works here were earth-filled walls of rails. The builders had piled the rails horizontally to a height of seven feet and buttressed them with vertical posts.
Four hundred yards separated the Balcarres Redoubt and the Breymann Redoubt. In between the two redoubts, 100 French-Canadian militiamen held two cabins that they had fortified.
Although the fighting was not renewed for some time, the Americans were busy. One day after the battle, a force operating far to the rear captured the British flotilla on Lake George. Although a prospective siege of Fort Ticonderoga was quickly abandoned, the actions menaced Burgoyne’s potential escape route and made their isolated position all the more periolous.
Morale sank in the gloomy British camp. Far from likely help, they were fast consuming their food and had little prospect of replenishing their supplies. Wounded men lingered under the care of the medical staff, all too often until death. Living officers attended auctions of the possessions of their dead comrades.
A night of heavy rain washed away soil and sand from many hastily dug and shallow soldier’s graves, confronting the British with the macabre sight of lifeless bodies exposed to the morning sun. Night after night the eerie howling of wolves, lured to the battlefield by the corpses in their shallow graves, kept even the most exhausted men grimly awake.
Gates’ troops had much higher spirits. A rumor swept through the camps that Burgoyne had been killed. Apparently this mistake arose because one of Burgoyne’s aides, Captain Charles Green, was shot from his horse when he was near Burgoyne. Green liked appearing in a particularly splendid uniform, and he made a tempting target for the enemy riflemen aiming at redcoat officers.
Arnold and Gates were embittered rivals from their jostling for command. After the September 19 battle, their quarrel escalated. Gates relieved Arnold of his command, leaving him at loose ends.
At the beginning of October, Burgoyne’s troops waited for their commander’s next move. Retreat meant a difficult and risky journey for his battered army. A general retreat might allow Gates to release several thousand men to strengthen Washington’s main army. On October 3, to stretch out their diminishing stores, the British reduced their soldiers’ rations.
Burgoyne held a council of war on October 4. He proposed a plan to leave 800 men to guard their supplies and send the rest of the army to turn the American left. Phillips, Riedesel, and Fraser all found the plan too risky. So Burgoyne proposed a second, more flexible plan, which called for committing only 1,500 men to the attack. If repulsed by solid resistance, the foray could be passed off as a reconnaissance. Should fortune smile upon the British, they might find a way to gain the hill to the right of Bemis Heights, and push the Continentals out of the way. Hedging their bets with a practical goal, the British also would mount a heavily guarded foraging expedition to harvest the wheat that was growing between the lines of the opposing armies.
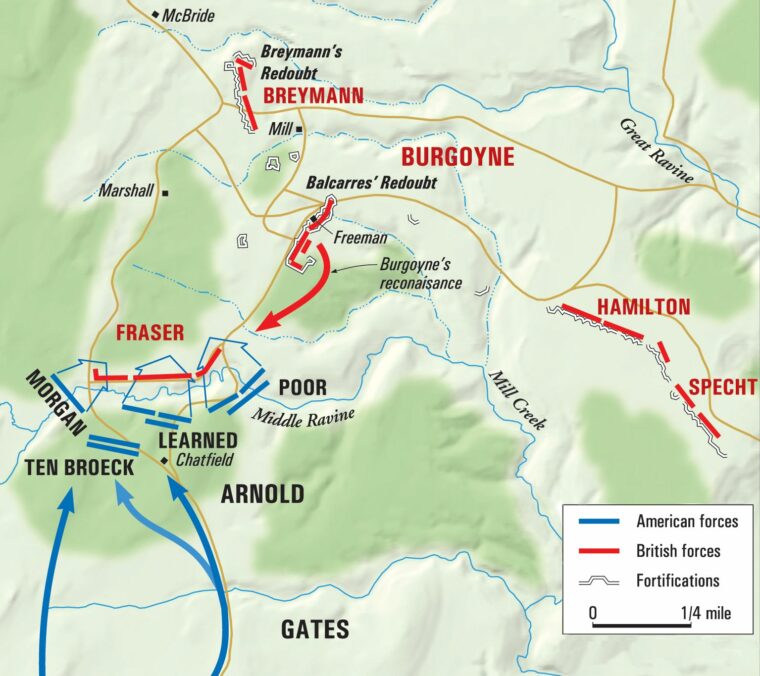
At noon on October 7, Burgoyne assembled 1,500 men with 10 cannon and led them out of the British camp. Fraser led the vanguard consisting of the 24th Foot and Alexander Lindsay, the Earl of Balcarres’ battalion of light infantry. He was followed by Riedesel with a German detachment and a battalion of grenadiers under Major Acland, who had returned to duty after recovering from injuries suffered in the fire in his tent.
The Americans had posted pickets at Joshua Barber’s farm, which was situated a half mile southwest of the British redoubts. They rushed back to report the sudden appearance of a heavy British force. Lt. Col. James Wilkinson, who served as deputy adjutant general on Gates’ staff, went forward to observe the enemy advance. Fraser had deployed Lord Balcarres’ troops on his right. The light infantry disappeared into the woods west of the field. The 24th Foot and the Germans held the center, with the grenadiers holding the left. Burgoyne, Phillips, and Reidesel perched on the roof of Barber’s cabin, scanning with their field glasses but seeing little beyond the farm but a panorama of forest.
Wilkinson reported the enemy’s position to Gates, and warned that the British would try to attack the American left. Gates sent Morgan’s riflemen in first, this time closely supported by Dearborn. Brig. Gen. Enoch Poor and Brig. Gen. Ebenezer Learned followed behind with their two brigades.
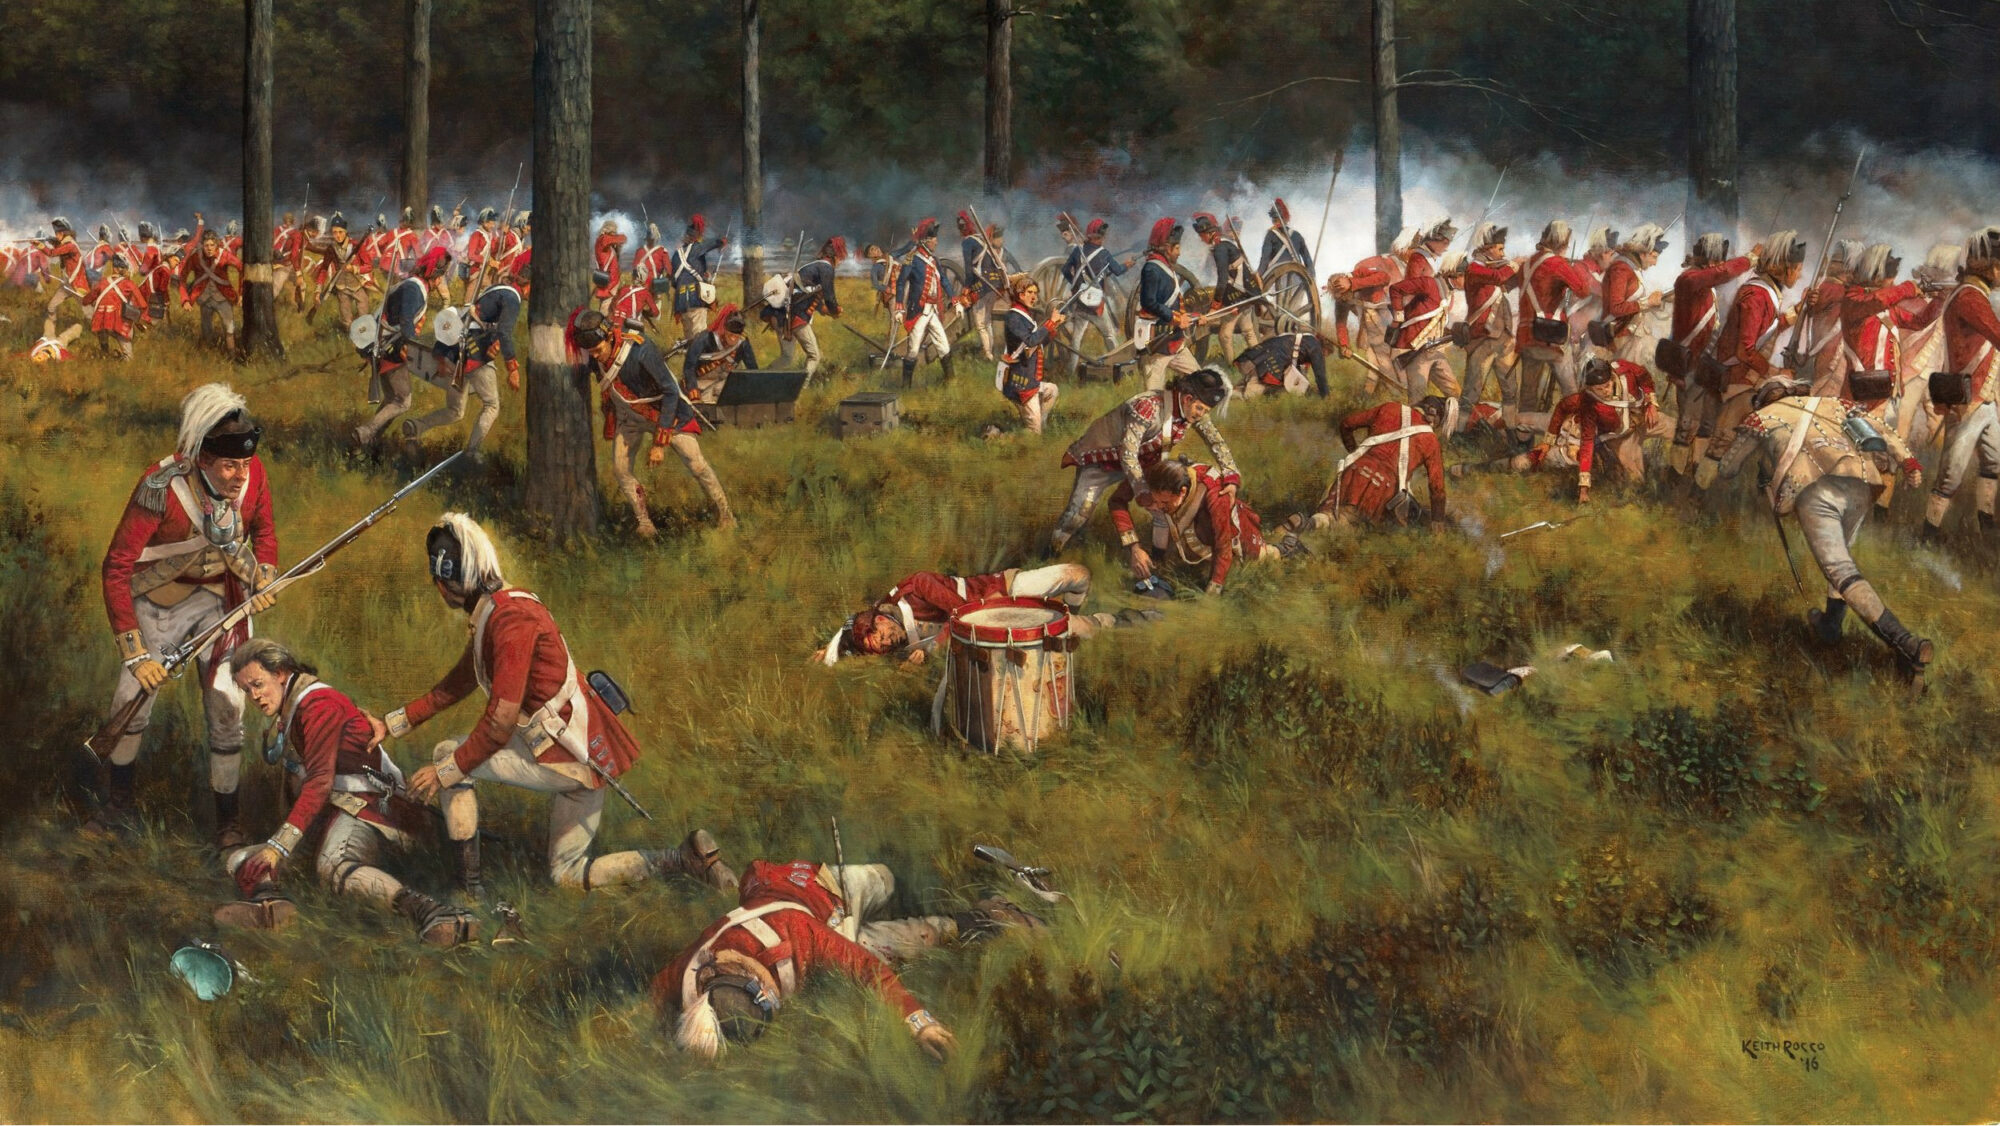
Morgan struck first, falling upon the British right. Some of Fraser’s sharpshooters and Indians temporarily slowed Morgan down. In the meantime, Poor confronted the grenadiers. Acland’s outnumbered men wavered amid a massive volley from Poor’s brigade that cut down numerous men and left Acland shot in both legs. The Americans surprised the grenadiers with a bayonet charge, and drove them back.
Learned’s advance against the 24th Foot and German troops was slowed by a pair of German 6-pounder guns. Although Arnold had no official place in the chain of command, he appeared on the field and took it upon himself to send three of Learned’s regiments to charge the enemy line. For a time, they made little headway.
To the right of the 24th Foot, Morgan’s riflemen whittled away Balcarres’ men. Fraser, concerned about this threat, rode over to steady the light infantry. A rifle bullet tore into his stomach, and he fell with a mortal wound.
Fraser’s fall shocked the outnumbered British and Germans. Worried about the potential collapse of his line, Burgoyne ordered the men in the field to fall back to the redoubts.
As the redcoats rushed to their field fortifications, Poor’s Brigade focused on a small outwork on a rise that shielded the Balcarres Redoubt from the north. The Americans overran the work, but took such heavy casualties that the spot became known afterwards as “Bloody Knoll.”
Although other small outworks fell, the main redoubts with their artillery and thick walls held firm. Arnold and other officers pressed the attack against the Balcarres Redoubt, but the British held.
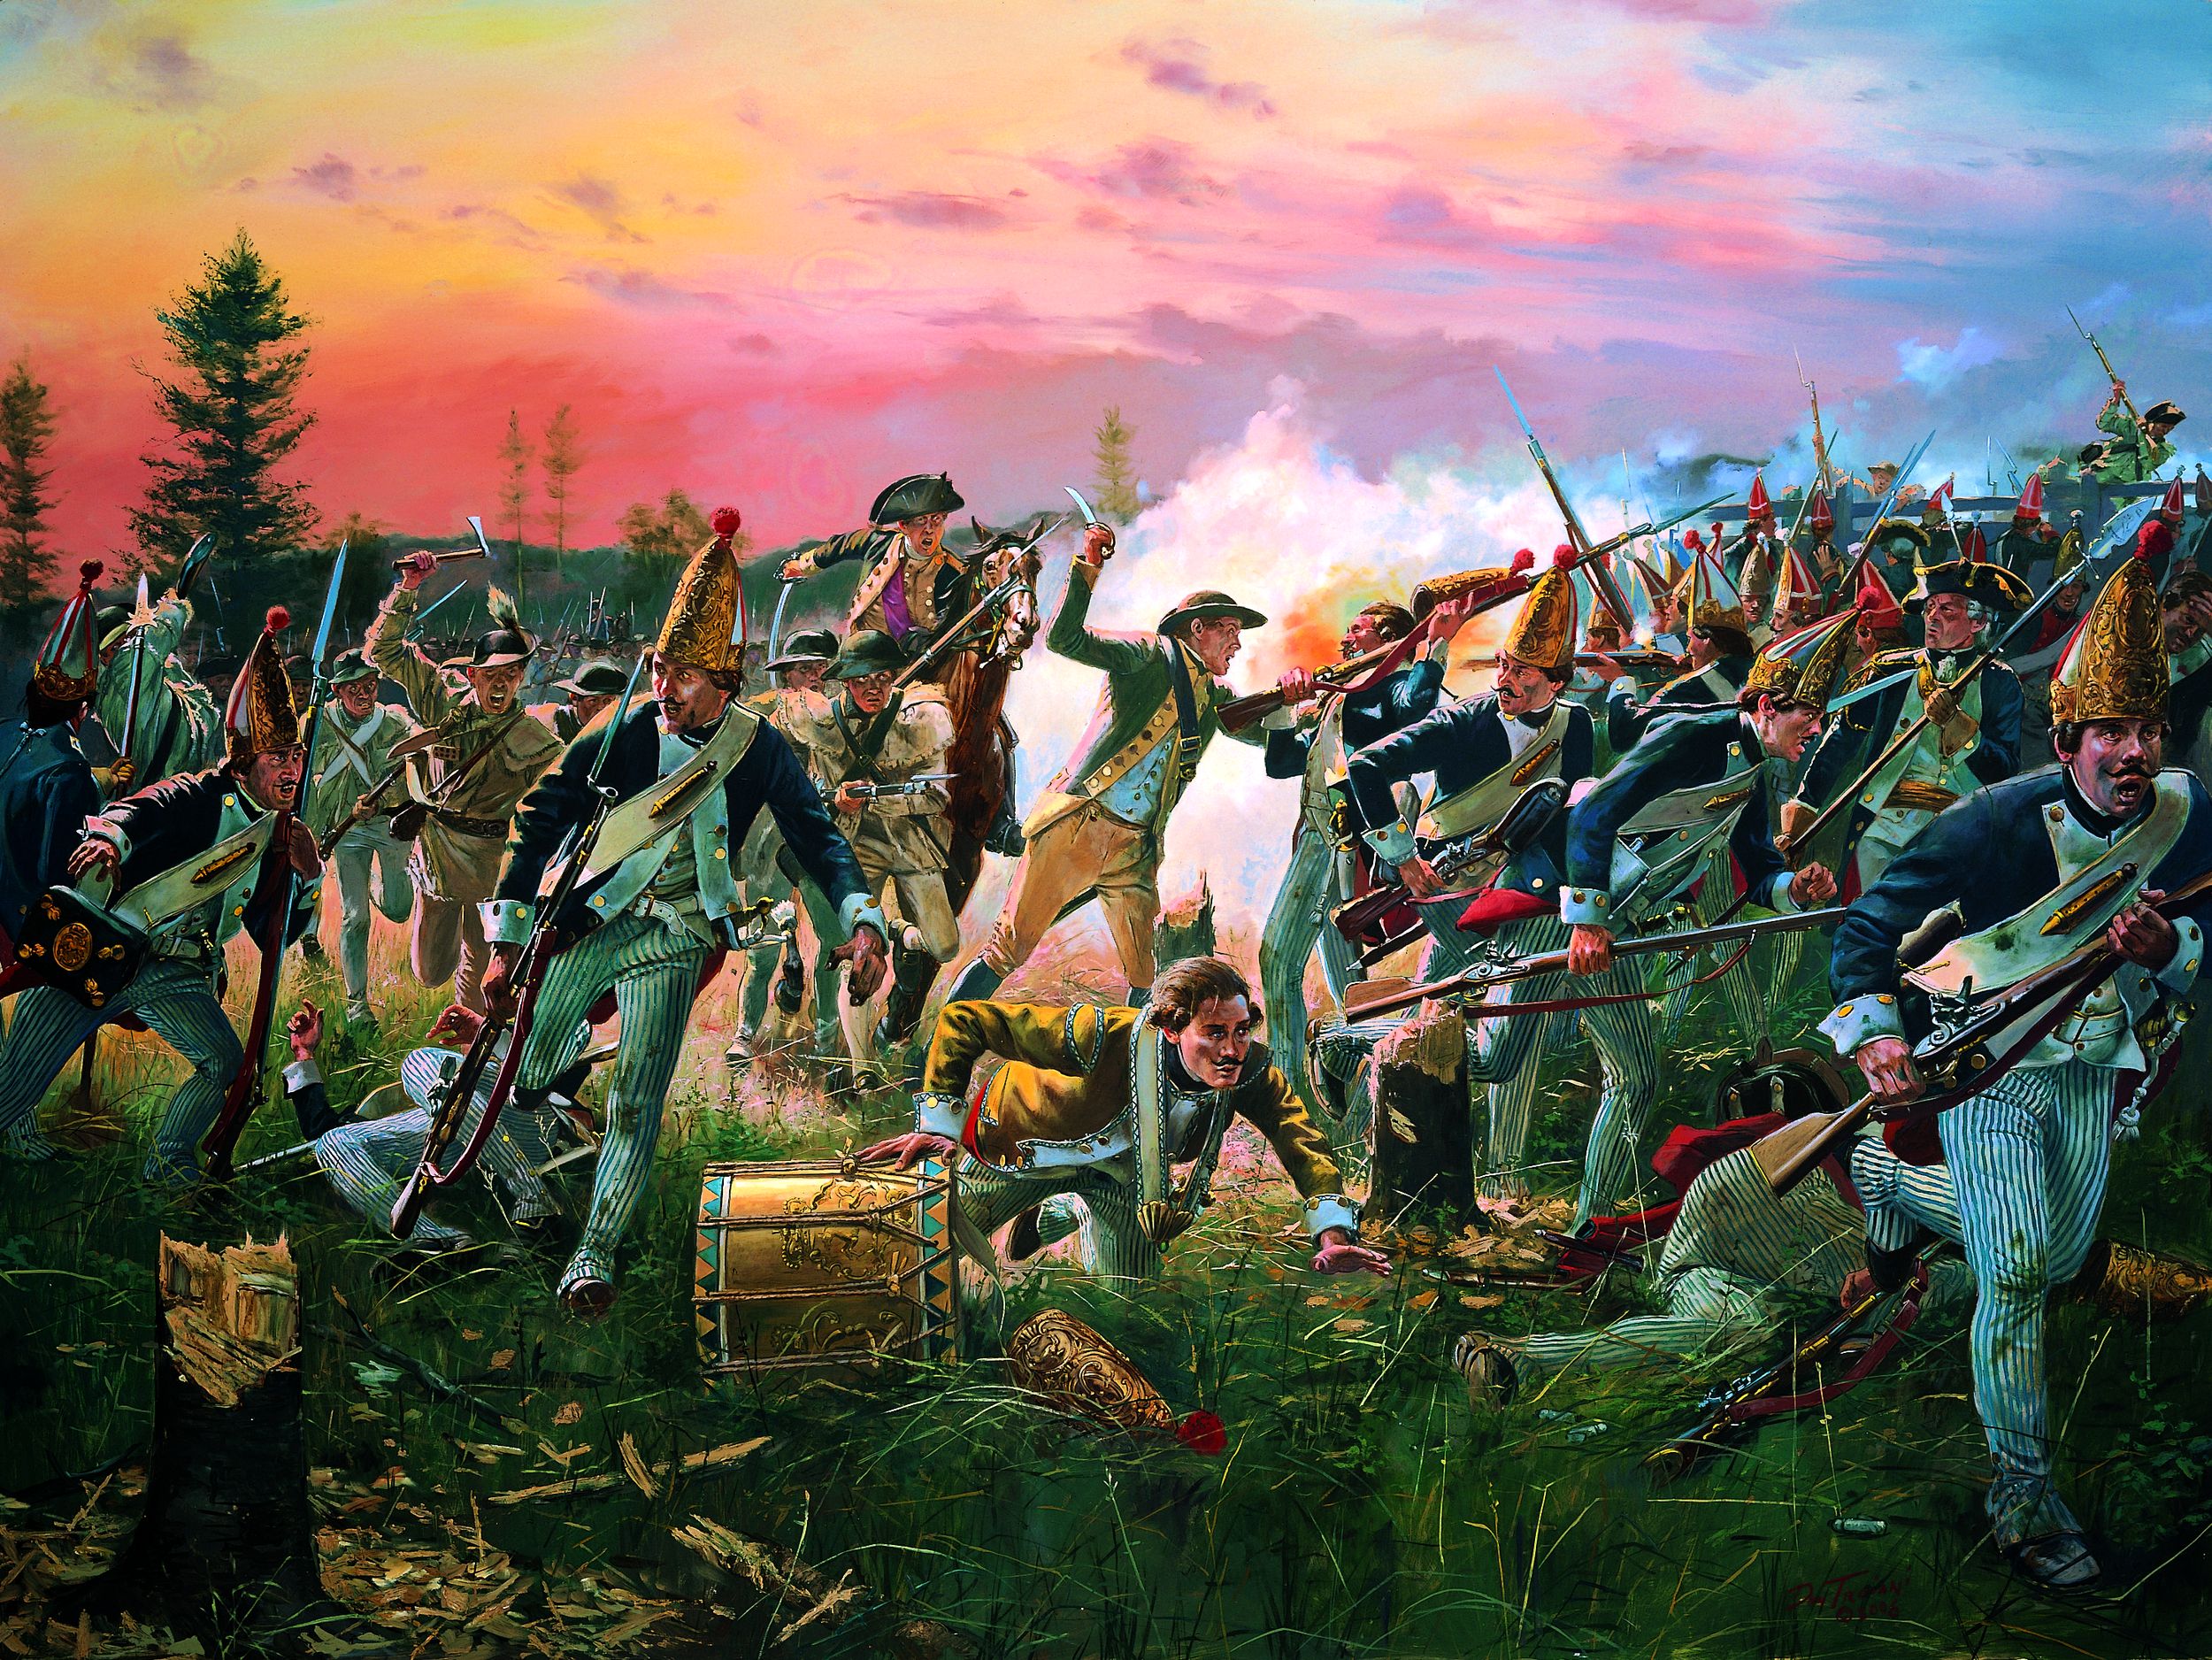
A short distance to the right, though, the isolated Breymann Redoubt was also a target of determined attack. The smaller work was held by Lt. Col. Heinrich von Breymann and 200 German troops. Arnold rode ahead of his men to urge them onward. The general was shot in his left leg, but his men swarmed over the walls and poured into the German-held redoubt.
Breymann was outraged at the failure of his men to stop Arnold’s attack. Swinging his saber in a blind rage, he hacked down four of his men with his saber until a British soldier halted the rampage by shooting him dead.
The capture of the Breymann Redoubt threatened the entire British army. Burgoyne ordered the work retaken, but it proved impossible. Just as in the first clash of September 19, darkness brought a halt to the firing. The British suffered an additional 700 casualties. In contrast, the American lost just 150 men, most of who had fallen in the assault on the Balcarres Redoubt.
With the vital Breymann Redoubt lost, along with a substantial portion of his irreplaceable troops, Burgoyne decided to withdraw toward Ticonderoga. As details of soldiers kept the campfires blazing bright, the rest of the dispirited redcoats abandoned their works in the gloom of the night. They gathered near the Hudson.
Under sharp sniper and artillery fire, Burgoyne’s troops spent October 8 huddled near the river, preparing their withdrawal. Fraser died of his wounds in the morning. Before dark, a chaplain conducted an Anglican burial service. In the distance, American gunners saw a small crowd gathering. Unaware of the crowd’s purpose, Gates’ guns opened fire and dropped cannon balls around the mourners. The incoming shot threw dirt on the chaplain and the funeral party, but did them no harm. After the burial, all through the night of October 8-9, the British marched out of their camps and headed north.
Burgoyne intended to cross the Hudson, but the morning of October 9 revealed that American troops were dug in to block the intended crossing. The British could do nothing but slog ahead on the west bank of the river. Rain poured down, and hooves, wagon wheels, and human feet alike sank deep into the muddy ground.
The march slowed to a crawl until the redcoats made camp near Saratoga, taking over the Schuyler farm. After the grim day of trudging through the rain and mud, the bone-weary soldiers “although wet with rain, were indisposed to cut wood for their fires, and rather desirous to lie down in their drenched clothes,” recalled Sergeant Roger Lamb of the 9th Foot.
Lamb and a few of his fellow redcoats found shelter in the hen house of Schuyler’s farm. But the little building caught fire and the tired soldiers “would have been consumed,” said Lamb, were it not for some alert officers who spotted the blaze. Lamb and the others then “joined their companions, who were unhoused and exposed to the wet and night air,” he said.
Elements of the Continental Army drew near, and the British dug new entrenchments rather than risk being attacked while they were on the move. Musket and cannon fire menaced the trapped redcoats, but the simmering attacks never grew into another battle. Outnumbered and surrounded, Burgoyne requested terms on October 13.
Gates demanded unconditional surrender, but wavered and after some negotiations accepted Burgoyne’s offer. Surrender terms were quite lenient, and included the provision that the British troops would return to England, but would not fight again in the war.
After that, Burgoyne learned that Clinton had captured the Continental outpost at West Point on the Hudson. Burgoyne’s hopes soared once again, and he tried to stall the final arrangements in the hope of delaying affairs long enough that Clinton could somehow get him off the hook.
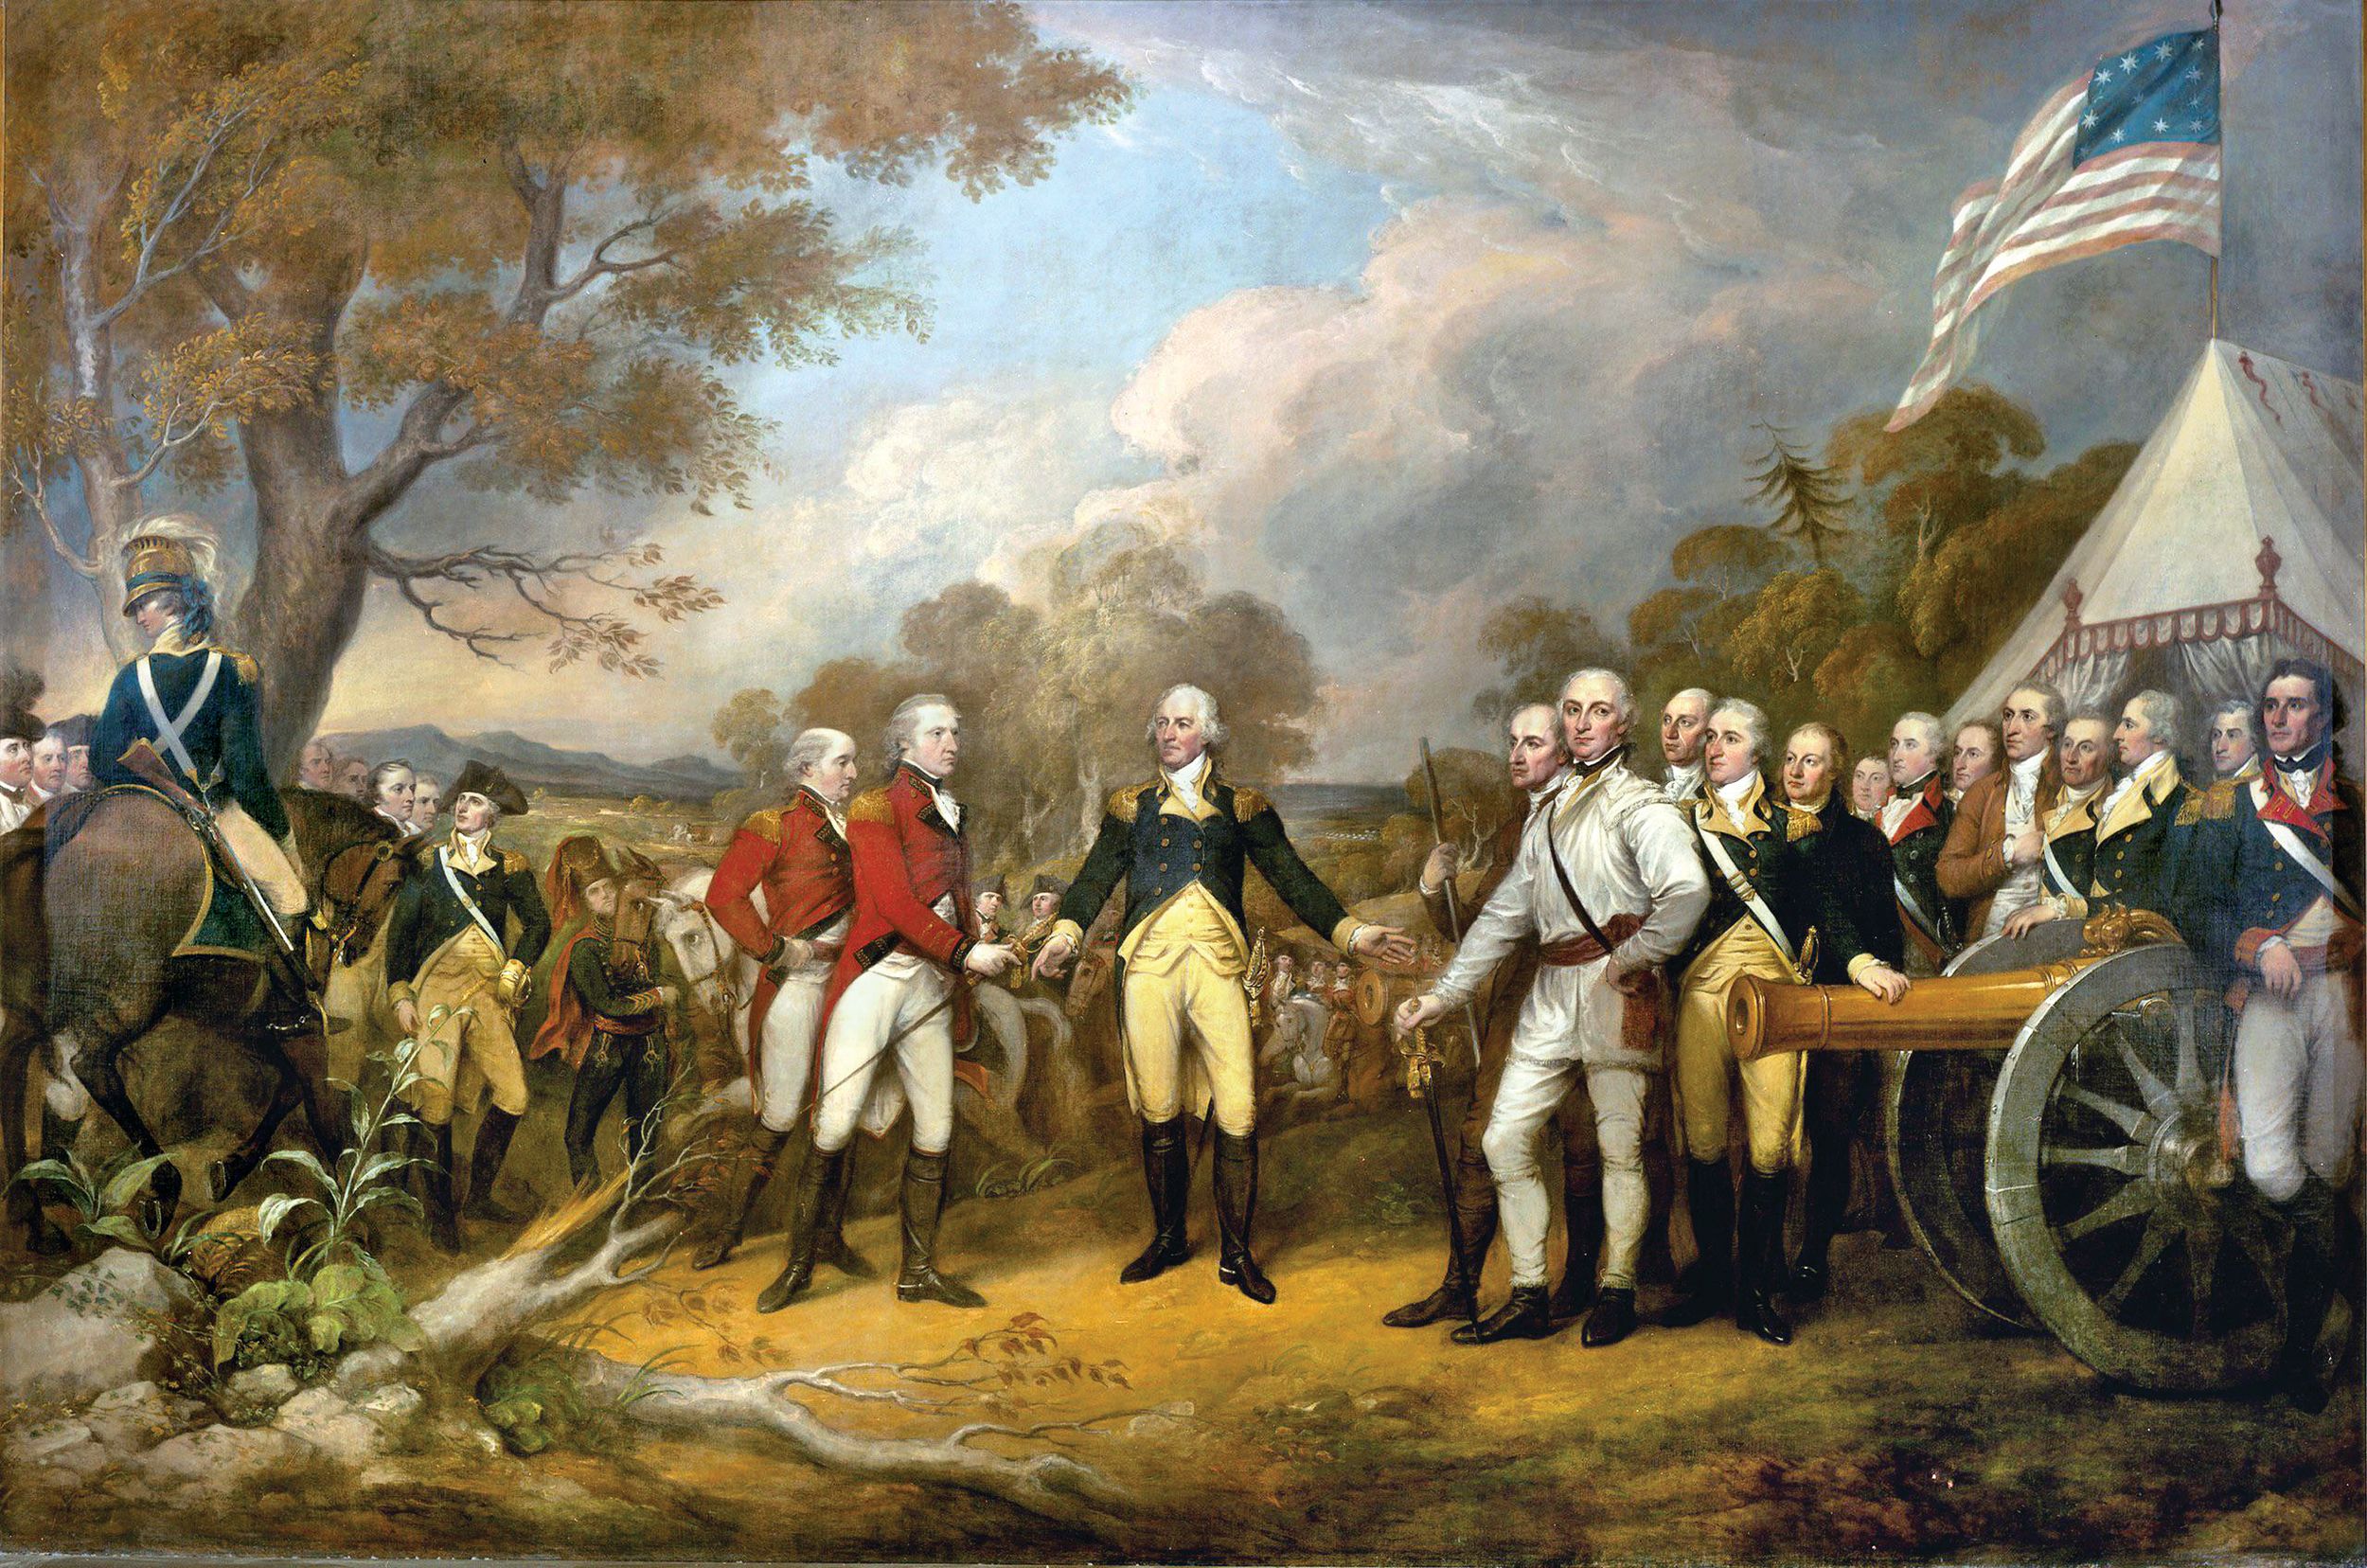
But help never arrived. Burgoyne eventually gave up his trapped army on October 16. As he signed the necessary papers at Saratoga, the two clashes fatal to the British cause became better known as the Battle of Saratoga, rather than the battles of Freeman’s Farm or Bemis Heights. British and German troops marched to stack their muskets near the Hudson at Fort Hardy, another one of the many abandoned outposts of the French and Indian War. The disarmed redcoats marched back, passing between two long files of Continentals and militia.
The articles of the Convention of Saratoga spelling out the terms of surrender applied to the 3,400 British, 2,500 Hessians, and 600 women and children who were camp followers. Six of the captured officers also were members of the British Parliament. The Americans allowed the French-Canadians and the American Loyalists to depart, as well as sailors from the Royal Navy. With the prisoners came a windfall for the American forces. They took possession of 37 cannons and mortars, 4,647 muskets, 72,000 cartridges, and piles of other equipment. Burgoyne offered his sword to Gates, who refused to take it.
After the dignified surrender ceremony, events would not run as easily as the captives hoped. The long march under guard of the 5,900 troops of the Convention Army to Cambridge, Massachusetts was, in the words of Patriot Mercy Otis Warren, “solemn, sullen, and silent.”
While the soldiers of the Convention Army waited for passage to England, angry delegates in the Continental Congress tried to cancel what ardent Patriots saw as an overly lenient agreement. At last, they declared that the prisoners would not be paroled until London ratified the terms.
The British Crown refused to enter into negotiations with the Patriots whom it continued to regard as rebels. Burgoyne and a few officers obtained parole and left for England, but most of the prisoners stayed under guard. Many hundreds of the soldiers escaped, and fewer than 1,000 were still held by early 1781. The last were released only in 1783, after the Treaty of Paris ended the hostilities.
Saratoga marked the high point of the checkered career of Benedict Arnold. Capable of inspired leadership, and plainly displaying great courage in both of the battles of Saratoga, his pride and ambition doomed his career. He resented the promotions of other officers, including some incompetent ones, ahead of him. Corrosive jealousy combined with the lure of money led him to collaborate with the British.
At first Arnold sold military intelligence, but he then developed a plot to hand over the stronghold of West Point, which the Patriots again held, to the British. The plot failed in 1780, but Arnold escaped to the British and received a brigadier general’s commission. It was small recompense for turning himself from an American hero into the very archetype of a traitor.
The importance of the outcome of the clash at Saratoga to the Continental cause can hardly be overestimated. Long wishing to even their score with the British after the Seven Years’ War, the French eyed the growing colonial rebellion with great interest. But as in the case of the Jacobite rebellions of 1715 and 1745, which had threatened to topple the British throne, the French initially believed the Americans had little chance of success and that to join with them was too risky.
But at Saratoga the Americans had forced the surrender of a large, professional European army. Because of this, they suddenly looked much more impressive than they had at first glance. Paris believed it was safe to offer French aid, and their intervention gave new life to the Continental cause and led to the French-American victory over Great Britain. When Lord Charles Cornwallis ended his ill-fated campaign at Yorktown, Virginia, he signed the surrender papers for another British army on October 19, 1781, four years and two days after Burgoyne’s surrender at Saratoga.

Join The Conversation
Comments
View All Comments