By Christopher Miskimon
In April 1941, things were going quite well for the German armed forces. In a series of earlier campaigns, they had conquered Poland, the Low Countries, Norway, and France. Though tentative plans to invade England had been shelved after the desperate and heroic British defense in the Battle of Britain, U-boats were now trying to slowly starve the stubborn British into submission.
Yugoslavia and Greece were falling, and plans for the conquest of the Soviet Union were moving forward. In the desert of North Africa, the British, after initial success against the Italian Army, were now in retreat toward the Egyptian frontier, hounded by General Erwin Rommel and the newly arrived German Afrika Korps. The Axis juggernaut was about to receive a small yet stinging defeat, however, one that would teach Australian and British troops that their foe was not invincible. At the same time, the Germans would learn of the tenacity and maturing skill of their British Commonwealth opponents along with the dangers of overreaching. The lesson would come to be known as the Easter Battle, and it would take place in the desert sands outside the coastal city of Tobruk.
Fortress Tobruk
Soon to be famous as Fortress Tobruk, this city in eastern Libya sat astride the coastal road that wound its way along the Mediterranean Sea to the Egyptian border and beyond. A bay provided a natural harbor with sufficient depth for large oceangoing vessels, making Tobruk an important supply point for any Axis advance into Egypt. The rest of the local coastline was broken by a series of wadis, steep and low areas through which water flowed after a desert rain, that would hinder vehicle movement. Inland from the town a series of two escarpments rose into the plain above. This desert plain was nearly featureless, dotted by a few patches of thorny shrubs or the occasional well, surrounded by a few fig trees.
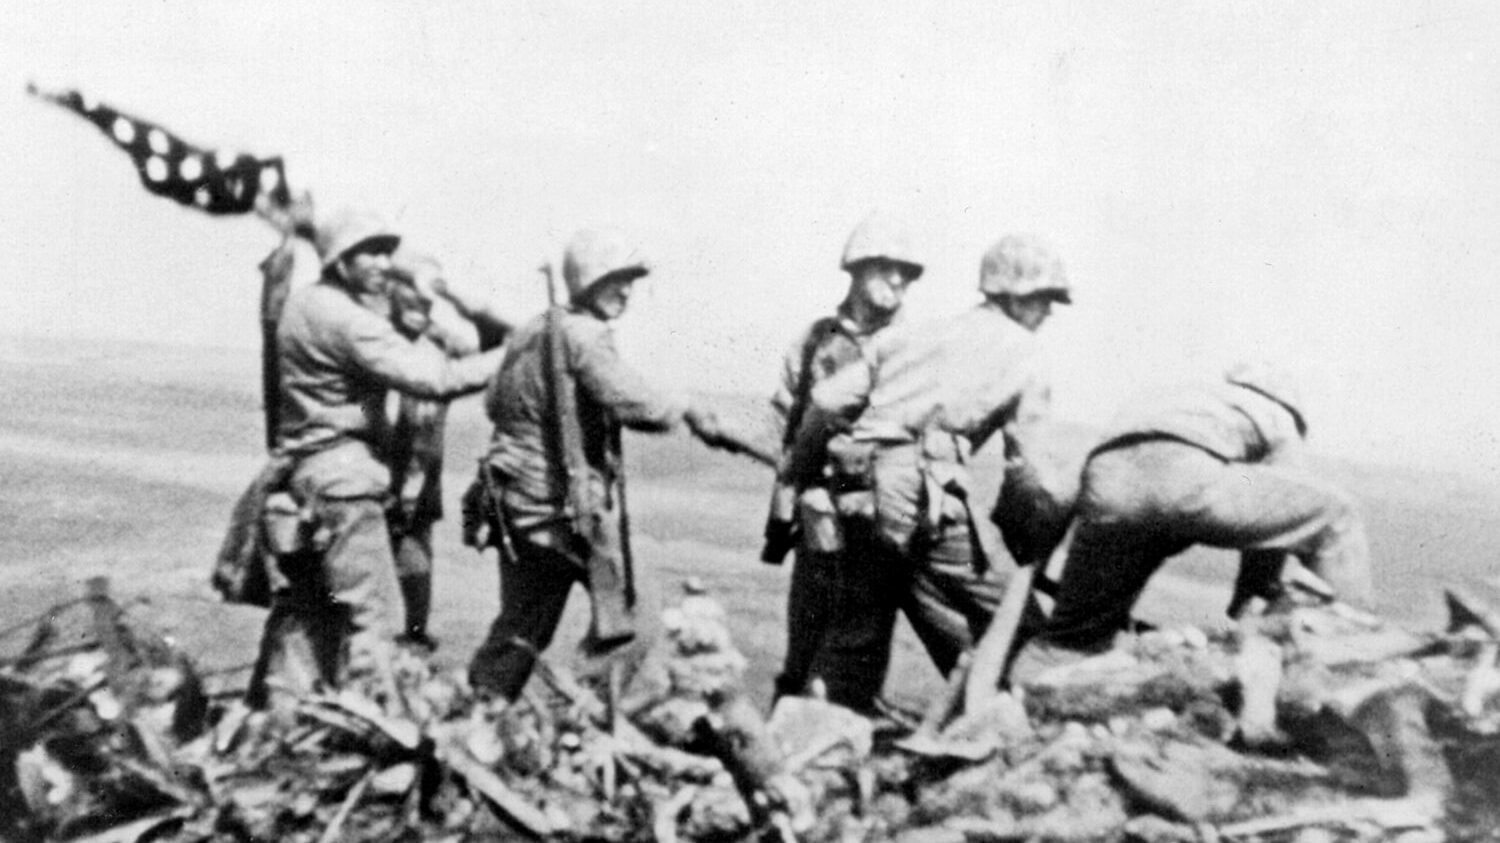
The Italian Army had occupied Tobruk until its capture by Commonwealth forces in early January 1941. The British advance had continued until Rommel’s counteroffensive on March 31. As British forces fell back, the Australian 9th Division, only recently called to the front from Palestine, was ordered to move to Tobruk from its position in Derna to the west.
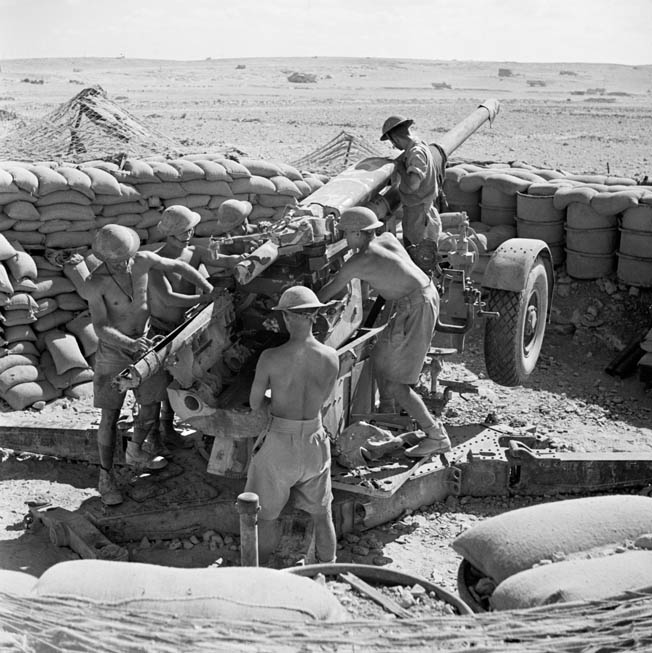
The 9th Division was commanded by Maj. Gen. Leslie J. Morshead. In overall command of the Tobruk defense was Maj. Gen. John Lavarack, former commander of the Australian 7th Division. He was to have the 9th Division, the 18th Brigade of the 7th Division, and several thousand British troops with artillery, tanks, and support units. The artillery was a mix of 48 25-pounders, 12 18-pounders, and 12 4.5-inch howitzers while the available armor included about 60 cruiser, infantry and light tanks with some 30 armored cars.
Some 26 more tanks were undergoing repair at the time of the first battle. Additionally, there were several antitank units but a shortage of guns to equip them. While there were a number of the standard British 2-pounders, most Australian units had to make do with captured Italian weapons. Some Australians also manned captured Italian field artillery pieces.
Air support was provided by several squadrons of Hawker Hurricane fighters and Bristol Blenheim bombers. With this force, Lavarack was expected to hold out for two months, thus enabling the British to reinforce their army in Egypt. Eventually, the garrison would hold for eight months.
The Red Line and the Blue Line
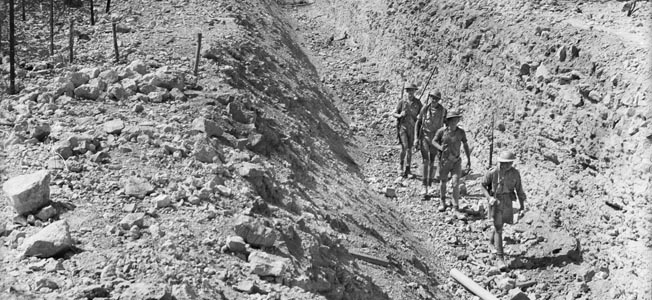
Lavarack and Morshead worked well together and quickly developed a defensive scheme largely based on the fortifications begun by the Italians before they had lost Tobruk to the British. A perimeter was manned averaging nine miles outside the town. It arced around Tobruk in a half circle ending at the shoreline. The Italians had placed barbed wire around much of this perimeter during their occupation and had also begun an antitank ditch, though it was incomplete at the time of the Easter Battle. Some of the ditch had been covered with boards and a thin layer of sand to camouflage it. Mines were placed to slow enemy penetrations.
The perimeter was guarded by a series of strongpoints arranged in a zigzag pattern, one forward then one back, alternating that way along the entire length to the wadis. The forward posts were 750 yards apart, with the second row some 500 yards behind the first. They were numbered consecutively; outer posts were odd numbered, inner posts even numbered.
These strongpoints were positioned to provide interlocking fire to cover the perimeter as well as good observation. They averaged 260 feet wide with three circular weapons pits made from concrete, two for machine guns and one for an antitank gun. To improve cover, these pits were flush with the ground. Communications trenches, also made with concrete, connected the pits. These were typically eight to nine feet deep with an overhead cover of boards and earth.
This main line of defense was called the Red Line. Behind it antitank mines were placed to contain armored penetrations. Three miles behind the Red Line sat the second line of defense, the Blue Line, manned by reserve units. If this were breached, the last stand would take place at the Green Line, two to four miles outside Tobruk itself.
The artillery was sited to cover the troops manning the Red Line. The shortage of antitank guns meant that all field artillery was positioned and sited for the antitank role as well. A mobile reserve of tanks, artillery, and antitank guns was formed to reinforce and plug gaps. Morshead dictated that no ground should be surrendered, deep patrols should be conducted every night to spoil any chance of enemy surprise, positions and obstacles must be improved continuously, and defensive actions would be conducted in depth using the reserve. The infantry manning the perimeter would allow any armored penetrations to continue and to be engaged by the artillery; their job would be to engage any accompanying infantry.
Advantages and Disadvantages of the Overconfident Axis
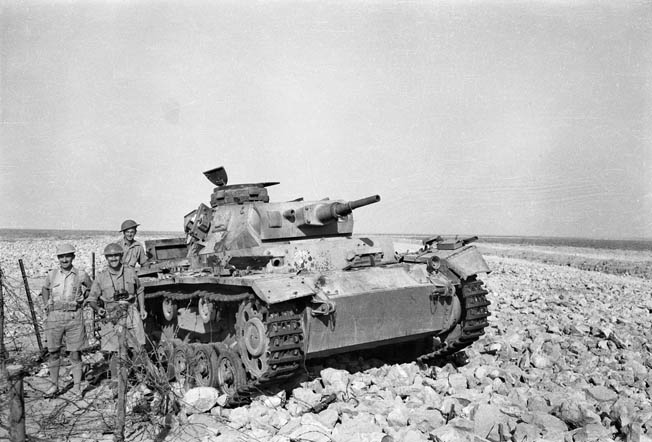
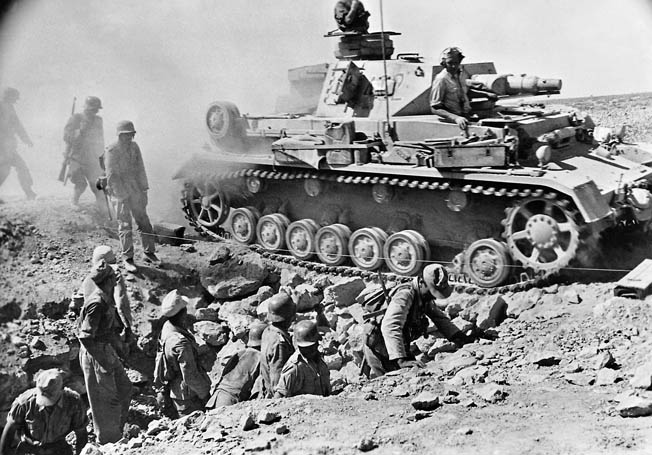
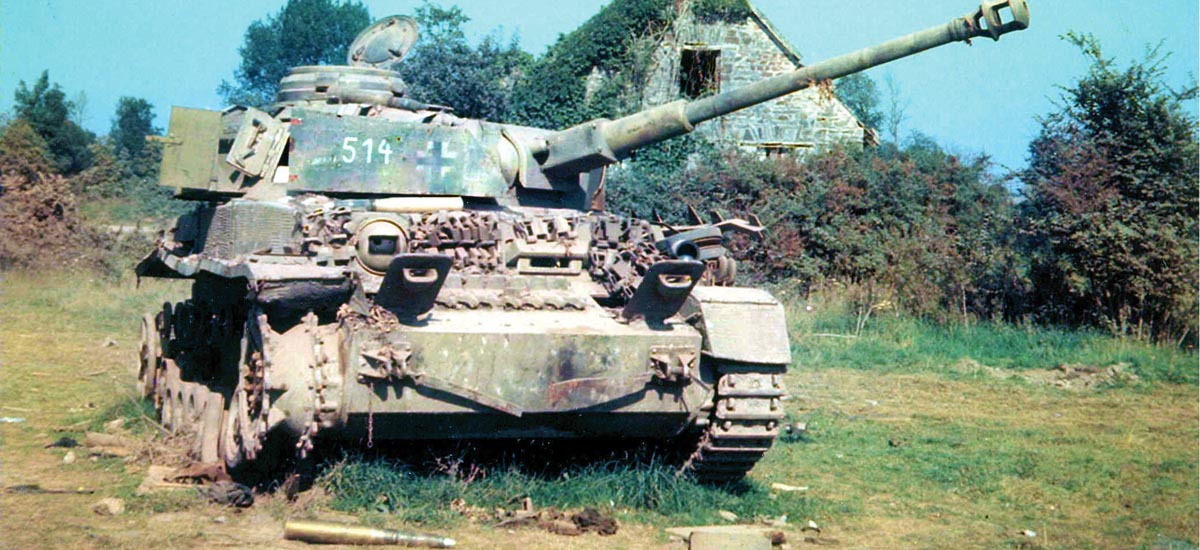
Thus organized, the Aussies and their British and Indian cohorts dug in and prepared for the enemy onslaught. The forces arrayed against them were formidable. The German 5th Light Division, while not fully equipped, had strong armored forces in its 5th Armored Regiment, with about 150 tanks including the Panzer Mk. II, III, and IV, commanded by a Colonel Herbert Olbrich. The 5th itself was commanded by General Johannes Streich. It also had a reconnaissance unit with 25 armored cars; two machine-gun battalions, artillery, antitank, and antiaircraft battalions rounded out the force.
The antitank units fielded a mixture of 37mm and 50mm weapons, with a few 88mm guns added from the flak regiment. Air support came from Fliegerkorps X, with a mixture of up to 450 fighters, dive-bombers, and bombers. The Italians had elements of three separate divisions in the area: one infantry, the Brescia division; the motorized Trento; and the armored Ariete. The Ariete Division could muster about 80 M13-40 and L-3 tanks. The estimated total strength of this force was roughly 25,000 troops.
The Germans had reason to be confident. While the 5th Light Division troops were new to desert fighting, they were experienced veterans of Poland and France, well versed in the tactics of the Blitzkrieg. They considered their Mark III and IV panzers superior to the majority of British tanks in the North African theater though they did fear the Matilda infantry tank with its thick armor. They had good air support, and their main opponent, the Australian 9th Division, was a newly formed unit with limited training and experience. It also lacked a full issue of equipment.
Unfortunately for the Afrika Korps and its Italian allies, the situation was not so favorable. While it was true that the Australians were new troops and lacked much equipment, they were in a strong defensive position. They were well supplied, had plenty of good artillery and air support, and also had the advantage of interior lines for the movement of their reserves.
Besides these Allied advantages, the German and Italian forces faced many difficulties that further unbalanced the equation. Their own supplies had to cross hundreds of miles to reach them from Tripoli, making resupply tenuous to forward units and vulnerable to air attack. The lack of experience in desert fighting meant German units did not realize the need to carry additional water and fuel with them to avoid shortages.
Further, these distances and the desert conditions played havoc with tanks and vehicles, causing mechanical failures. The initial Axis superiority in tanks was actually much diminished as panzers broke down during the advance. For the Easter Battle, some sources report the Germans as having only about 38 tanks fit and ready for combat, with a few dozen more Italian tanks to join them, perhaps a total of only 55 to 60 tanks in all. Axis armored units were not at full strength, though still a formidable force. The same could be said of Fliegerkorps X; only 250 of its planes were generally available at a given time.
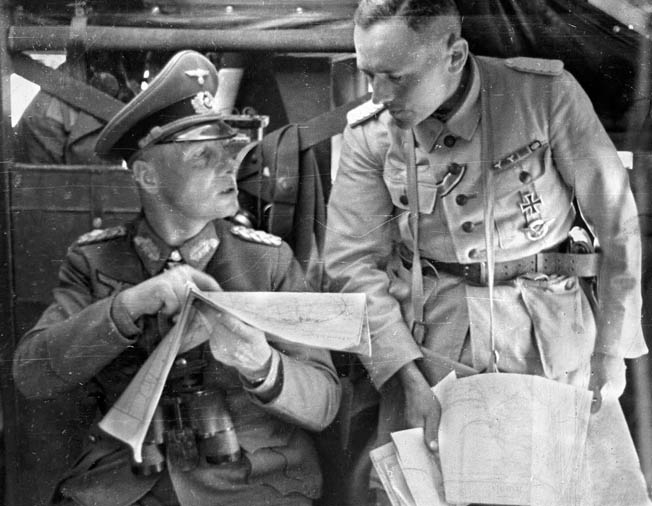
Finally, it may be said that German overconfidence played a part in the battle as well. By the time 5th Division elements reached the area of Tobruk, they were exhausted from the pace of the advance, and their vehicles and equipment needed maintenance. Rommel, eager to chase the British to the Suez Canal, underestimated both the size and morale of the garrison in Tobruk. Streich, the 5th Division commander, wanted time for his men to rest and reconstitute, but Rommel ordered him to assault the besieged Australians. With so much success in their efforts thus far, the Germans seemed to have succumbed to the victory disease. In the coming days they would pay dearly for their pride.
Facing the German Panzers
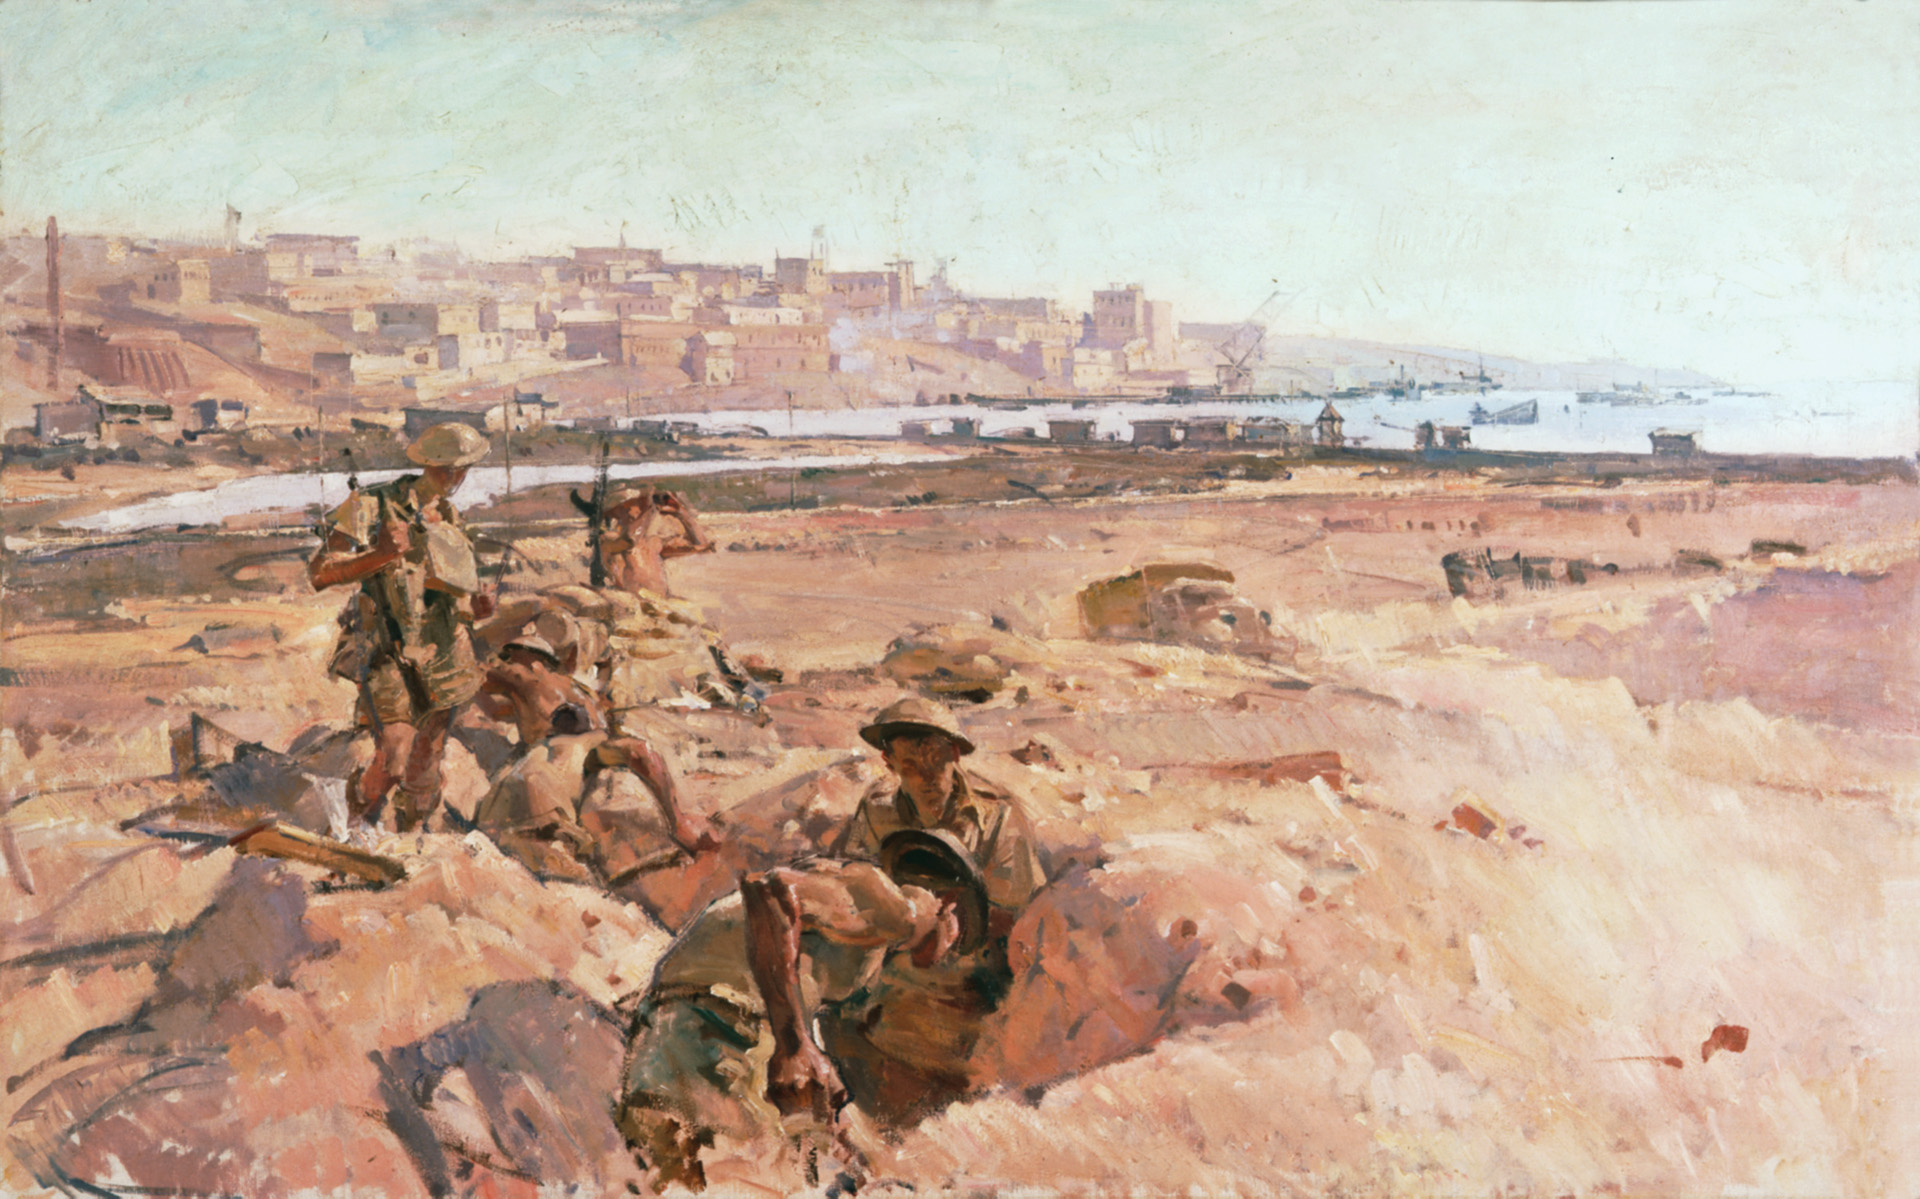
The battle itself began at midday on Good Friday, April 11, 1941. The area to be attacked was on the southern side of the perimeter, around the road leading south from Tobruk to El Adem. This portion of the line was guarded by the Australian 20th Infantry Brigade with three battalions. The 2/13th Battalion occupied the strongpoints east and slightly west of the road with the 2/17th battalion to the west of them. The brigade reserve was the 2/15th Battalion, headquartered less than four miles behind the Red Line further up the road, where the roads to El Adem and Bardia intersected.
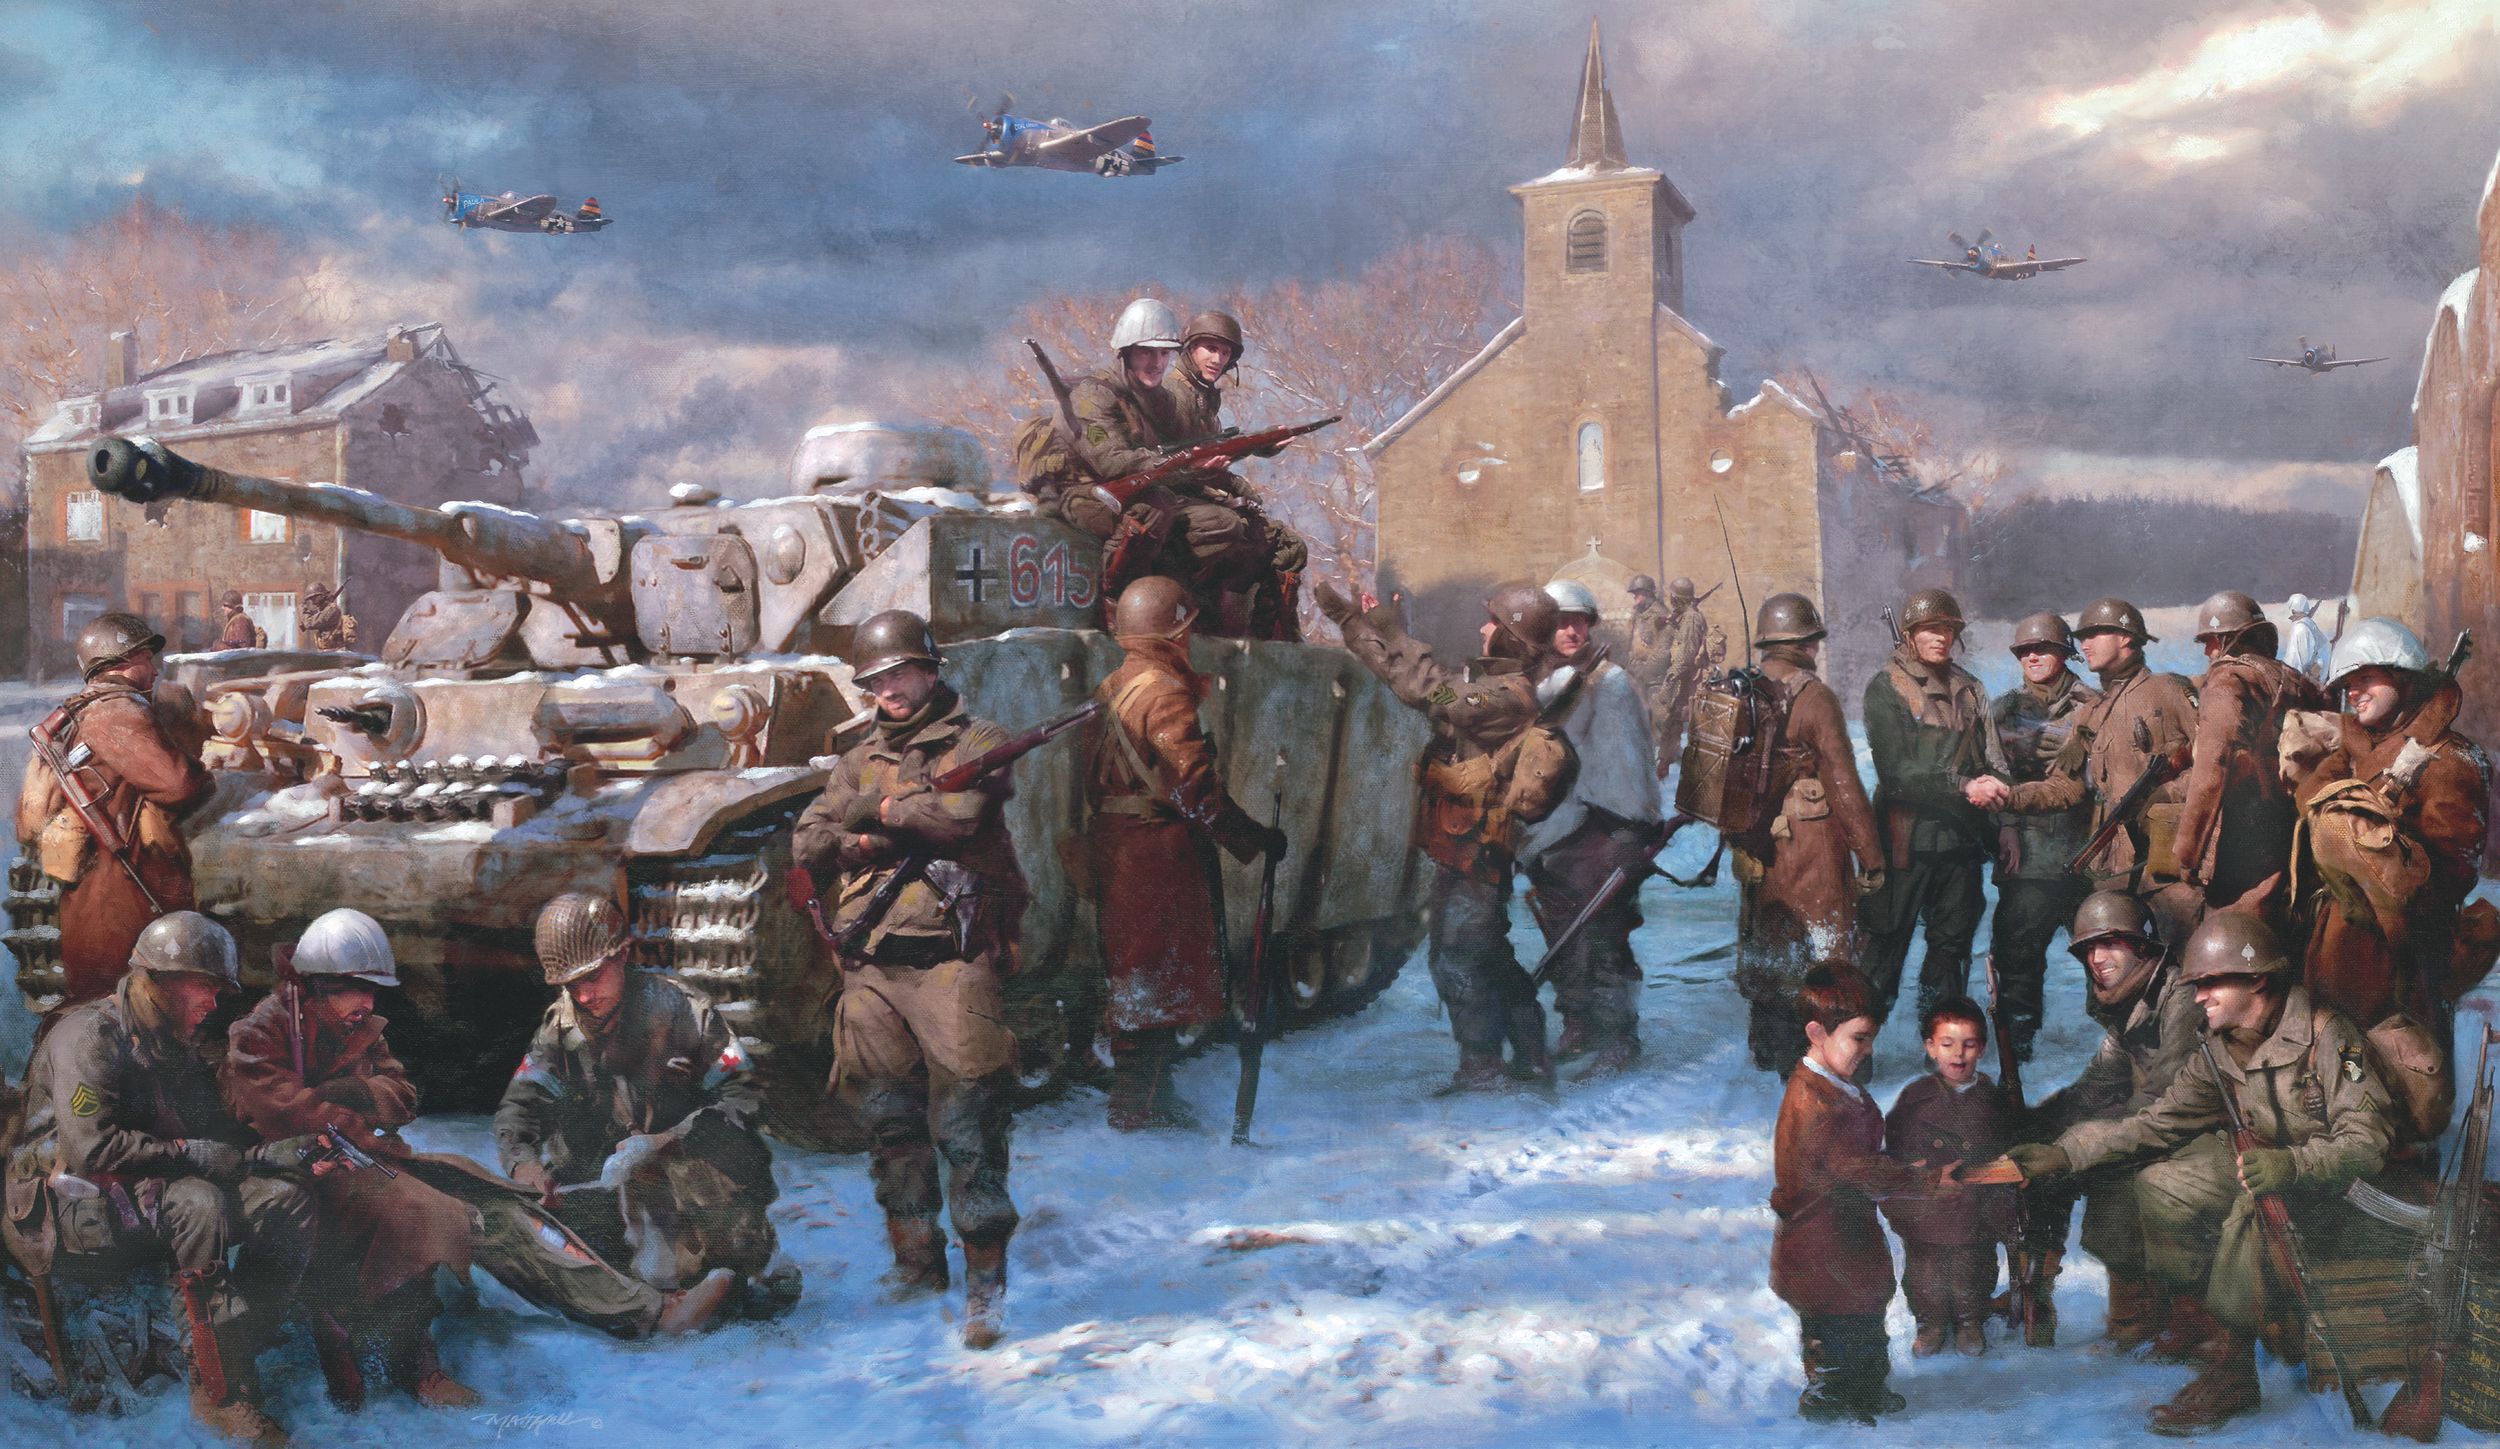
The 5th Panzer Regiment received orders to attack the Tobruk perimeter at 7:30 am. Moving out an hour later, it reached its assembly area at 3 pm and immediately came under enemy fire. The Australians reported destroying five German tanks 1,000 yards from Outposts R59 and R63. Also at 3 pm, some 700 German infantry moved to within 400 yards of 2/13th’s strongpoints. The Aussies opened fire with machine guns and rifles on the advancing Germans.
Meanwhile, D Company of the 2/17th, occupying the eastern portion of the battalion position, nearest the El Adem road, spotted seven enemy tanks in front of its westernmost strongpoint, R31, and an hour later saw infantry in front of the next post to the east, R33. When both moved toward the barbed wire of the perimeter, British artillery opened fire on them. The infantry was stopped, but the tanks pressed on.
The 5th Panzer Regiment began its attack at about 4 pm with 25 tanks. These tanks moved up to the D Company portion of the line and quickly ran into the antitank ditch, which they found impassable. The D Company commander, Captain Balfe, observed the tanks come through the British barrage and opened fire on the forward outposts. Balfe reported 70 Axis tanks, including Panzer IVs and Italian M13s with a large number of Italian light tanks as well. As he watched, they moved up in three waves of 20 tanks each with a fourth wave of 10. Though they fired at his positions, they did not move in.
Balfe later reported that the ditch in front of his company was not deep enough to prevent the tanks from crossing. The minefield had been hastily emplaced, and he did not think it capable of holding up the Axis armor. None of his strongpoints had their antitank guns, though some had antitank rifles of limited value. His troops were reduced to using these few anti-tank weapons along with machine-gun and rifle fire to combat the tanks. Inexplicably, the tanks broke off after a short time and moved off to the east toward the 2/13th. Unknown to Balfe, the Germans considered the ditch impassable and had decided to move east to find a better crossing point. As the unit moved, Australian troops adjusted the artillery fire to stay on the Germans.
Infantry Attack
The next trial for D Company began when another 700 enemy infantry approached some of their outposts. The Australians were spread thin; the outposts that could range the German troops had only a few dozen rifles and Bren guns to hold them off. When they began taking fire the Germans went to ground, but soon they began moving under the cover of their own machine guns.
As the sun began to set over the battlefield, these troops reached the antitank ditch and dug in. Soon mortar fire from the antitank ditch began to pelt the Australian positions; because the Australians had been hastily deployed without full equipment, they lacked mortars of their own with which to reply. The British artillerymen feared to fire on the ditch due its proximity to the Australian positions.
The Allied command had received a report of a tank breakthrough near the area where the German attack had begun. They quickly ordered the 1st Royal Tank Regiment (RTR) to move up and stop the penetration. When they arrived at the scene, there was no breakthrough, so the 11 cruiser tanks made their way east toward the El Adem road in search of the enemy. Meanwhile, the 5th Panzer Regiment’s tanks were moving along the ditch, now in front of the 2/13th. As they moved, they tried to suppress the Australian outposts with fire. Here the mortar platoon of the 2/13th, manning two Italian 47mm antitank guns, opened fire on the Axis force, quickly knocking out one Italian tank and hitting a few others. Another Italian light tank, previously disabled, was also shot up by the mortarmen. Its crew surrendered.
By 5:15 the German regiment had reached the El Adem road but found a substantial minefield blocking its progress. The Germans began to move their tanks away just as the 1st RTR arrived. Both sides opened fire as the Germans withdrew, adjusted artillery following them as they went.
The British tankers continued on to the road, where another mixed group of German and Italian tanks was spotted about a mile outside the perimeter. These advanced at about 7 pm and were engaged by both the tanks and artillery in a brisk 30-minute engagement. As it ended with another German withdrawal to the south, British losses were two Cruiser tanks destroyed and one disabled versus seven knocked-out Axis tanks.
In front of D Company, patrols were sent out by the Australians and found the German infantry had withdrawn. After dark, more German tanks and engineers probed the 2/13th’s line. The engineers were equipped to breach the wire and the ditch. The Australians launched a quick counterattack, however, which drove off the enemy, even forcing them to abandon their breaching equipment.
Overall, the German attackers had been surprised at the ferocity of the Australian defense, conducted at times at the point of a bayonet. The 5th Panzer Regiment had been foiled by the unexpected antitank ditch, heavy shelling, and antitank fire.
Reconnaissance in Force
As the night went on, the Australians feverishly tried to bolster their defenses with both engineers of their own and more mines. General Lavarack ordered patrols to ascertain the enemy’s next move and moved the reserve 18th Brigade closer to the perimeter.
Saturday, April 12, dawned without the expected Axis assault. The Germans were trying to formulate a new plan of attack but were frustrated by their poor maps (which were on a 1:400,000 scale) and the failure of the Italian High Command to send them the defensive plans for the Tobruk area. Thus the Germans were totally uninformed about the extent or configuration of the Allied defenses.
To gain the information they so desperately needed, the Germans sent out reconnaissance probes to seek weak points in the antitank ditch. A German engineer officer reported finding an area, two and a half miles west of the previous day’s initial attack, where there was no antitank ditch. Olbrich dispatched 24 tanks to the suspected gap with orders to renew the attack. Engineers were attached to this force to breach any obstacles or ditches that might in fact be there. Once assembled, this force approached the Australian lines at about 3:15 pm.
The attack came under heavy fire almost as soon as it began. Artillery rounds screamed in with what Olbrich called “superb accuracy” while overhead British aircraft pounded the German force with bombs. At first the panzers tried to support the engineers while they attempted to breach the Australian lines. The fire the engineers drew was so intense, however, that despite great bravery they simply could not follow the armored advance.
By 4 pm, the Germans could make out the enemy positions, but 45 minutes later they ran into the antitank ditch they thought was not there, stopping their assault cold. They waited for 15 minutes, hoping the engineers might appear despite the fearful odds. Artillery and antitank fire pounded them the entire time. When the supporting engineers failed to appear, the order was given to withdraw. Again, British artillery followed them, adjusting as they moved. Even under the heavy shelling, the Germans grimly retained their discipline and fell back in good order.
The second day had ended with another failed Axis assault, though the attack was really more a reconnaissance in force, lacking the full support a major attack required. Overhead, British and German aircraft dueled on April 12 as Ju-87 Stukas tried to dive-bomb the harbor only to be engaged by Hurricanes of the RAF and an intense and murderous antiaircraft fire that claimed four enemy planes. The Axis positioned their troops for a more decisive engagement to begin the next day.
An Assault With Inadequate Intelligence
The primary assault force for the attack would be the 5th Light Division, formed up on both sides of the El Adem road, with the Italian units spread out to its left along the Allied perimeter. Directly to the 5th Division’s left was the Italian Ariete armored division. The Brescia infantry division was farther to the west around the road to Derna. There they would make a demonstration attack to divide their enemy’s attention.
The 8th Machine Gun Battalion would initiate the main assault by creating a breach in the Australian line through which 5th Panzer Regiment would pour, one of its battalions driving north to seize the crossroads while the other strove to the northwest toward Fort Pilastrino, located on a ridge of the same name, close to the 20th Brigade headquarters. With these objectives taken, Axis forces would continue their offensive, with the 5th Panzer Regiment leading the way for the Ariete division all the way to Tobruk itself. The attack would begin at 5 pm on the 13th, with the tank breakthrough taking place before dawn on the morning of the 14th, following an artillery preparation.
Unfortunately for the Axis forces, planning for the attack was hampered once again by the lack of accurate intelligence and aerial reconnaissance caused at least in part by poor coordination between the Italian High Command and the German forces. The outdated maps were a factor as well. Compounding this was the aggressive Australian patrolling, which foiled German attempts at scouting on the ground.
The selected breaching point, some two and a half miles west of the El Adem road, lay near Post R33. The tank ditch in this area was some 12 feet deep, a serious though not insurmountable obstacle. Had German scouts been able to range more freely, they might have discovered a flaw in the defenses. Less than 2,000 yards northwest of R33, the tank ditch in front of Posts R27 and R29 was less than three feet deep. Even worse, between Posts R11 and R21, near the targeted Pilastrino Ridge, there was no ditch at all. Lacking this crucial information, the attack would go through the Australian lines at R33. Facing the Germans were the men of D Company, 2/17th, who had fought off a portion of the German attack two days before and occupied Outposts R30 to R35.
The first signs of the imminent assault came during the afternoon of the 13th, when Axis troops and vehicles demonstrated across a 10-mile-wide area in front of the Australian positions. Shortly afterward, a staff car preceded by motorcycles was spotted moving along the perimeter, stopping in some dead ground about 4,000 yards out, appearing to the Australians to be setting up a headquarters. A Luftwaffe plane flew over, dropping leaflets asking for the surrender of the defending troops. Other aircraft flew over, obviously reconnoitering the defenses, especially the wire and antitank ditch.
Trucks carrying German infantry then appeared, also about 4,000 yards out. The Australians watched these troops disembark from their transport with almost relaxed ease, staying concentrated despite their proximity to the enemy. Well-directed artillery fire and close air support soon made them regret their slowness, and they dispersed away from the trucks. Soon small detachments of them began to creep forward, moving to within 1,500 yards. There, they set up machine guns and took the Australian outposts under fire, shooting at anything that moved.
The First Australian Victoria Cross at R33
At 4 pm, the 20th Brigade commander, Lt. Col. Crawford, called B Company, his reserve, up to new positions behind D Company. One hour later Axis artillery started pounding the D Company portion of the line with heavy fire; a half hour after that, enemy infantry with a few tanks were spotted approaching the wire. Moving under covering fire from machine guns and rifles, this group came to within 500 yards of the line. The defenders called in artillery, and soon 25-pounder shells began crashing into the Axis advance, stopping it cold.
As darkness fell, RAF reconnaissance flights showed Axis forces massing near the El Adem road, with some 300 tanks and vehicles clustered nearby. Solitary panzers came up to the tank ditch and cruised along it, either scouting for an easier crossing point or trying to mask the infantry and engineers who were coming up behind them. That infantry moved up to the antitank ditch in front of D Company and secured the area to be breached while sappers began to clear lanes through the mines.
With the outer perimeter penetrated, a small group of 30 German soldiers tried to capture R33. To give them the edge, they took with them eight machine guns, two small cannon, and a mortar, more than enough firepower to overwhelm a single outpost. Emplacing themselves a scant 100 yards east of R33, they opened fire, drawing a brisk response from the Australians inside. When it became apparent to the defenders that the German troops could not be pushed back by fire, the outpost commander led six of his men in a vigorous counterattack. This small group of Australians tore into the far larger German unit, bayonets fixed to their rifles and throwing grenades ahead of them as they advanced.
The daring gambit paid off. When it was over, the Australians had driven off the entire group, captured a prisoner, and left a dozen dead Germans lying on the ground. One of the Aussies, Corporal Jack Edmundson, fought so bravely he was posthumously awarded the Victoria Cross, the first Australian to receive the honor during the war.
Patrols were sent out all along the Australian perimeter, with two going out near R33. Both returned with reports of enemy activity nearby and a prisoner from the 8th Machine Gun Battalion. Lt. Col. Crawford decided to make a dawn counterattack against this force and alerted B Company; the reserve moved up earlier, to be ready for the task. As an added precaution, D Company of the 2/15th Battalion, the brigade reserve, was moved up to new, closer positions just behind B Company.
Breaching the Allied Perimeter
Shortly after midnight, the Germans started their penetration of the line. Several hundred infantry broke through the wire around R33 and spread out in a fan around the outpost for several hundred yards. Captain Balfe fired a flare with his Very pistol, calling for artillery. Once again 25-pounder shells fell on the Germans, but this time they were not to be deterred. Despite casualties, they remained firmly in place around the post.
At 4 am, Axis armor was spotted gathering near the El Adem road and immediately came under the now customary artillery bombardment. By 4:45, the German tank force began its movement toward the perimeter near R41. Because of the bad maps, German engineers had to lead the tank columns to their crossing points. In the dark, units of the 5th Panzer Regiment became disorganized, requiring radio silence to be broken to realign for the attack. This wasted precious time. When the regiment finally reached the breach point, the German artillery had already shifted. For once, however, luck was with the Germans. An early morning fog helped conceal them, preventing concentrated fire from being placed on them as their tanks crossed the ditch one at a time.
Once through the perimeter, a few German tanks supported the infantry around the outposts, laying heavy fire on them. After the entire unit was through, the tanks formed up and moved out toward their objectives. A few of them towed antitank or flak guns; others carried infantry. The Australian infantry, following their plan, allowed the German tanks to proceed deeper into the perimeter. They called for artillery, which pelted the exposed German infantry, killing many of them and driving the rest off the tanks they were riding and back toward the wire.
This separated the tanks from most of the infantry they would so sorely need to root out the guns that awaited them just a few miles ahead. With their infantry pinned down, they made a risky decision and the German armor moved on with only a few infantry still along, the 2nd Battalion in the lead with the 1st trailing behind.
“We Are Right in the Middle of it With No Prospect of Getting Out”
The Axis tankers made their way east toward the road through the dust and smoke of the battlefield, then turned north to move on the crossroads. After moving about 4,000 yards, the column ran headlong into the Blue Line defenses. In their path lay the 32 25-pounder guns that had shelled them so relentlessly as well as an Australian antitank regiment.
Though they lacked armor-piercing ammunition, the British artillerymen depressed their guns and started pouring direct fire into the Germans over open sights. The big, high-explosive shells were too much for the tanks’ armor, and panzer after panzer was destroyed. When they tried to flank the artillery to the right, the antitank gunners opened fire and stopped them. With at least five tanks knocked out, the 2nd Battalion was ordered to withdraw. It turned around and ran right into the 1st Battalion coming up behind, causing temporary confusion.
To compound their problems, Portees (2-pounder antitank guns mounted on trucks for added mobility) had moved around the German flanks and now began sniping at the panzers as they headed south. General Morshead ordered the 1st RTR’s cruiser tanks forward to engage the German armor as well. The British tanks approached from the east and identified their foe through the swirling dust and smoke. At 7 am, they closed with and engaged the Germans, who themselves had just turned east to try to escape the gauntlet of fire they were now taking from all sides. With the eastern side of the box closed, the German tank columns once again turned south and headed back toward the gap they had entered just a few hours earlier.
To their credit and despite the horrible pounding they had taken, the German withdrawal was carried out in good order. As they moved, the panzer crews took up 360-degree firing positions to enable them to evacuate their dead and wounded from the knocked-out tanks. When they moved, the British tanks joined by two Matilda infantry tanks gave chase.
German Lieutenant Joachim Schorm, of the 6th Company of the tank regiment, recalled the confusing maelstrom into which he and his panzer crews had been thrown: “We are right in the middle of it with no prospect of getting out. From both flanks, armor-piercing shells whiz by at 1000 meters per second…. Above us Italian fighter planes come into the fray. Two of them crash in our midst … we take a wounded and two others aboard, and the other panzers do the same…we have to press on toward the south, as it is the only way through. Good God! Supposing we don’t find it?”
Despite the obvious fear and despair, the regiment kept its cohesion and continued as a unit.
Meanwhile, back at the breach at R33, the German and Australian troops were fighting desperately—the Germans to keep the gap open, the Australians to close it and trap the Axis forces within. Behind Post R32, inward of the breach, the German used several antitank and field guns to try and knock it out for good. Despite the heavy fire from these guns, the Aussies managed to knock out all the crews of the cannon with rifle fire. In response, another field gun and several of the dreaded 88s were brought from outside the perimeter, right up to the breach. Once again, however, the Australian infantry shot down the gun crews one by one. As dawn broke, German machine gun positions were also targeted and knocked out.
The German Withdrawal
As the retreating panzers approached the breach, the Axis infantry within the perimeter were pinned down and cut off from their comrades outside it. Over 100 Germans took cover in a cluster of ruins known as Goschens House, north of the outpost line. Then D Company, 2/15th, north of the Germans set up a blocking position and B Company, 2/17th attacked them. Once again throwing grenades and brandishing bayonets on the muzzles of their rifles, the Australians rushed their opponents, killing or capturing 36 of them. Later 75 more would be captured there.
The panzers now started their withdrawal through the breach, carrying what infantry they could with the rest running alongside. Some of the panzers were festooned with Australian prisoners captured earlier. Smoke from burning tanks obscured much of the battlefield, including the gap in the antitank ditch. Blindly the panzer drivers went back through the breach, some of them stopping to limber the abandoned cannon, their dead gunners lying around them.
The men of D Company, unable to see into the smoke-shrouded withdrawal site, poured fire into it anyway. Most of the Australian prisoners the Germans had captured jumped off the tanks in the confusion and ran to freedom. Some of the German infantry took cover in the tank ditch from this murderous fire, only to be captured later. Captain Balfe could see that the Germans, despite retaining their good order, were retreating. He had to restrain his men from chasing them outside the perimeter.
The next few hours were spent rounding up wounded and prisoners and taking the toll. The 5th Panzer Regiment had lost 40 men and 17 of the 38 tanks it had taken through the breach. Large numbers of the 8th Machine Gun Battalion’s men were now dead, wounded, or captured. Rommel ordered another attack for 6 pm that same day, but there were not enough troops or vehicles to scrape together, and the attack was called off. Though additional fighting would go on for much of April, the Easter Battle itself was over.
Losses for the Axis side were estimated at 150 killed with another 250 taken prisoner. Twenty-nine tanks were also lost. The Allied defenders of Tobruk listed casualties of 26 dead, 24 wounded, four tanks and one artillery piece lost. In the skies over the besieged town, 17 German and one British aircraft were brought down.
“The Forces Available Were Inadequate For the Task”
Though Rommel had vowed to take Tobruk, such was not to be, at least not yet. More fighting lay ahead for him and his Afrika Korps in the war of movement that characterized the North African theater. Downplaying the battle, German Maj. Gen. Alfred Toppe would later reclassify the attacks of April 13-14 as “raids” and summarize the failure with the phrase, “The forces available were inadequate for the task.”
Another attack on Tobruk occurred in late April, lasting into early May. In this assault the Germans made more gains but again failed to take the fortress. When Rommel returned after the Battle of Gazala, he mounted another attack that took the city, along with thousands of prisoners and vast amounts of supplies, on June 21, 1942. Later, in retreat after El Alamein, the Axis would leave the town to the advancing Allies without a shot fired.
Like Rommel, the Australian troops who fought there also made a lasting reputation for themselves, one that added to their nation’s military lore. During the siege, German Propaganda Minister Josef Goebbels referred to the defenders as “rats.” With their characteristic pluck, the Commonwealth troops took the name for themselves. From then on nicknamed the “Rats of Tobruk,” they and their British and Commonwealth brethren would hold out until the British Crusader offensive pushed the Axis forces back and enabled the relief of the garrison in December.
The 9th Division had been withdrawn in October. Sent to Syria, it was there the men learned that Tobruk had finally fallen to Rommel. The division went on to fight in the Pacific, one of the few Allied units to fight against Germany, Italy, and Japan.
During the war in North Africa, Rommel’s reputation grew until his very name took on the power of a sort of devil, the very mention of his presence almost a harbinger of Allied defeat. The ability of the Tobruk garrison to hold out against him became a psychological beacon of resistance to the Axis. While the size of this battle and the number of casualties suffered were relatively low compared to the larger, more epic engagements of the war, the Easter Battle was significant as the first, albeit small, victory in the saga of Fortress Tobruk.
Australian troops were the first allied soldiers to defeat the Italians in Operation Compass, the Germans at Tobruk and the Japanese in New Guinea.
Sunset on the 14th of April 1941 was the Last Sunset Corporal John Edmondson VC would see . To all the Heroes of the Siege of Tobruk who changed the course of History against all odds for our freedoms today . Lest We Forget.