
By Michael E. Haskew
By the autumn of 1797, revolutionary France had been at war with the combined forces of the First Coalition for four long years. Arrayed against France at various times were no fewer than seven European powers, their jittery governments seeking to stem a perceived tide of revolutionary fervor that threatened to sweep across the Continent and possibly cross the English Channel as well. Deposed King Louis XVI had gone to the guillotine in January 1793, and his wife, Austrian-born Marie Antoinette, had suffered the same fate during a frenzy of horrific retribution against the French nobility that came to be known as the Reign of Terror.
The French Juggernaut vs the Royal Navy
With the execution of Louis, the other crowned heads of Europe shuddered, and territorial ambitions gave way to a collective instinct for self-preservation. Spain, the Netherlands, Prussia, Austria, Naples, Sardinia, and a reluctant Great Britain allied themselves against France. In early 1795, French troops occupied the Netherlands and renamed the country the Batavian Republic. The Austrians and Prussians were defeated at Wattignies and Weissenbourg, and each made a separate peace with France. By 1796, Spain had also been defeated and had become an ally of the French, and Napoleon had won spectacular successes during an invasion of Italy.
While the French juggernaut was victorious across continental Europe, the indomitable British Royal Navy still held sway at sea. On June 1, 1794, the British under Admiral Richard Howe earned a tactical victory in the Battle of the Glorious First of June, inflicting 4,000 casualties on the French and sinking or capturing seven French vessels. No British ships were lost in the action, which took place in the middle of the Atlantic Ocean, approximately 400 nautical miles from the French-held island of Ushant. And on February 14, 1797, a British squadron of 15 ships under Admiral Sir John Jervis defeated a Spanish fleet under Admiral Don José de Cordóba during the Battle of Cape St. Vincent off the coast of Portugal. Heavily outnumbered, the British captured four of the 28 Spanish warships and killed or wounded 800, while suffering only 73 dead and 327 wounded themselves.
Farther to the north, the stage was being set for the most bitter naval battle of the War of the First Coalition. For several months, the British North Sea fleet, commanded by Scottish-born Admiral Adam Duncan, had been on station in the frigid sea, blockading the Dutch naval vessels in the harbors at Den Helder and Texel in the Frisian Islands and countering the French strategy of landing troops in Ireland to provide direct support for an uprising against British rule. The British were keenly aware of France’s intent; the previous year an attempt to land troops at Bantry Bay in County Cork had been turned back by severe weather.
Mutinies Marr the Royal Navy
Although the British were grateful for France’s nature-induced reversal of fortune, the Admiralty had problems of its own. In mid-April 1797, the crews of 16 Royal Navy vessels anchored at Spithead, near Portsmouth, mutinied in protest of harsh living conditions and low pay. As mutinies go, the Spithead mutiny was remarkably mild. Most of the regular officers were allowed to remain in control of their ships, and a normal dockside routine was followed while elected representatives presented the sailors’ grievances. Additionally, warships scheduled for convoy protection or patrol duties sailed as planned. In the event that a real threat from the French materialized by sea, the mutiny would be halted and the ships of the Channel Fleet, commanded by Admiral Alexander Hood, would loyally defend their country. The rebellious sailors made it a point to celebrate King George III’s birthday with 21-gun salutes, causing one French revolutionary to laugh: “A floating republic! My God, that’s funny!”
For two weeks the representatives of the mutineers attempted to negotiate without success, demanding an end to the “purser’s pound,” a practice in which the ship’s purser routinely kept two ounces of every pound of meat. The mutineers also demanded a much-needed pay raise, amnesty for all mutineers, and the reassignment of certain objectionable officers. Eventually, Howe, for whom the sailors held great respect, was called upon to mediate the crisis and reach a settlement in what came to be known as the “Breeze at Spithead.”
Meanwhile, the unrest at Spithead had spread to another Royal Navy anchorage, the Nore, in the Thames estuary. On May 12, inspired by the affair at Spithead, mutineers seized control of HMS Sandwich, a 90-gun ship of the line converted to a floating battery. Led by Richard Parker, a former naval officer, the mutiny at the Nore took on a character very different from its predecessor. Eight nonnegotiable demands were presented, among them an assurance that the terms offered to the sailors at Spithead would also apply to those at the Nore, including pardons for all mutineers and increased pay for the lowly tars.
The mutinous fleet blockaded the mouth of the Thames, preventing commercial traffic from reaching London, and Parker, a diehard French sympathizer, determined to sail his company to France. Such sentiment, however, ran counter to the sympathies of most British sailors. When the signal to set sail was raised, not a single vessel followed HMS Sandwich. The rebellion quickly fractured, and Parker was arrested and clapped into irons. Tried and convicted of mutiny, he was hanged from the yardarm of his ship on June 29. In all, 29 Nore conspirators were hanged, while many others were flogged, sentenced to prison, or banished to Australia. In a ghoulish footnote, Parker’s widow, Ann, dug up his body at Sheerness Fort and attempted to smuggle his remains back to London for Christian burial, but authorities discovered the body at the bottom of a cart and displayed it in a public tavern for a week before taking pity on the widow and returning her husband’s remains to her.
Further mutinies aboard ships of the Royal Navy occurred in 1797, including revolts on board several of Duncan’s ships in the North Sea and on vessels off the coast of Spain, near the Cape of Good Hope and in Irish waters. In one particularly violent revolt, sailors on the 32-gun frigate HMS Hermione mutinied in the West Indies, killed nearly all of their officers, and turned their ship over to the Spanish.
Theobald Wolfe Tone, the Irish rebel leader, was well aware of the British mutinies, and repeatedly urged the French that the time was ripe to carry out the long-delayed invasion of Ireland. Much to Tone’s disgust, months passed without action. While the weather steadily worsened, the 18,000 French and Dutch troops who had boarded the troopships for Ireland began to sicken and die in the fetid holds in Texel harbor. In August, the invasion was cancelled and the troops returned to shore.
Duncan Prepares for the Dutch Offensive
By September, Duncan’s squadron off the coast of Texel had been battered by the same heavy weather in the North Sea, and British provisions, too, were running low. Duncan was ordered to Yarmouth with the majority of his warships for much-needed refitting and resupply. His parting words to his captains were defiant. “I shall not, gentlemen, put foot off the ship,” he said. “Your supplies of water and provisions shall be sent to you in the morning, and I hope to be able to sail again in 20 hours, when an early meeting with the enemy will give us cause to rejoice.”
Duncan left a skeleton force off the Dutch coast to warn of any movement by the enemy squadron under the command of Admiral Jan Willem de Winter, who had arrived at Texel in June. Under Captain Henry Trollope, the token British force at times included as few as three or four ships—Trollope’s 74-gun HMS Russell, the 50-gun frigate Adamant, and the cutters Black Joke and Active. To give the appearance that a much larger British force remained on the blockade line, Trollope ran up signal flags to fictitious ships and conducted maneuvers as if in concert with other vessels.
When de Winter arrived at Texel in June, the expectation was that the invasion plan would go forward in the near future; with its cancellation, the Dutch ships languished in harbor, their combat readiness degrading daily. The Committee for Naval Affairs in The Hague, aware that the British force opposite Texel was understrength, ordered de Winter to take the offensive in early October. “We order you immediately to set sail with the first good wind,” the directive read.
As the sun was rising on the morning of October 8, the Dutch spotted Trollope’s trip wire. Black Joke made for Yarmouth with all haste to raise the alarm. Meanwhile, de Winter, following orders, retired closer to his base at Texel. Although his ships had not finished replenishing their stores, Duncan feared that Trollope might be attacked by a superior Dutch force and annihilated or—even worse—that the Dutch fleet might be screening another French invasion force. When word of the Dutch sortie reached him on the morning of October 9, Duncan ordered the balance of the British fleet to set sail immediately. By the morning of the 11th, Duncan had rendezvoused with Trollope and approached near enough to the Dutch coastline to observe 22 merchant ships at anchor in Texel harbor.
The opposing British and Dutch forces were roughly equal in number, and in comparison to other naval squadrons of the day, neither appeared to be substantial. Duncan’s fleet consisted of 24 ships, including the 74-gun ships of the line Bedford, Triumph, Montagu, Russell, Powerful, Monarch, and Venerable. The 64-gun warships were Lancaster, Belliqueux, Ardent, Monmouth, Veteran, Agincourt, and Director, the last of which was commanded by Captain William Bligh of Mutiny on the Bounty fame. The frigates Isis and Adamant, each with 50 guns, Beaulieu with 40, and the smaller Circe with 28 were supported by the cutters Martin, Rose, King George, Active, and Diligent.
HMS Venerable, Duncan’s flagship, was a third-rate ship of the line. These vessels typically carried 64 to 80 guns on two gun decks. Launched in April 1784, Venerable mounted a total of 28 large 32-pounder cannons on its gun deck, 28 smaller 18-pounders on its upper gun deck, and secondary armament of 18 9-pounders on the quarterdeck forecastle. Venerable displaced 1,669 tons, while her length was 170 feet and her beam slightly wider than 47 feet. In comparison, first-rate ships of the line were typically armed with 100 guns, second-rates with 90, and fourth-rates with 54 to 60 guns each. At least a few of Duncan’s complement had originally been conceived as “Indiamen” meant for commercial trade in the Far East but then converted to warships.
The Dutch fleet was similar to its adversary in strength, with none of its ships classified higher than third-rate. De Winter’s flag flew aboard the 74-gun Vrijheid. The remainder of the fleet was composed of the 76-gun Staten Generaal; the 74-gun Jupiter and Brutus; the 68-gun Cerberus, Gelijkheid, Haarlem, Leyden, and Tjerk Hiddes; the 64-gun ships Hercules and Wassenaer; and the lesser-armed Alkmaar, Batavier, Beschermer, Delft, Mars, Monnikendam, Ambuscade, Heldin, Minerva, and Waakzamheid. These were supported by the 18-gun brigs Atalanta, Daphne, Ajax, and Galathe, along with the tiny Het Haajse with six cannons.
The Opposing Admirals
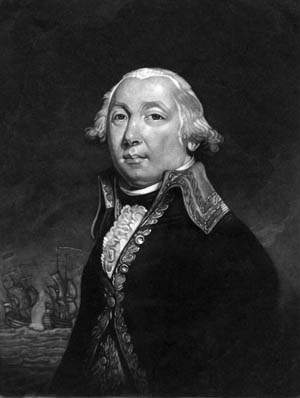
A native Scotsman, Duncan had been born in Dundee in 1731. He had joined the Royal Navy at the age of 15 and sailed with the naval squadron that delivered the British land force under General James Braddock to America during the French and Indian War. Rising steadily, he served successively as captain of the warships Valiant, Monarch, and Edgar, and he was commended for bravery on several occasions. In 1783, Duncan attained the rank of rear admiral, and in the spring of 1795 he was elevated to commander in chief of the North Sea fleet.
De Winter, at 47, was two decades younger than his opponent. Having served in the Dutch Navy as a young man, his antiroyalist political leanings forced de Winter to flee to France. Later, emboldened by the revolution, he joined the French Army, rose to the rank of brigadier general, and returned to the Netherlands after France took control of the country in 1795. The following year, de Winter reentered naval service as vice admiral and commander of the Dutch fleet.
When it was determined that the Dutch warships had not returned to their harbor, Duncan sailed south in search of the enemy. De Winter, meanwhile, was sailing north-northeast in a westerly wind. On the morning of October 11, the two fleets sighted one another roughly 18 miles off the Dutch coast near the village of Camperdown. Aware that his ships were of shallower draft than those of his enemy, de Winter attempted to lure the British into shoal waters to impede their maneuverability. Realizing the identity of the opposing commander, Duncan punned: “Gentlemen, you see a severe winter approaching. I advise you to keep up a good fire!” Alert to the danger of the shallows and the prospect that the Dutch fleet might slip away, Duncan reacted quickly, abandoning an earlier attempt to form a line of battle to confront de Winter.
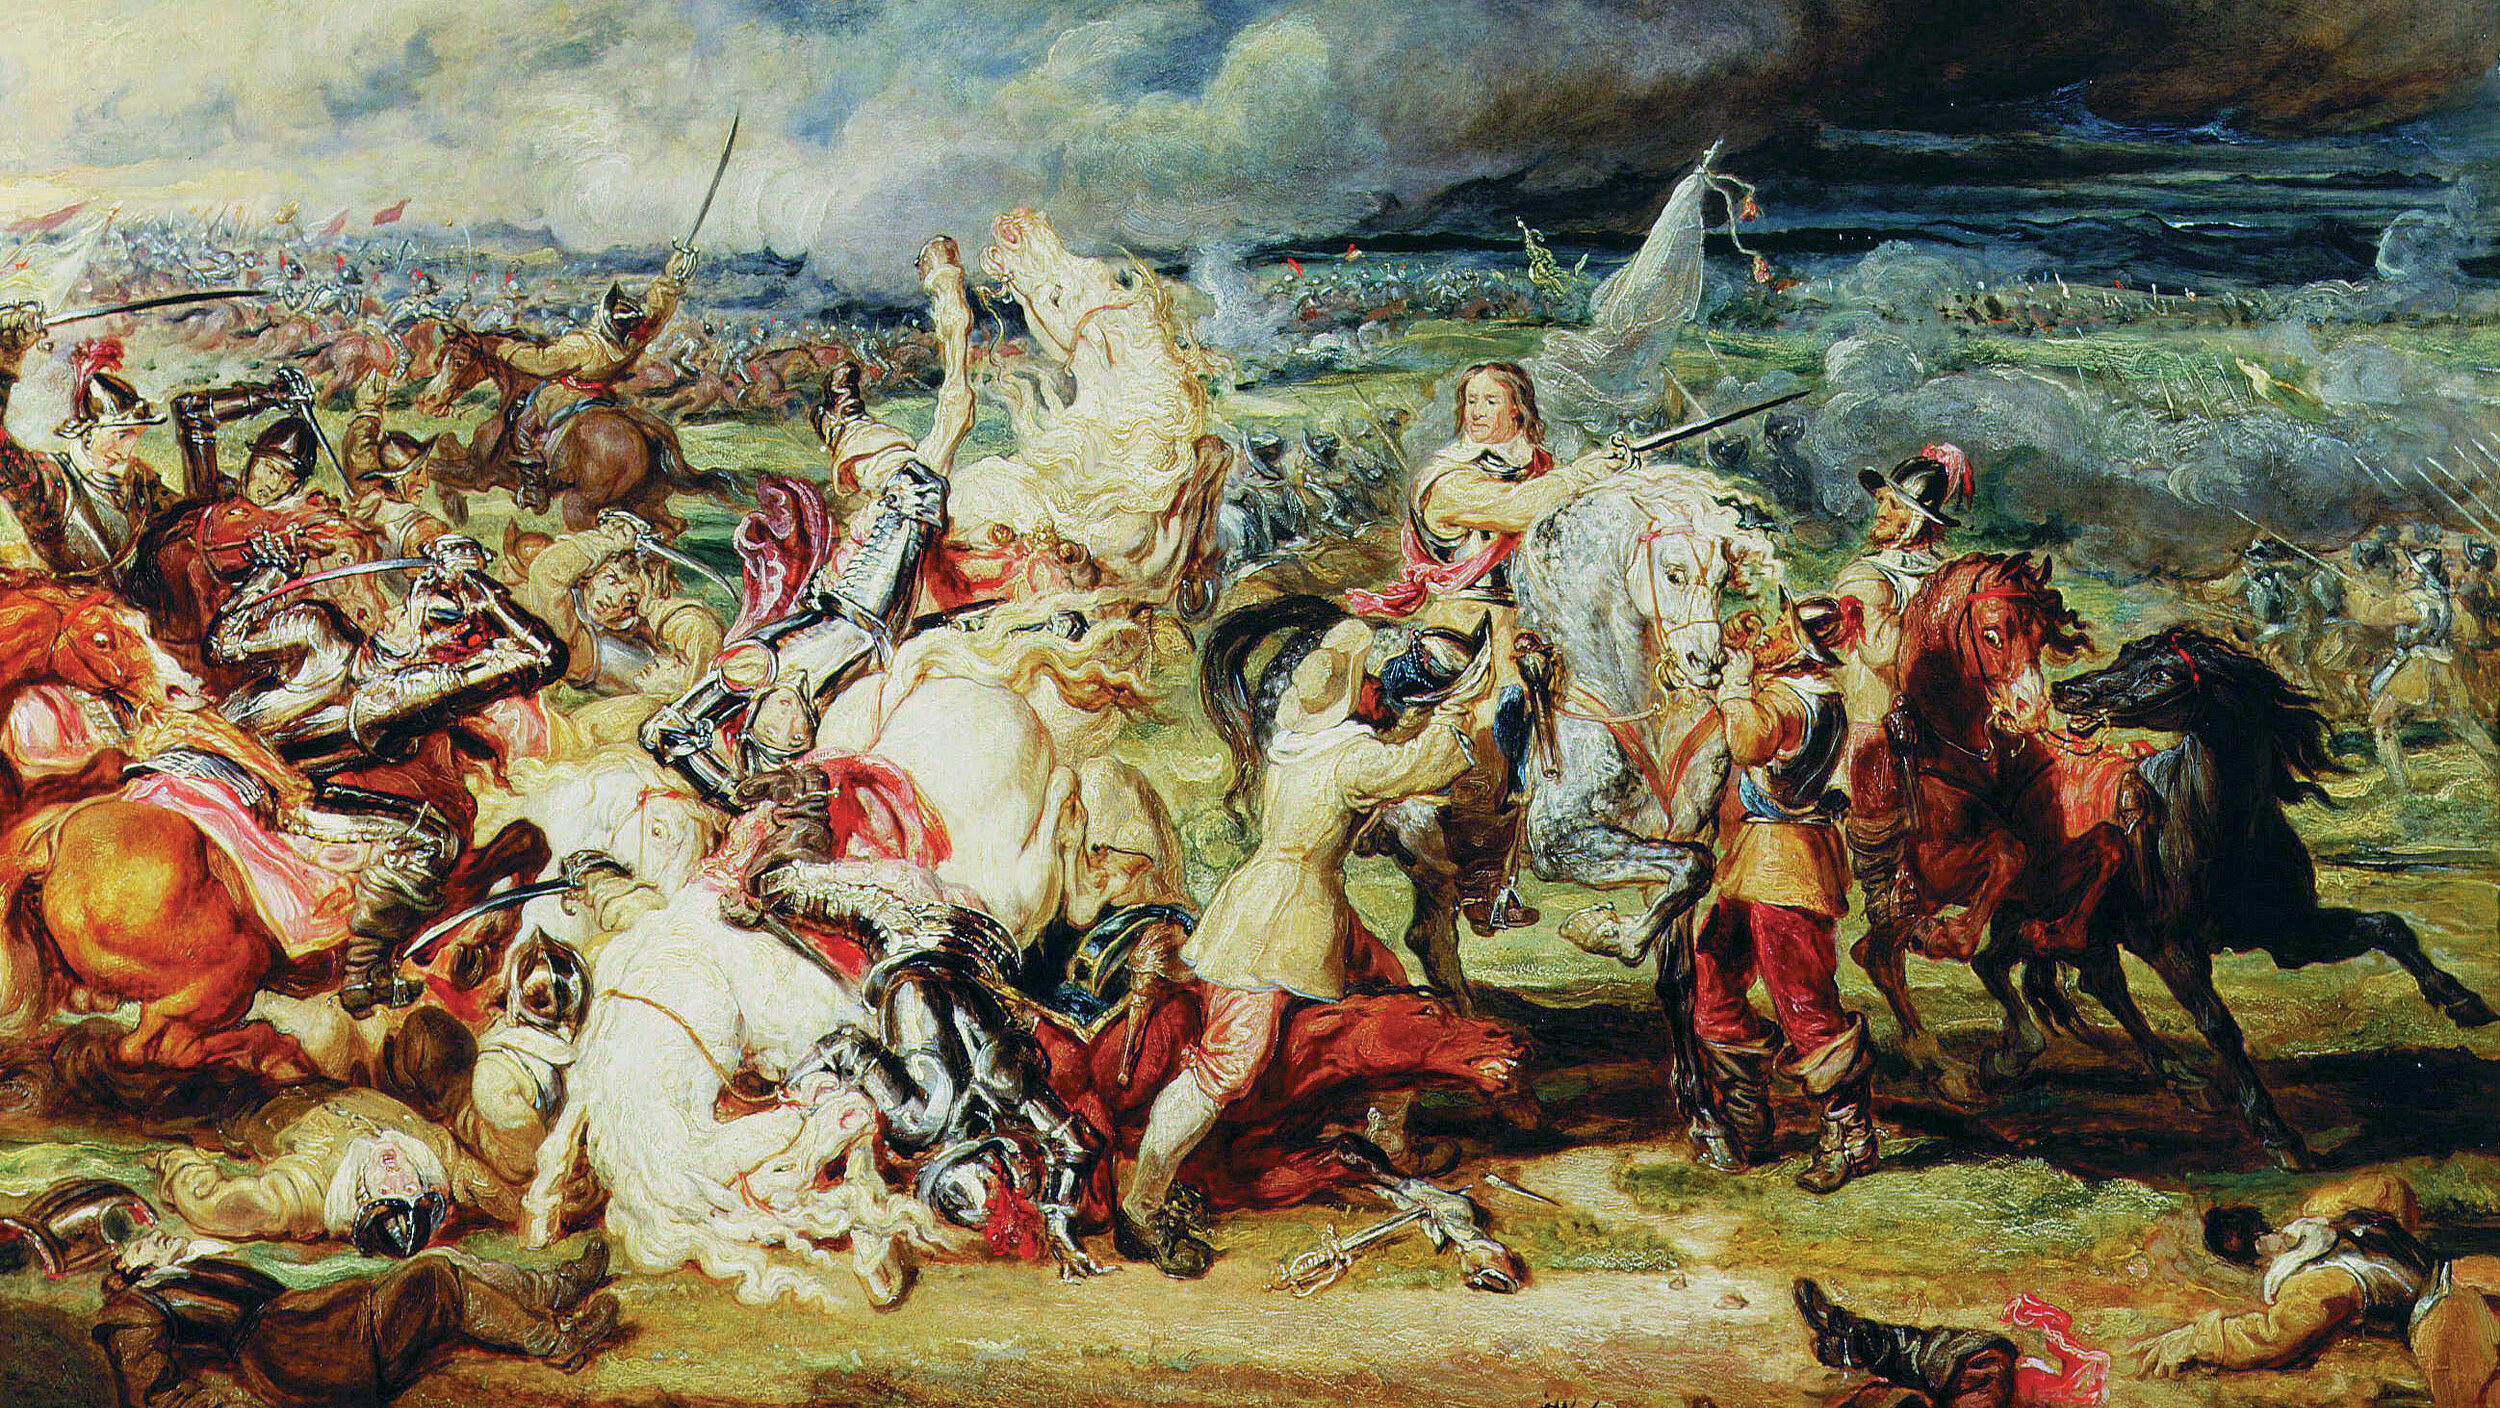
The Battle Begins
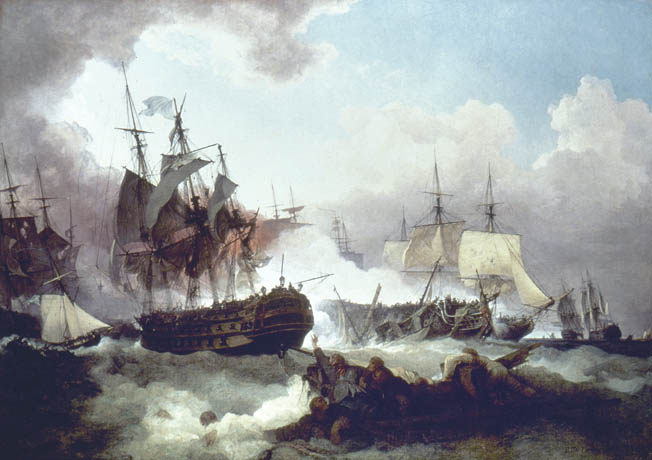
“At nine o’clock in the morning of the 11th,” Duncan wrote to the Admiralty two days after the battle, “I got sight of Captain Trollope’s squadron, with signals flying for an enemy to leeward; I immediately bore up, and made the signal for a general chase, and soon got sight of them, forming in a line on the larboard tack to receive us, the wind at N.W. As we approached near, I made the signal for the squadron to shorten sail, in order to connect them; soon after I saw the land between Camperdown and Egmont, about nine miles to the leeward of the enemy. Finding there was no time to be lost in making the attack, I made the signal to bear up, break the enemy’s line, and engage them to leeward, each ship her opponent, by which I got between them and the land, whither they were fast approaching.”
Closing in two ragged lines, Duncan made for the van of the Dutch fleet, meanwhile ordering Vice Admiral Richard Onslow, aboard HMS Monarch, to break the Dutch line of battle near the rear. When one of Onslow’s lookouts shouted that the Dutch ships were too close together to break their line, the skipper responded defiantly, “The Monarch will make a passage!” Fellow captain John Inglis, a hot-blooded Scot commanding Belliqueux, was even more adamant. “Damn!” he cried, throwing his useless signal book to the deck. “Up with the helm and gang into the middle o’ it!”
Onslow was as good as his word. Monarch was the first to breach the Dutch line, slamming a broadside into Haarlem and Jupiter as she passed between them at about 12:30 pm. HMS Powerful, close behind, took on Haarlem from the weather side, while Monarch became locked in close combat with Jupiter on the lee. The movement unavoidably exposed Monarch to fire from Monnikendam and Atalanta, which blasted away gamely until forced to retire by the heavy guns of the British vessel. Monmouth and Russell engaged Alkmaar and Delft at the end of the Dutch line, while the remainder of Onslow’s group, including Beaulieu, Adamant, Veteran, and Montagu, followed the admiral into the melee.
 Inexplicably, Captain John Williamson held Agincourt out of the fray. Following the battle, Williamson faced court-martial on a charge of failing to engage the enemy as directed by Duncan. Williamson’s principal accuser was Captain Thomas Hopper, commander of the Royal Marine contingent aboard Agincourt. “This is the second time that I have seen the British flag disgraced by the cowardice of my captain!” bemoaned Hopper. Eighteen years earlier, Williamson, as a young lieutenant, had been present in the Hawaiian Islands with Captain James Cook and was reported to have quickly fled the area, leaving Cook to be murdered by Hawaiian natives on the beach. Ultimately, Williamson was found guilty and cashiered from the Royal Navy.
Although Jupiter had been the first Dutch ship to come under fire, the gallant 74-gun vessel was the last of those at the end of the Dutch line to strike its colors. Hercules caught fire on the poop deck and quickly staggered out of line and was forced to surrender after her crew had thrown most of its powder into the sea to prevent a catastrophic explosion if the fire reached the magazine. Delft was raked by broadsides from Monmouth and Montagu, dismasted, and forced to surrender.
Twenty minutes behind Onslow, Duncan attempted to breach the Dutch line astern of Vrijheid, but Staten Generaal closed the gap and forced HMS Venerable to pass to her stern. Venerable slipped to the lee and managed to come alongside her intended target, Vrijheid. Flagship fought flagship, while Ardent pounded away at Vrijheid from the weather side. Bedford became the third British ship to hit Vrijheid while squeezing past the stern of Gelijkheid. Triumph, closely following Venerable, became entangled with Wassenaer. While Venerable was occupied with Vrijheid, the center of the Dutch line remained relatively unengaged. Brutus, Leyden, and Mars heroically sped to the aid of their overmatched flagship and poured concentrated fire into Venerable. Other ships of Duncan’s group, particularly Ardent, were taken in the flank by the Dutch trio.
So damaged was Venerable that she was compelled to withdraw on the starboard tack. At the height of the battle, a portion of Venerable’s mast was shot away, carrying with it Duncan’s personal flag. The absence of the admiral’s flag was an acknowledged signal of surrender, so a 22-year-old seaman, Jack Crawford, took up the ensign, climbed the remnant of the mast, and nailed the colors back into place, earning himself the nickname “Hero of Camperdown” and providing the source of a familiar naval phrase “to nail your colors to the mast.” During the cannon fire, Duncan remained entirely unfazed. Seeing a 13-year-old midshipman ducking a blast, the admiral admonished him gently: “Very well, my boy, but don’t do it again. You might put your head in the way of a shot.”
Triumph, having vanquished Wassenaer, joined Ardent and Director in continuing to pummel Vrijheid. The Dutch flagship lost all three masts, at least one of them falling to starboard and rendering her guns on that side useless. Gallant but battered to a hulk, Vrijheid finally struck her colors. De Winter was captured by a boarding party while hastily attempting to nail a sheet of lead over a shot hole in the bottom of a small punt. “My destiny was not foreseen,” he said calmly as his captors closed in. William Bligh, with customary ill grace, alienated many of his fellow officers by claming an inordinate amount of credit for Vrijheid’s capture. Curiously, when Wassenaer initially surrendered and fell out of the Dutch line of battle, one of the 18-gun Dutch brigs began firing at the disabled vessel until she raised her flag and resumed fighting. Seeing the Dutch flag hoisted once again, HMS Russell proceeded to subdue Wassenaer once and for all.
Eleven Prizes
Casualties began to mount on both sides, and surgeons did what they could to care for the wounded. Aboard Russell, Dr. George McGrath described an amputation at the height of the battle. “He was laid on the table and the operation performed in such a way which he bear very well indeed so much so that he did not require an assistant to hold him on the table,” reported McGrath. “Lucky it was that he bare it so well, as a shot at this time came into the cockpit and passed the operating table close. This startled all the women who formed the chief of my assistance.”
Several Dutch ships, their captains determining that the odds were against them, turned from the British and independently made for the safety of shallow water. Among these was Beschermer, which had sailed at the head of the Dutch line. Such behavior might appear at first glance to have been outright cowardice, but it was customary at the time for frigates to stand off from an engagement of heavier warships. In contrast, several of the Dutch frigates fought on gamely against their more heavily gunned British opponents. Drawn by the rumble of cannon fire, hundreds of Dutch onlookers watched from shore as the two sides battled distantly in the fog and rain.
The surrender of Vrijheid brought an end to the close-quarter melee, and Venerable found herself in dangerously shallow water—only nine fathoms deep. Quickly, Duncan, Onslow, and the other British captains assessed their situation. Eleven Dutch warships—Vrijheid, Jupiter, Tjerk Hiddes, Gelijkheid, Haarlem, Hercules, Wassenaer, Alkmaar, Delft, Monnikendam, and Galathe—had been taken as prizes. Dutch casualties included a staggering 540 killed and more than 600 wounded. Among the dead were the captains of Vrijheid and Wassenaer, while three Dutch admirals had been wounded.
“Rather Take a Brave Man’s Hand Than His Sword”
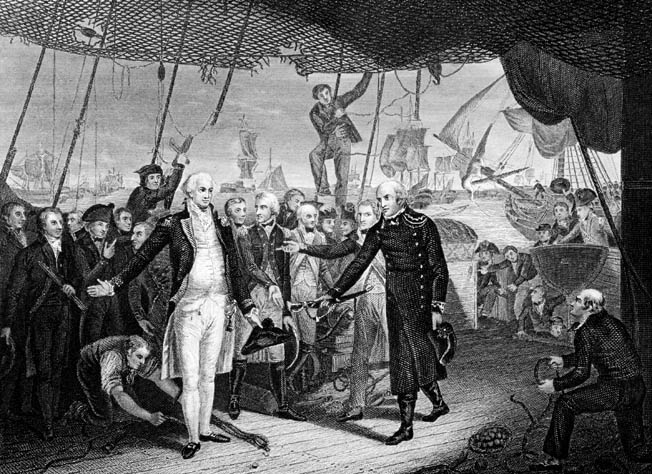
The defeated de Winter was brought aboard Venerable. When he offered his sword to Duncan, the latter refused to accept it and shook his adversary’s hand instead. “I would rather take a brave man’s hand than his sword,” said the Scotsman. Both Duncan and de Winter were men of considerable physical stature, standing well over six feet tall, and de Winter remarked that it was miraculous that two men of their size could come through such a terrific battle unscathed. Duncan agreed, and the two commanders retired below decks for a quick but companionable dinner of cold beef and wine. De Winter remained in British hands until December, when he was exchanged. A Dutch court of inquiry later concluded that the commander had performed well during the engagement and had served the Dutch flag honorably.
For the British, it was apparent to all that they had fought a foe worthy of respect. More than 200 British seamen were killed and another 800 were wounded at Camperdown. Among the slain was the heroic Captain Richard Burgess of HMS Ardent, which had been locked in deadly combat with Vrijheid. Although several Dutch ships were still attempting to escape, the British were in no shape to pursue the enemy. A number of their own vessels had sustained heavy damage. Dutch gunners had concentrated on the hulls of the British ships, and Ardent alone had suffered more than 100 hits.
Several factors contributed to the British victory at Camperdown, not the least of which was the employment of short, smoothbore, 32-pounder cannons, which fired round shot at low muzzle velocity during the engagement and produced a greater number of lethal wooden splinters when the shots struck home. The British sailors had also been at sea for a longer period than their Dutch counterparts, who had suffered from an erosion of their sailing skills due to long months of enforced boredom in the harbor at Texel. In his after action report, de Winter identified four reasons for his defeat: the size and superiority of the British ships, the enemy’s ability to work together, the advantage of being the attacker, and the fact that some of his own ships had retired prematurely from the fight.
On October 15, Duncan wrote to his brother-in-law, Robert Dundas, lord advocate of Scotland, as his ship neared home. “I write you these few lines to say I hope the action I have had with the Dutch, who fought with their usual gallantry, is not exceeded by any in this war,” he informed his kinsman. “We have suffered much; the returns I have had, and have not had half, exceed 191 killed and 565 wounded. From only two Dutch ships 250 killed and 300 wounded. We was [sic] obliged being so near land to be rather rash in our attack, by which we suffered more. Had we been ten leagues at sea none would have escaped. We were much galled by their frigates when we could not act; in short, I feel perfectly satisfied all was done that could be, nor have any fault to find. The Admiral [de Winter] is on board with me, and a most agreeable man he is, speaks English well, and seems much pleased with his treatment. I have assured him, and with Justice, nothing could exceed his gallantry. I believe the pilot and myself were the only two unhurt on the quarter-deck, and de Winter, who is as tall and big as I am, was the only one on his quarter-deck left alive.”
The Legacy of the Battle of Camperdown
The battered British ships reached Yarmouth on October 18, but their prizes were so badly damaged that they were deemed unfit for further service and broken up. Delft, in fact, had sunk in heavy seas en route. In the wake of the Battle of Camperdown, Duncan was given the title Viscount Duncan of Camperdown and Baron Duncan of Lundie, while Onslow was made a baronet and Captains Trollope and W.G. Fairfax of Venerable were knighted. One hundred and eighty mutineers, held in irons aboard the prison hulk Eagle, were pardoned as well. In 1799, Duncan commanded a naval force that landed at Den Helder, near the anchorage of the remaining Dutch ships, which surrendered almost immediately. He served in the Royal Navy until his retirement in the spring of 1800 and died of a stroke four years later at the age of 70.
The decisive defeat of the Dutch fleet at Camperdown postponed another French expedition to Ireland for nearly a year—one that was thwarted yet again by bad weather. By that time, the strength of the Irish rebellion had ebbed significantly. Within a decade, Duncan’s heroics at Camperdown had been eclipsed by those of Admiral Horatio Nelson. Interestingly, Duncan’s improvised tactics, employed in haste at Camperdown, were adopted by Nelson to pierce the French fleet at Trafalgar and win the most illustrious victory in British naval history.


Am looking at an article/photograph concerning the presentation, by William Oliphant Hutchison, of a huge oil painting commemorating the Battle of Camperdown. The presentation was made to the Royal Naval and Royal Marine Canteen, Rosyth, in 1941. My grandfather, CPO Albert Whiting, who was in charge of the Canteen appears in the photo. I’m interested to find out where this painting is now and whether it can be viewed? Can you assist??