By Christopher Miskimon
The midday sun sat almost directly overhead as Subaltern T. Hepple led his tank out of the French village of Petit Vimy. Nearby was the famous Vimy Ridge, where a generation earlier British soldiers had struggled so desperately during World War I. It was just before 12 pm on May 21, 1940, and the Battle of France was in full swing. The Allied armies were reeling before the Nazi onslaught, unable to match the blitzkrieg. Hepple was leading a scouting party on reconnaissance ahead of a British counterattack aimed at blunting that assault. His unit, B Company, 7th Battalion, Royal Tank regiment (7RTR), was a key element of that attack.
As his tank, a light Mk. VIB named Guinevere, rumbled down the road, antitank shells began landing just a few yards ahead. Fortunately for Hepple and his crew, the enemy gunners had led their target just a little too much. Hepple could not spot the guns, so he ordered his tank into cover and radioed a report to his headquarters. Receiving no reply, he moved on, spotting a company of tanks in the distance. The British officer thought they were French tanks and moved toward them, but they left before he could approach.
Soon he reached the town of Dainville. Suddenly Hepple spotted two men hiding in a cornfield just off the road. Chasing them into the field, Hepple opened fire with his tank’s .303 machine gun. One of the Germans was hit, sending him sprawling to the ground. The other, a noncommissioned officer, quickly surrendered. Hepple had him sit on the rear of the tank, covering him with his revolver as they continued down the road. They passed the wrecks of automobiles and the body of a dead civilian in the mile to the next village. Once there the British tankers found the hamlet occupied by German troops. Their fire flew all around the tank as Hepple and his crew beat a hasty retreat back to British lines. He found a unit of the Durham Light Infantry in Dainville and handed over his prisoner to them. Afterward he returned to his company commander, Captain M.W. Fisher, and made his report.
Operation Fall Gelb
Hepple’s abortive reconnaissance mission was part of a greater effort that May morning. The war had been going badly for the Allies since the Wehrmacht invasion began 11 days earlier. Up to that point, World War II in Western Europe had been almost comically quiet, leading pundits in the press to label it the “sitzkrieg.” That changed on May 11, when the Nazis enacted operation Fall Gelb (Case Yellow), which was their plan to invade France and the Low Countries. More than three million soldiers supported by thousands of tanks, artillery pieces, and aircraft attacked the Allies.
In terms of numbers, the British, French, Dutch, and Belgians matched or even exceeded their attackers. They had more artillery and tanks. Many of the French tanks in particular were considered qualitatively superior to what the Germans were fielding. Also, the Allies were fighting a defensive battle, one where their near parity in troop numbers boded ill for German success. Many thought it would be a repeat of World War I.
Any overconfidence in Allied superiority was dashed when the blitzkrieg struck. Although some troops in both the French and English armies understood what modern mechanization meant for the conduct of warfare, others were not so astute. Many senior leaders in particular were unprepared for the pace of armored warfare and could not react quickly enough to German movements. This meant Allied leaders often lacked good intelligence on the enemy and that their countermoves came too late to make a difference.
Even German leaders were hard pressed to maintain an even pace. Only part of their army was mechanized, the rest moving by foot and horse as armies had for centuries. This left it better prepared for short, violent campaigns rather than long attritional struggles. Frequently the fast-moving panzer formations left behind their supporting infantry divisions, leaving them with only the few riflemen riding alongside in half-tracks and trucks. In some cases the infantry units were several days’ march behind the armored divisions, creating gaps that were thinly held if at all.
This was the situation the opposing armies faced when they met near the French town of Arras on May 21, 1940. The panzer divisions had raced ahead, threatening to cut off Allied units and destroy them piecemeal. At the same time, the distance they had gone from their support created an opportunity the Allies could exploit if they could move quickly enough. Success would result in the panzer units being cut off from their fuel and supply sources. The tables would then be turned. A dire situation turned into a last minute victory, perhaps one big enough to turn the tide of the campaign and allow them time to consolidate and strike back.
Up to that point, the war had gone largely according to the German plan despite the problems caused by the speed of the panzer formations. When the Nazis attacked on May 10, they did so with three Army Groups. Army Group C attacked the Maginot Line in the south, diverting French attention and resources. In the north, Army Group B invaded Holland and Belgium, drawing both the British Expeditionary Force (BEF) and French formations toward it. The main German blow came in the center using Army Group A, which came through the Ardennes, a heavily forested area thought impenetrable to large armored formations. It quickly crossed the Meuse River and headed for the French coast to cut the Allied forces in half.
For several critical days the Allied intelligence services had tried to guess where the German main thrust was headed. Some thought it would turn south to encircle the Maginot Line, while others believed the panzers would make a dash for Paris. They eventually realized the goal but struggled to foil it in time.
Assembling an Allied Armored Counterattack
By May 20 the German XV Panzer Corps under Generalleutnant Hermann Hoth was near Arras. Two other corps-sized tank formations had already advanced farther. Generalleutnant Heinz Guderian’s XIX Panzer Corps had reached the English Channel and was securing bridges over the Somme River. Guderian’s troops had repulsed a French armored counterattack on May 17 led by Maj. Gen. Charles De Gaulle. The situation grew dire for the French and the BEF as the German thrust created a corridor between their forces.
French Commander-in-Chief General Maxime Weygand ordered a counterattack from the north and south to cut off the leading German divisions from their support. The French struggled to form a scratch force for their counterattack. Most of their tanks had been distributed among the infantry units in small groups, making it impossible to concentrate them. Assembling the requisite number of tanks for a counterattack would require a direct order to the infantry commanders threatening any who disobeyed with a court martial for disobedience. But it would take time to reassemble them into a coherent unit.
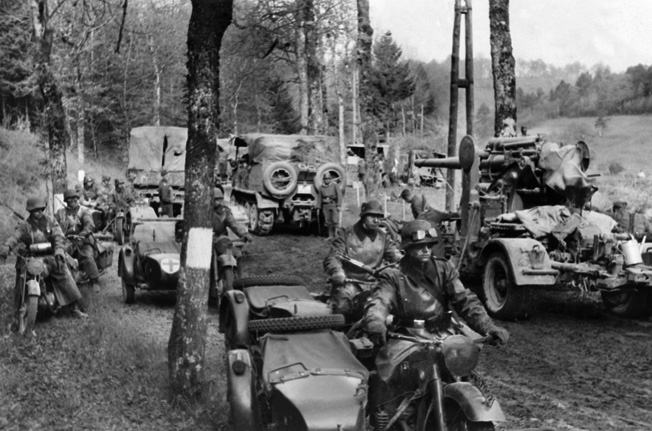
The British were better positioned to carry out their own plan, having kept their small tank force together. The 1st Army Tank Brigade was composed of the 4th and 7th Battalions, Royal Tank Regiment (RTR). The tank brigade was the only armored unit in the BEF, and it was below strength due to mechanical failures. In the beginning of the campaign, it moved north with the rest of the English force. Ordered south on May 15, the tankers were forced to conduct a 130-mile road march because freight trains were unavailable. The local road network was poor and streams of panicked refugees further slowed the brigade. Along the way, Luftwaffe ground attack aircraft strafed and bombed the long columns of tanks, trucks, and staff cars. The British were lucky, though, losing only a single tank when a bomb blew it onto its side.
Two British Columns
Once in place, the British organized their armor into two columns. The Right Column was composed of the 7th RTR, 8th Battalion of the Durham Light Infantry, 260 Anti-tank Battery of the Royal Artillery, a platoon from the antitank company of the 151st Brigade, and a machine-gun company and a scout platoon from the 4th Royal Northumberland Fusiliers. For artillery support, the column would have the 365 Field Battery of the Royal Artillery.
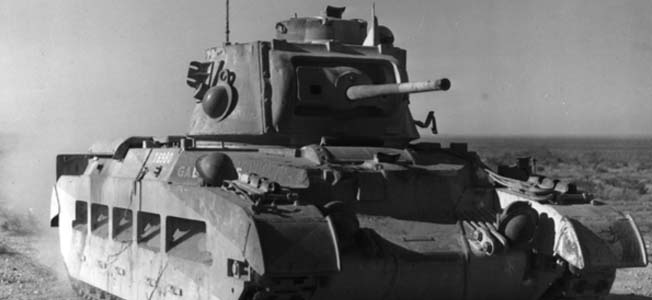
The Left Column was similarly organized. It comprised the 4th Battalion RTR and the 6th DLI as their primary components. In support the column boasted a machine-gun unit and scout platoon from the 4th Royal Northumberland Fusiliers. The Left Column’s antitank firepower came from the 206 Anti-tank Battery and another platoon from the 151st Brigade’s anti-tank company. In addition, the Left Column had the 368th Field Battery of the Royal Artillery. Between the two columns, the tanks available amounted to 58 Matilda Mark Is, 16 Matilda Mark IIs, and 14 Mark VIB light tanks. The precious Matilda IIs were divided equally between the tank regiments.
The Matilda I was an infantry support tank capable of only eight miles per hour. It was armed with either a .50- or .303-caliber Vickers machine gun. Despite its rather anemic armament, the Matilda I had up to 60mm of frontal armor. This made it resistant to the standard German antitank gun of the time, the 37mm PAK 36, which could penetrate only 29mm of armor at 500 meters. The Matilda I’s two-man crew consisted of a driver and a commander who also acted as the gunner. In practice this meant the commander had to divide his attention between the two duties. The machine-gun armament had almost no effect on any but the lightest German tanks; nevertheless, it could spray infantry or antitank guns with bullets from a distance with little fear of effective reply.

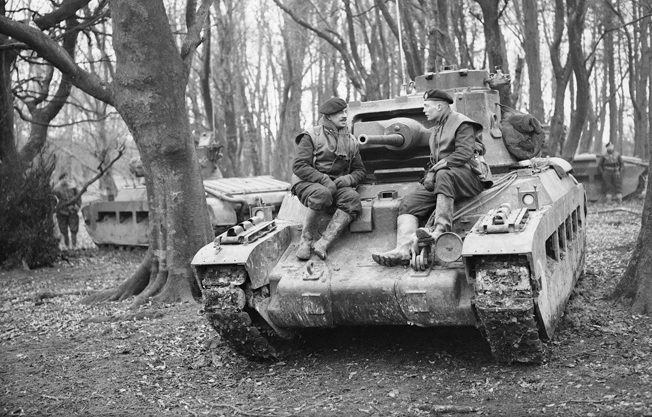
The British tank the German crews truly feared was the Matilda II, an improved model sporting a 2-pounder cannon that could pierce 37mm of 60-degree sloped armor at 500 yards. Unfortunately, the 2-pounder had only armor-piercing ammunition not high explosive, making it ineffective against enemy guns or infantry. Against such targets the tank depended on its coaxial machine gun. The Matilda II carried 78mm of frontal armor, making it nearly impervious to the PAK 36. It was faster than its predecessor but still only managed 15 miles per hour. As an additional advantage the Matilda II had a crew of four: a driver, gunner, loader, and commander. This freed the commander to control his tank and coordinate with his unit.
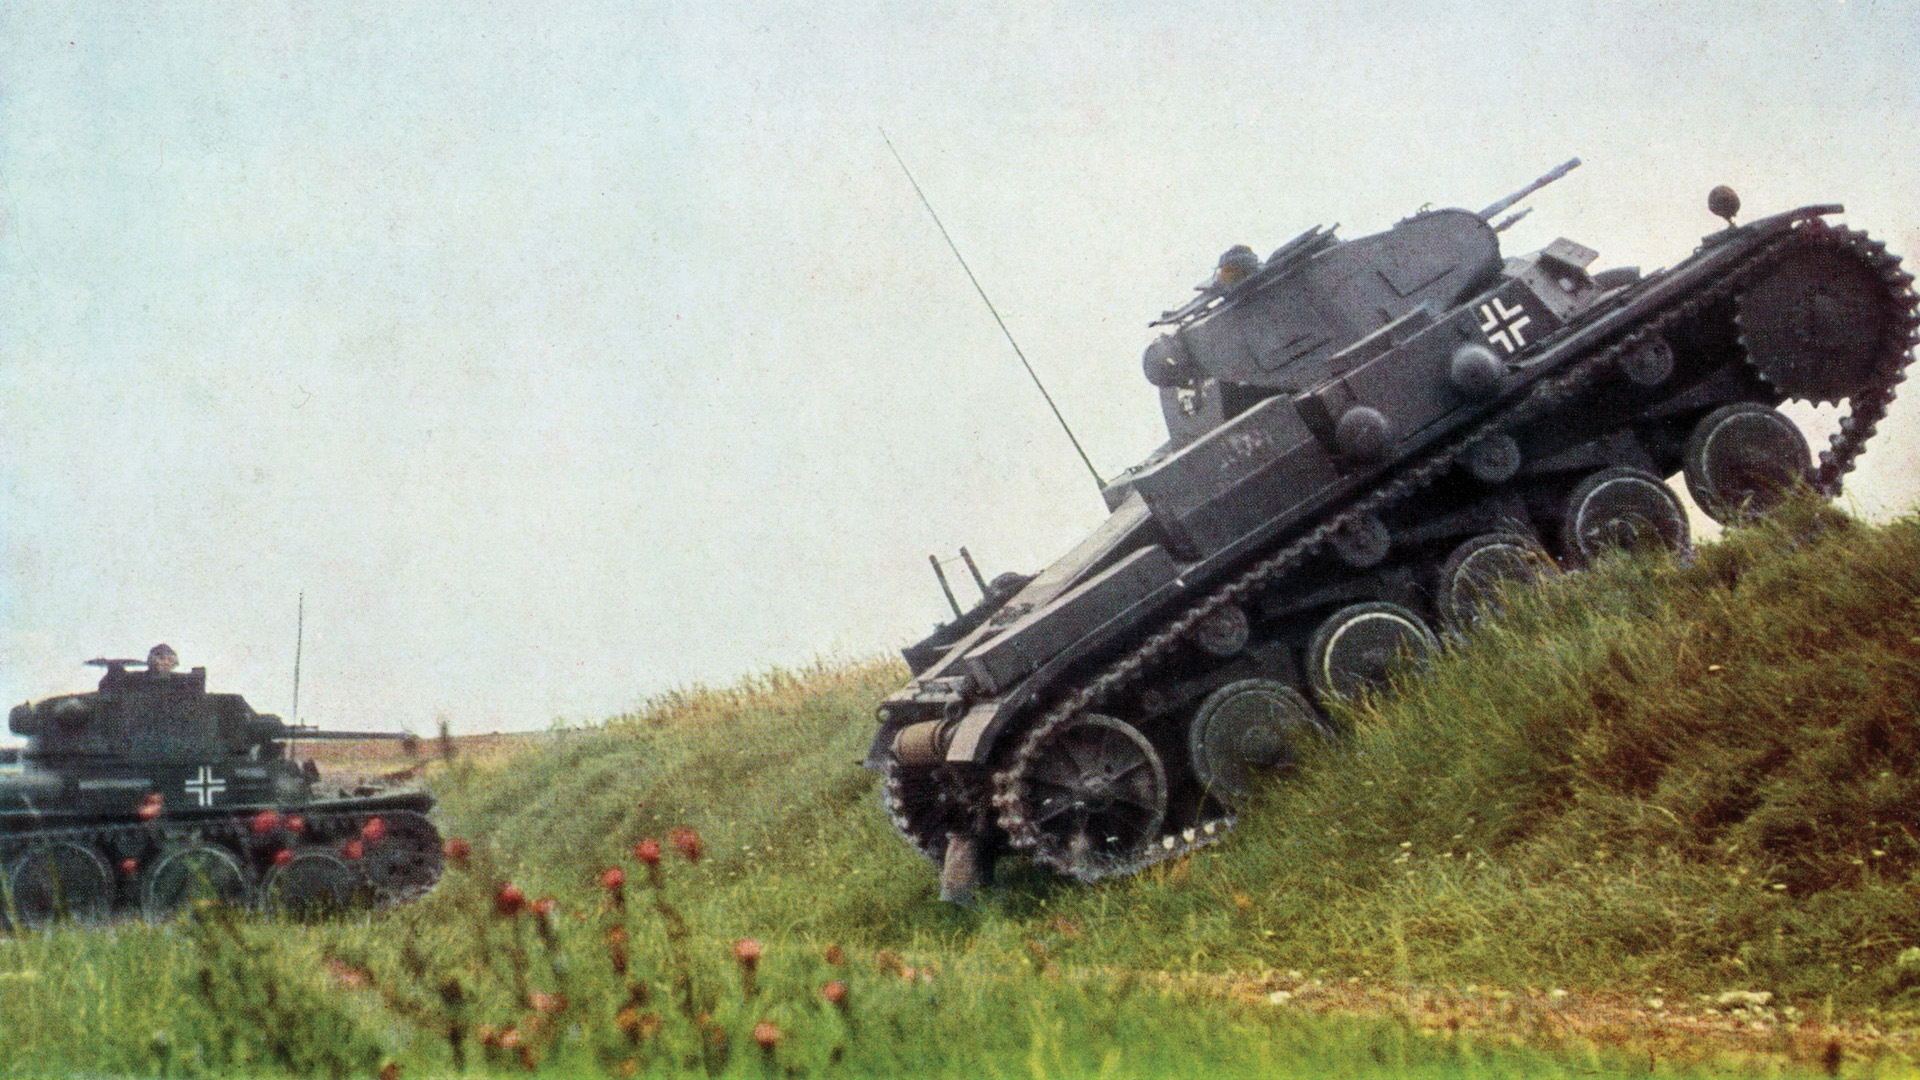
The Mark VIB was a light tank suited only for reconnaissance duty. It carried a .50 and a .303 Vickers machine gun side by side in the turret. Armor protection was a paltry 14mm that left it vulnerable to gunfire. The tank was rated at a maximum of 35 miles per hour on roads, but crews complained the tank’s suspension was so bad it could not move quickly cross-country. It had a three-man crew consisting of a driver, gunner, and commander.
The Plan of Attack
The plan of action called for the columns to move in parallel. The two columns would descend Vimy Ridge and move south toward Arras, passing the town to the west. Afterward the British would turn left and move south of Arras before forming a new line oriented toward the east. The distance for the Left Column was 18 miles. Since the Right Column would have to make its left turn farther out, it would cover 21 miles in total. The entire British force would have its right flank covered by a French armored unit, the 3rd Division Legere Mechanique.
From the beginning, the chance of victory for the British appeared tenuous at best. Originally, two entire divisions were to make the counterattack, the 50th and 51st Infantry Divisions reinforced with the 1st Army Tank Brigade. The counterattack went forward with what amounted to four battalions of tanks and infantry reinforced with what supporting arms were available in time. Both the English and French commands were having extreme difficulty moving forces and reacting to German movements.
Preparations had to be made quickly, causing misunderstandings and leaving insufficient time for planning at all levels. Leaders received orders without enough time to brief their subordinates properly. The infantry was still marching to their forming-up areas so the armor officers couldn’t coordinate with them. Few maps were available. Worse still, the entire brigade had been under radio silence since it was in Belgium. After the march the radios were switched back on, only to find the bulk of them had drifted off of frequency and could not be retuned in the time available. Most of the tankers would have to use flags and hand signals to communicate. Only the light tanks had working radios since they had used them during recent scouting missions.
Erwin Rommel’s 7th Panzer Division
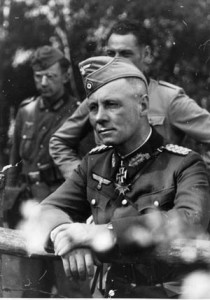
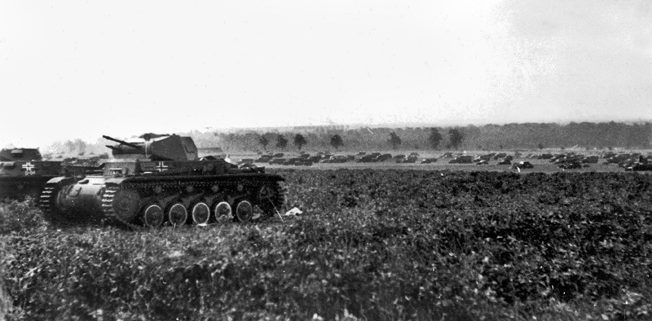
The German XV Panzer Corps was situated in the path of the British columns. The 7th Panzer Division under Generalmajor Erwin Rommel had a mission to isolate Arras from the west. For this purpose, it would be heading west and north into the oncoming British. Once west of Arras, the division was to seize crossings over the Scarpe River, a tributary of the Scheldt River. The 5th Panzer Division was assigned to protect the 7th’s right flank through supporting attacks. The inexperienced SS-Totenkopf Division was deployed on the left flank of the 7th Panzer Division. Rommel was still building his reputation during the Battle of France. He would gain everlasting fame as the Desert Fox in North Africa in less than a year’s time. For now, he was proving himself an aggressive and bold leader.
As events unfolded, the 5th Panzer Division was delayed and therefore never became involved in the Arras fighting. This left the 7th Panzer Division as the only armored force committed. To carry out his mission, Rommel had 36 PzKpfw IV tanks along with 106 PzKpfw 38(T)s. Unlike his British opponents, his tanks were liberally equipped with functioning radios and his crews were well-drilled with a decent amount of combat experience.
The 21-ton PzKpfw IV was Rommel’s largest tank but was designed for infantry support. It was armed with a short-barreled 75mm cannon. This fired a low-velocity round giving poor armor penetration, though its high-explosive round was deadly to exposed infantry and gun crews. It carried a maximum of 30mm of armor and could make 25 miles per hour. Its five-man crew allowed the commander to pay full attention to leading his tank.
The smaller PzKpfw 38(T) weighed in at only about 10 tons. It was actually a successful Czechoslovakian design inherited by the Germans after they occupied that country in 1939. A decent tank for this early stage of the war, it sported a 37mm cannon and a pair of machine guns. The tank’s armor was 25mm thick and it could go 26 miles per hour. It was rugged and reliable, so the Germans kept manufacturing them in captured factories. The light tank was issued to the 7th Panzer Division essentially as a replacement for the PzKpfw III, which was in short supply due to the expansion of the number of armored divisions in the German Army.
The Germans and British were on opposite courses, moving straight toward one another. The numerically superior Germans were about to run into a British armored force with fewer numbers of better protected tanks, only a few of which carried effective armament. By coincidence, both forces were scheduled to begin their attacks at about 2 pm on May 21. While Subaltern Hepple was carrying out his harrowing reconnaissance, troops on both sides were carrying out last-minute maintenance and waiting for the weary infantry to catch up and get into position.
Fateful Decisions by British Armor
Rommel’s tanks moved first when he ordered Panzer Regiment 25 forward at 2 pm. Its goal was the village of Acq, northwest of Arras. Rommel accompanied the leading elements, a normal practice for the German leader. After a short time, though, he had to leave to find his motorized infantry regiments, which were supposed to be close on the flanks of the panzer regiment. They were not in sight, which prompted Rommel to go find them and prod them forward.
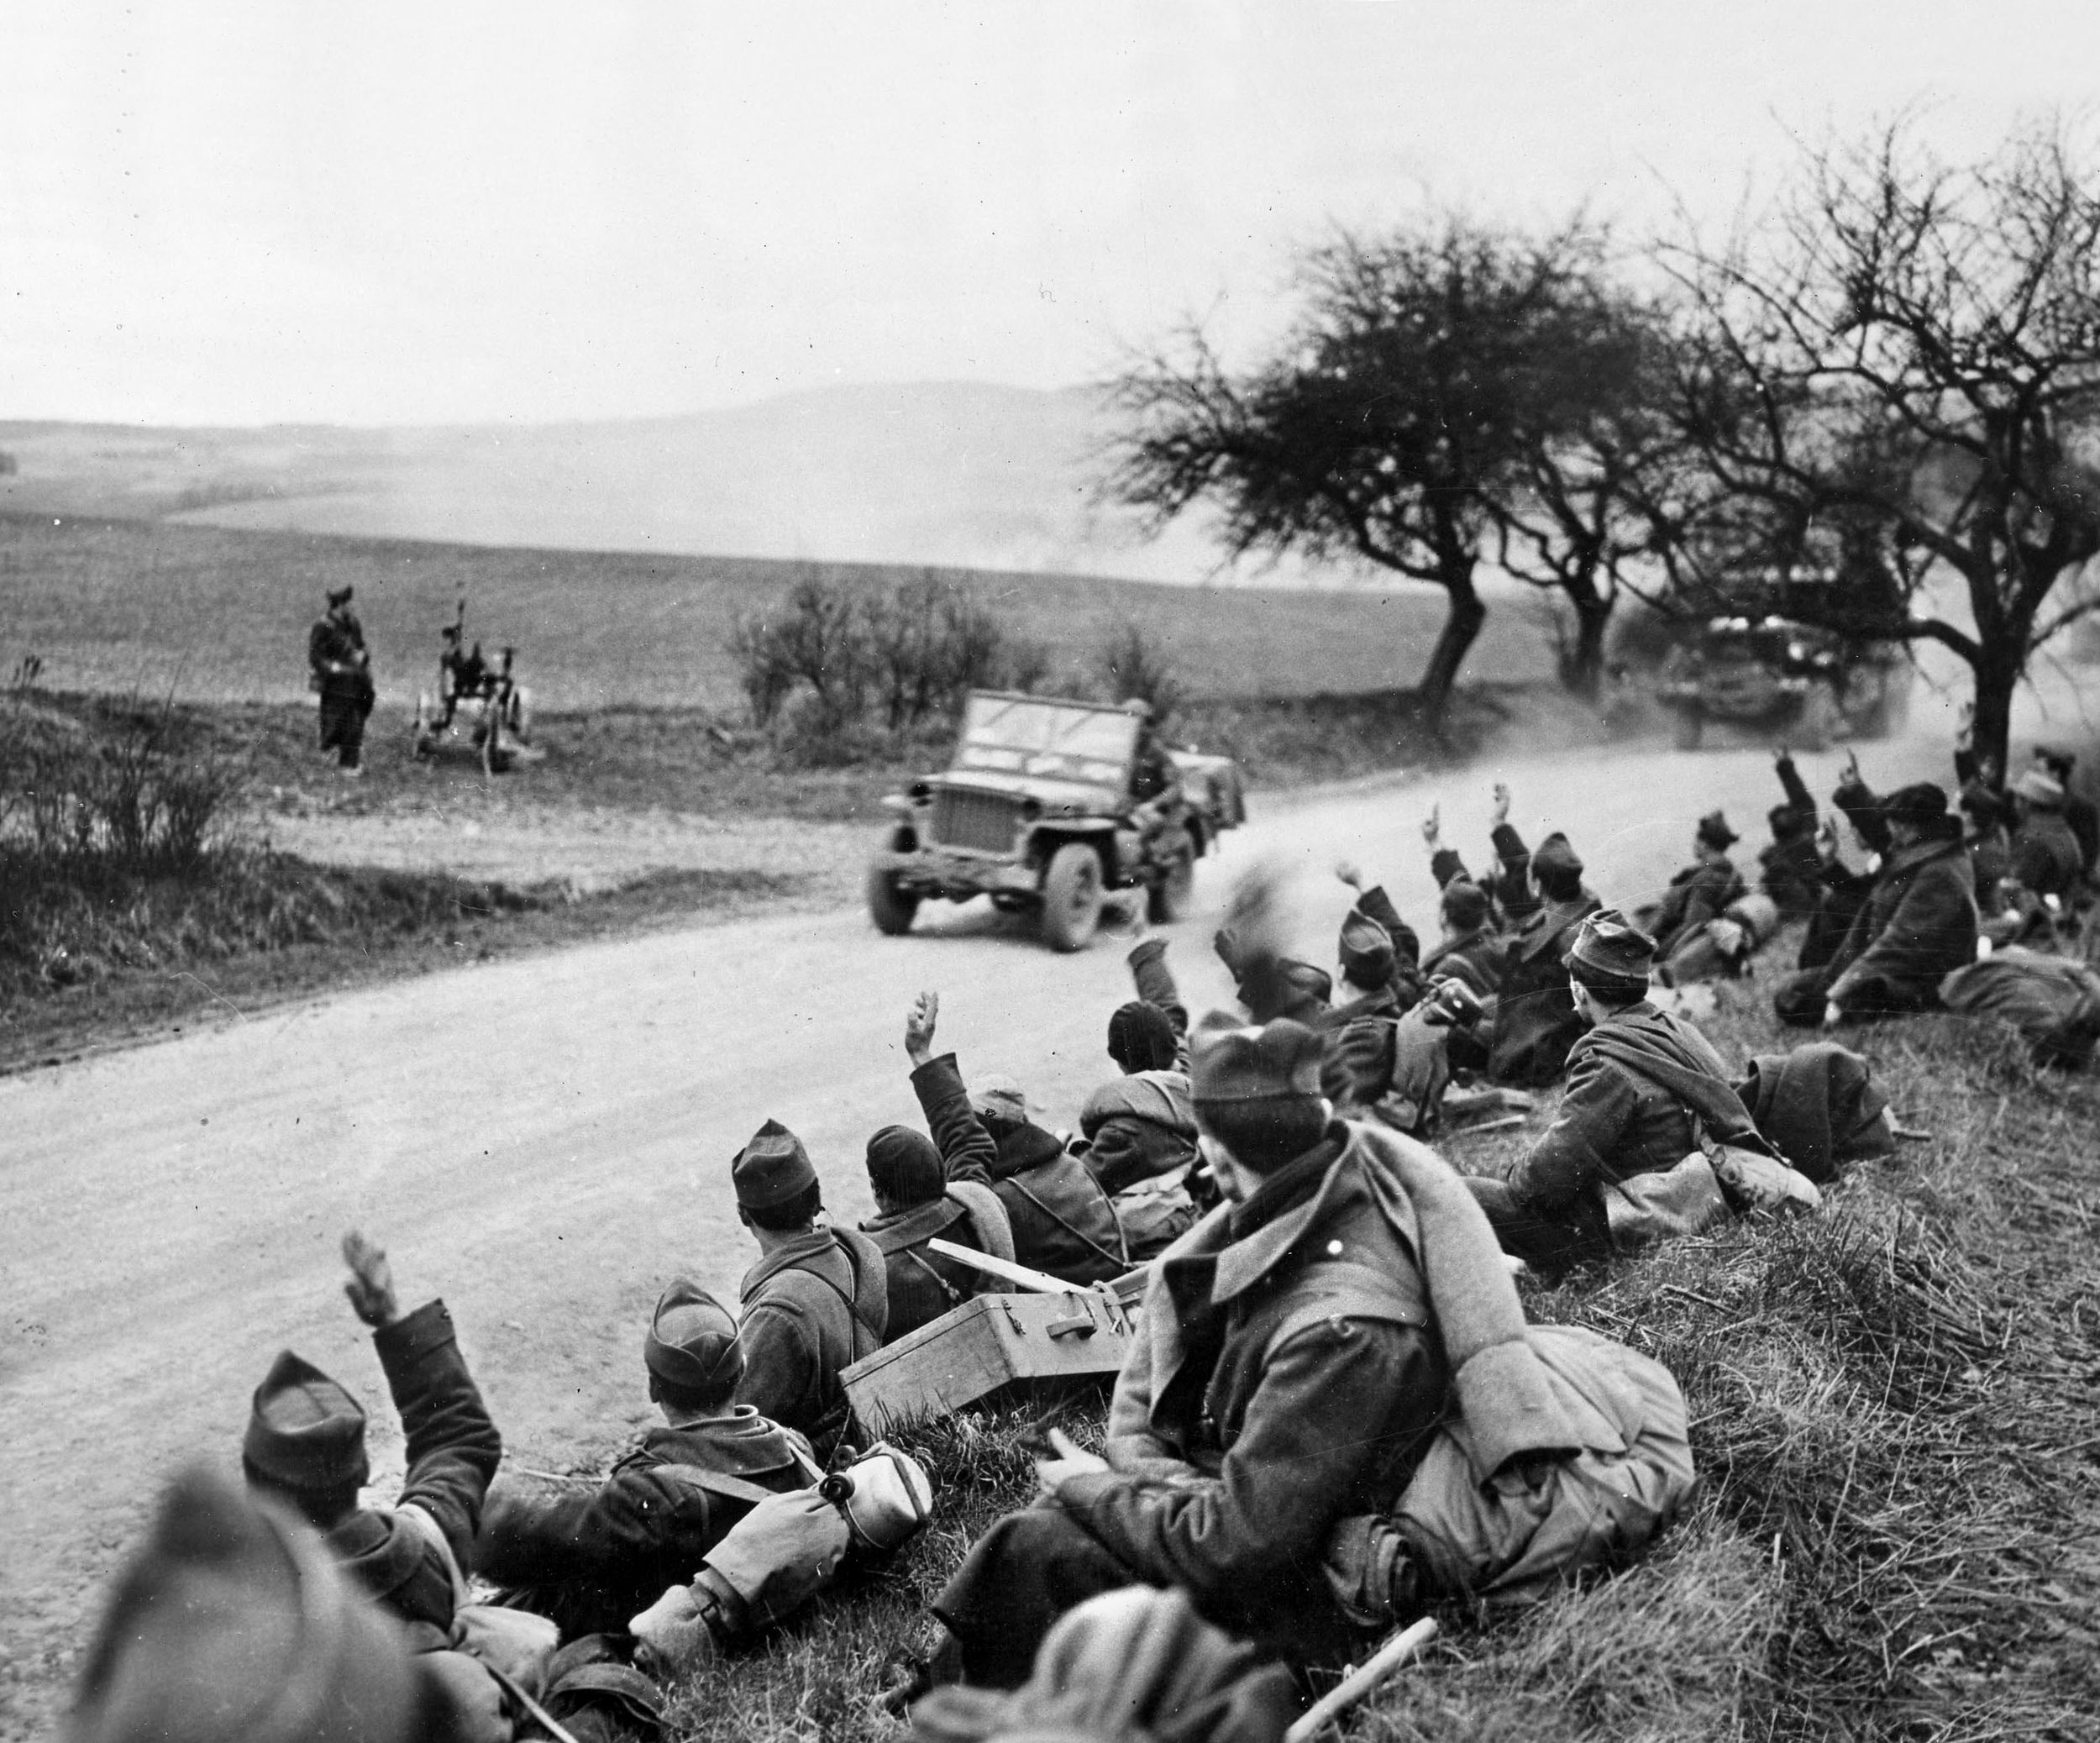
About 30 minutes later the British Right Column began moving. 7RTR took the wrong road and became separated from the infantry, drifting west. Near the village of Duisans, elements of the Right Column became involved in a brief firefight with what turned out to be French tanks from the screening unit to the west. The misunderstanding was quickly realized and the unit moved on Duisans itself. The French tankers also pointed out German tanks advancing to the west. These tanks were from Panzer Regiment 25.
Earlier in the morning, a British armored car company mauled a German artillery battery at Duisans. Then, English tanks and infantry arrived to seize the village and take the survivors prisoner. The captured Germans were rounded up and turned over to the French for evacuation. It was a short fight but had a significant effect on the rest of the battle. The 7RTR commander, Lt. Col. H.M. Heyland, realized he was falling behind the progress of the Left Column and wanted to make up lost time. He decided to bypass the next objective, the town of Warlus, and advance on Dainville. He left two companies of infantry and some antitank guns in Duisans and ordered his tanks to move.
This fateful decision meant the Right Column would pass the advancing Panzer Regiment 25 to the east rather than meeting it head on near Warlus. The German tanks would have been unable to penetrate the armor on the Matildas, but they were vulnerable to the Matilda II’s 2-pounder cannon and even the .50 caliber machine guns of the Matilda Is. A potentially serious problem for the Germans was eliminated by a fluke.
Impenetrable Matilda Tanks Meet German Infantry
To the northeast, the Left Column ran into the German Infanterie Regiment 6, pushing deep into its flank. This unit was the right flank for 7th Panzer Division and one of the formations Rommel was trying to find and push forward. At that point, one of its columns was under attack by the Left Column’s tanks. The German infantry and antitank guns in the column deployed and began firing at the attacking armor.
The Matilda I tanks at the front of the column returned fire and advanced. Sergeant H.D. Reed commanded one of these tanks. “Earth was being thrown up all around and strange thudding noises were heard and felt,” wrote Reed. “I distinctly remember Squadron Sergeant-Major Armit, just ahead of me, getting repeated hits on his tank turret. Everyone was firing away briskly.” Gunfire flashed between the two sides as trucks, half-tracks, and other vehicles were hit and burned.
“I claimed a motorcycle and sidecar machine gun outfit, which divided itself around a tree, and a lorry,” wrote Reed. “I could not get at an antitank gun concealed in front of a railway bridge but decided to polish off two lorries parked nearby. Next thing, a flash and a cloud of smoke—even inside the tank I felt the blast. This had been an ammunition lorry and its demise also put paid to the gun.”
The German infantry watched in alarm as their 37mm antitank guns had little effect on the Matildas. Rounds fired in rapid succession bounced off their thickly armored hulls. The British tanks had unarmored stowage bins outside the armor, and in several cases the contents were lit ablaze by all the gunfire. This caused quite a spectacle on the battlefield as apparently burning tanks continued firing and attacking. The Matildas kept coming, overrunning the enemy antitank guns and destroying them by crushing the gun’s trails under their tracks. The gun crews were slain by machine-gun fire as they fled.
This became too much for the German infantry. Seeing their antitank guns destroyed, they stood helpless against the British armor. Although the riflemen had seen combat earlier in the campaign, the casualties they took here were heavier than anything experienced before. A few of the riflemen initially broke and ran. Within a matter of minutes, the entire force fled the field either on foot or in the few vehicles that remained operable. The fleeing troops ran south, where they collided with Infanterie Regiment 7, itself now embroiled in combat with 7RTR.
Repulsing the British
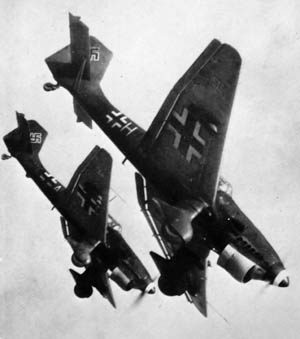
Sweeping aside the German infantry, 4RTR continued through the villages of Achicourt, Agny, and Beaurains. The British infantry occupied the last two towns while the tanks moved to seize ground south of Beaurains, an area known as Telegraph Hill. The advance began to falter. Rommel, aware of the peril facing his division, had personally intervened to bring forward his heavy artillery and a battery of his 88mm antiaircraft guns.
The powerful 88s were the only weapon capable of penetrating the armor of the Matilda. Although designed primarily as an antiaircraft weapon, the designers possessed the forethought to make it a dual-purpose gun. To meet that requirement, they had outfitted it with sighting systems and the appropriate ammunition. That foresight paid off in that moment of crisis for the Germans.
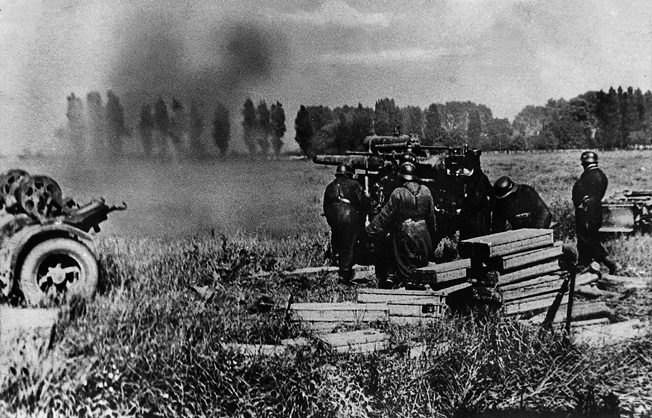
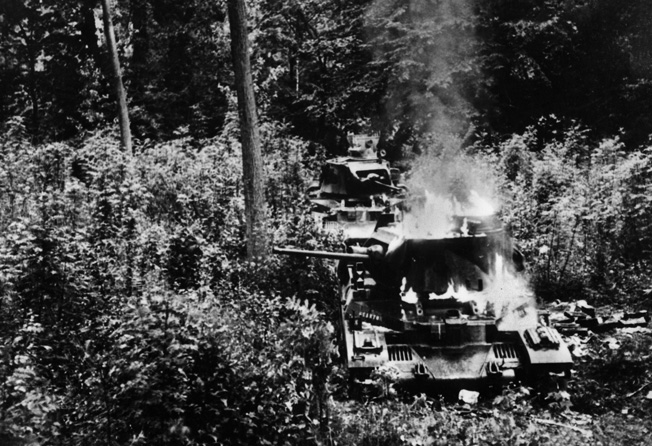
A stiff fight began as the British found the odds beginning to even. The 88mm rounds could easily pass through the Matilda’s armor. Worse still, Luftwaffe aircraft appeared overhead. Stuka dive bombers screamed down on the vulnerable British, dropping high-explosive bombs and strafing any enemy targets they could find. The tide of battle swung to the Germans, and burning British tanks began to litter the battlefield. The commander of 4RTR, Lt. Col. J.G. Fitzmaurice, was directing the action from his Mark VIB light tank when a round struck it in the side, tearing a hole through the armor and killing him.
Shortly after Fitzmaurice was killed, the regimental reconnaissance officer, 2nd Lt. Peter Vaux, arrived at the scene of the fighting. He also was riding in a Mark VIB light tank. Vaux’s recollections of the battle capture the change in British fortunes that afternoon. “Up to that moment the battle had been great fun—we had enjoyed it, but when we reached this line of field guns we could go no further,” wrote Vaux. “I was sent off to contact some tanks to tell them to pull back to Achicourt. Some small antitank guns opened fire on my light tank and a shot went in through the left of the turret, just behind my gunner’s head, and out through the right of the turret, just behind my head. I suppose we both turned a bit pale. Then, without a word, the gunner bent down, brought out his small pack, opened it and took out a very smelly pair of socks. He handed one to me; the other he stuffed into the hole on his side and I stuffed mine into the hole on my side—somehow or other we felt safer like that!”
Soon 4RTR had lost 20 tanks. Senior British commanders issued the order to withdraw. As they began pulling back, a few more German tanks appeared on the battlefield. They were stragglers from Panzer Regiment 25, separated from their unit earlier in the day. These tanks took part in several small counterattacks designed to throw the English back, but none succeeded. Hastily conceived, these responses occurred in a piecemeal fashion and only resulted in the loss of all the panzers.
4RTR’s Run-In With the Germans
Evening fell over the battlefield as 4RTR prepared its nine operational tanks for a German attack. Two light tanks, a Matilda II, and six Matilda Is were all that was left to hold back what was expected to be a strong assault. Almost all the available machine-gun ammunition had been expended during the day’s fighting. What was left was shared out among the remaining tanks. It amounted to 50 rounds per vehicle. Major J.S. Fernie took command of the regiment. Still, they had to hold as long as possible to allow what remained of Left Column to withdraw to relative safety.
At 9:30 pm the sound of tank engines could be heard in the distance. The regimental adjutant, Captain Robert Cracroft, thought they were a group of Matilda IIs, which had become lost in the dark and were moving toward the rally point. He stepped onto the road and waved the approaching column down with his map case. The line of tanks came to a halt in front of the British captain who only then realized the tanks were German. Cracroft and the Germans stared at each other for a few seconds; the unlikely encounter had surprised them all. Sergeant Reid, who had earlier blown up the enemy ammunition truck, was still in command of his Matilda I and recalled the bizarre scene. “Then a revolver shot rang out, then a burst of machine gun, then a bigger gun,” he wrote. “To our left a lorry went on fire and in the light of that we saw the doubled-up figure of the adjutant scurrying towards his light tank, he in a very white-looking trenchcoat. The next minute all hell was let loose, tracers everywhere, especially the rapid fire green tracer of the German motorcycle outfits.”
The sudden firefight lasted just a few minutes, ending with a German withdrawal. In the shadowy darkness, punctuated by the flames of the burning lorry, the British could see a pair of knocked-out tanks and some dead and wounded men from the accompanying motorcycles. They had whipped the Germans, but it was likely they would soon return, and by that point the British tanks were out of ammunition. Cracroft looked for Major Fernie for orders, but he was nowhere to be found. The captain decided to withdraw since the tanks could accomplish no more. He led them through the fields to Vimy Ridge. Major Fernie and Lieutenant Vaux were separated during the fighting and captured by the Germans. They escaped by swimming across the Somme River and ultimately were reunited with 4RTR in England.
Wiping Out the German Gun Batteries
While 4RTR was fighting Rommel and his guns, 7RTR went through its own ordeal. After reaching Dainville, the regiment spread to the southeast. Having driven past the enemy tanks, the British instead ran into Infanterie Regiment 7. The Matildas were proof against the infantry’s weapons and once again swept the German riflemen away, just as their brethren in 4RTR did to the north. This German unit also broke, the survivors running straight into the neighboring SS-Totenkopf. This division had barely seen any fighting that day and was similarly unprepared to face tanks. A number of the SS units panicked and ran as well.
This success spurred the British onward, but at about 3 pm they ran into Rommel’s line of artillery and 88mm guns. Some of the leading Matildas were knocked out. The 7RTR commander, Lt. Col. Heyland, was killed along with his adjutant. Despite this setback, Major John King assumed the lead and both Achicourt and Beaumetz were in British hands by 4:50 pm. King further led a tank attack against Rommel’s gun line and punched through with his Matilda IIs. For his part, Rommel remained with his guns most of the day, directing their fire. He was so focused on the battle he did not notice when his orderly was killed standing next to him.
As the battle continued, opposing tanks and artillery desperately tried to win the upper hand. Major King commanded one Matilda while Sergeant B. Doyle led another. Their first move was to overrun a battery of antitank guns, knocking out the guns and sending the surviving crews into headlong flight. After that, they ran headlong into four panzers and destroyed them all. The 2-pounder shot went right through the panzers’ thin armor, setting two afire. A stowage bin on King’s tank erupted in flames, causing excessive smoke. The crew had to open their hatches to avoid choking on the fumes.
Continuing their rampage with King’s tank in the lead, they smashed through a barricade made of farm carts only to be hit by an artillery round. The hit jammed the turret, and the concussion from the blast broke the gunner’s arm even through the armor plate. The next target was another antitank battery. Doyle’s tank crushed one of the guns under its tracks. The rest of the battery suffered the same fate as the earlier one.
Meanwhile, King spotted one of the dreaded 88mm guns nearby. He maneuvered his tank through some dead ground into which the enemy gun could not fire. They eventually reached a spot where he could turn his entire tank to allow the machine gun in the jammed turret to bear. Spraying the 88mm with bullets suppressed the crew long enough for Doyle to get close enough to knock the gun out for good.
The pair of tanks moved on, their crews eager to inflict more destruction, but their run was at an end. Doyle’s tank took a direct hit from an artillery piece, putting it out of action. King’s tank suffered an internal fire, likely caused by the beating it had taken, forcing the crew to evacuate. Both tanks sat just in front of the Germans’ last line of defense.
This was the high-water mark for 7RTR. The infantry dug in and readied the villages for German counterattacks. The tanks pulled back to support them but were later to return to Vimy. They arrived at 11 pm. Their long day was over.
Subaltern Hepple’s Abandoned Tank
Subaltern Hepple of 7RTR went through his own ordeal. After making his report, the young officer took his tank back to the battle. He soon caught up with the rest of B Company, falling in behind two Matilda IIs. He was intent on passing them and catching up with the other light tanks when enemy antitank guns opened fire on them a mile west of Achicourt. Hepple’s tank was hit three times, breaking its right track and leaving it immobile. He returned fire and along with the Matildas silenced the guns. The other tanks moved on, leaving Hepple and his crew alone with their crippled tank.
For several minutes, rifle fire peppered the British tank. Then Hepple saw two large groups of Germans gathering down the road. He scattered them with his machine gun and then engaged more enemy troops trying to operate one of the abandoned antitank guns. Throughout this time the crew tried to reach help by radio, but no one answered their calls. They later found the antenna damaged by rifle fire.
A short time later more British tanks and infantry appeared. Hepple dismounted to inspect the damage. The right track was broken and the radiator leaking badly. Members of his tank crew worked furiously to repair the tank while artillery began to fall around them. Overhead a few Stukas appeared to strafe and bomb the area. A Matilda was also disabled nearby and Hepple went with another officer to check on it. The tank’s commander was dead, and the tank’s track blown off. They placed a demolition charge inside the tank and abandoned it.
By that time, it was dusk. With the light fading and a German attack seemingly imminent, Hepple and his men prepared to abandon their own tank as well. There were several German motorcycles nearby, and these were set afire along with several antitank rifles. They removed everything they could and put it on a Bren Carrier they managed to start. Setting their own tank ablaze, the British troops started toward Achicourt.
Soon they came under the expected German attack. A captured French tank came down the road firing at them with its machine guns. The carrier broke down, leaving Hepple and his men on foot. They joined with another tank crew and an infantryman, grabbed a pair of Bren guns, and moved off. They soon found a destroyed airfield where they stopped to rest. The next morning Hepple led his party into Arras, where the local commander sent them back to Vimy.
Two More Attacks by Rommel
The expected German riposte did occur but met with little success. The side effect of Rommel’s personal involvement in countering the British assault was a loss of focus on what his own tank force was doing. Panzer Regiment 25 had secured it objective earlier in the day and then sat there awaiting further orders. By the time the battle had subsided enough for Rommel to once again look at the larger picture, the sun was beginning to set.
At 7 pm Colonel Karl Rothenburg, commanding Panzer Regiment 25, finally received orders to attack the British columns in their rear. He complied and sent off his tanks, which promptly ran into a line of 2-pounder guns from the 260th Anti-tank Battery. While those guns savaged the German armor, French tanks from the 3rd Division Legere Mechanique also attacked the German flank. At least a dozen panzers were lost along with a few of the French heavy tanks and a few of the 2-pounders. Afterward, at 11 pm, Rothenberg’s unit was ordered to stop for the night.

The failure of the panzers, however, was not Rommel’s last attempt. He pushed forward his two infantry regiments as well. At 12 am the 6th was able to overrun a British machine-gun company while the 7th attacked the village of Warlus. German artillery and mortar fire started large fires within the town as infantry from the 8th DLI battled to defend it. The German pressure was intense, and British ammunition supplies were running low. But when the situation was most desperate, the proverbial cavalry arrived. A half dozen French tanks accompanied by two troop carriers blasted their way through the German lines. The remaining garrison rallied around these vehicles and the whole group fought their way out of Warlus and fell back to Vimy. The Arras counterattack was over.
Successes and Failures of the Counterattack on Arras
The fighting of May 21 had failed to cut the German line of advance. Failures in coordination between the British and French and the limited tanks and troops available for the attack had made attaining such an objective a remote possibility. Still, the counterattack had an effect, if only a temporary one. It had cost Rommel approximately 40 tanks and 600 casualties, along with the majority of his antitank guns. Rommel reported being attacked by hundreds of enemy tanks. He was either padding his report to cover his mistakes or had simply overestimated his opponents, a phenomenon that was not altogether uncommon in a confusing action such as Arras. Partly as a result of this report, the Germans reallocated some of their panzer forces toward Arras in case Allied strength there was not yet depleted. This slowed their forward advance.
By slowing the German panzer advance, the Arras counterattack had bought more time for the Allies to solidify their defenses at Dunkirk for the sea evacuation. When combined with German leader Adolf Hitler’s decision to halt his tanks short of Dunkirk and allow the Luftwaffe to attack the port city, it allowed the British to hold out long enough for the Royal Navy to initiate its evacuation, which began on May 26. By June 4, approximately 336,000 British, French, and Belgian troops were saved from imprisonment or death. These soldiers would form the nucleus of the Allied armies that fought in North Africa, Italy, and France during the liberation of those regions and countries from Axis control.
Join The Conversation
Comments
View All Comments