
by William H. Langenberg
In November 1941, about 150 miles off the west coast of Australia, a singular naval battle was fought that had great implications for all struggles at sea, past and future. It is, to this day, little known and even less publicized, but that does not detract from its significance.
[text_ad]
An Obscure Sea Battle With Far-Reaching Implications
This clash was the short, but internecine, battle between the German merchant raider Kormoran and the Australian light cruiser Sydney, a theoretically one-sided duel favoring the cruiser in which both participants eventually sank, one with the loss of all hands. Such a remote battle between only two ships, one of which was not even a man-of-war, is meaningful because it illustrates, perhaps as forcefully and clearly as any other sea duel, the potential, life-saving value of constant vigilance.
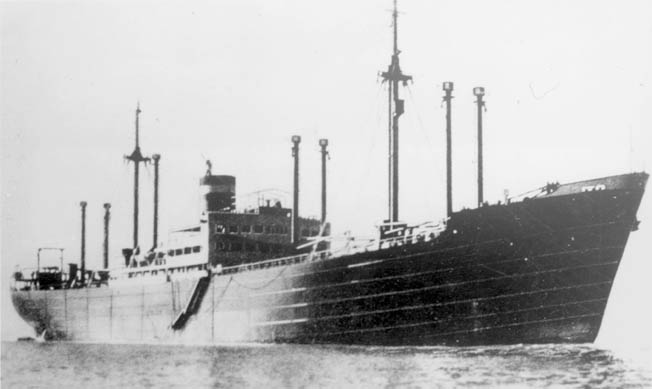
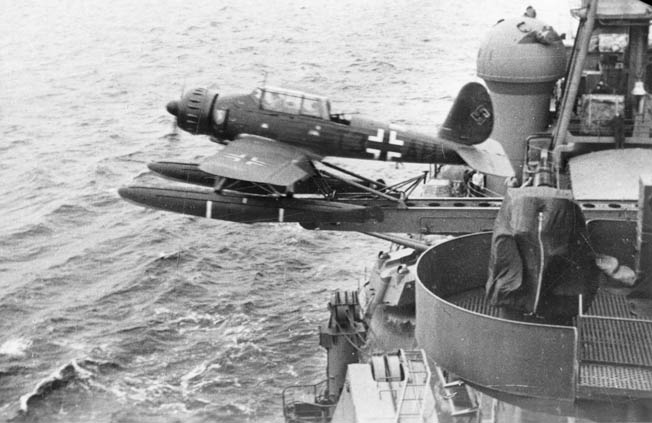
As a German Navy auxiliary cruiser, Kormoran was an impressive vessel. She had an overall length of 538 feet, a beam of over 66 feet, and a top speed with a clean hull of 18 knots. Kormoran contained six holds and displaced about 19,900 tons, resulting in a mean draft of 28 feet. Powered by four 9-cylinder diesel-electric engines producing 16,000 horsepower and driving a single propeller, Kormoran had an enormous range of over 84,000 statute miles at 10 knots. She possessed a cruising endurance of 352 days carrying a crew of 26 officers and 375 men. Armament fitted aboard Kormoran included six 5.9-inch, quick-firing cannon with a range of 18,200 yards; three 37mm and five 20mm antiaircraft guns; two twin torpedo tubes above water and two single torpedo tubes below the surface. The raider also carried 360 ship-launched electric mines, plus 30 mines capable of being laid by Kormoran’s high-speed motor launch. For scouting and observation purposes, she carried two Arado 196A-1 seaplanes, stored out of sight in a specially ventilated compartment of a hold when not in use. But Kormoran, like other auxiliary cruisers, lacked redundant fire-fighting and other damage-control systems essential to counteract battle damage, which were standard equipment aboard Kriegsmarine warships.
A Young But Capable Sea Captain
Crucial to the successful operation of a German World War II armed merchant raider was an experienced, aggressive, and resourceful commanding officer, one able to make quick and correct decisions without waiting for guidance from higher authority. During a long cruise, often burdened by extended periods of fruitless searching for prey, the captain bore sole responsibility for the discipline, morale, well-being, and safety of his crew.
Kormoran was led by Kapitän zur See (Lt. Cmdr.) Theodor Detmers. Detmers was a determined and capable officer who had joined the Navy at age 19. He served in the cruiser Koln and visited Australia in 1933 as a lieutenant aboard that ship. Detmers advanced to command of torpedo boat G11 in 1935. Shifted to destroyers, he was assigned as first lieutenant aboard the new Leberecht Maass the following year, and finally posted as captain of Hermann Schoemann, in which he served until 1940, gaining combat experience in the Norwegian campaign. Detmers was only 38—the youngest of the German raider captains—when he assumed command of Kormoran.
Detmers began his first and only cruise in Kormoran when he sailed from Gotenhafen (formerly the Polish port of Gydnia) on December 3, 1940. Ten days later Kormoran reached the open Atlantic via Denmark Strait and proceeded south toward her assigned operating areas in the Indian Ocean and Australian waters, with the South Atlantic and Pacific as alternatives.
Kormoran Racks Up Kills On Maiden Cruise
On January 6, 1941, Kormoran sank her first victim, the Greek steamer Antonis. Her second successful attack took place on January 18, 1941, when she sank the tanker British Union at night by the light of her searchlights and star shells. Two more successful attacks were conducted on January 29, 1941, when she sank the British freighters Africa Star and Eurylochus in the Atlantic about 800 miles west of Freetown, Sierra Leone.
On February 7, 1941, Kormoran rendezvoused with German tanker and supply ship Nordmark and transferred to her 170 prisoners taken from the aforementioned sunken ships. Throughout March and April 1941, Kormoran remained in the Atlantic, suffering frequent engine breakdowns. But she was not inactive. Early in March she rendezvoused with the supply ship Pinguin, pocket battleship Admiral Scheer, and U-124, transferring replacement torpedoes to the submarine. Later she added to her list of victims the British tanker Agnita, the Canadian tanker Canadolite, the British freighter Craftsman, and the Greek steamer Nicolas D.L. All these ships were sunk except the new Canadolite, which was sent to France under command of a prize crew.
Paint It Black
On May 1, 1941, Detmers took his ship around the Cape of Good Hope and had the crew paint the ship’s hull black to facilitate her passing as a Japanese vessel while cruising the Indian Ocean. During operations in this new hunting ground, Detmers was promoted to commander, but his raider had little initial success. It was not until June 26, 1941, that Kormoran achieved her first victory in the Indian Ocean, the Yugoslav steamer Velebit. Later that same day, Kormoran sank the Australian vessel Mareeba. Kormoran was disguised during these attacks as the Japanese merchant vessel Sakito Maru. Detmers then proceeded to a position about 900 miles south of Ceylon, where for about two weeks his ship underwent an afloat overhaul and changed camouflage to the Dutch freighter Straat Malakka. This involved repainting the superstructure brown, with a black funnel.
Upon completion of the overhaul and identity transformation, Kormoran operated over a wide area in the Indian Ocean, but without success. Steaming north on August 26, 1941, crew members of Kormoran sighted the first land they had seen since the mountains of Norway had disappeared over the horizon nearly nine months earlier. It was a mountain peak on the island of Enggano off the southwest coast of Sumatra. This unbroken 258-day sea tour illustrates the loneliness and independence of German merchant-raider operations early in World War II.
Steaming Towards Australian Coast
Detmers then took Kormoran south, and on September 26, 1941, the raider met and sank her tenth and last merchant ship, the Greek steamer Stamatios G. Embiricos. Kormoran’s victims now totaled 68,274 tons, but the raider’s most formidable foe was still to come.
Kormoran was ordered to rendezvous with the German supply ship Kulmerland about 1,100 miles off the west coast of Australia. On October 16, 1941, the two ships met. They sailed leisurely north in company for 10 days. Kormoran transferred her prisoners from the last six sinkings to Kulmerland and took aboard enough fuel and provisions to sustain herself at sea until June 1942. Kormoran, however, was not destined to use much of her new supplies. After parting from the Kulmerland, Kormoran moved westward, where another afloat engine refit was undertaken. Upon completion of repairs, Detmers intended to lay a minefield off the western Australian port of Perth, but he received a message from the Naval High Command that a convoy was due to leave there escorted by a British cruiser. Hence, he chose to head for Shark Bay, farther north along the Australian west coast. Kormoran was thus steaming north-northeast on the afternoon of November 19, 1941, when an unidentified vessel was sighted on the horizon, just off the port bow.
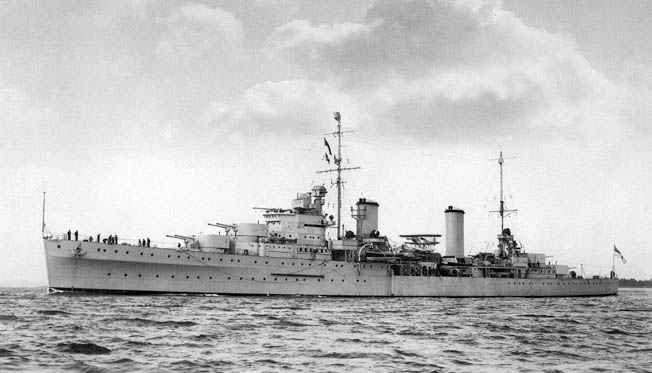
Formidable Australian Vessel Of British Lineage
The keel of HMAS Sydney was laid down on July 8, 1933, as HMS Phaeton, one of Great Britain’s Leander-class light cruisers. She was transferred to the Australian Navy in June 1934, launched September 22, 1934, and commissioned as HMAS Sydney on September 24, 1935. Sydney was one of three modified Leander-class ships that became the Australian Perth-class light cruisers. She had an overall length of 555 feet and a beam of 56 feet. Her displacement was 9,080 tons fully loaded, and she was powered by four Admiralty boilers driving four Parsons geared turbines connected to four propellers. Her 72,000 shaft horsepower generated a maximum speed of about 32 knots.
As main armament Sydney carried eight 6-inch guns mounted in four twin turrets, two forward and two aft. She also mounted four 4-inch guns plus 121/2-inch and four 3-pound antiaircraft guns. Eight 21-inch torpedo tubes augmented her firepower. One seaplane was carried aboard on a single catapult located amidships between her two stacks.
Sydney had a distinguished combat record in the eastern Mediterranean. She participated in a major battle with the Italian Fleet in June 1940. One month later, she led in the sinking of the Italian cruiser Bartolomeo Colleoni, then engaged in convoy escort duties until detached to proceed back to Fremantle in January 1941. From February 1941 until she encountered Kormoran, HMAS Sydney was employed mainly on patrols and convoy escort in Australian waters.
Aussie Captain No Stranger To Tactics Of German Raiders
On May 15, 1941, Captain Joseph Burnett, Royal Australian Navy, took command of the light cruiser. Burnett was an officer of recognized professional achievement. He was the third Naval College graduate to achieve the rank of captain, to which he was promoted in December 1938. When war broke out in 1939, he was appointed to the Navy Office as assistant chief of the Australian Naval Staff. He was later advanced to deputy chief. During these tours on the Naval Staff, Burnett participated in devising defenses against early German surface-raider attacks in Australian waters. He also had the opportunity to review all reports of Australian warships in action against the merchant raiders. Thus, he was no stranger to raider threats and tactics.
Sydney’s employment after Burnett assumed command was relatively routine. During May and June she escorted the troopship Zealandia to Malaya from Fremantle, handing over escort duties to HMS Danae off Sunda Strait, and later taking over from Danae in the same position to escort Zealandia back to Fremantle. Near the end of June she escorted a convoy, including Zealandia, to Sydney. The months of July, August, and September were passed mostly off eastern Australia escorting ships to New Zealand and Fiji and patrolling off Melbourne. At the end of September, Sydney escorted a convoy from Melbourne to Sunda Strait, returning on October 7 to Fremantle, where she was to be based. The cruiser departed again with Zealandia on November 11 for Sunda Strait, where she turned over escort duties to HMS Durban and set course to return to her home port.
A Clear Day When Rivals Met Up
Sydney signaled her expected arrival time back in Fremantle as the morning of November 20. She was thus steaming south-southwest toward Fremantle on the fateful afternoon of November 19, 1941, when she sighted an unidentified ship on the horizon, broad off the starboard bow. The vessel was Kormoran steaming north-northeast at 11 knots off the western Australian coast, approximately 150 miles southwest of Carnarvon. The day was clear and visibility was excellent.
At 1555 hours, one of Kormoran’s lookouts reported an object on the horizon, just off the port bow. At first the sighting was thought to be a sail, but it was soon identified as a warship. Immediately thereafter, Captain Detmers ordered his crew to action stations, rang up full speed ahead, and came left to a west-southwest attempted escape course into the sun.
The warship, now identified as an Australian Perth-class cruiser about 10 miles distant, altered course toward Kormoran and began to overhaul her. The cruiser continuously challenged Kormoran with her searchlight, to which the raider made no reply. When at about seven miles distant, the cruiser, now identified as HMAS Sydney, signaled Kormoran by searchlight to hoist her signal letters. Detmers initially hoped to avoid action by passing off Kormoran as the Dutch vessel and hoisted Dutch colors and the flag signal “PKQI” for Straat Malakka. At 1700, he broadcast a Q message, announcing a suspicious ship approaching, in the name of that Dutch vessel.
Germans Fail To Acknowledge Secret Signal
By 1715, Sydney had drawn almost abeam of Kormoran, less than one mile away. Both ships were now steering west-southwest at about 15 knots. The cruiser was at action stations with all eight 6-inch guns and four torpedo tubes trained on Kormoran. Detmers noted through his binoculars, however, that Sydney’s light guns did not appear to be fully manned and that some crew members were lounging at the rail. Furthermore, Sydney’s seaplane catapult, which had earlier been swung out as though the aircraft were about to be launched, had been swung inboard.
The time of decision for Kormoran was now nearly at hand. The Sydney made a two-flag hoist, “IK,” which were the center two letters of Straat Malakka’s secret identification signal, a fact unknown to Detmers. Kormoran made no reply. Sydney then signaled Kormoran by light to show her secret signal. Detmers now knew Kormoran would have to fight. He immediately ordered the Dutch colors to be struck, and the German battle ensign was quickly hoisted as Kormoran’s gun flaps swung away. In less than six seconds the fictitious Straat Malakka changed from a seemingly innocent merchant ship into a deadly raider. It was now 1730.
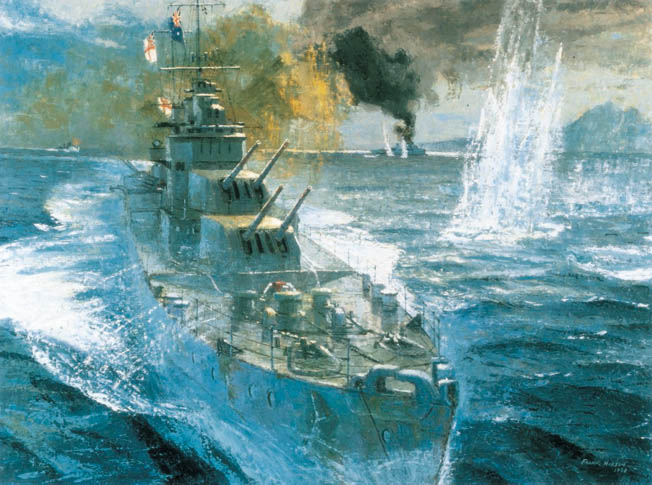
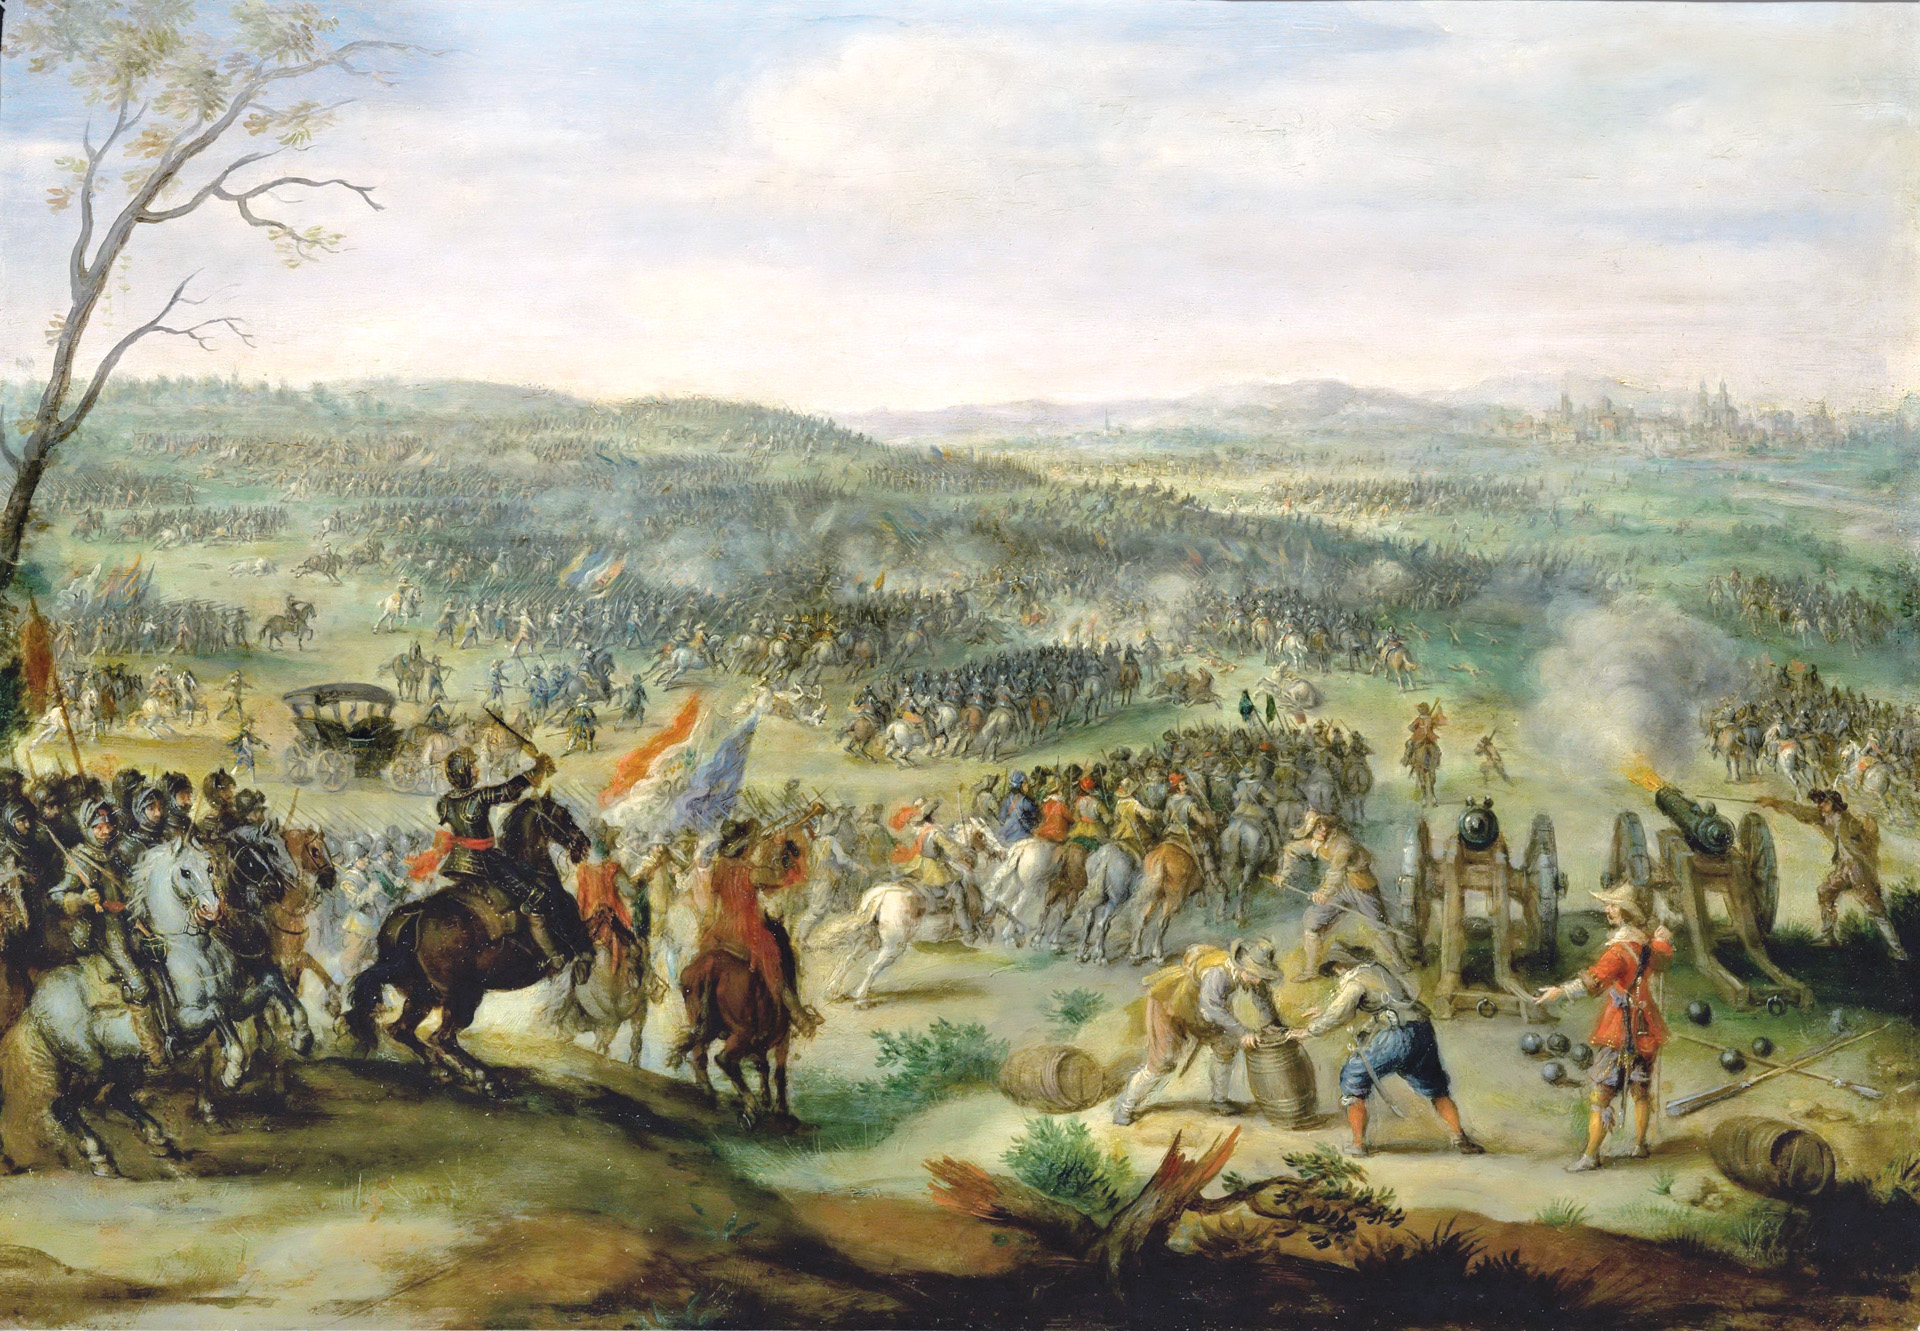
The Raging Sea Duel Commences
Kormoran opened fire and simultaneously launched two torpedoes. The raider’s guns promptly scored hits at a range of 1,640 yards on Sydney’s bridge and director tower. These were answered by a full salvo from Sydney, which failed to hit. Kormoran again scored quickly with two salvos that hit Sydney on the bridge and amidships. Another hit crippled the seaplane on Sydney’s catapult and started a raging fire. From Kormoran’s bridge, Detmers could see men falling on the cruiser’s bridge, torpedo battery, and superstructure from the heavy close-range assault by the raider’s antiaircraft battery and starboard 5.9-inch guns.
For a few seconds after her initial salvo, Sydney did not repeat fire. It seems probable that one of Kormoran’s early salvos put the cruiser’s forward two turrets out of action. Sydney’s third turret, however, reopened fire and scored three damaging hits on Kormoran. The first of these passed through her funnel and exploded on the raider’s disengaged side, showering the radio room with splinters. The second round burst in the auxiliary boiler room and oil bunker and knocked out Kormoran’s fire-fighting equipment. The third damaged the transformers for the main engines. Fire and smoke engulfed Kormoran’s engine room. Meanwhile, both ships continued to shoot. Sydney’s aftermost turret fired only two or three salvos, all of which were high. At about this time, one of Kormoran’s two torpedoes launched earlier struck Sydney beneath her forward turrets. The other missed close ahead.
Two Heavyweights Take a Beating
Her stern now slowly settling in the sea from the torpedo damage, Sydney turned toward Kormoran as if attempting to ram. As she turned, the top of the cruiser’s second turret was hit by a shell and blown overboard. Sydney passed under Kormoran’s stern, heading southward and appearing to lose headway. The cruiser’s heavy guns were now strangely silent while Kormoran, holding course and speed, continued to fire rapidly at the flaming warship, achieving repeated hits on her hull along the waterline. Meanwhile, aboard Kormoran, uncontrolled fires raged in her engine room, the smoke from which partially obscured Sydney from Kormoran’s bridge. But the raider continued to engage the cruiser with her after guns as the range opened to about 4,400 yards.
At approximately 1745, Sydney fired four torpedoes. Detmers was then turning Kormoran to port in order to bring her broadside to bear. Sydney’s torpedo tracks were sighted at about the same time Kormoran’s engines broke down, but the torpedoes missed the raider close astern. Sydney was now ablaze from her bridge to the after funnel as she steamed slowly southward. Her heavy guns remained silent although the cruiser’s secondary armament fired rounds at Kormoran, most of which landed short. Kormoran, however, continued to score hits on the cruiser, firing repeatedly until 1750 when the range was about 6,600 yards. At approximately 1800, Kormoran launched a final torpedo at Sydney from a range of 7,700 yards, which missed astern.
Detmers Gives Command To Scuttle The Ship
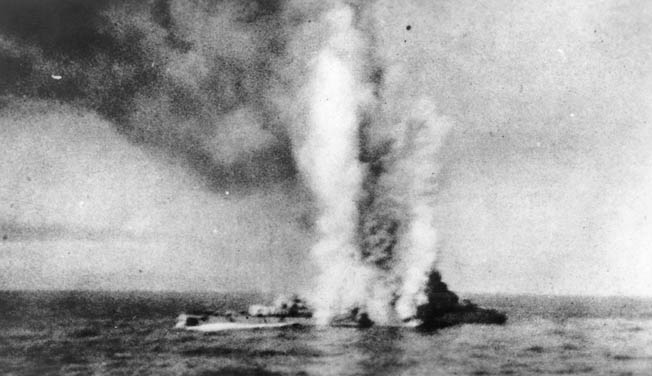
After 30 minutes of violent, close-range action, both ships were now crippled and on fire. Kormoran’s engine room was ablaze and wrecked. At 1825 she fired her last shot at a range of approximately 11,000 yards. In less than one hour of battle, she had fired about 450 rounds from her main battery and several hundred rounds from her antiaircraft guns.
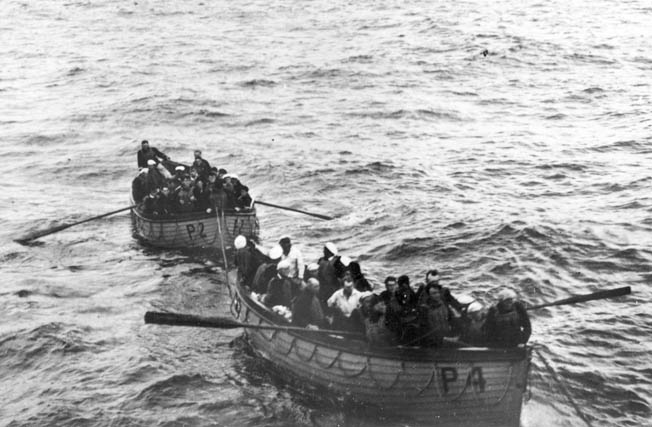
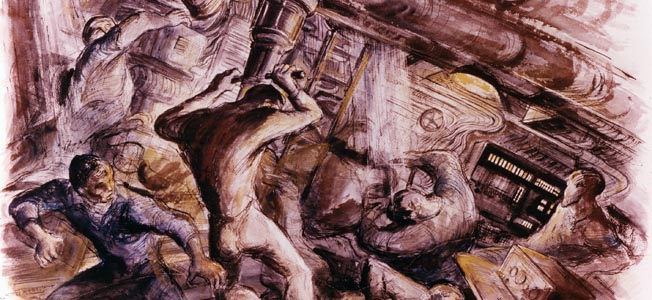
Detmers reluctantly concluded that his ship was fatally damaged and beyond salvage. The engine room fire was out of control, and over 200 mines remained on board. Darkness was fast approaching. At 1825, he ordered the crew to abandon ship, and all boats and lifesaving equipment were lowered into the water. Detmers, most of Kormoran’s officers, and enough ratings to man the guns remained on board while scuttling arrangements were completed. At approximately 2400, all hands abandoned ship, including Detmers in the last boat, and the scuttling charge was detonated.
Within half an hour Kormoran’s remaining mines exploded, and she sank stern first. Of the 395 officers and men on board, two officers and 78 men lost their lives. Twenty of these were killed in action, most of them in Kormoran’s engine room, while the remainder drowned during the abandon ship operation when an overloaded raft capsized.
All Hands Lost On Sydney
Kormoran’s crew members watched Sydney disappear from view in the gathering gloom, heading south-southeast at a range of approximately 10 miles. A distant glare in the darkness indicated her presence until about 2200, when occasional flickering continued. Before 2400 that, too, disappeared. Of Sydney’s 43 officers and 602 ratings, none survived. To this day the only remnants of Sydney are two lifebelts and one Australian Carley float damaged by gunfire. These were recovered by HMAS Heros on November 27, 1941, about 160 miles northwest of Carnarvon. This float is now displayed at the Australian War Memorial in Canberra.
All 315 survivors from the Kormoran eventually reached shore from six boats and two rafts. They either found land or were rescued by passing ships. They were repeatedly interrogated and then incarcerated by the Australians for the duration of the war. During this period of imprisonment, Germany awarded Detmers the Knight’s Cross of the Iron Cross. The survivors from Kormoran were repatriated to their homeland in January 1947.
Conspiracy Theories Swirl Around Loss Of Sydney
The repatriation of Kormoran’s crew members did nothing to diminish the curiosity of Australian citizens about this battle. The fact that Sydney had no survivors led to continuing debate as to whether complete information on her loss has ever been made public. No record of a formal court of inquiry immediately after the sinking was ever discovered. As a result, much speculation has arisen about possible alternative scenarios to the description of the duel between the Kormoran and the Sydney pieced together from interrogations of German survivors. Only a brief description of the battle was included in the Royal Australian Navy’s official history of World War II.
Thus, it is easy to comprehend the ongoing skepticism among families of the Australian cruiser’s missing crew members that HMAS Sydney, pride of the Australian Navy, could be sunk by a converted merchant ship, or that competent, experienced Captain Burnett would have brought his ship so close to an unidentified, but large and potentially dangerous, opponent.
An Inquiry Launched
In an effort to end such speculation, the Joint Committee on Foreign Affairs, Defence and Trade of the Australian Parliament completed an exhaustive inquiry into the loss of HMAS Sydney during 1999. The inquiry examined pertinent documents relating to the battle, and included oral and written testimony from interested parties who thought they had relevant information to contribute. In particular, the committee examined all the well-publicized alternative battle scenarios, including allegations of the participation of a third party, in a diligent effort to evaluate their plausibility. The general conclusion of its detailed 192-page report was that, unless hard evidence to the contrary becomes available, the foregoing account of the Kormoran–Sydney battle is the most accurate description of the action that can be recounted. The committee recognized that, lacking testimony from Australian participants in the battle, its report “may not put an end to the wilder speculation that surrounds this matter.”
In evaluating this strange naval battle, it should be recognized that details of the engagement were developed after the action, primarily from careful interrogation of Kormoran’s survivors. No input from Sydney’s captain or crew has ever been available. Reasons for actions and precautions taken or not taken by the Sydney unfortunately will never be produced.
Questions and Doubt Linger
Even allowing for this one-sided knowledge, some questions about Sydney’s actions remain. Why did Captain Burnett fail to use his seaplane to investigate Kormoran at a distance? Why, with full knowledge of German merchant-raider activities in Australian waters, did he not confirm his suspicions about the identity of Kormoran by asking the Australian Navy Office if Straat Malakka was in the area? Why was his crew not attentive at full action stations when approaching an unidentified, but large and potentially dangerous, ship?
In retrospect, however, it appears that Captain Burnett made a tragic mistake when he brought Sydney too close to Kormoran and allowed his cruiser to be taken by surprise. The overwhelming advantages of speed, firepower, and defensive armament possessed by his modern Australian light cruiser were all compromised. Exacerbating this condition was the lackadaisical posture of many Sydney crew members ostensibly manning action stations as their cruiser approached the raider.
Of what value is constant vigilance? In the case of the Kormoran–Sydney battle, it was life itself.

Join The Conversation
Comments
View All Comments