By William E. Welsh
The crash of the heavy guns from a dozen British and French capital ships, one of which was the super-dreadnought the HMS Queen Elizabeth, reverberated against the shoreline of the Dardanelles on February 19, 1915. The Allied fleet engaged the Turkish forts guarding the entrance to the straits at long range that day, although three of the warships did move in much closer. The Allied warships drew surprisingly little return fire, but at the same time they did not inflict any significant damage on the forts that defended the straits. British Vice Adm. Sackville Carden, the officer commanding the British forces in the Aegean Sea in World War I, had to delay his next attack for nearly a week because of severe weather.
Vice Adm. John de Robeck, who directed the bombardment on February 25, engaged the forts at close range. This allowed the captains of the warships to observe the effects of their fire more closely. The forts received such a pounding that day that the Turkish and German crews manning the guns withdrew from the forts to minimize their loss in lives.
But silencing the forts guarding the entrance was only the first part of a naval campaign aimed at reaching Constantinople in the hope of toppling the supposedly fragile Ottoman Empire, thereby taking it out of the war. The Ottoman Empire had secretly joined the Central Powers in August 1914 and then officially announced to the world two months later that it had sided with Germany and Austria-Hungary in the global conflict.
The Ottoman Empire had been in a downward spiral since the late 16th century. It was economically unstable and had come to be increasingly reliant on Western Europe to maintain its existence. Indeed, the threat that Imperial Russia posed to the Ottoman Empire had sparked the Crimean War. Russia maintained its pressure on the Turks, defeating them decisively in the Russo-Turkish War of 1877-1878. The disastrous Balkan Wars of 1912-1913 saw the Ottoman Empire lose nearly all of its remaining European territories to Bulgaria, Serbia, Greece, and Albania.
A coalition of nationalist generals known as the Young Turks, who were determined to implement major economic reforms in the Ottoman Empire, had emerged in 1908. Enver Pasha, one of the Young Turks who gained dictatorial powers in 1913 through a coup d’état, had orchestrated the alliance with Germany. Ironically, the British had actually driven the Turks into the arms of Germany by seizing two dreadnaught battleships purchased by Turkey but not yet delivered by the outbreak of the war. The Germans, in a clever move, replaced the losses by giving the Turks two German battle cruisers Goeben and Breslau.
Winston Churchill, the First Lord of the Admiralty in Prime Minister Herbert Henry Asquith’s liberal government, had dispatched the Royal Navy to bombard the Turkish forces at the entrance to the Dardanelles shortly after the Ottoman Empire had joined the Central Powers. Lord Fisher, the First Sea Lord, supported Churchill’s plan for a naval offensive to capture the Dardanelles, but had said it must happen immediately, before the Turks had time to improve the naval and land defenses protecting Constantinople. “I consider the attack on Turkey holds the field!” wrote Fisher in January 1915. “But only if it is immediate.” The British War Council stopped Churchill from pressing the attack against Turkey at that point in the war, however.
When it became obvious in early 1915 that the Allied and Central powers were locked in a stalemate on the Western Front, the military leadership of Britain and France began to ponder at length how they might defeat the Turks in a quick and decisive campaign. The need for a campaign against the Ottoman Empire became a pressing matter when the Turks gained the upper hand in fighting against the Russians in the Caucasus Mountains. The driving motivation in opening the Dardanelles to Allied shipping was to establish a supply route into the Black Sea by which the Allies could funnel supplies and military equipment to the hard-pressed Russian armies.
When Churchill asked Carden what it would take to force the Dardanelles so that an Allied fleet might reach Constantinople, the admiral told him it would have to be done in three phases. First, Allied warships would have to silence the heavy guns in the forts guarding the entrance to the straits. Second, Allied minesweepers would need to clear Turkish waters of mines. Third, the Allied warships would have to secure the Sea of Marmara, beyond the Dardanelles.
Turkish minefields in the Dardanelles had the potential to cripple the Allied fleet and wreck the naval campaign to reach Constantinople. When Carden became seriously ill in late February, command of the fleet devolved to Robeck. Although Robeck had 12 British and four French battleships, the crews of the minesweepers were civilians. The civilians operating the minesweepers were not inclined to risk their lives in the performance of their duties.
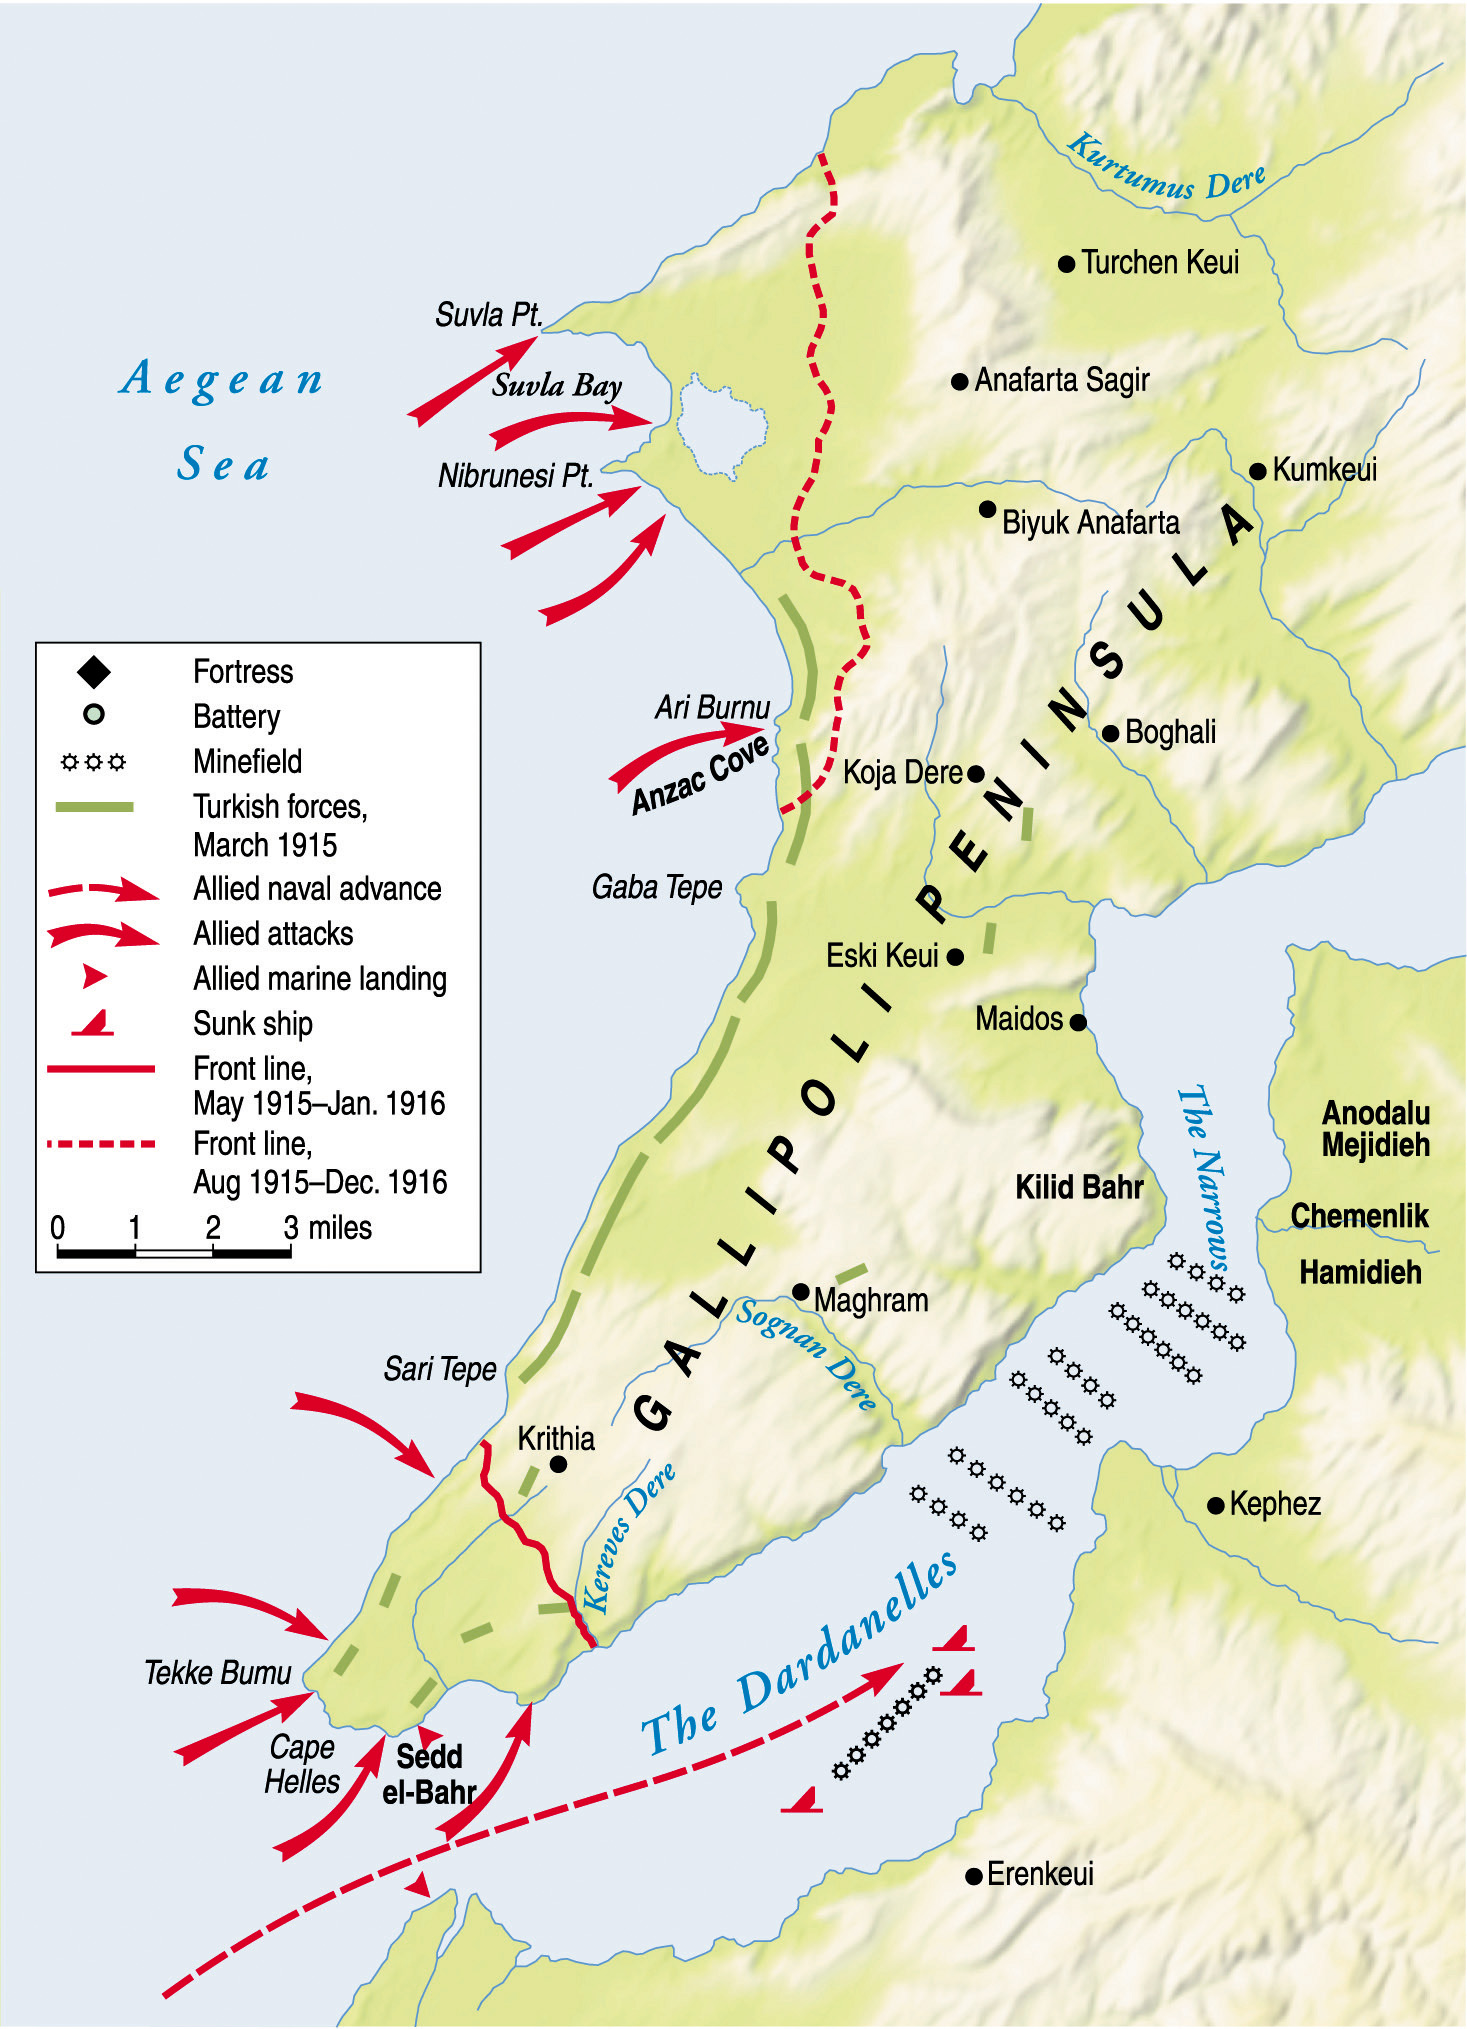
With the naval campaign bogged down at the end of February, British Minister of War Lord Herbert Kitchener agreed to land troops on the Gallipoli Peninsula to help clear out the forts on the European side of the Dardanelles. The peninsula, which juts out into the northern Aegean Sea, is 52 miles long. Tapered at both the top and bottom, the peninsula is 12 miles wide in the middle.
Kitchener had already deployed Lt. Gen. William Birdwood’s Australian and New Zealand Army Corps, known as the ANZAC Corps, to the Greek island of Lemnos, and he now also begrudgingly transferred the British 29th Division, which he had been holding back in case it was needed on the Western Front in France.
By mid-March, Robeck had succeeded in silencing the batteries in the forts at the mouth of the Dardanelles, but not deeper into the straits, where batteries lined both coastlines. The fleet faced a daunting challenge clearing routes through the minefields while running the gauntlet of batteries inside the Dardanelles. The Turks had not only stationary gun emplacements defending the straits, but also mobile howitzer batteries.
Robeck committed nearly his entire fleet to clearing the minefields and silencing as many of the remaining batteries as possible on March 18. His goal was nothing less than forcing a passage of the Narrows section of the Dardanelles between the towns of Kilid Bahr and Chanak. The Allied battleships continued taking fire from the Turkish gun emplacements, and the naval assault that day went badly. The French battleship Bouvet struck a mine and sunk within minutes, sending 639 of its 674 officers and sailors to their deaths. As the day wore on, two British battleships, the HMS Ocean and HMS Irresistible, also sank. Turkish fire had also done considerable damage to many of Robeck’s other warships.
Since the Allied warships had not even reached the two major minefields known to exist inside the straits, the Allied admirals and captains were puzzled as to where the mines had come from that sank the warships. They surmised that individual mines had broken free of their tethers and floated into the warships. This was not the case, however: On March 8, Turkish mine expert Lt. Col. Geehl Bey had secretly laid a line of 20 mines parallel to a line of Turkish mobile batteries deployed on the Asiatic side of the Dardanelles. It was these mines that had sunk the Allied battleships.
Robeck and senior army commanders who observed the attack on March 18 advised the British War Council that a naval attack alone would not succeed. Although the Turks had exhausted a significant amount of ammunition for their artillery, they still had enough left to repulse another attack if the British chosen to launch one. What is more, the Turkish minefields in the Dardanelles remained intact.
The British War Council decided not to renew the naval attack until Allied infantry had come ashore and secured the Kilid Bahr Plateau, not far from the tip of the Gallipoli peninsula that overlooked the Narrows section of the Dardanelles. At that point, the mine-clearing could resume under protective fire from both land-based artillery and naval gunfire. Once the minefields were cleared, then warships could steam into the Sea of Marmara in order to reach Constantinople.
Two competent commanders directed the 80,000-strong Turkish Fifth Army that would contest the Allied landings. Lt. Gen. Liman Von Sanders, a 60-year-old German general from Pomerania, who led the German military mission to Turkey, oversaw the defense of the Gallipoli peninsula. The Ottoman Imperial Government gave him command of the Fifth Army, which initially consisted of six divisions. Von Sanders was flexible, decisive, and experienced. He deployed four of the Fifth Army’s divisions on the Gallipoli peninsula and two on the Asiatic side of the Dardanelles.
Thirty-four-year-old Brig. Gen. Mustafa Kemel, who commanded the Turkish 19th Division, possessed superb strategic and tactical skills and ingenuity. Equally important, his courage would inspire the Turkish troops under his command to put up a tenacious resistance to the Allied forces that were soon to land on the peninsula.
Although Lt. Gen. Essad Pasha, who commanded the III Corps of the Fifth Army, was Kemel’s superior officer, Kemel would frequently take actions during the Gallipoli campaign that, although beyond his authority, were tactically sound.
Sixty-two-year-old General Ian Hamilton commanded the British Mediterranean Expeditionary Force. His initial forces consisted of the British 29th Division, Royal Navy Division, 1st Australian Division, New Zealand and Australia Division, and the 1st Division of the French Corps Expéditionnaire d’Orient. Only the 29th and French 1st Division had any significant military training. The other three divisions were green and untested.
As Hamilton’s force swelled, he realized that Lemnos lacked the infrastructure to serve as a forward base for all of the divisions slated for the invasion. He therefore decided to stage his attack from Alexandria, Egypt. This would also give him an opportunity to reorganize his expeditionary force so that there was a clear chain of command.
The downside of transferring Allied men and ships from islands in the Aegean to Alexandria was that it gave Von Sanders ample time to deploy his forces in the best possible positions to contest the Allied landings on the Gallipoli peninsula. The most practicable landing sites were at the town of Bulair on the north end of the peninsula, Suvla Bay and Ari Burnu in the middle of the peninsula, and Cape Helles at the southern tip of the peninsula.
Von Sanders deployed the 5th and 7th divisions at the top of the peninsula near the towns of Bulair and Gallipoli and the 9th Division at the bottom of the peninsula at Cape Helles. He assigned Kemal’s 19th Division to serve as a mobile reserve stationed in the middle of the peninsula at the town of Boghali. The 3rd and 11th divisions assumed positions on the Asiatic side at the mouth of the Dardanelles to thwart a landing at that location. Von Sanders’ plan was to deploy regiments in screening positions atop the high ground overlooking the beaches to contain the Allied landing forces. In the event the Allies broke through a screening force, he would commit some or all of his reserves. The Turks had the advantage of being able to entrench on heights overlooking the beaches where, if they chose to do so, they could engage the Allied troops as they came ashore.
Hamilton’s invasion force faced a daunting challenge. They had to secure their landing beaches, and in some cases scale forbidding heights. Moreover, they had lost any element of surprise by the time spent organizing for the expedition in Egypt. But the British command believed the Turkish infantry would not stand up to their troops, and they proceeded under that flawed assumption.
While the 29th Division would come ashore at Cape Helles, the ANZAC troops would land further up the peninsula at Gaba Tepe. In order to confuse the Turks as to the focus of their attack, Hamilton directed General Antoine Masnou’s 1st French Division to land at Kum Kale on the Asiatic coast, where they could cover the rear of the British by preventing the Turks from moving mobile artillery into position to shell the landing beaches at Cape Helles.
In a move that weakened the forces at the two primary landing sites on the Gallipoli Peninsula, Hamilton also planned two diversionary attacks. A small contingent of French troops would land at Besika Bay, while a detachment of the Royal Naval Division would come ashore at Bulair Neck. To make the diversionary attack at Bulair Neck appear convincing, 20 warships steamed into the Gulf of Saros on the northern coast of the peninsula and fired broadsides against suspected Turkish positions at Bulair.
The Allied armada returned to the Gallipoli peninsula on the morning of April 25. Three British battleships, the Queen, Prince of Wales, and London, accompanied the troopships maneuvering into position at night to disembark their troops at Gaba Tepe. Steam pinnaces [light vessels] carried on the warships towed rowboats 3,000 yards toward the shore but stopped a few hundred yards from shore for fear of running up on rocks in the shallows.
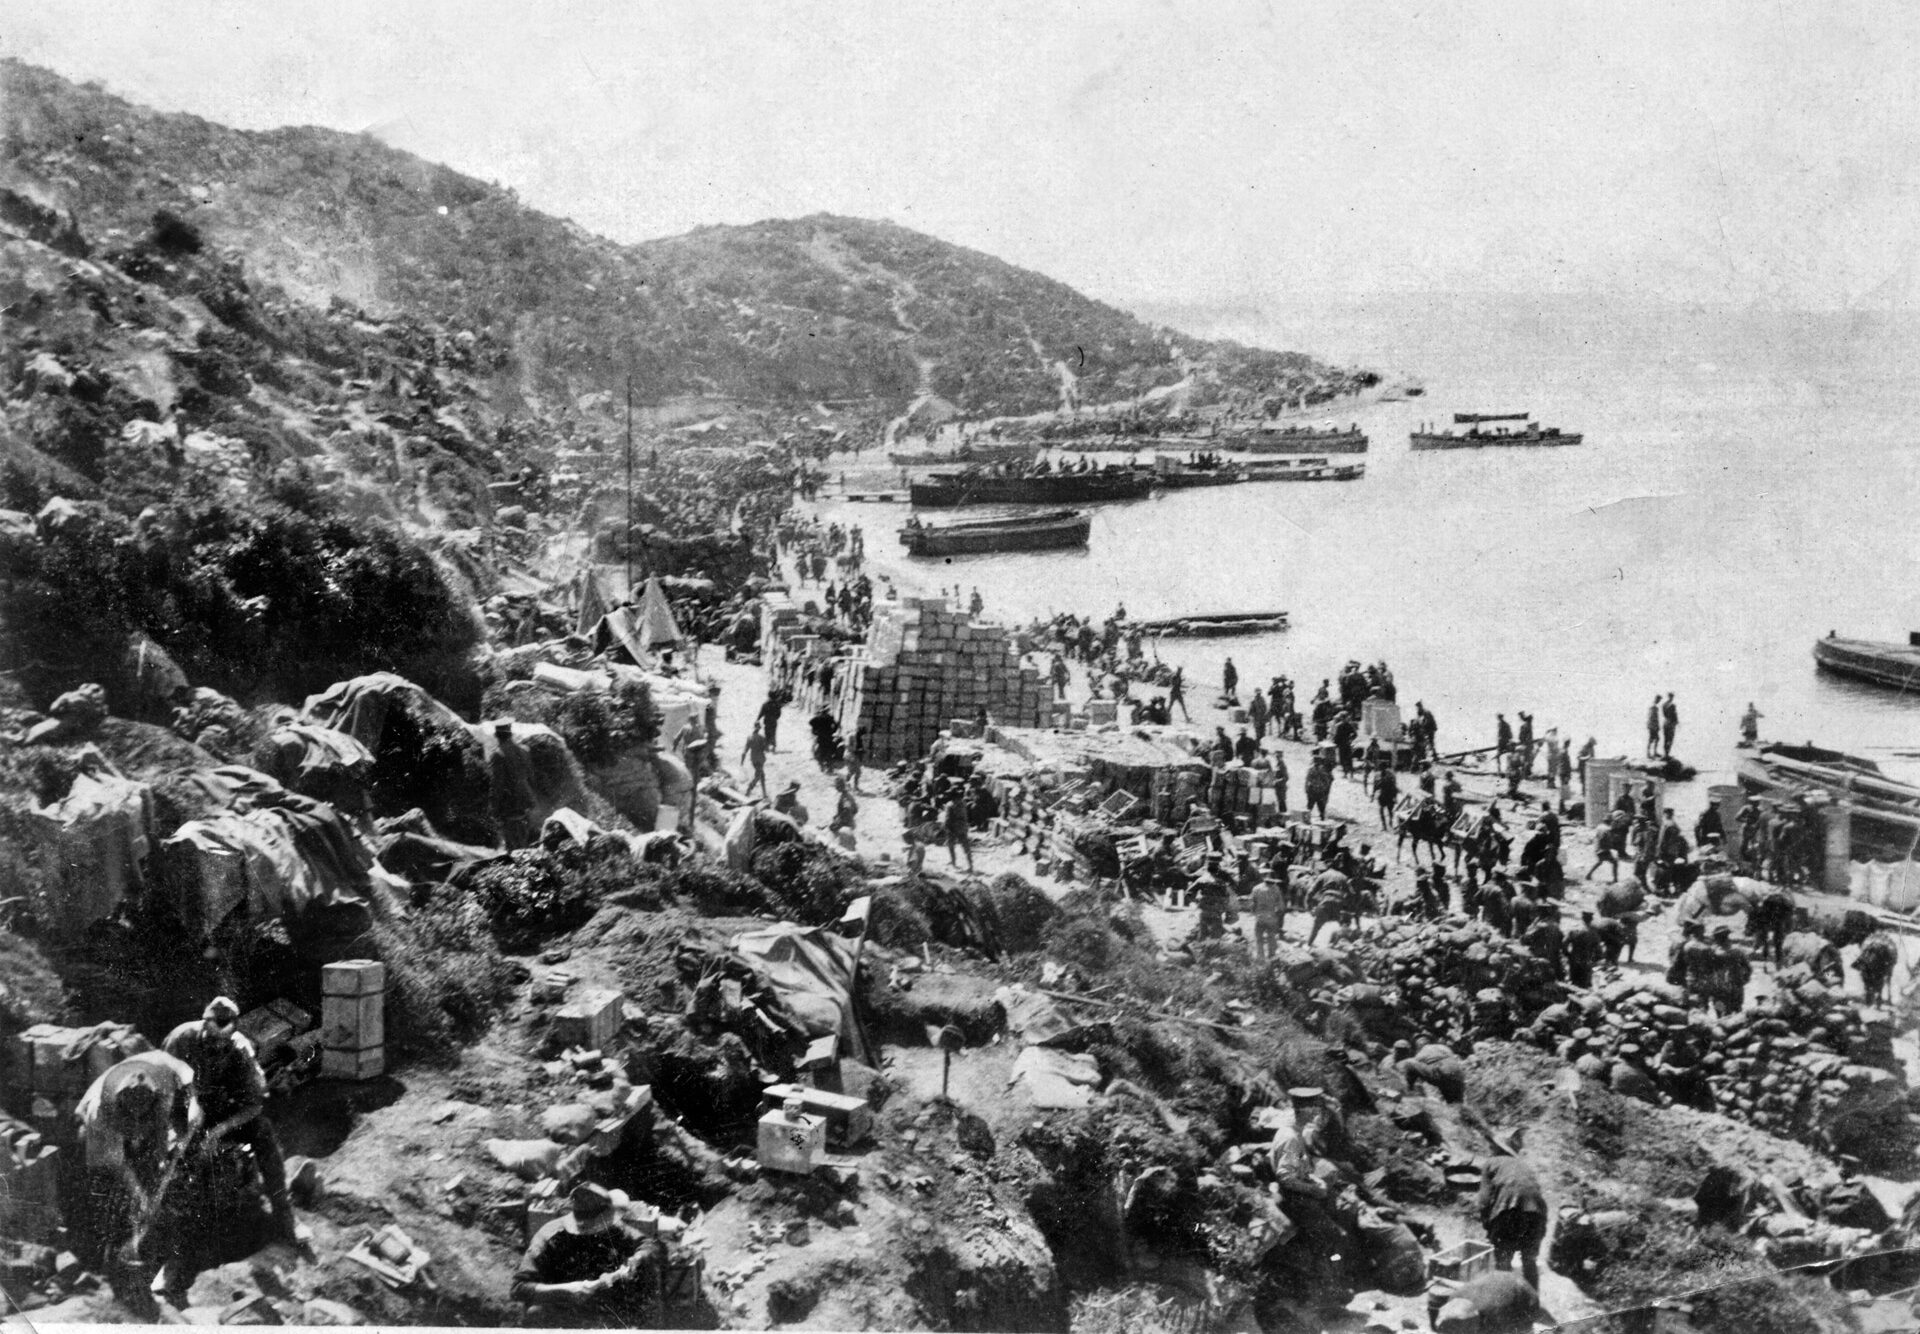
The naval vessels carrying the ANZAC troops missed their intended landing site, which was designated “Z Beach,” and mistakenly deposited the Australia and New Zealand troops a short distance north of it on a narrow beach at Ari Burnu. The barren landing site, which lacked an adequate water supply for the troops who would be operating out of it, became known afterwards as ANZAC Cove.
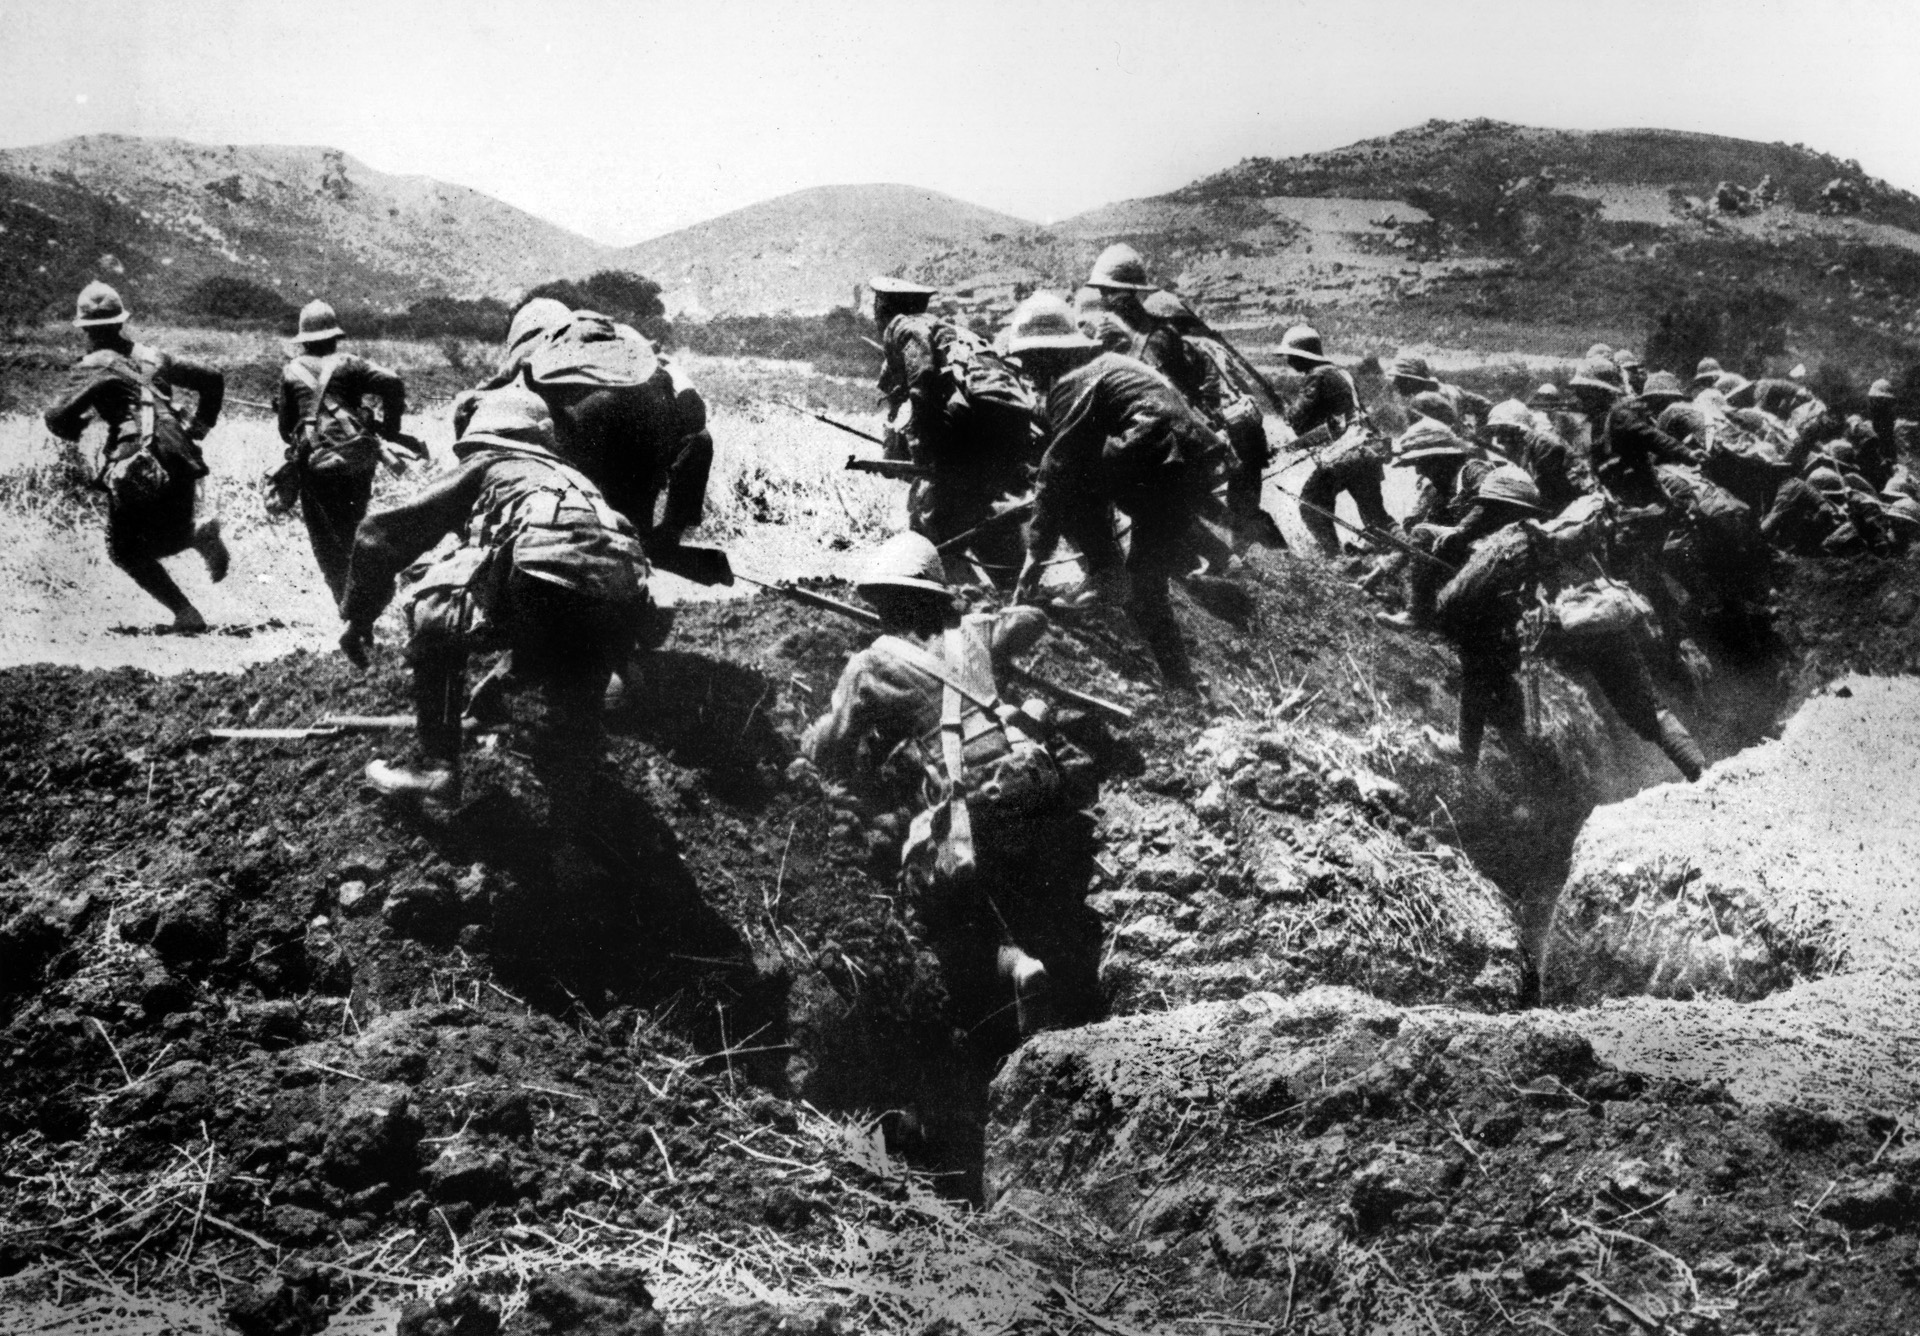
The ANZAC troops wound up in a dreadful place. The beach was at the base of a high cliff. The landscape on Gallipoli generally was covered with scrub; that is, low trees and bushes. The initial landing force that came ashore at 4:30 a.m. consisted of 1,500 Australian troops, who immediately began scaling the low cliffs. They made their way to the top by working their way back and forth through gulleys whenever possible. Throughout the course of the long day, 6,500 more troops came ashore until the entire ANZAC corps had been landed.
Three ANZAC scouts had orders to move as far inland as possible. They wound up climbing three separate peaks. The last of these, which was situated two miles inland from ANZAC Cove, was the 1,000-foot-high Sari Bair range. The fighting in the days that followed would rage near the Chunuk Bair, the second-highest peak in the range. The scouts reached the top of the mountain range at 7:00 a.m. From their vantage point, they could see the plateau of Kilid Bahr and the Narrows section of the Dardanelles just beyond it. If all went according to plan, Birdwood’s ANZAC Corps would link up with Maj. Gen. Aylmer Gould Hunter-Weston’s 29th Division on the plateau in a matter of days.
Although Birdwood did not come ashore at first, his two divisional commanders had the presence of mind to expand the beachhead as quickly as possible. The four battalions of the 3rd Australian Brigade of Maj. Gen. William Throsby Bridges’ 1st Australian Division led the assault. They were followed by the 2nd Australian Brigade and the 1st Australian Brigade. Two Indian mountain batteries with 12 mule-drawn 10-pounder guns accompanied the advance.
When the British attack began, Von Sanders was at his headquarters at the town of Gallipoli. He was awakened by staff officers at 5:00 a.m. and informed that British naval squadrons and detachments were landing troops at five separate locations, including the Asiatic side of the Dardanelles. Fearing that Allied troops were coming ashore in his rear at Bulair at the neck of the peninsula, he rode off with his staff to take personal charge of defending that location. Before departing, he issued orders for the Turkish 7th Division to march from Gallipoli to Bulair. He stayed at Bulair just long enough that day to assure himself that it was not a main landing point for the British before returning to Gallipoli.
Essad Pasha sent an urgent dispatch to Kemel, whose headquarters was located at the village of Boghali, east of the Sari Bair range, shortly after dawn to detach a battalion immediately from his 19th Division to contain the ANZAC landing. When he received the dispatch at 6:30 a.m., Kemel sent a battalion from the 57th Regiment on its way. He and his staff followed. They came upon the troops who had lost their bearings while heading west into the mountainous terrain. He and a few officers went ahead to reconnoiter the ground and ran headlong into a group of Australian soldiers. Both parties went to ground, taking cover in the scrub, and Kemel sent one of the officers to hurry forward the Turkish infantry. The encounter occurred on the slopes of Chunuk Bair.
As the fighting commenced, Kemel issued orders for his entire 57th Regiment and an Arab regiment in his division to engage the advancing Australians. By doing so, he overstepped his authority. Since his division was designated as a reserve force, he should have cleared it with his immediate superior Pasha. Realizing this, Kemel rode off to III Corps headquarters, where he debriefed Pasha and asked for permission to commit his third and last regiment to the expanding battle. Pasha realized the severity of the threat and gave his consent. The 57th Regiment, which was heavily outnumbered, was destroyed by the vanguard of the ANZAC Corps that day. Nevertheless, the Turks prevailed in the struggle for control of the Sari Bair range, and in so doing, they contained the advance of the ANZAC troops to just 2,500 yards from their landing beach. It was a setback that jeopardized the success of the entire invasion.
The ANZAC troops began entrenching on the west side of the Sari Bair range on April 26. Fierce fighting erupted in the no-man’s land between the ANZAC forces and Kemel’s reinforced 19th Division. The Turks charged the soldiers of the 1st Australian Division in an effort to hurl them back; the Australians and Turks fought hand-to-hand with each other. In the brutal fighting that occurred on April 26 and April 27, the 1st Australian Division suffered 4,500 casualties, which was nearly half of its strength.
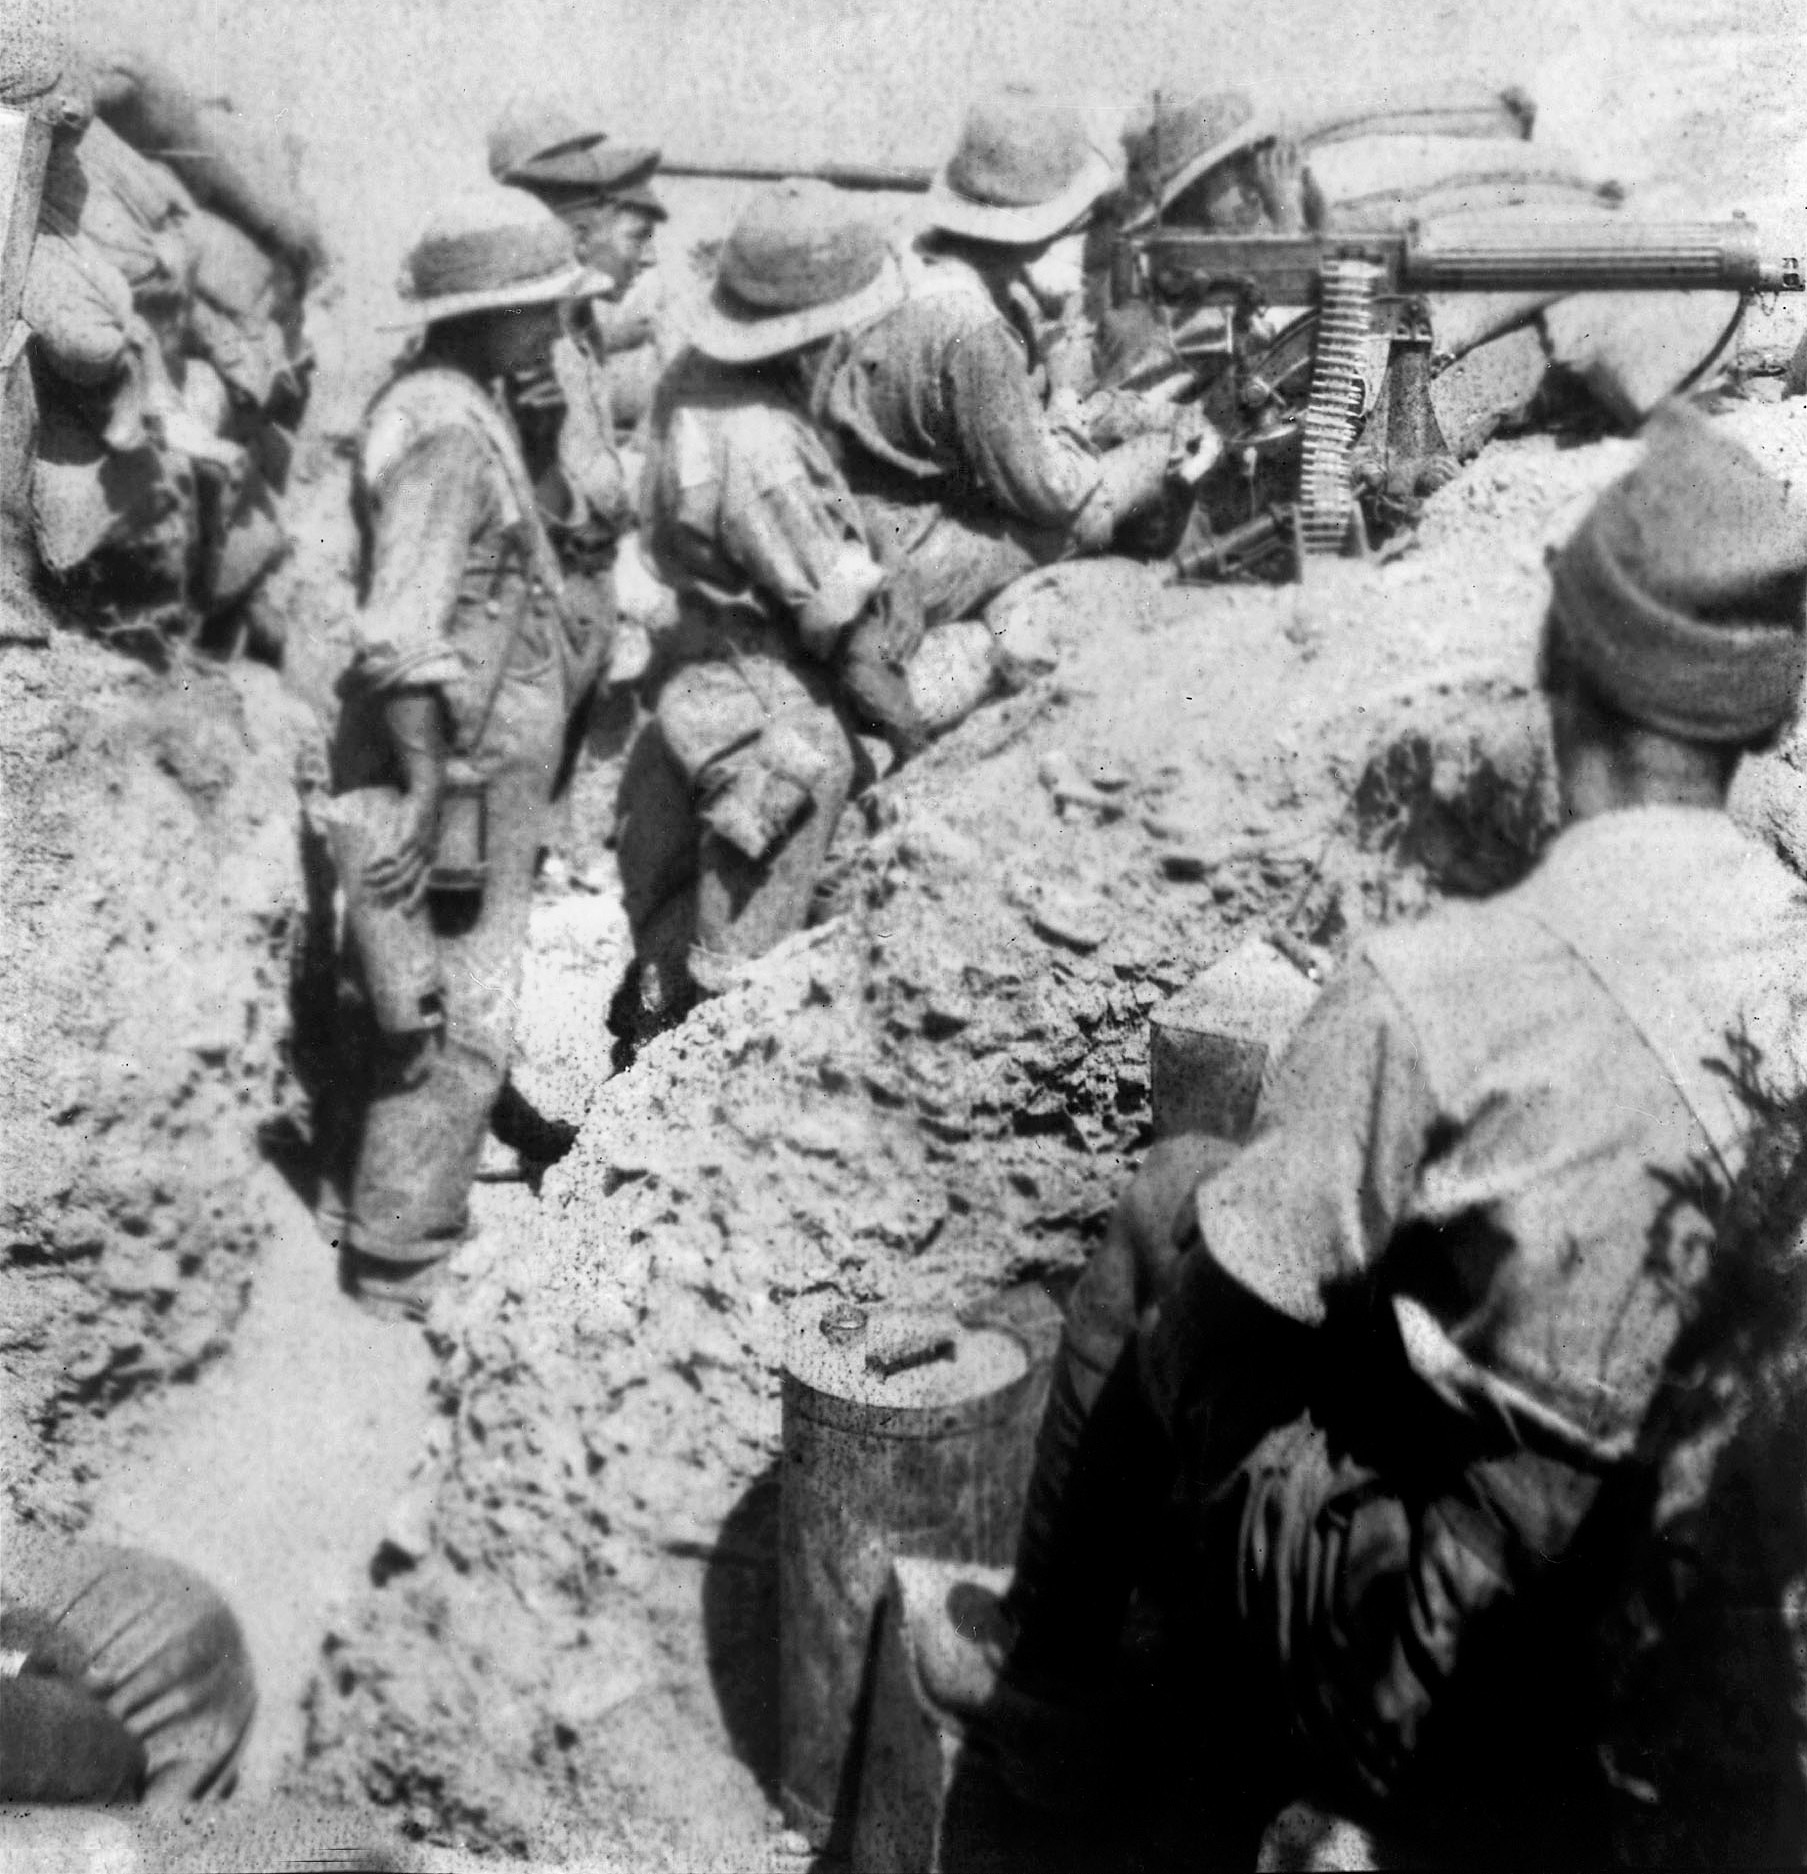
The ANZAC troops on the frontline had to get by without the artillery support necessary to make any substantial headway against the entrenched Turks. They not only lacked any substantial heavy-artillery support, but also suffered from an acute shortage of trench mortars and spherical hand grenades. In an effort to compensate for the lack of grenades, they crafted home-made ones by packing discarded tin cans with explosive charges.
The Australians also had a difficult time holding their trench line because of an acute shortage of water. While the troops dug trenches, groups of soldiers had to return to ANZAC Cove to haul water, ammunition, and equipment to the front lines.
The 29th Division went ashore at five different beaches, coded S, V, W, X, and Y, at Cape Hellas. Lt. Gen. Hunter-Weston planned to make the main thrust at beaches V and W, at the tip of the peninsula. The other three beach landings, which were situated further up the tip, were conducted by forces with orders to strike the enemy forces opposing the main landings in the flank. Elements of the 86th and 87th brigades that landed at beaches S, V, and Y did not face any resistance when they came ashore. But at the tip of the peninsula, two companies of the 3rd Battalion of the Turkish 26th Regiment were entrenched behind rows of barbed wire.
The British troops landing at Cape Helles at the tip of the peninsula had the advantage of being covered by protective fire from British warships that could fire broadsides from three directions against the Turkish troops.
The 1st Lancashire Fusiliers belonging to the 86th Brigade landed in the first wave at W Beach, at the very tip of the peninsula. They were followed ashore by the second wave, consisting of the 4th Battalion of the Worcestershire Regiment. Turkish machine gunners behind barbedwire defenses raked the Lancashire Fusiliers as they came ashore, inflicting 50 percent casualties on the battalion. But when the troops in the second wave came ashore, they overran the defenders.
The situation was far worse, though, at V Beach. Rather than being towed to shore in small boats pulled by steam pinnaces, the plan called for the River Clyde, a tramp steamer that had been converted to a troop ship, to purposely run itself aground on the shore. Once it was fixed on the shoreline, troops were to come ashore over gangplanks.
As the troops from the 1st Royal Munster Fusiliers of the 86th Brigade filed across the gangplanks, Turkish machine gunners and riflemen poured a heavy fire into their ranks. One company drawn from the 1st Royal Dublin Fusiliers and two companies of the 2nd Hampshire Regiment arrived in the second wave in row boats pulled by the steam launches. The Turks defending V Beach, which was situated a short distance east of W Beach, fought with extreme tenacity. They benefitted from accurate supporting fire delivered by a Turkish howitzer battery deployed just north of the beach.
With the first wave no longer combat effective, the Turks were free to focus concentrated fire on the second wave of troops struggling to get ashore. “The water seemed to be alive, the bullets striking the sea all around us,” wrote Captain David French of the 1st Royal Dublin Fusiliers. “Heaven alone knows how I got through a perfect hail of bullets.” Those who did manage to get ashore were pinned down on the narrow beach throughout the first night. It was not until the early afternoon of the following day that the British succeeded in driving off the Turks.
Over the course of the next three days, the 29th Division endeavored to advance up the peninsula. They only got three miles, though. Two battalions of the Turkish 26th Regiment and an engineer company occupied trenches protected by layers of barbed wire at the town of Krithia, several miles above the tip of the peninsula. The losses were heavy enough at beaches V and W that Hamilton decided to transfer the 1st French Division from Kum Kale to Cape Helles for the drive against the Turkish forces at Krithia. It proved in the long run to be an unwise decision because shortly after the French departed, heavy guns from the forts and mobile batteries on the Asiatic side began bombarding the British and French troops at the bottom of the peninsula.

Hamilton pressed Lt. Gen. Hunter-Weston to advance as quickly as possible in order to seize a key raised plateau named Achi Baba that was situated northeast of the town of Krithia. If the Allies could gain control of the heights, then they could establish long-range batteries on Achi Baba that would give the British control of the bottom one-third of the peninsula.
Heavy fighting erupted on April 28 in a day-long clash that became known as the First Battle of Krithia. The Allies launched repeated frontal attacks against the Turkish forces deployed in and around the town. At one point, elements of the British 88th brigade gained a toehold on Achi Baba, but a spirited attack by the Turks forced them back. In just that one day of fighting, the British suffered 3,000 casualties.
Von Sanders had spent the last few days in April reinforcing the Turkish forces defending the Sari Bair range and those entrenched at Krithia. His first move was to shift the 5th and 7th divisions south from the northern end of the peninsula. He also began receiving substantial reinforcements from the mainland. He received two from Constantinople and transferred by boat the 3rd Division from the Asiatic shore, where it was no longer needed.
Von Sanders heavily reinforced the III Corps. Essad Pasha was nominally in command of the forces containing the ANZACs, but Kemel was the de facto commander. With his force swelling to 16,000 troops on the frontline along the Sari Bair ridge, Kemel launched a major counterattack on May 1. After a blistering Turkish artillery bombardment had pummeled the ANZAC trenches, multiple waves of Turkish infantry assaulted the entrenched Australian and New Zealand troops. To their credit, the ANZACs, who were being bloodied for the first time, hurled back the mass charges of the courageous Turks.
Kemel maintained the pressure on the ANZACs, launching follow-up attacks on May 2 and May 3. Hamilton reinforced Birdwood by sending Maj. Gen. Archibald Paris’ Royal Naval Division to help plug gaps in the ANZAC lines. The 2nd Naval Brigade moved up to the front line just as the Turks had completed their costly counterattacks.
In addition, the Turks defending Krithia launched two major counterattacks against the Allied forces on the nights of May 1 and May 3. The counterattacks occurred at night because the Turks feared the naval gunfire that the British could bring to bear against their forces if they emerged from their trenches. These Turks suffered heavy losses that were unnecessary because the Allies were unable to make any headway against Turkish defenses in any case.
The Allied advance north from Cape Helles suffered from a lack of coordination among the senior levels of command. Lt. Gen. Hunter-Weston and his staff were responsible for this. At that stage of the fighting, the Ottoman forces did not even have a continuous defensive line across the base of the peninsula. The Turks simply held a string of outposts and entrenched positions on both sides of the town. With better coordination, the Allies might have dislodged them by maneuvering against weak points and using diversionary attacks to draw Turkish strength away from the main point of attack. Instead, just a few thousand Turks succeeded in bottling up more than 20,000 troops from the British 29th Division and the 1st French Division.
In order to give Hunter-Weston enough strength to break through the Turkish lines, Hamilton transferred two ANZAC brigades on the night of May 5 to the Krithia sector. In the reshuffling of forces in preparation for a renewed attack to gain the high ground at Achi Baba, Hamilton assigned the 29th and 125th Indian Brigades to the 29th Division to sustain it as an effective force and offset the heavy losses it had suffered up to that point in the campaign. By the end of the first week in May, Hunter-Weston had 25,000 troops for a fresh attack against the Turks holding Krithia and Achi Baba.
The British renewed their attack on May 6 in what became known as the Second Battle Krithia. For three days, the British hurled their troops against the Turkish positions. By that time, the 26th Regiment had been substantially reinforced. The casualties suffered as the British infantrymen charged into the teeth of the Turkish machine guns were horrendous. The three-day battle cost Hunter-Weston 6,500 men—three times the Turkish losses. The gain of 600 yards was negligible.
At that point, Hamilton wired Kitchener that he needed more men if he were to succeed in reaching the Kilid Bahr Plateau. Kitchener responded by sending the 42nd Division and the 29th Indian Brigade, which were forward deployed in Egypt.
The Gallipoli campaign began to fall apart when Italy joined the Allies on May 23, 1915. Commodore Roger Keyes, who was Vice Adm. Carden’s chief of staff, had suggested a war council to resume naval operations in the Dardanelles. But Allied priorities changed when Italy entered the war, for London had pledged to give naval support to Italy if needed in its war against Austria-Hungary. Owing to the threat that German U-Boats and Turkish destroyers armed with torpedoes posed to their capital ships, the British withdrew their battleships. But they left their destroyers in place to furnish badly needed supporting fire.
As the prospects for a clear-cut victory against the Turks on the Gallipoli peninsula diminished with every passing day, Fisher came out ardently against any resumption of naval operations to force a passage of the Dardanelles. Fisher, who by that time was engaged in bitter disputes on naval strategy with Churchill, resigned his post as First Sea Lord on May 15. The reason given was that he was adamantly opposed to any further action in the Dardanelles or transfer of any more warships to the sector.
When Asquith was compelled to establish a coalition government that month, the Conservatives demanded that Churchill be removed as the First Lord of the Admiralty. Although demoted to a lesser position in the government, Churchill remained on the Dardanelles Committee, where he continued to argue in favor of continuing the campaign.
With naval support hamstrung by London, the entire campaign hung on the success or failure of Hamilton’s Allied army on Gallipoli. With the Turkish ranks on the Sari Bair line having swelled to 30,000 troops by mid-May, the Turks launched a fresh attack against the ANZAC trenches on May 19. The Turks succeeded in temporarily capturing part of a section of the ANZAC forward trenches, but a counterattack by the 14th (Victoria) Battalion of the 4th Australian Brigade expelled the Turks. The Turks suffered 13,000 killed and wounded. Australian and New Zealand machine gunners had literally mowed down the Turks by the thousands at the cost of a few hundred Allied casualties.
The heroism of the Australians and New Zealanders was exemplified by Lance-Corporal Albert Jacka of the 14th Battalion. Jacka became the first ANZAC soldier of the war to receive the Victoria Cross when he shot five Turks and bayoneted two more during the Turks’ costly attack.
The Third Battle of Krithia began on June 4. By that time, though, the Allies held no significant numerical advantage over the Turks. The British and French fielded 30,000 men, and they faced 25,000 Turks who were entrenched. Moreover, the Turks had 86 pieces of artillery to support the soldiers in the trenches. The British lost 4,000 men in yet another defeat at Krithia.
London decided in June to send five new divisions to Hamilton in hopes that the fresh troops would enable him to achieve victory against the Turks on the Gallipoli peninsula. These divisions were the 10th, 11th, and 13th divisions from Kitchener’s so-called New Army, as well as the 53rd (Welsh) and 54th (East Anglian) territorial divisions. Hamilton decided to reinforce the ANZACs with just one division, which was the 13th Division. The other four divisions would conduct a new landing at Suvla Bay, just five miles north of ANZAC Cove. Hamilton’s plan called for the two bridgeheads to link up and advance east to the shore of the Dardanelles.
The 10th and 11th divisions, which had a combined total of 20,000 troops, landed at Suvla Bay on August 6. But the landing soon bogged down for a familiar reason, namely, 61-year-old Lt. Gen. Frederick Stopford, given command of the newly created IX Corps, did not press his attack. With the British milling about at Suvla Bay, Kemel launched a ferocious counterattack that put Stopford on the defensive.
Birdwood had assigned Maj. Gen. Alexander Godley to direct the forces attempting to break out of the ANZAC bridgehead. While this required attempting to finally gain control of the Sari Bair range, it also involved sending forces on the left flank of the bridgehead north to link up with the forces advancing east from Suvla Bay. Godley’s first attack was directed at the Turkish forces at Lone Pine, an objective on the southern end of the ANZAC line. The 1st Australian Division had orders to charge across 220 yards of no-man’s land to assail the Turkish trenches just before nightfall.
Officers blew whistles at 5:30 p.m., and soldiers of the Australian 1st Division surged across the rocky ground. When they reached the Turkish position, they found the intrepid Turks had covered their trenches with neat rows of pine logs. As some soldiers tried to pry the logs loose, others fired through cracks in the logs. The Australian soldiers eventually gained access to the trenches and began fighting the Turks with bayonets, clubbed rifles, and fists.
“[We were] met by some Turks who came at us suddenly and savagely,” wrote Private Charles Duke of the 4th (New South Wales) Battalion, whose recollection captures the ferocity of the close-quarters combat in the trenches. “I lunged at the nearest, but my bayonet stuck in his leather equipment. Instantly he raised his rifle to shoot me, but before he could there was an awful bang alongside my ear, and he fell crumpled at my feet. My mate behind me had put his rifle over my shoulder and had shot him, but that discharge nearly blew my head off.”
The British captured the first line of trenches on the first day but continued fighting the Turks in that sector for three more days at a cost of 4,000 casualties before finally capturing the location. Seven Victoria Crosses were awarded for valor in the Lone Pine sector.
The main attack, though, all along the Turkish line, began at 9:00 p.m. on August 6. At first light the following day, the 8th and 10th regiments of the Australian 3rd Light Horse Brigade were tasked with capturing a knoll held by entrenched Turks that blocked one of the avenues of approach to the peak of Chunuk Bair.
Whistles blew at 4:30 a.m., signaling the attack. The soldiers went over the top in what would prove an impossible mission. The troopers, who fought dismounted, had to cross 60 yards of a saddle between friendly forces on Russell’s Top and enemy forces on the scrubby knoll to the east. Two rows of Turkish riflemen opened fire on the charging Australians. The Turks succeeded in mowing down two-thirds of the 600 Australians that made the charge.
“Most of the first wave was down: either killed, wounded, or had taken cover,” wrote Lieutenant Andrew Crawford of the 8th (Victoria) Light Horse. “I was soon laid out with a couple of bullet wounds in my body and a graze on my head. I could not move and was eventually dragged back into our trenches.”
Stopford’s failure to press inland, combined with the failure of the ANZAC troops to make much headway other than at Lone Pine, resulted in another static front on August 10. The British attacked again on August 21 in an attempt to gain ground but make no headway against steadfast Turkish troops. One of the principal reasons for the failure of the attacks in August was that the troops in the bridgeheads lacked the sufficient heavy artillery to soften up the Turkish defenses.
With the advent of the autumn months, the weather turned foul, with heavy rains sparking flooding in the gullies on the peninsula. The Australian government, horrified by the losses its forces had suffered on the Gallipoli Peninsula in multiple failed attacks, successfully lobbied London for the removal of Hamilton from command. Following his dismissal in October, Lt. Gen. Charles Monro took command.
Upon his arrival, Monro recommended immediate withdrawal. This prompted Kitchener to visit the peninsula in November to see things for himself. That same month, Churchill resigned from the government. Kitchener agreed with Monro’s assessment of the situation. Although some quarters of the British government were calling for a fresh naval offensive in the Dardanelles, Kitchener had the final word on the matter.
The first troops to be extracted were those at Suvla Bay and ANZAC Cove on December 19-20. The remaining troops at Cape Helles were withdrawn on January 8-9, 1916. The efficient evacuation without casualties was the only real success of the entire campaign.
The Gallipoli campaign had failed because of a lack of preliminary tactical reconnaissance, poor planning and logistics, and an overestimation of the capabilities of the Allied forces. Last but not least, London had seriously underestimated the resourcefulness of the Ottoman generals and the fighting spirit of the Turkish soldiers.
“Senseless Slaughter at Gallipoli”
Just one of WWI’s many senseless slaughters.