By Niels Henkemans with Sean Claxton and Charles C. Roberts, Jr.
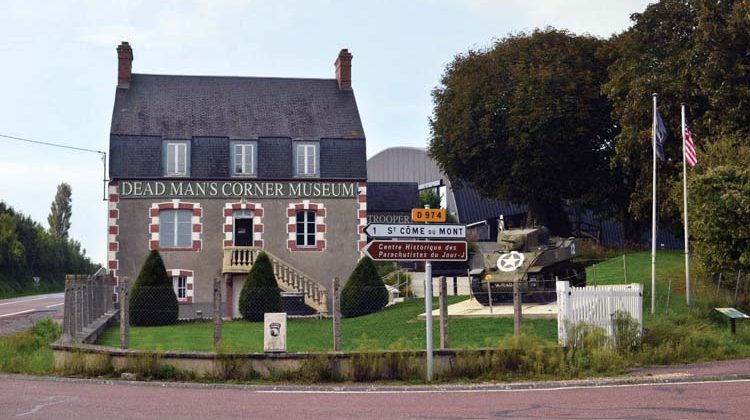
“Dead Man’s Corner,”at a road junction south of Saint-Côme-du-Mont, has become one of Normandy’s most famous landmarks. The story of what happened there has become legendary: an American Stuart tank was destroyed at the intersection and remained in place for several days, the dead body of the commander hanging out of the turret. The troops started to refer to the spot as “the corner with the dead man in the tank” and later simply as “Dead Man’s Corner.” As with all legends, the true story is much more complicated. This article is an attempt to separate fact from fiction and explore what can be proven and what remains a mystery to this day.
The name “Dead Man’s Corner” is old. It was already mentioned in the combat interviews of S.L.A. Marshall, conducted in the summer of 1944. The general public likely first learned the name through one or two books: either S.L.A. Marshall’s own Night Drop (1962) or the highly acclaimed account of A/506th PIR trooper Donald R. Burgett’s Currahee, A Screaming Eagle in Normandy (1967).
Dead Man’s Corner (DMC) lies at the fork of the D-974 and D-913 roads, a few hundred yards south of the center of Saint-Côme-du-Mont. In 1944, the intersection was strategically important. The D-974 was the most direct route to Carentan and part of the N-13, the highway between Paris and Cherbourg, while the D-913 was significant since it was the southernmost road connecting Utah Beach (via Sainte-Marie-du-Mont) to the highway. The terrain itself was also important, as the intersection lies on the ridge overlooking the German-flooded fields north of Carentan.
The M5A1 Stuart light tank lost at Dead Man’s Corner belonged to the 70th Tank Battalion, an experienced formation that had already seen action in North Africa and Sicily. The battalion arrived in England in late November 1943 and was destined to take part in Operation Overlord in support of the landings at Utah Beach. Company A, B, and C, with their M4 Sherman tanks, would be part of the first waves. Two companies with DD (duplex-drive, or amphibious) tanks would land in the first wave at H-Hour to support the 4th Infantry Division. Company A would support 1st Battalion, 8th Infantry Regiment, on Tare Green Beach, while Company B would support 2nd Battalion of the same regiment on Uncle Red.
These landings would be followed by the deep-wading tanks of Company C in the third wave (H+15), which would land on both beaches. Eight tanks outfitted with bulldozer blades landed in this wave, as well.
The battalion’s Company D, with its Stuart tanks, was not part of the initial assault; it was scheduled to land on Uncle Red in Wave 21 at H+260. After landing, it would proceed as soon as possible to its assembly area and be ready to support the 101st Airborne Division.
The junction south of Saint-Côme-du-Mont was selected as the objective of 1st Battalion, 506th Parachute Infantry Regiment (101st Airborne Division). This key area was primarily defended by the paratroopers of Fallschirmjäger-Regiment 6 and 3rd battalion of Grenadier-Regiment 1058 of the 91st Luftlande Division. The German regimental HQ and an aid station were established in the house at the junction.
On that day, 1/506th PIR fought its way down the D-913 against considerable enemy resistance, while 2nd battalion moved towards Angoville-au-Plain, a half-mile northeast of Saint-Côme-du-Mont, which was quickly secured. During the fighting, the paratroopers were assisted by American armor. Initially, Sherman tanks of Company A, 746th Tank Battalion, provided that support.
It was while riding in one of these vehicles that the commander of the 1st battalion, Lt. Col. William L. Turner, was fatally wounded. His death temporarily halted the advance of the battalion, and it pulled back to Beaumont to regroup. In the late afternoon, the tank company returned to bivouac for maintenance and resupply. Its place was taken over by elements of Company D, 70th Tank Battalion. 1/506th PIR was further reinforced by D/506th PIR, which was detached from 2nd battalion.
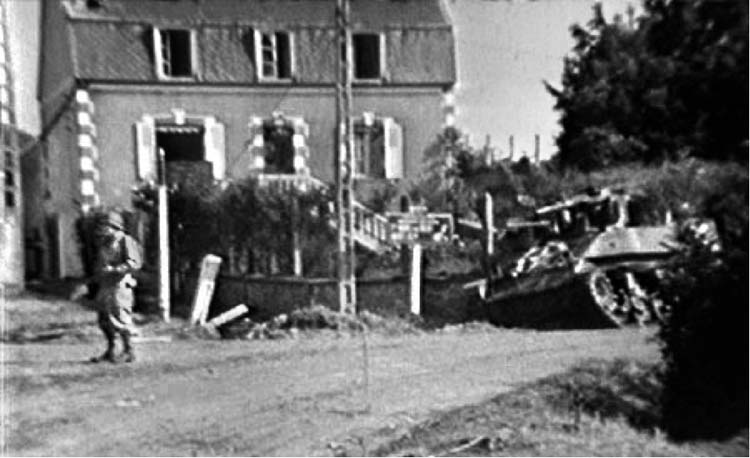
With these reinforcements, the battalion resumed its advance in the early evening. The paratroopers of D Company led the advance, spearheaded by light tanks. Late in the evening, the battalion reached its objective, the intersection. At that very moment, the lead tank was knocked out, and the legend of “Dead Man’s Corner” began. This includes the gruesome detail of the body of the commander hanging out of the turret for several days.
The most common version of “Dead Man’s Corner” can be traced back to either S.L.A. Marshall’s Night Drop or Don Burgett’s A Screaming Eagle in Normandy. In examining the books, it becomes clear that the accounts therein differ from the legend as it is told today and that has become the accepted story.
Burgett wrote: “Farther to our left the small tank that had been hit the day before [7 June] still smoked a little. The body of the tank commander who had been so nice to us still sat in the turret.” Marshall’s version says, “For several days thereafter, the ruined hull stood at the intersection, a dead man sitting upright in the turret.”
Neither book claims that the commander’s body hung out of the turret of the Stuart. However, such an interpretation has become part of the legend. Despite our efforts, no original source has been found to claim the commander ever hung out of the turret. Because of the fame of the story, it is no surprise that people have attempted to determine the identity of the unfortunate tank commander. In recent years, this effort has produced a specific name, which has been published in several books: 1st Lt. Walter T. Anderson. After investigating the available evidence, however, there is not a single reason to believe that Lieutenant Anderson was killed at Dead Man’s Corner. This leaves the identity of the unfortunate commander a question still to be answered.
To answer this question, it is necessary to make a fresh start. We will begin by explaining why it is unlikely that Lieutenant Anderson was killed in the tank at DMC. While it is true that Lieutenant Anderson would have been a tank commander, most tank commanders were (staff) sergeants. The Table of Organization and Equipment (TO/E) of a light tank company calls for just five officers, and all of them had clear tasks. There was a company commander (usually a captain) and a maintenance officer, doubling as the executive officer. These two men were the two senior officers and would be in charge of the company.

There would be three additional officers, one to command each individual platoon. If fewer than five officers were available, a platoon could also be led by a senior NCO. This task would usually fall to a staff sergeant, who, under normal circumstances, commanded the second section of a platoon of five tanks.
The story of Lieutenant Anderson begins with an entry in the Company D diary from December 1, 1943. Company commander Captain Brodie listed the names and ranks of the officers in his company. 1st Lt. Anderson was the maintenance officer and two 2nd lieutenants were listed as platoon commanders. Lieutenant Anderson was the second-ranking officer in the company, and this was still the case on D-Day. Thus, he should never have been in the tank at Dead Man’s Corner.

The company used a common numbering system for its tanks: Tanks 1-5 in 1st Platoon, 6-10 in 2nd platoon, and 11-15 in 3rd Platoon. Captain Brodie commanded Tank 16 and the second tank of the HQ section; Tank 17 was reserved for Lieutenant Anderson.
Officially, the TO/E prescribes that Tank 17 should be commanded by a sergeant. However, in most battalions, the company second-in-command would assume command of that tank in combat. This is even more apparent for the 70th Tank battalion, where the maintenance officer was the standard commander of Tank 17. Even after Lieutenant Anderson’s death, this practice continued in Company D.
Since Tank 17 was his tank, Lieutenant Anderson can be assumed to have been killed in that tank, as well. This is supported by the diary, which states: “We found Tank 17 today […] and learned Lt. Anderson had been killed.” Additional evidence is provided by Sergeant Francis Ross, who confirmed that Tank 17 was used by Lieutenant Anderson. He knew this for a fact because he was personally asked by the lieutenant to become his driver but declined.
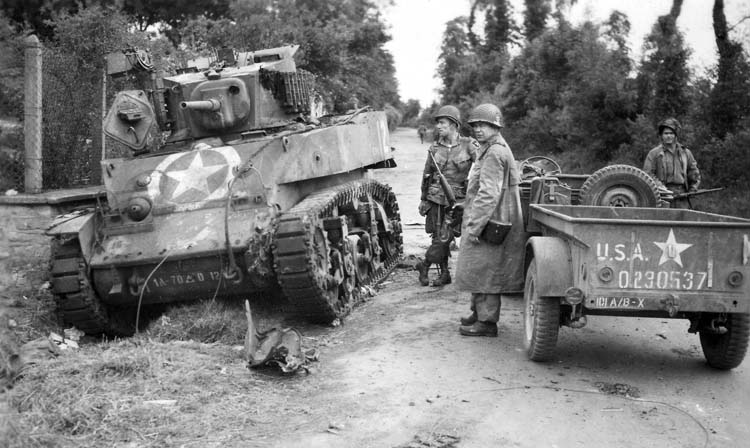
All of this is relevant because the tank at Dead Man’s Corner is not Tank 17, but Tank 12. This automatically rules out Lieutenant Anderson as the dead man at the intersection. The numbering system used by the battalion means that Tank 12 was the second tank within 3rd Platoon. Such a tank was almost certainly commanded by a sergeant, with a crew comprising lower ranks, which means that we should look for an enlisted man, not an officer.
Three documents are crucial in identifying the tank crew: the casualty list of Company D, entries in the company diary, and the official history of the battalion (published shortly after the war). The casualty list is the most important, as it contains data on when, where, and how men were killed, wounded, or went missing.
The company diary is important mainly because it states that two tanks were knocked out on June 7. One of them was “totally destroyed,” and the other had a “hole completely through the front sloped plate.” It identifies these tanks as Tank 10 and 12. No other damaged tanks are mentioned in the diary, and it is likely that most of the casualties suffered by the company on D+1 came from these two tanks.
There were six battle casualties on June 7, from three different locations. This is a good indication that each location refers to one specific tank and its crew. The locations as given are not very precise but are all (south)west of Vierville.
When the descriptions of the casualties are compared to the wreck at Dead Man’s Corner, we can identify a probable crew member. The famous photograph of the tank shows that a hollow charge weapon penetrated the tank’s armor on the left front. This would have struck the driver in the head, almost certainly killing him.
Evidence for this can be found in the photo. The driver’s hatch is still closed, while all other hatches are open. When driving, the hull hatches were usually buttoned down, as they tended to bounce and could interfere with turret traverse. Because the driver’s hatch was locked from the inside, it would be difficult to remove the driver’s body. It is quite possible that the unfortunate driver was still in his seat when the photograph was taken.
The combat interviews also make mention of “a dead man inside it.” The evidence clearly points to the driver of Tank 12 being killed inside the tank. Research from author Mark Bando also supports this scenario. According to Private Emmert O. Parmley (F/502nd PIR), the driver was still in the tank when he examined it. The body could not be seen unless someone looked through an open hatch at an angle.
To identify the unfortunate driver, we have to look for fatalities on the casualty list. The official TO/E calls for the driver of an M5A1 to be a T/4 or T/5 (Technician 4th or 5th Grade). One T/5 is listed among the casualties of June 7, but this man was seriously wounded by shrapnel and burns from antitank fire. This would not indicate a deceased driver and contradicts the testimony of Private Parmley and the photo of the wreck.
However, in Company D, not all drivers held an official technician’s rank. The battalion’s General Orders of January and April 1944 show that at least five privates and eight Pfcs of Company D were officially qualified to drive tracked vehicles. This means that the search for the driver killed at Dead Man’s Corner should not be limited just to technician ranks.
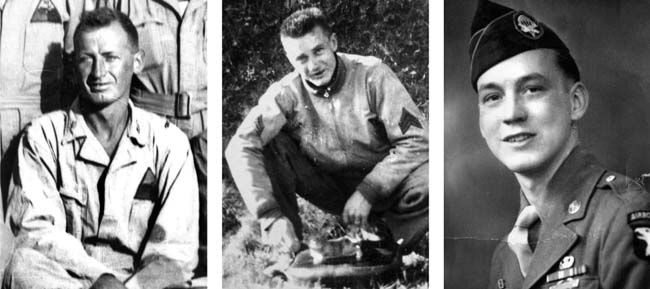
According to the casualty list, only four Company D men were KIA or MIA on June 7: Lieutenant Anderson, two sergeants and a single private. This focuses the attention on the fourth man: Private Aaron D. Curry. He was “killed in action […] by burns from antitank fire.” This matches the expected wounds of a hollow-charge weapon like a panzerfaust, panzerschreck, or hafthohlladung (the latter a shaped charge, also called a panzerknacker, or “tank breaker”).
Crucially, Private Curry was indeed one of those qualified to drive a tracked vehicle. This evidence leaves little doubt that Private Curry was the driver of Tank 12, and that the body seen by Private Parmley was that of Private Curry.
The date of Private Curry’s death is listed as June 12 in the battalion’s official 1945 history, and this is recorded on his grave. This is not at all strange: If the body of Private Curry remained in the tank for several days, the date of June 12 may reflect the date it was recovered and officially identified. In fact, the date strengthens the evidence of Aaron D. Curry being killed in Tank 12.
The casualty report gives the approximate location of his death as “one mile northeast of Carentan.” The list has two more casualties at the same location and date: one wounded and the other listing as missing in action.
Among these two men is the likely commander of Tank 12, Sergeant Anthony I. Tomasheski. He was initially reported in the company diary as missing in action and was later listed as killed in action. When his body was examined, it was found that he had suffered fractures to his skull, jaw, and left humerus. His body was ultimately returned for burial in the U.S.
The other name on the list is Private Jack Hughes, who was wounded in action by “burns from antitank fire.” His role in the crew has not yet been determined, as privates could act as co-driver or gunner in an M5A1 tank. We believe all three men were part of the crew of Tank 12. Unfortunately, there are no records of the composition of individual tank crews to prove this once and for all.
The identity of the fourth crew member is the biggest mystery. This may or may not have been Private Ray Bonzo. In the company diary he is listed as wounded on June 7, and this is supported by the Morning Report of June 11 (S.W.A.). However, the casualty report lists him as a “Non-Battle-Casualty” (N.B.C.). It states he was hospitalized with bad shock. Whether this was caused by being in Tank 12 when it was knocked out is unclear. Private Bonzo returned to the company on July 21.
It is possible that the casualties from the other location came from one specific tank as well, most likely Tank 10. This includes T/5 Tadeus J. Wozny, who probably was the driver of that tank. The other is Sergeant Frank E. McNally, who was reportedly killed by sniper fire at the same location. His rank indicates he was a tank commander, but proving he belonged to the same tank as T/5 Wozny has not been possible. Since tank commanders were vulnerable to small-arms fire, it is also possible he belonged to an undamaged tank.
Does this analysis mean that the unfortunate commander left sitting in the turret for several days was Sergeant Tomasheski? No, not necessarily. The evidence this ever happened is quite weak. It does not match the story in the combat interviews nor the evidence presented in Rendezvous with Destiny. In the end, it hinges on Don Burgett’s story and the earlier book of S.L.A. Marshall. Burgett was, however, very clear that he indeed saw the body of a tank commander. But which tank was it?
His book, Currahee, holds important clues that help to answer that question. On June 7, he joined his company in the advance towards the road junction. The situation became confused, and he attached himself to a small group of men. Together they kept moving, struggling their way through hedgerows and fields. They lost contact with the rest of the company and believed they had fallen behind, so they kept advancing to try to regain contact with the other troops.
After crossing hedgerow after hedgerow, field after field, the men suddenly came to an area where they could “look down a long sloping landscape and see a broad river”—the flooded area north of Carentan. But no other troopers were in sight. Contrary to what they thought, their group was ahead of the rest. The men found themselves standing in a large field. Below it was a blacktop road, which led down to the river. The banks on each side of the road were “eight or ten foot high.” Here the five men made their stand.
As they were fighting, the sounds of battle to their rear grew stronger, until the noise of an approaching tank became unmistakable. It turned out to be an American M5A1 Stuart, which joined their battle. When it had exhausted its ammunition, it moved out to get more.
This is where Don Burgett’s version of the Dead Man’s Corner story starts. Just after the tank left, the men heard an explosion and saw oily smoke rising. The tank had been hit. Of course, it made sense to assume this was the tank that was knocked out at DMC, but it was probably a different vehicle. To understand this, it is crucial to determine where the men had been fighting.
The general area described by Don Burgett can only be the high ground somewhere between Saint-Côme-du-Mont and Carentan, and the road he described matches the N-13. It has been claimed that Burgett’s group was south of DMC. This seems to be based on the assumption that the tank that left Burgett’s group and moved north over the N-13 was the same as the tank that was ultimately destroyed at the junction. Thus, the group must have been south of the junction.
On location in 2012 with Mr. Burgett, he indeed confirmed to us that the tank moved north over the N-13. But north from where? The most important evidence comes from his description of the terrain in the book. South of DMC, there are no high banks lining the road. Instead, the road is lying on an embankment above the fields. The landscape today is still very much as it was in 1944. In fact, the only area with banks and fields above the N-13 can be found north of DMC.
Don Burgett’s group fought in the field north of the current museum. This also explains how the tank could suddenly appear from their rear, as the N-13 runs north-south, while the D-913 runs to the northeast from DMC. The western edge of the field is formed by the N-13, while the east corner borders on the D-913. As the reinforced 1/506th PIR advanced, a tank only had to turn off the road to enter the field.
In 2012, we took Mr. Burgett to the field, where he confirmed that the terrain matched what he remembered. Without hesitation, he pointed out where the tank had entered the field and the corner where it later left the field and moved onto the N-13. Exiting the field in the northwest corner is quite simple, since the banks level off to road level at that point.
Since Burgett fought north of DMC, it would mean that “his” tank was knocked out between DMC and Saint-Côme-du-Mont. There is evidence to support this. In his postwar monograph, Major Friedrich August Freiherr von der Heydte, the commander of Fallschirmjäger-Regiment 6, wrote: “Enemy reconnaissance troops succeeded in infiltrating through the thin German MLR [main line of resistance] in the confusing terrain. Around 10 PM, two American armored reconnaissance vehicles broke through to the road to Carentan: one was destroyed by a regimental messenger with a hollow-charge weapon directly in front of the regimental CP, the other was destroyed on the southern exit of Saint-Côme-du-Mont by an antitank gun.”
Burgett himself wrote: “Instead of cutting back the way he had come […] he turned onto the road so he could make better time. That was a mistake. For when he came into view of the 88 near the corner, they drilled an armor-piercing shell straight through the turret. The small tank erupted in a violent explosion and started to burn. The whole crew died instantly. We could smell their flesh cooking in the flames, along with a heavy oily smoke. Seeing the tank crew die that way made me feel bad. That commander was a hell of a nice guy.”
Burgett again mentioned the tank when describing the events on the morning of June 8, when the troops were preparing themselves for a new attack on Saint-Côme-du-Mont and Dead Man’s Corner: “Farther to our left the small tank that had been hit the day before still smoked a little. The body of the tank commander who had been so nice to us still sat in the turret.”
While the account is quite vivid, it may be possible that one or two assumptions or guesses have been made in an attempt to tell the story more clearly. The corner referred to by Burgett clearly is DMC. That tank, however, never burnt out, nor was it hit by an “88,” nor did the entire crew die. Are we simply seeing the effect of an urban legend being retold?
Of Burgett’s personal Normandy story, few actions were addressed by earlier publications. Dead Man’s Corner was, however, covered by both Rendezvous with Destiny and Night Drop. The discrepancies may just be caused by an unfortunate attempt by Burgett to explain his own experiences in light of what had already been written by others, without realizing they were unrelated events. The rather dramatized story in Night Drop may have compelled him to incorporate certain graphic details in his own book, at the expense of his own experiences. It was no longer possible to determine this beyond any doubt nearly 70 years after the fact.
Ironically, Burgett’s own interpretation of the tank being hit by a field piece is supported by Major von der Heydte. It would also rule out the tank at DMC. The description of Tank 10, with a “hole completely through the front sloped plate,” could match Don’s writings. The question now becomes which wreck he saw and where. Was this Tank 12 at DMC or another tank closer to Saint-Côme-du-Mont?
In addition to the tank that assisted Don Burgett’s group and the one lost at DMC, there was at least one other incident on D+1. Both Mark Bando and S.L.A. Marshall have written about an attack on a light tank that occurred somewhere behind the leading elements (Company D) of the advance to the intersection. In order to reach it, the battalion had to pass the crossroad east of Saint-Côme-du-Mont.
The lead elements of the battalion managed to get through unscathed, but later elements ran into German resistance and, when a tank reached the crossroad, it came under attack. Night Drop has the more dramatic version of the incident:
“A light tank chugged ahead of them [elements of Company A and Headquarters Company], and they had outstripped the other men out of a desire to stay in the lee of its protection. As the tank entered the crossroad, a German rocket hit it dead on. The tank stopped and its gas tank exploded. That one shot finished 1st Battalion for the day, except for a few hands from Able and Headquarters who ran on past the flaming derelict.[…] The tank still blazed, and 1st battalion stayed ditched.”
A more balanced version has been written by Mark Bando. According to him, two of the crew members were wounded when several antitank rockets hit the vehicle. The tank caught fire, but was not disabled and pulled back several hundred meters, opening a gap in the column. After the fire had been extinguished, it rejoined the fighting with its machine guns. In the confusion, tanks on both ends of the gap started firing at one another. The situation was finally cleared up, and the firing ceased. The advance of the battalion to DMC was however halted for the day.
This incident provides a third location where a tank was hit by German fire, but it also raises new questions. Could T/5 Wozny have been one of the casualties? Was this Tank 10 or another vehicle not damaged enough to report? If the tank indeed remained operational, it cannot have been the wreck seen by Don Burgett. Still, there is a chance it was knocked out but replaced by another vehicle.
The evidence shows that Tanks 10, 12, and 17 were hit in the June 7-8 period. Photographs in situ are only known of Tank 12, which was photographed at DMC and later at a vehicle dump. It shows localized fire damage along the driver’s side top track run. The same dump also held the wreck of a Tank 10, which likewise shows fire damage. Was this damage sustained on June 7 or later in the campaign?
The first time after D-Day that Tank 17 was mentioned in the company diary was on June 9. It had not yet shown up. Unfortunately, the records do not say when it went missing. The battalion’s official history states that Lieutenant Anderson was killed by a mortar round while in the turret, and the casualty list gives the location of his death as “one mile north of Saint-Côme-du-Mont.”
Support for this is provided by Private Eldon R. Abrahamsen (I/502nd PIR). On June 8, he was part of a patrol in that area that became pinned down by German fire. A light tank was brought up for assistance, but it did not end well: “The tank commander’s hatch on the tank was open and a German mortar shell dropped right in the hatch, which killed the crew.”
Although the number of casualties in the tank cannot be correct, the vehicle itself may well have been Lieutenant Anderson’s Tank 17. The casualty list gives the cause of death as “shrapnel from artillery.”
There is no clear-cut answer as to which knocked-out tank Don Burgett saw. In fact, in 2014 he stated that the wreck he saw late on June 7 and the one he saw on the morning of June 8 may, in fact, have been two different vehicles; he had pulled back to Beaumont during the night and may have encountered wrecks en-route.
That morning, the official line-of-departure for his battalion was indeed somewhere between Beaumont and Saint-Côme-du-Mont, just west of the D-913. This makes it more likely that he saw the wreck of Tank 10, rather than Tank 12 at Dead Man’s Corner. Ultimately, we must conclude that it is impossible to determine exactly what happened in those late hours of June 7. It is not clear which tank had a dead commander in its turret and where it was seen by Don Burgett. There is evidence to support all three tanks, and evidence that argues against each option.
Still, we now know the identity of the unfortunate driver who gave his life at Dead Man’s Corner—Aaron D. Curry—and probably that of his tank commander—Anthony I. Tomasheski—as well. For over 70 years, the two men were mere statistics among the casualties from Normandy, but now their story and their sacrifice are at least a bit clearer, as is the story of Dead Man’s Corner.
(The authors would like to thank Mark A. Bando for sharing his knowledge and research, as well as all those who provided photos and information for this article. A special thanks goes to the late Donald R. Burgett for having taken the time to walk the battlefield with us and patiently answer our questions.
We dedicate this article to the brave men of the 70th Tank Battalion and the 101st Airborne Division, and thank them for their role in liberating Europe from Nazism.)