By Bruce Petty
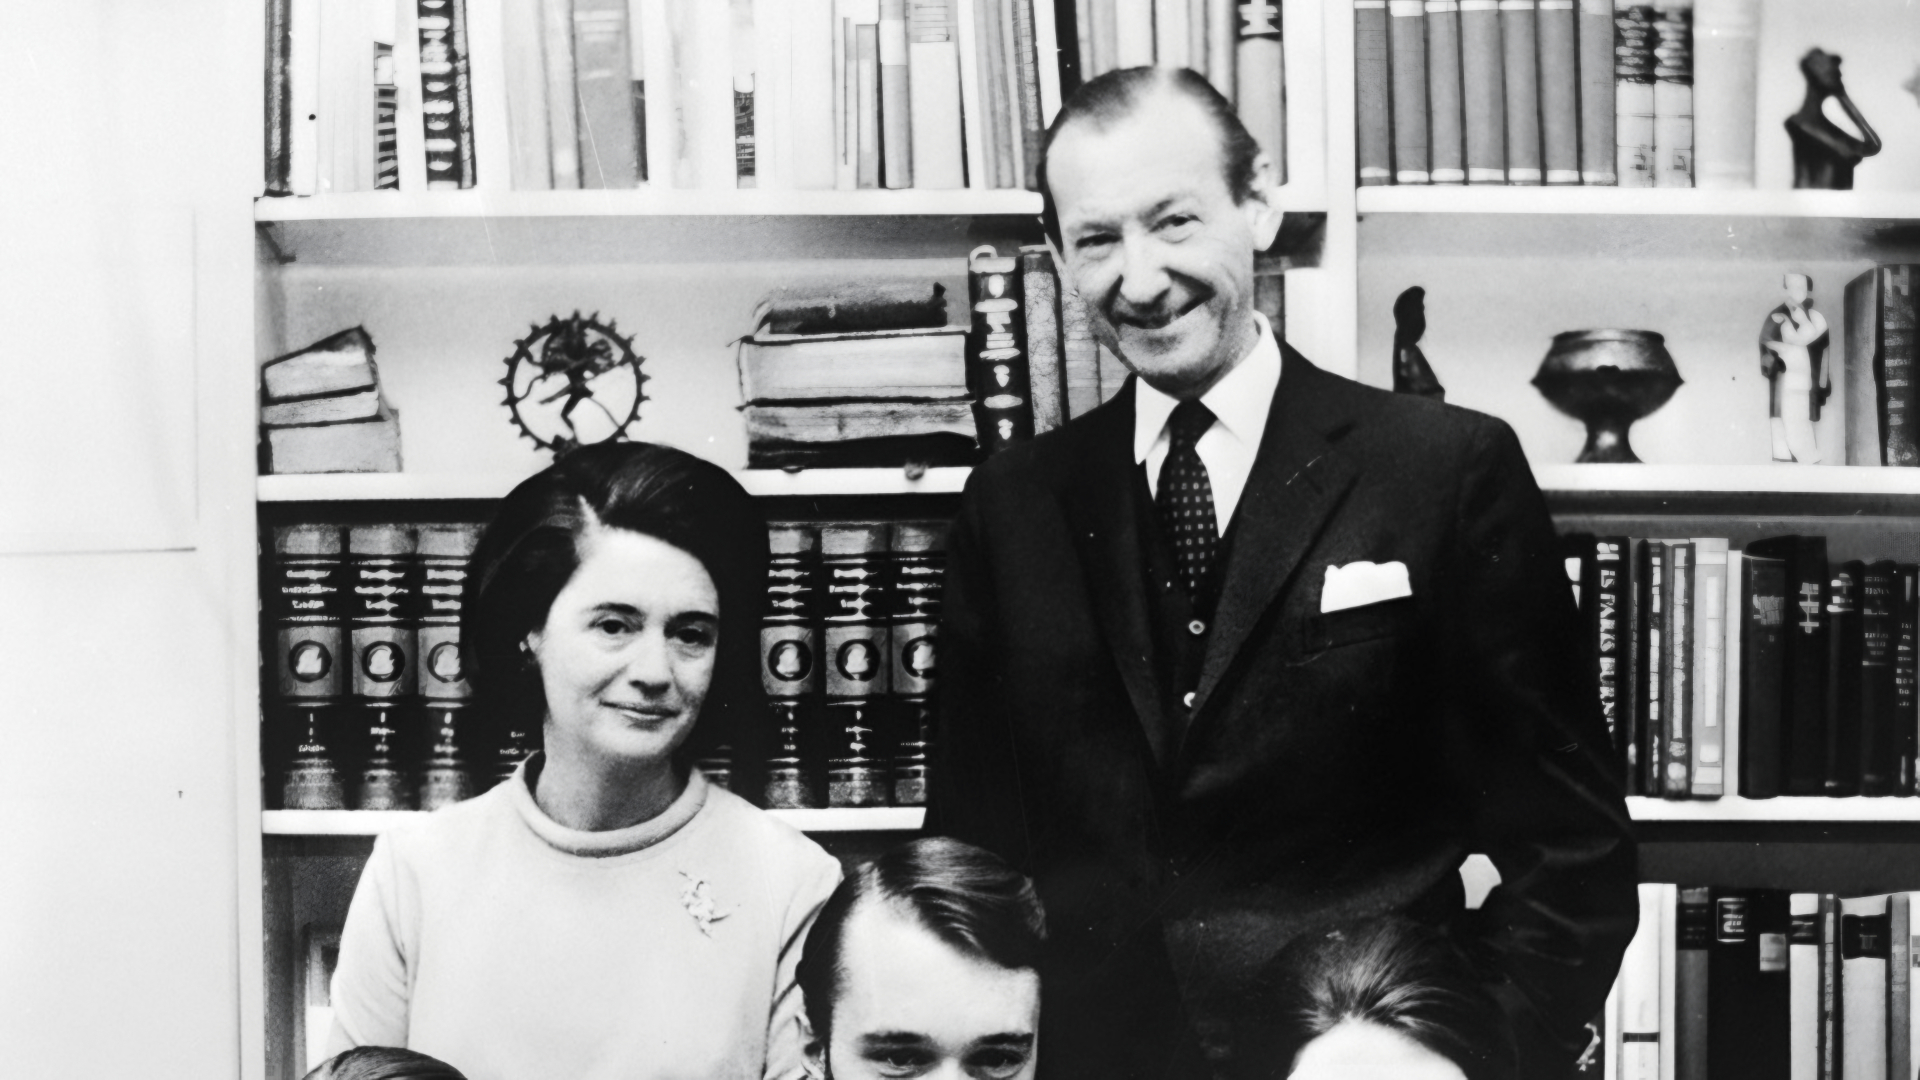
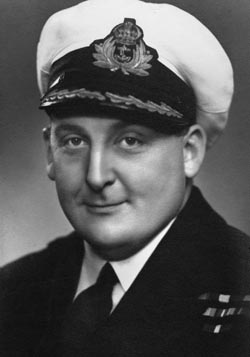
Gordon Bridson was born in Wellington, New Zealand, in 1909, but shortly thereafter his family moved to Auckland, where he attended Auckland Grammar School. Bridson was larger than most children his age, and into adulthood he continued to stand taller than most men.
Given the near-religious aura that rugby held in the psyche of many New Zealanders, one would think that Bridson would have gravitated toward that sport. For whatever reason, however, and in spite of his size, he gravitated toward swimming, rising to the top of that sport in New Zealand in the 1920s and early 1930s, consistently winning ribbons and cups in national competitions. In 1930, he even went to the Empire Games in Canada, where he won a silver medal. For reasons never explained or expressed, he showed little interest in swimming after that.
In 1927, aged 18 and still an active swimmer, he joined the Royal New Zealand Naval Volunteer Reserve (RNZVR) and received his commission in February 1928 as a probationary sub-lieutenant. Twelve years later, almost a year after World War II started in Europe, he was promoted to lieutenant commander in the RNZVR. A month later, in May 1940, he left with the first draft of volunteers to serve with the Royal Navy in Great Britain, a common practice in those days for New Zealand naval personnel, being British Commonwealth citizens.
As was the case in the United States, when war came to England and British Commonwealth countries, they were caught woefully unprepared. They had few ships, and even fewer, once German submarines began to sink them in large numbers. Commercial vessels were therefore appropriated and converted to military use. For example, HMNZS Matai, a former lighthouse tender, was converted to military use as a minesweeper.
Once in Britain, Bridson was put in command of HMS Walnut, which was 164 feet long, had a complement of 35 men, and did a whopping 11.5 knots when the engines were in good working order. This was also the estimated top speed of mass-produced American Liberty ships that were being launched in American shipyards at about this time. Bridson commanded Walnut for 14 months, from July 23, 1940 to September 26, 1941, and as the Battle of Britain was fought between July and October 1940, one can only imagine the adventures and sights these men at sea witnessed.
The Walnut was part of a 10-ship flotilla that escorted ships in coastal British waters, and though all the ships in this flotilla were part of the Royal Navy, they were manned for the most part by New Zealand officers and ratings. They were often attacked by German ships and planes, and it was during this time that Bridson was awarded his first of many medals, the Distinguished Service Cross.
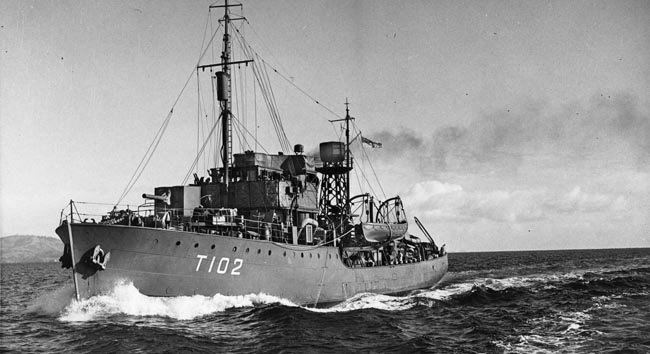
In October 1941, less than two months before the Japanese bombed Pearl Harbor and pulled the United States into World War II, Bridson took command of the newly built Bird-class minesweeper Kiwi (T102). Compared to Walnut, Kiwi was 168 feet long and was capable of a breathtaking 13 knots.
When commissioned, Kiwi’s armament consisted of one World War I-vintage 4-inch gun, a few machine guns, and 40 depth charges. With depth charge racks and “Y” launchers, these minesweepers, which were originally ordered as training vessels, were obviously prepared for a multitude of combat-related jobs, including antisubmarine warfare.
Once Kiwi and her sister ship Moa were fitted for sea, they set out on their long voyage for the Pacific. However, before becoming involved in the fighting in Pacific waters, Kiwi and Moa first had to get there. That meant surviving a crossing of a North Atlantic infested with U-boats, which at the time looked capable of crippling Britain’s war effort, as had almost happened a generation earlier during World War I.
Kiwi took up the rear of a convoy that was set to leave British waters for Halifax, Nova Scotia, in the closing days of 1941. The thoughts of Lt. Cmdr. Bridson and his crew may have been on the threat of U-boat attacks as they set off, but what really came close to sinking them was one of the worst recorded Atlantic hurricanes of the century. South of Iceland, the weather turned nasty, and Kiwi found herself battling seas of up to 80 feet. The crew was confined below decks, except when one of the depth charges broke loose and a work party had to be sent on deck to secure it. Then, on January 9, Kiwi rode the crest of a monster wave and then was sent airborne by a following sea that almost sank her. The damage was severe with bulkheads crumpled and flooding in various parts of the ship, including the bridge where windows gave way. Abandoning ship in Arctic waters would have spelled doom for any crewmen who attempted it, unless they were picked up almost immediately, and being at the end of the convoy, that was not likely. Thanks to skilled seamanship and perhaps a bit of luck, however, Kiwi survived.
A lull in the storm came on January 11, allowing temporary repairs to be made to damaged parts of the ship. Other members of the crew were sent topside to chip away the tons of ice that had accumulated on the rigging and other parts of the ship. With all the damage done to the ship below decks, Kiwi did not need the risk of capsizing from the added weight of accumulated ice topside.
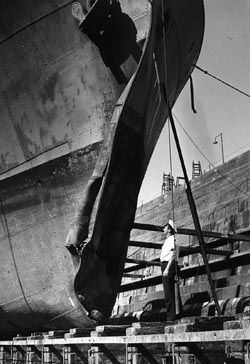
On January 16, Kiwi and her crew were in sight of Newfoundland. Escaping attack from patrolling U-boats in the area, Kiwi put into port where the ship spent two weeks in drydock having emergency repairs done. Likewise, the crew relaxed and caught up on much-needed sleep after the many stressful days and nights of fighting the hurricane.
On January 30, Kiwi left Newfoundland bound for Boston. She left through U-boat-infested waters but arrived without incident. In Boston, Kiwi spent an additional month in Bethlehem Shipyard undergoing further repairs before she was deemed seaworthy again. She was a lucky ship in more ways than one. Not only had she survived one of the worst hurricanes to hit the North Atlantic that century, but she also evaded the U-boats that dominated Atlantic waters at that time. In January 1942, a total of 46 ships were lost to U-boat attacks, and most of them were lost in the North Atlantic.
After a month spent in Boston to repair not only Kiwi but also give her crew a rest, the ship set out again, but this time for warmer waters. Kiwi sailed through the Caribbean and transited the Panama Canal on its long voyage to Auckland before setting off to join the U.S. Pacific Fleet in its struggle to turn the tide against Japan in the waters around the Solomon Islands.
Being a small ship that needed regular refueling stops along the way, Kiwi took a circuitous route to New Zealand, sailing up the west coast of Latin America to San Diego, California. She then headed west to Hawaii, then southwest to Fiji before reaching Auckland and what must have been a welcome time at home with friends and family. Bridson and many others in his crew had been away from home for almost two years.
Tulagi, a small island off the coast of the larger Florida Island in the Solomons, became the first home port for New Zealand’s 25th Minesweeping Flotilla in the South Pacific Theater, then under the command of U.S. Admiral William F. “Bull” Halsey. They may have been a minesweeping flotilla, but in the early days of the Pacific War, there were not enough ships of various types to satisfy the myriad needs of a navy unprepared for a world war. As a result, these New Zealand corvettes served a variety of functions, including antisubmarine patrols.
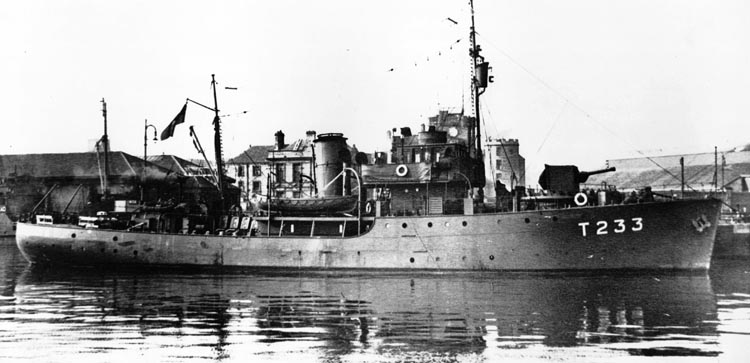
The 25th Minesweeping Flotilla was made up of six ships. Matai, originally commanded by A.D. Holden, was the command ship of the flotilla. Prior to the war, Matai served at various times as a lighthouse tender and a governor’s yacht before being requisitioned for wartime use. Likewise, HMNZS Gale and Breeze served as coastal cargo vessels and were owned by the Canterbury Steamship Company before being put to military use. Comparatively speaking, only HMNZS Kiwi, Tui, and Moa were what one might refer to as purpose-built, though even they were constructed on trawler hulls. All three were built in the Henry Robb Shipyards in Leith, Scotland.
Kiwi and Moa were the first of the New Zealand corvettes to see action in the South Pacific. With little in the way of armament, Kiwi and Moa, literally days before going into combat for the first time, traded several bottles of rum (some say it was gin) for some 20mm Oerlikons. As Leading Signalman J. Slater recalled, “The Kiwi mounted one of hers straight in front of her 4-inch gun on the foredeck, and we [aboard the Moa] mounted ours slightly to starboard of the 4-inch.” However, Ewan Stevenson, an underwater archaeologist who has explored and photographed the sunken Moa more than once, says it is mounted on the bow forward of the 4-inch gun and on the centerline.
Thanks to the success of Allied code breakers, Admiral Halsey’s command knew that the Japanese were reinforcing and resupplying their troops on “Starvation Island,” as the Japanese came to call Guadalcanal. This was because they had failed not only to eradicate the Allied presence on Guadalcanal, but had also lost the ability to resupply their forces by conventional means. They were thus forced to pull not only many of their destroyers from their designated task of engaging the enemy but also many of their submarines in an effort to save the situation and avoid defeat. However, what Allied intelligence did not know was that at about this time the Japanese had concluded that the situation on Guadalcanal was not salvageable. The resupply efforts would soon give way to evacuating as many troops as possible, something that was soon to be accomplished at night using destroyers.
On the night of January 29, 1943, though, Kiwi and Moa were directed by the commander of Naval Base Cactus to patrol on a line off Kamimbo Bay on the northwest coast of Guadalcanal for a distance of two miles on either side of the bay’s center line. As Lt. Cmdr. Bridson related in his after-action report, Kiwi proceeded with Moa and commenced patrolling at 6:30 pm. Both Bridson aboard Kiwi and Lt. Cmdr. Peter Phipps (later admiral), skipper of Moa, agreed beforehand to patrol line-abreast with a distance of approximately one mile between them. Less than five hours into their patrol, Able Seaman E. McVinnie, the ASDIC operator aboard Kiwi, made a contact at 9:05 pm at a distance of 300 yards and identified it as a submarine. Soon thereafter, Moa confirmed the contact, and Kiwi then altered course 10 degrees to starboard in order to pass ahead of the submarine. Kiwi then attacked with depth charges, while Moa stood back and directed Kiwi with her sonar.
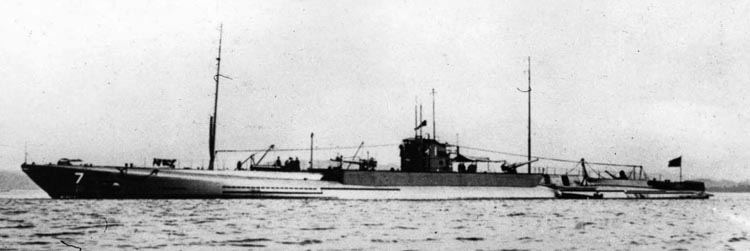
Interestingly enough, the submarine detection gear known as ASDIC, or sonar, was in part the World War I-era invention of a New Zealander: Ernest (later Lord) Rutherford, born near the town of Nelson on New Zealand’s South Island. Rutherford today is referred to as the father of nuclear physics and won the Nobel Prize for chemistry in 1908. During World War I, he turned his attention to submarine detection, resulting in the development of sonar, and it was this innovation that came to be used by all the navies of the world to detect enemy submarines. It was sonar that allowed Kiwi and Moa to first find and then depth-charge the Japanese submarine I-1.
At the time neither Bridson nor Phipps knew that their adversary was the I-1. Nor did they know it was faster than and also twice as big as their two small minesweepers. All they knew was that they had found a submarine and that it was most likely Japanese. Nonetheless, they were committed, and retreat appears not to have been an option. I-1 also had a deck gun that was much larger than anything either Kiwi or Moa had. Still, following the phosphorescent wake of the submerged submarine, Kiwi moved in and dropped six depth charges.
The resulting underwater detonations knocked sailors aboard I-1 off their feet, and a leak appeared in one of the aft provision spaces. Kiwi then pulled away to make sonar contact again. At about 400 yards, Kiwi reestablished contact and moved in to drop another pattern of depth charges. Further damage was done to the steering engine and port shaft of I-1. Pumps were disabled, and a high-pressure manifold was ruptured, filling the control room with a watery mist. The main switchboard was damaged as well, and all the lights went out on the sub. She then developed a 45-degree down angle and plunged well below her designed limit to an estimated depth of 590 feet. Leaks then appeared in her forward torpedo room. Her captain, Lt. Cmdr. Sakamoto Eiichi, ordered the forward group of main ballast tanks blown and a full reverse on the remaining drive shaft. As a result, the loss of I-1 was prevented, if only temporarily.
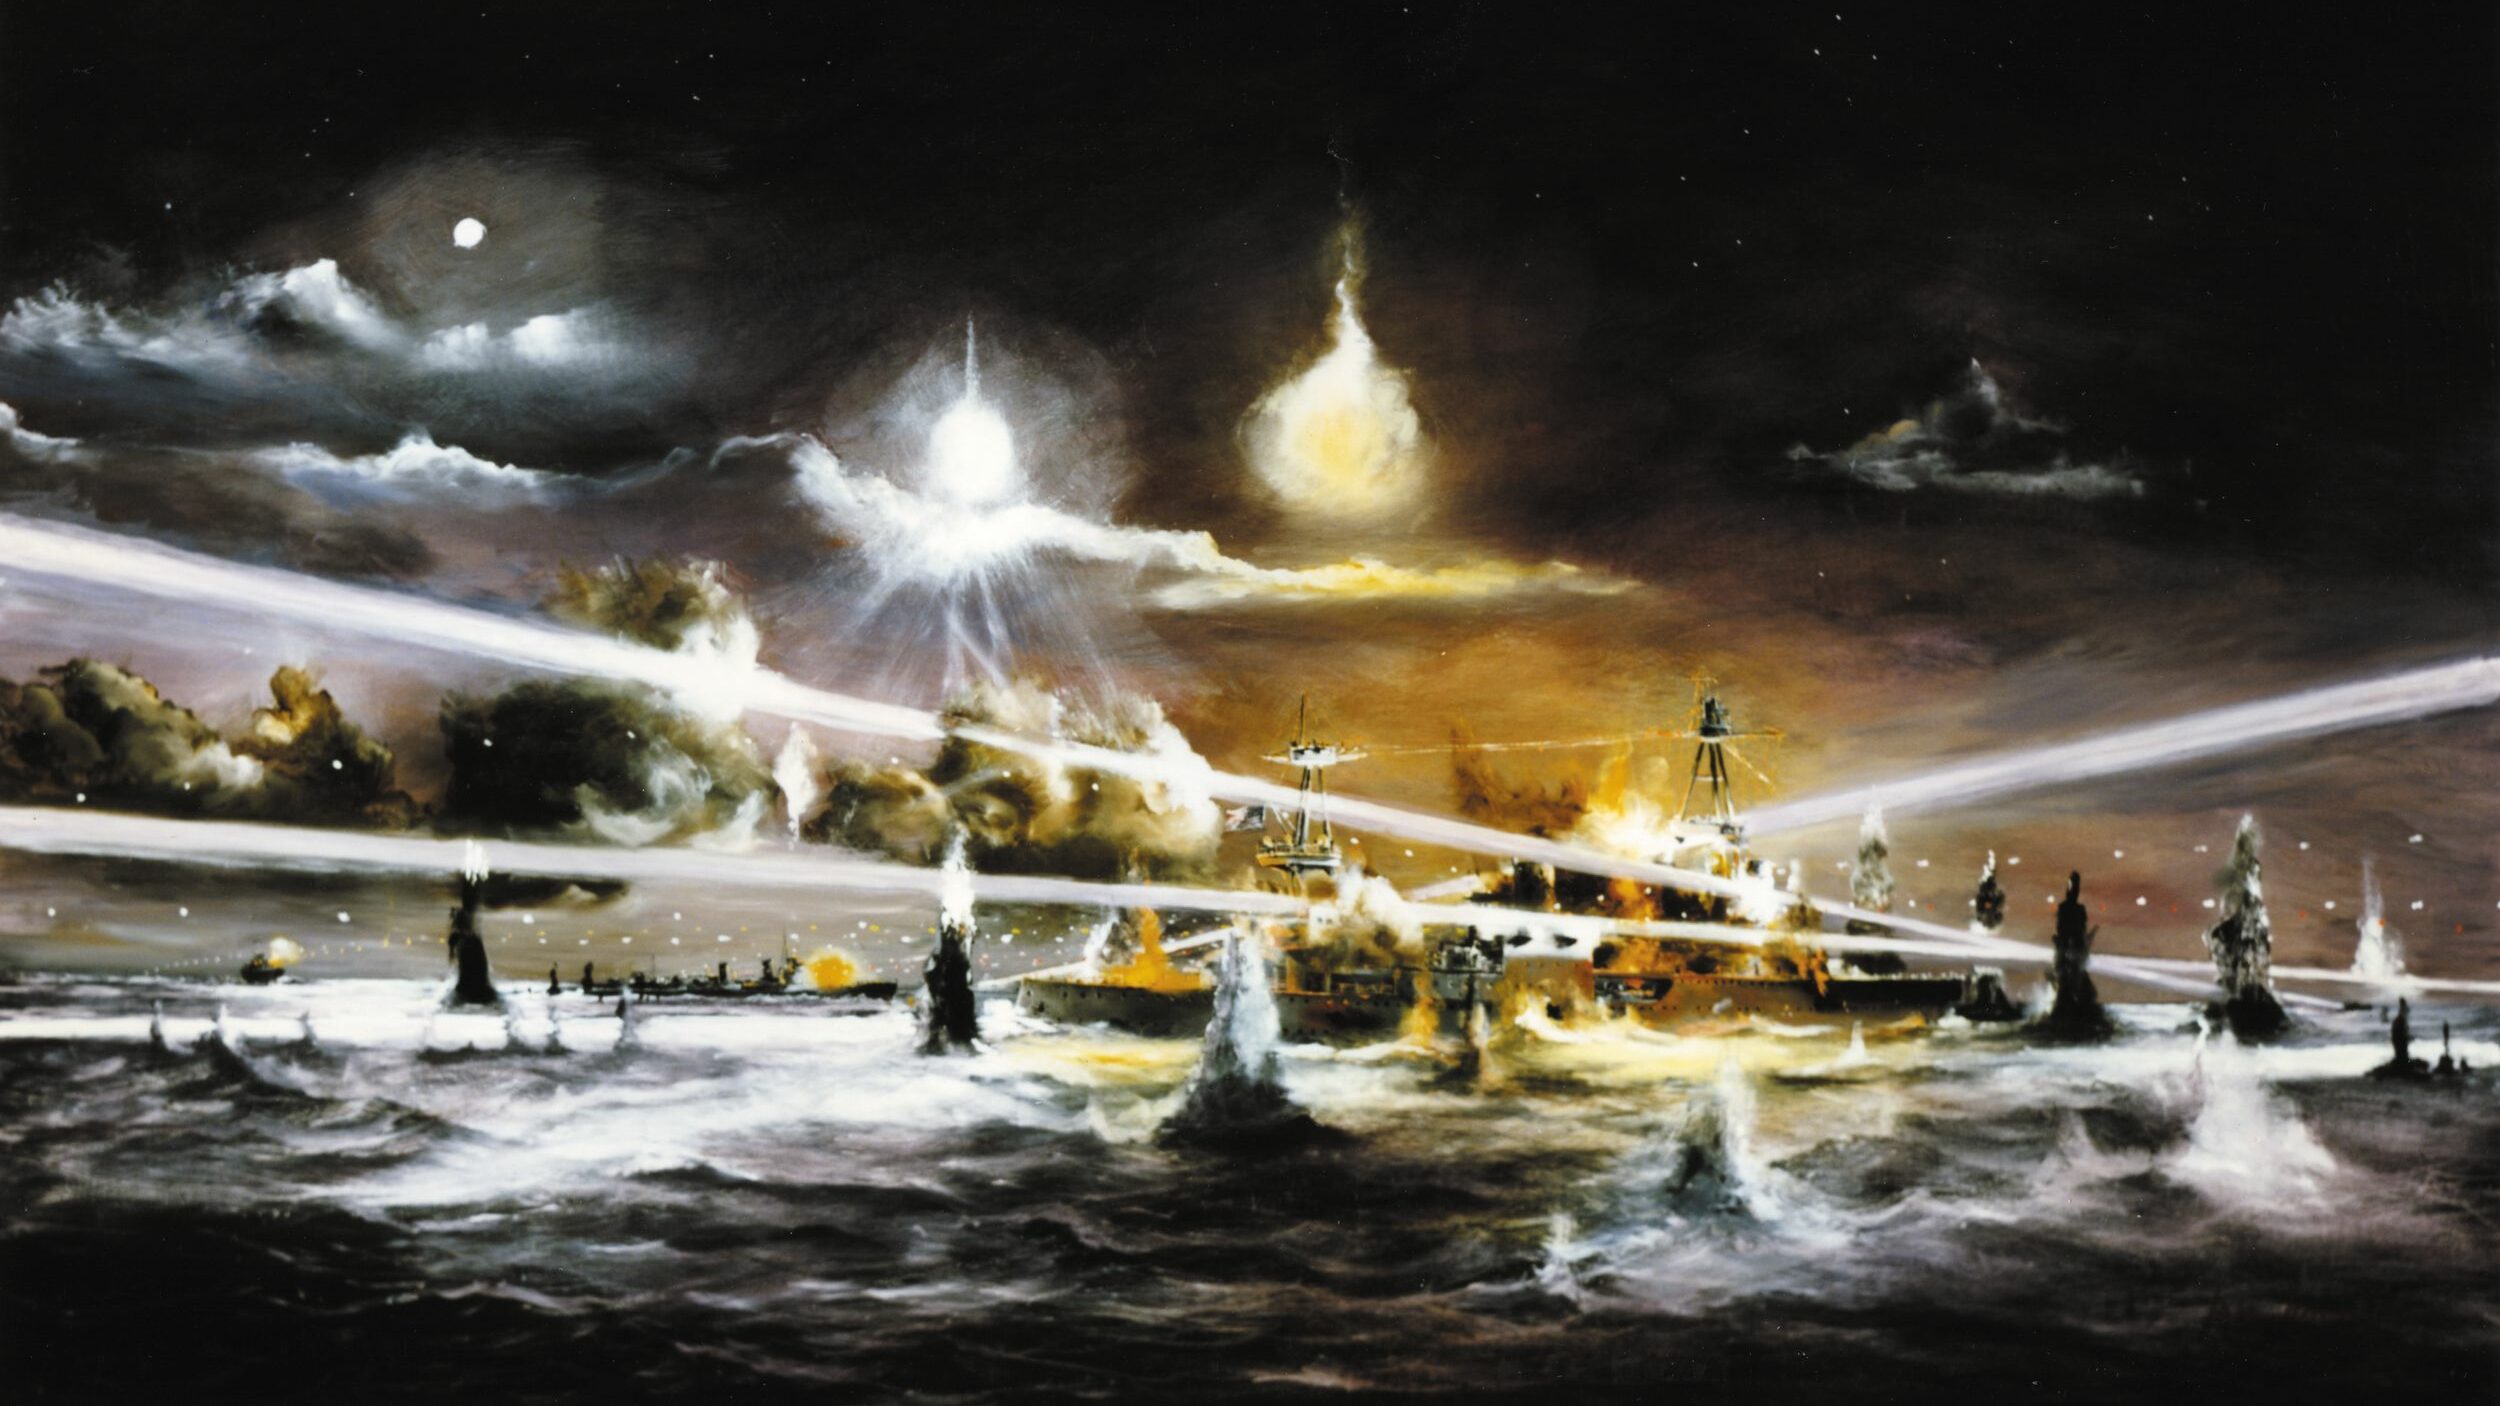
I-1 surfaced, but seawater had damaged her batteries. That left only her starboard diesel engine operational, and with Kiwi 2,000 yards away, I-1 made a run for it on the surface at 11 knots. Sakamoto then took the helm and ordered the sub’s 125mm deck gun manned, as well as its machine guns. Simultaneously, Kiwi opened up with her 4-inch gun, manned by Leading Seaman W.I. Steele, Able Seaman J.W.C. Kroening, and Able Seaman J. Washer. Likewise, Kiwi’s 20mm Oerlikons opened up while Leading Signalman C. Buchanan illuminated I-1 with Kiwi’s 10-inch searchlight. Moa lent a hand by firing off star shells that not only illuminated I-1 further but also illuminated Kiwi for the Japanese.
The opening barrage of what proved to be a close-in surface battle reminiscent of a bygone era worked to Kiwi’s advantage. Almost immediately, Lt. Cmdr. Sakamoto and the entire Japanese bridge crew were mowed down, including most of the gun crew. Barges lashed to the sub aft of the conning tower filled with supplies for the stranded and starving Japanese troops on Guadalcanal were set alight.
With the bridge crew either dead or wounded, I-1 started to lose speed and drift to starboard. Lieutenant Koreeda Sadayoshi, I-1’s torpedo officer, then came topside and took command. (Koreeda survived the sinking of I-1 and commanded a number of other subs later in the war, including RO-115 and RO-63.)
With Kiwi close aboard, Koreeda concluded that the enemy was planning to capture the sub. He ordered a reserve gun crew on deck and brought up others with rifles in an attempt to prevent the unthinkable from happening. He even sent the officers to fetch their samurai swords.
Sometime during this action, one of the gunners aboard Kiwi testified that he saw somebody in the conning tower of I-1 throw a box overboard that sank immediately. Whether the box contained codebooks or other documents was never ascertained. According to W.J. Holmes in his book Double Edged Secrets, escaping crewmembers of I-1 took “current code books” and buried them ashore, but left behind “call lists, old code books, and charts.” Allied divers later salvaged these, and they proved of great value.
At 9:20 pm, Kiwi altered course to ram I-1, hitting the sub on the port side abaft the conning tower. Soldiers meant to land on Guadalcanal along with the supply barges were seen jumping overboard at this point. Bridson in his after-action report observed as he backed off I-1 that she was “definitely holed.” Kiwi’s 20mm Oerlikons again raked the sub in an attempt to suppress any further return fire. However, I-1 continued to make good speed at an estimated nine knots.
Bridson decided to ram her a second and then a third time. The second attempt was a glancing below, and Bridson reported that it was at this time that Kiwi suffered her first and only casualty of the battle. Leading Signalman C. Buchanan, who was manning the 10-inch searchlight, was wounded, but he continued to man his post until relieved at the conclusion of the battle. He died of his wounds two days later and was honored by both the New Zealand and American navies. He was posthumously awarded the Navy Cross, one of only nine non-Americans to be so honored in World War II.
Although Bridson was formal in his after-action report of the events that took place on the night of January 29, 1943, another account, this one by Admiral Halsey, gives a livelier picture of the events: “The skipper immediately put his helm over and rang up full speed on his telegraph, which so astonished the chief that he yelled up the speaking tube, ‘What’s the matter, you bastard? Have you gone crazy?’ ‘Shut up!’ the skipper yelled back. ‘There’s a weekend’s leave in Auckland dead ahead of us! Give me everything you’ve got, or I’ll come below and kick hell out of you!’ Then Bridson rams again, this time ‘for a week’s leave.’ Ramming I-1 for the third time, he is reported as correcting himself in saying, ‘Once more for a fortnight!’”
In addition to Halsey’s account, another version that added to the reputation, if not the mystique, of Gordon Bridson was shared some years after the war by David Graham, who served on HMNZS Kiwi with Bridson. He described in part the encounter with I-1 as follows: “He [Bridson] shouted down the voice tube, ‘Stand by to ram!’ When the voice replied back from the engine room, ‘What the hell do you do when you ram?’ he [Bridson] replied, ‘I don’t know, I’ve never done it before.’”
Also at this time, Lieutenant Sakai Toshimi, I-1’s navigator with sword in hand, tried to board Kiwi but fell into the sea as it pulled away. He was later rescued and served out the war on two other subs before going down with RO-114 the following year.
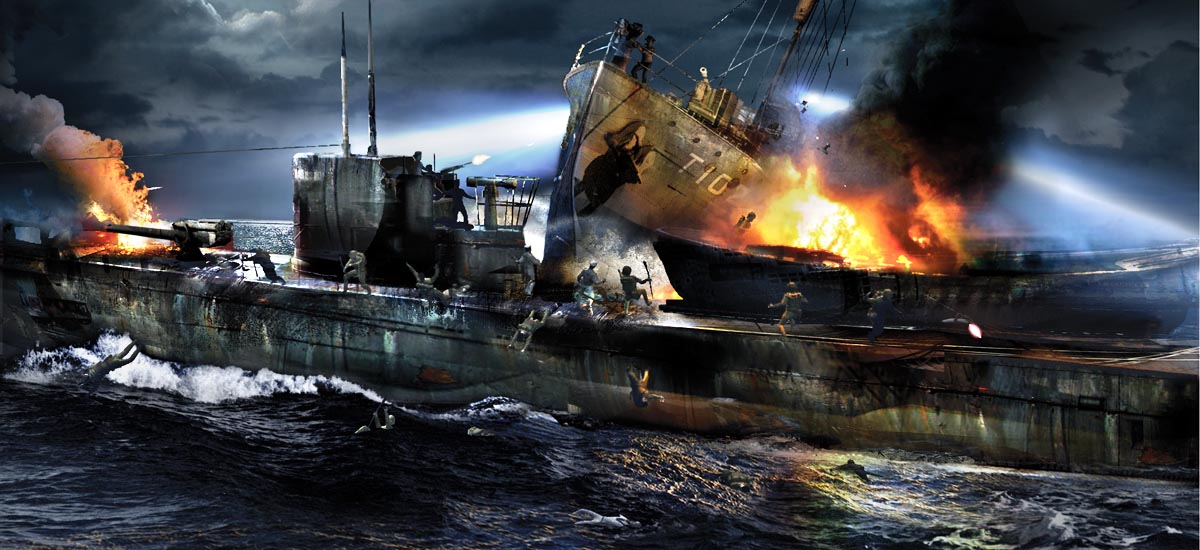
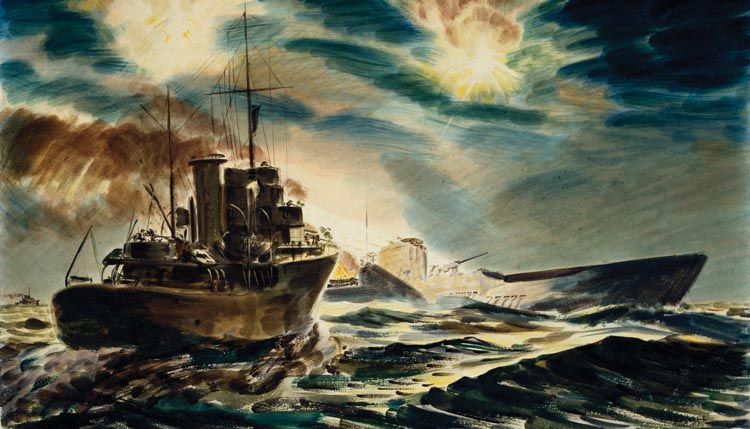
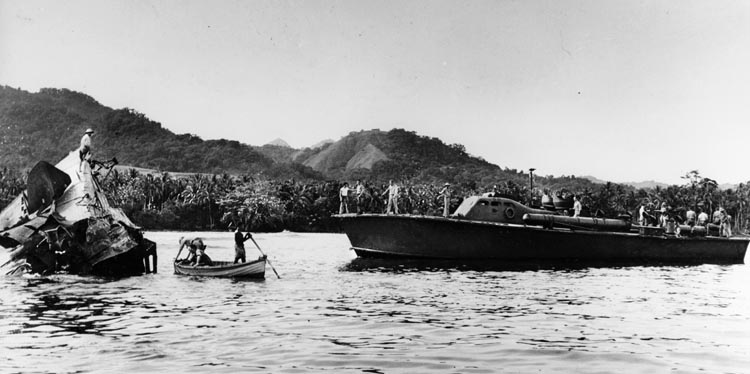
Kiwi’s third ramming of the I-1 punctured one of the sub’s main ballast tanks, and the minesweeper’s hull slid up onto the sub’s after deck. She tilted precariously to one side before sliding off. Her stem was badly damaged, as was her sonar gear.
during the attack on I-1 off Guadalcanal.
By this time the battle had been going on for almost an hour, and Kiwi’s guns had overheated, forcing her to withdraw. Moa then took up the chase, firing all she had and making more hits on the sub. At 11:15 pm, I-1 ran aground just inside Fish Reef north of Kamimbo Bay. The after part of the sub filled with water and sank, while the bow rose at a steep angle above the reef. Lieutenant Koreeda, the senior surviving officer aboard I-1, ordered his men to abandon ship. Sixty-six soldiers and sailors aboard the stricken I-1 escaped to shore and were later evacuated to Rabaul.
In an interview that appeared in The New Zealand Herald the following March, Bridson reported that aboard Kiwi during this battle, there were two Guadalcanal islanders. No explanation was given for why they were aboard, other than to say that during the battle, they joined in by passing up ammunition for the guns. When Kiwi returned to port, the relatives of the two men came aboard “and completely ignoring George and Benny asked me if they had shown fright in front of the Japanese. I assured them they had not, and immediately the pair became centers of attention of an admiring throng.”
In another interview that same month with The Auckland Star, Bridson expressed thanks to the Americans for always giving them timely warning if anything too big to handle might be coming their way. “They didn’t waste any time,” he said. “If they told us to scram, we scrammed.”
Today, we know that these warnings came as a result of Allied efforts at breaking the various Japanese codes, efforts that went back to World War I when the Japanese diplomatic code was first cracked. If Bridson suspected as much, he never expressed it. At the very least, individuals serving in the Solomon Islands knew about the work of the coast watchers and, of course, Allied submarines and aircraft, many with photoreconnaissance capability, which supplemented what the codebreakers could not always provide. At the same time, the intelligence people and high-ranking military personnel on the receiving end of intelligence made sure that snooper aircraft were spotted by the enemy, making them think that their movements were detected by means other than a compromise of their codes.
Although the two minesweepers suffered only one casualty, there easily could have been more. After the battle and damage to both ships was assessed, it was found that one of the 20mm Oerlikons had been hit more than once either by machine-gun bullets or shrapnel. Able Seaman Dalton, who was manning one of them, was therefore one lucky lad.
Besides damage to the forward part of Kiwi from ramming I-1, she also suffered damage to her stern, but not from I-1: it resulted from the premature detonation of one of her own depth charges. In addition, bullet holes were found above the waterline on the port bow, the shrouds on the starboard side of the foremast were shot away, windows on the starboard side of the wheelhouse were shattered, and the winch and wheel covers on the foredeck were destroyed. Most of the damage appears to have been on the starboard side of Kiwi, but how much was the result of hostile gunfire or of the ramming action was not made absolutely clear in the report.
Moa, on the other hand, came out relatively unscathed, even though she joined in the final stage of the battle after Kiwi’s guns overheated. The down side for Moa, however, was that she had to remain on station while Kiwi returned home for repairs and a hero’s welcome for the officers and ratings. The sailors were greeted by large crowds and marched through Auckland in a parade dedicated to them, and this after less than two months in a combat zone. Moa was later sunk off the coast of Tulagi in April 1943 as a result of enemy action.
Even before the sinking of I-1, these little New Zealand ships had a reputation in the South Pacific. Part of it stemmed from envy by their American allies, because the New Zealand Navy, being part of the British Commonwealth, was “wet” (i.e., they allowed liquor aboard their ships), but the U.S. Navy was “dry.” As a result, American naval officers were more than willing to ingratiate themselves to their counterparts in the Royal New Zealand Navy in order to receive invites to the ship’s pub when in port. Of course, a couple of bottles of rum had bought 20mm Oerlikons for Kiwi, and another two bought some for Moa, making a big difference in the battle with the Japanese submarine.
Likewise, the ratings in both navies engaged in a barter system that was symbiotic. Most New Zealand Pacific War veterans confessed that American chow was head and shoulders above anything they were served in their messes, whether aboard ship or ashore. Additionally, American servicemen were paid more than New Zealand servicemen, moving the enterprising New Zealanders to find a variety of ways to supplement their comparatively low wages. Robert Gordon Dunlop, who served in the Solomon Islands as part of the only New Zealand Army division to serve in the Pacific (the 3rd), related the following in a 2007 oral history interview: “We had a camp [on Guadalcanal] that was almost backed on to an American rations store, and a couple of our fellows set up a still. We would go over to the American camp and get a lot of grapefruit juice tins and put it through the still—the distiller—and then sell it back to the Yanks. They gave $30 a bottle for it. It was their own ingredients they gave to us, and then bought it back at $30 a bottle. You could put a match to it and get an almost colorless flame—pretty pure spirits, really.”
Similarly, Charles Laid, who was in a Royal New Zealand Air Force squadron of Consolidated PBY Catalina flying boats based near Tulagi, commented, “The 505 Seabees were the Americans that did the net and boom [on Tulagi], and they used to come to our base. As you know, the American Navy is dry, but every week the Seabees used to bring a barge-load of booze over to us, and then on Wednesday and Saturday nights, the American servicemen would come over to our base and help us drink it. The incongruity of it occurred to me only after the war.”
In the case of HMNZS Kiwi, the sailors from New Zealand were well known for another reason. The skipper of Kiwi, Lt. Cmdr. Bridson, was not as stiff and formal as one might expect from a naval officer, especially one brought up in the tradition of the Royal Navy. Talking to his oldest son Nils, one is left with the impression that he was a big man with a big heart, and also had a sense of humor that helped him and his crew through some difficult times a long way from home and loved ones. To relieve some of the tension and perhaps even some of the boredom, Bridson and two of his fellow officers aboard Kiwi took to holding three-man parades while in port.
Again, Admiral Halsey in his autobiography relates having been witness to at least one of these parades: “Three of the Kiwi’s officers—the captain, the medical officer, and the chief engineer—were famous from the Solomons to Auckland. Everyone knew them at least by sight. Not only were they the most mastodonic men I ever laid eyes on—their combined weights were close to 800 pounds—but whenever the Kiwi put into Noumea, these monsters would stage a three-man parade through the town, one of them puffing into a dented trombone, another tooting a jazz whistle, and the third playing a concertina.”
Admiral Halsey also felt that the actions of Kiwi and Moa on the night of January 29 were important enough to deserve some recognition, not only from the New Zealand Navy, but also the U.S. Navy. He therefore recommended Bridson and Phipps for the Navy Cross. Engineering Officer W. Southward was awarded the Silver Star.
Regardless of the honor of being among the few non-Americans to be so awarded in World War II, the three New Zealanders arrived at Admiral Halsey’s office for the ceremony prelubricated. As Admiral Halsey put it, “I had to support them with one hand while I pinned on the crosses with the other. They thanked me, saluted, and rumbled away. The last I saw of them, they picked up the medical officer and their musical instruments, and were forming another parade.”
Bruce Petty is the author of five books, four of which concern World War II in the Pacific. He is a resident of New Plymouth, New Zealand.