By Donald J. Roberts II
Following the forced evacuation of Allied forces at Dunkirk in June 1940, British leaders viewed a dim future. Realizing that, at least for the moment, they alone faced the might of the German Wehrmacht, they nevertheless began efforts to strike back. Lt. Col. Dudley Clarke, a staff officer in the War Office, believed that a small group of irregular soldiers, using surprise and speed, could effectively attack German coastal defensive positions. In a report to his commanding officer, General Sir John Dill, chief of the Imperial General Staff, Clarke wrote of the need to put a spark in the “Army’s offensive spirit.”
Agreeing with Clarke’s idea, Dill passed the report to Prime Minister Winston Churchill, who believed in the concept as well. Churchill immediately wrote to the War Cabinet, explaining, “Enterprises must be prepared with specially trained troops of the hunter class who can develop a reign of terror down the enemy coast.” At the same time, Churchill wanted the Joint Chiefs of Staff to “propose measures for a ceaseless offensive against the whole German-occupied coastline, leaving a trail of German corpses behind.”
A Poor Start
Between June 24 and July 14, two hastily prepared raids were carried out against enemy locations south of Boulogne, France, and on the Channel Island of Guernsey. The raids, which were designed to test and to sabotage German defenses, both ended indecisively. Unforeseen difficulties, bad luck, and poor planning all indicated that proper coordination and cooperation must be maintained between separate branches of the armed services if Commando (the term was coined by Boers 50 years earlier) operations were to meet with success in the future.
To improve and organize Commando activities, Fleet Admiral Sir Roger Keyes was appointed director of combined operations. Keyes was very popular with the British people, and with Churchill’s continued support both men were able to convince Secretary of State for War Anthony Eden to expedite the Commando program.
During the next eight months, training methods improved and more equipment was gathered. What suffered, however, was morale. One cancelled operation after the next left the Commandos questioning if they would ever put their newly learned skills to use. Finally, on March 4, 1941, a virtually unopposed raid on the herring and cod oil factories on the Lofoten Islands off the Norwegian coast gave the Commandos their first significant victory. They destroyed 18 factories in the raid.
Enter Mountbatten
However, by the summer morale was once again low. Another long string of cancelled missions left General Keyes bitter. He believed that Allied planners had let slip away many opportunities that would have taken the war to the enemy. The hostile atmosphere between Keyes and top officials led to Keyes’ resignation. His replacement was Captain Lord Louis Mountbatten.
Mountbatten was a captain in the Royal Navy and a cousin of the king. Upon taking over Commando operations, he was appointed chief of combined operations and promoted to the rank of acting vice admiral of the Royal Navy. Mountbatten was also awarded the honorary ranks of lieutenant general in the Army and air marshal in the Royal Air Force. The main reason for Mountbatten’s multiple promotions was to improve coordination between the three branches of the armed forces, believed to be essential to successful Commando missions.
Within a short period, Lord Mountbatten became known as a soldier’s soldier. The men under his command respected and believed in their new commander. Mountbatten believed that “ventures in which sailors, soldiers and airmen were required to co-operate closely could succeed only if those concerned not merely planned together but lived together, played together and forgot, not their skills, but their individual loyalties and patterns of thinking.”
Targeting Fish Oil
With Mountbatten in command of special operations, the Ministry of Economic Warfare felt that it would be worthwhile to step up the campaign against the German-controlled Norwegian fish-oil industry. The March raid on the Lofoten Islands had been an attempt to eliminate German ability to produce explosives. The reasoning was that fish-oil contains a high level of glycerin, which is a necessary ingredient in gunpowder. Further, Allied planners knew that Norwegian fish oil was instrumental in the manufacture of Vitamins A and B. These two vitamins, sometimes called “sunshine” vitamins, were critical for German submarine crews who rarely surfaced during daylight hours. The successful Lofoten Island raid, which had eliminated nearly half of Germany’s production, prompted Mountbatten and Ministry planners to consider another attack, this time on the factories at Vaagso some 500 miles south of the Lofotens.
As more intelligence was gathered for the operation, an overall commander or “patron” was selected. This was Home Fleet Commander-in-Chief Admiral Sir John Tovey, given command of the raid because the Royal Navy was responsible for transporting the Commandos and defending them from German naval forces.
Operation ‘Anklet-Archery’
By the first week of December, 1941, Tovey, having studied a sufficient number of intelligence reports, had decided how he wanted to assault the factories on Vaagso Island.
He selected the code name “Anklet-Archery” for the operation, believing that a two-pronged attack would work best.
The “Anklet” portion of the raid, designed as a secondary attack or diversion, was under the command of Rear Admiral L.H.K. Hamilton. Hamilton’s mission was to land men from Lt. Col. M.S. Harrison’s 12 Commando (a numbered Commando comprised 450 to 630 men generally organized into five troops) on the Lofotens to draw enemy attention away from the main attack at Vaagso.
The primary attack, “Archery,” was an assault on the main factories and facilities on the islands of Vaagso and Maaloy. Tovey placed two men in command of “Archery”: Rear-Admiral Harold M. Burrough, heading the naval forces, and Brig. Gen. J.C. Haydon, heading the ground forces. Haydon then selected numbers 2 and 3 Commando for these attacks.
The Germans had fortified both target islands after their invasion of Norway in 1940. Defensive positions on the islands included batteries of field guns along the coastline. Antiaircraft weapons and numerous machine-gun emplacements were also positioned at critical locations around the islands. Garrisoning the defenses were men who, for the most part, were veterans of the Norwegian Campaign. Reinforcements were welcomed by the defenders fairly consistently, making the 2 and 3 Commando mission that much more difficult.
Admiral Tovey’s plan called for Archery to be a five-part operation, each part to be conducted by a group of Commandos. The brunt of the work fell to Lt. Col. J.F. Durnford-Slater’s 3 Commando, which organized itself into Groups I, II, and III.
Group I consisted of Number 2 Troop (roughly an overstrength platoon) commanded by Lieutenant R. Clement. Troop 2’s mission was to land on the extreme southern end of Vaagso Island at Hollevik and destroy any shore batteries that could threaten ships in the convoy. The troop was then to move north up the road to the town of South Vaagso and form a reserve for Group II.
Durnford-Slater decided to command Group II himself; it contained 1 Troop, commanded by Captain Bradley; 3 Troop, led by Captain Johnny Giles; and 4 Troop led by Captain Algy Forrester. This group was then to land south of the town of Vaagso, maneuver north into the township, and destroy shore factories as well as any enemy strongpoints they encountered along the way.
Group III commanded by Major Jack Churchill comprised Captain A.S. “Sandy” Ronald’s 5 Troop and Captain Peter Young’s 6 Troop. Their objective was to land on Maaloy Island and knock out all the fortified positions along the coast, then sweep across the island, eliminating all other enemy positions.
Group IV was formed by men from 2 Commando, whose role was to remain aboard the cruiser HMS Kenya and act as a reserve force for the operation. Group V was about a half-troop in strength from 2 Commando. It was to sail north of the town of South Vaagso onboard the destroyer HMS Oribi, disembark, and establish a blocking position between the towns of South Vaagso and North Vaagso. They were then to send a combat patrol into North Vaagso to round up any enemy forces they could find.
A Stormy Start
Following countless dress rehearsals and briefings over scale models of the objectives, the Vaagso-Maaloy Commandos loaded onto two LSIs (Landing Ship Infantry) and with a screen of four destroyers sailed from Scapa Flow on Christmas Eve. Their destination was a small base in the Shetland Islands. From there, they would dash for the target the following night. During the voyage to the Shetlands, violent seas damaged a number of vessels. Because the damage was too great to repair in time to meet the invasion date set for the morning of December 26, Admiral Burrough postponed the attack for 24 hours. D-day would now be the morning of the 27th.
At 6 am on December 26, “Anklet” got underway as the 300 men of Lt. Col. S.S. Harrison’s 12 Commando landed on the Lofoten Islands to begin their diversion. Landing unopposed, Harrison’s men were able to capture two harbors. The long hours of darkness provided cover so that the naval commander could keep his force close to shore to support the Commandos’ raid.
With repair crews working around the clock, the tiny armada sailed from the Shetlands the following evening. By 8:30 am on the 27th, the invasion force was in position to attack Vaagso and Maaloy. Although the Commandos had spent a tough 48 hours aboard the storm-tossed ships, with many of them becoming seasick, they had recovered sufficiently to go ashore and attempt to complete their mission.
The Taking of Maaloy Island
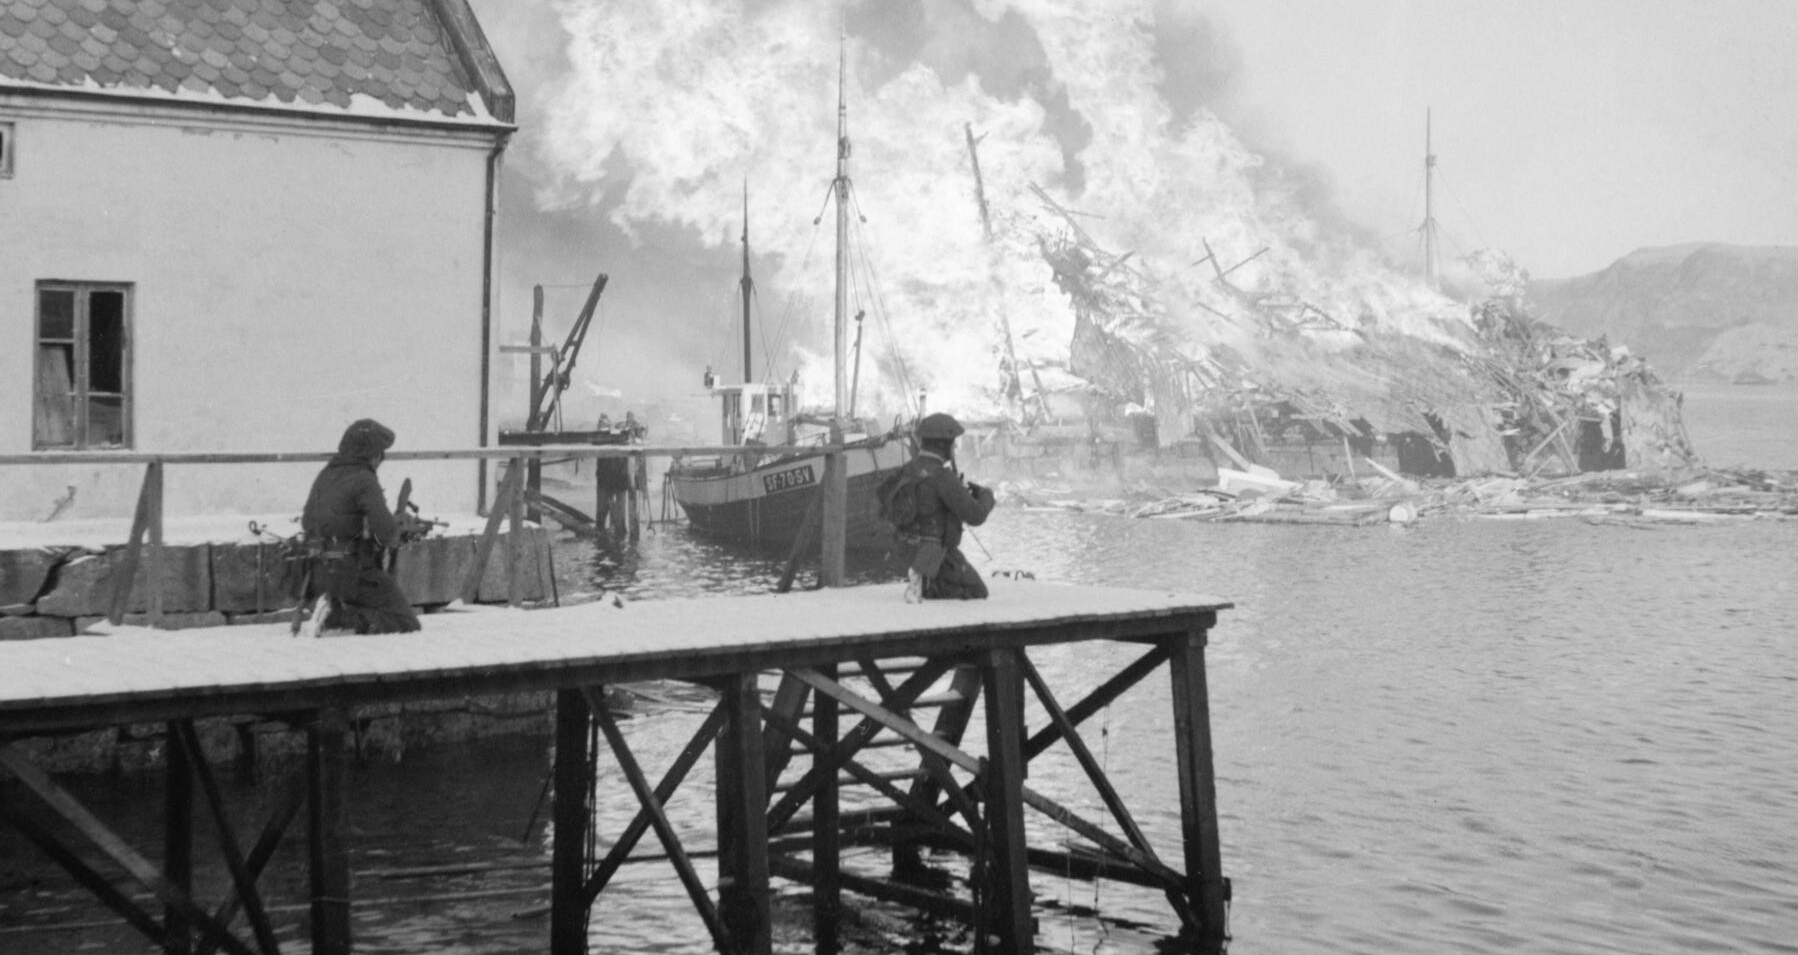
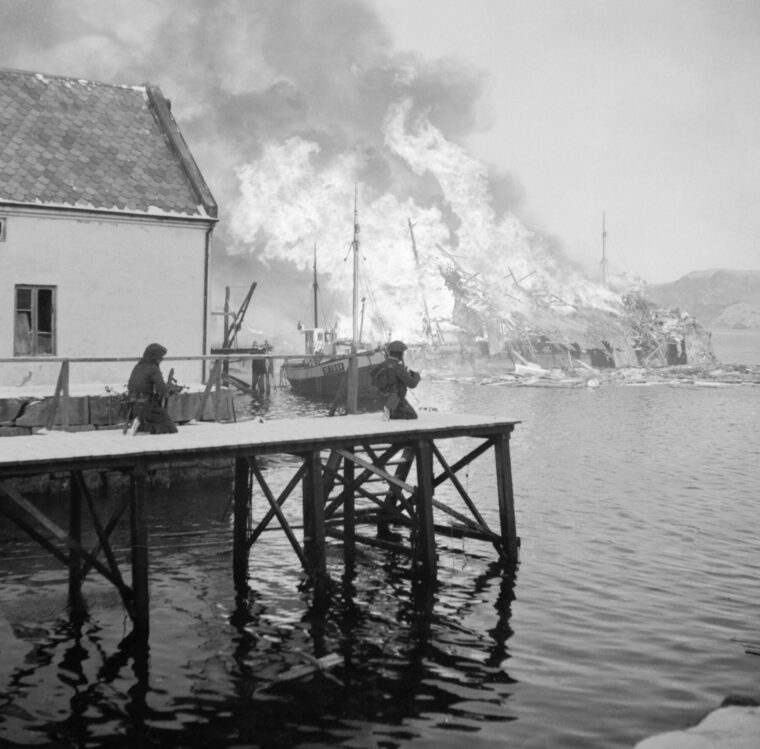
Only minutes after steaming into attack position, the cruiser HMS Kenya began bombarding Maaloy Island. For the next nine minutes, the Kenya—along with the invasion force’s destroyers and RAF planes—shelled and bombed the landing site, which was less than 250 yards square.
Since enemy observers on shore had been expecting a small German convoy, they were not alarmed to see Burrough’s ships steam into the channel. The unexpected bombardment, however, did catch them by surprise. During the shelling of Maaloy Island, the Commandos loaded into their Higgins landing boats and began moving toward shore. As they neared the objective, most of the barrage lifted. The plan was for Hampden aircraft to cover the assault by going in low and dropping smoke bombs. This they did, some dropping so close that Commandos were burned as phosphorous seared through their uniforms.
Without hesitation, the men of 5 and 6 Troops swarmed ashore, sweeping up and over the rocky, abrupt slopes. What they found was exactly what they had hoped. The bombardment had succeeded in keeping most of the enemy troops inside their defensive positions and out of the fight. Within minutes, 5 Troop captured a manned machine-gun position, while Commandos from 6 Troop overran and occupied four abandoned shore batteries.
The Hampdens had done such a good job dropping smoke bombs that a thick, dense layer of smoke covered much of the island. Not knowing who or what was 10 feet away and hidden by the smoke, the Commandos proceeded slowly across the island. Eventually, men from 6 Troop captured the majority of the island’s defenders, who were huddled inside an air raid shelter. The remainder of the Germans were captured in small groups or shot in brief skirmishes in and around the buildings on the island. In one short firefight, Captain Young and a sergeant surprised and then shot two Germans who came running out of a burning building. At 9:20 am, less than 20 minutes after landing on Maaloy, the island was secure.
Group I, the men of 2 Troop, accomplished their mission as quickly as their comrades on Maaloy. Coming ashore unopposed on the south end of Vaagso Island, the 50 Commandos swept into the Hollevik stronghold. They found only a few wounded enemy soldiers and Lieutenant R. Clement soon signaled the Kenya that the objective had been taken. Within minutes, 2 Troop began moving up the road to the north in order to act as a reserve for Group II, then beginning its advance on the town of South Vaagso.
As the men of 2 Troop marched north they suddenly saw a German Me-109 fighter zoom by on their right, about 20 yards away, flying low over the fjord. It then climbed straight up and shot down an RAF Blenheim fighter that had been covering the Commandos’ landings. Shocked, the men of 2 Troop realized that the Germans were going to put up a fight for the island.
The Battle for South Vaagso
Group II’s landing did not go as well as those of Groups I and III. Within seconds of reaching the shore, one of Group II’s landing craft suffered a direct hit—from a British aircraft. German antiaircraft fire had damaged a Hampden as it was dropping smoke bombs. Disabled, the crew released a 60-pound phosphorus smoke bomb that dropped squarely into one of 4 Troop’s landing craft, killing and badly burning half of the boat’s Commandos.
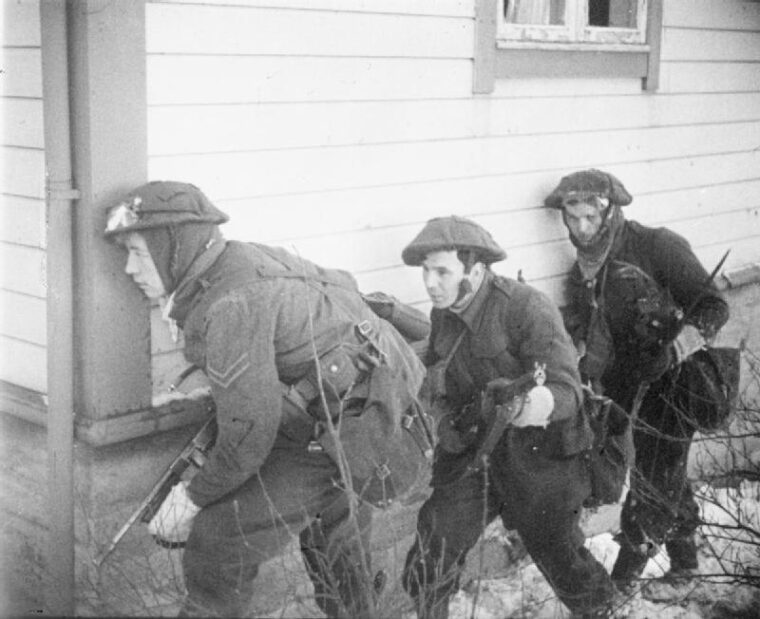
The principle of surprise was lost by the time Group II landed at South Vaagso. German resistance was stronger and better organized in the town than it had been on Maaloy. Enemy commanders had prepared strong defensive positions around town as well as deploying well-concealed snipers on the bluffs to the west of town.
To reach their objectives, which were to destroy the fish-oil factories, the men of 1, 3, and 4 Troops had to fight their way through the town. Countless numbers of small firefights erupted in and around South Vaagso’s buildings. At first, the battle was very confusing for the Commandos, because it seemed like enemy fire was coming at them from all directions at once. As the battle progressed, the Commandos lobbed grenades through windows or open doors then rushed into the buildings and shot any surviving enemy soldiers.
Some of the heaviest fighting centered in and around the Ulvesund Hotel. Most of the German defenders there were veterans. As the men from 4 Troop began to engage the enemy soldiers inside the hotel, Captain Forrester moved up and took a position across the street. Ignoring the heavy fire coming from the building, Forrester raced across the open ground and, as he was preparing to hurl a grenade into the hotel, was hit by enemy fire. Falling on top of the live grenade, the explosion killed him instantly.
Captain Forrester’s death momentarily slowed the attack. Within minutes, however, a Norwegian intelligence officer, Captain Martin Linge, led an assault on the hotel. As Linge was trying to force open a door, he was shot and killed by enemy soldiers.
Clement’s 2 Troop was now in the South Vaagso fight, but the resistance did not slacken. Accordingly, Colonel Durnford-Slater ordered the floating reserve and 6 Troop from Maaloy to reinforce the men fighting in the town. When Captain Young, who was still on Maaloy Island, heard the order, he knew right away that “things must be bad.”
Quickly organizing 18 men, Young loaded them into a landing craft and motored them to Vaagso. Meeting up with the “smoke-blackened and grimy” Durnford-Slater, Captain Young was immediately placed in command of the right wing of the advance northward.
The continuous street fighting was draining the Commandos’ ammunition supply. To help solve the problem, Captain “Slinger” Martin, 3 Commando’s administrative officer, organized a group of Norwegians who were standing around at the landing point. Martin loaded them down with small-arms ammunition and an ample supply of hand grenades and they all headed for the front, stumbling and sliding in the snow. In 10 minutes, the men fighting at the front were being resupplied with ammunition.
Demolition Time
Slowly, the Commandos opened holes in the enemy’s defenses, allowing the demolition teams to move forward and begin wiring the factories for destruction. In no time, several of the factories were burning out of control as were many of the town’s houses and shops. The smoke from so many burning fires slowed the momentum of the attack in places, but at the same time, the smoke prevented most of the German snipers from shooting effectively.
Group I’s final objective was the Firda factory. It was just in front of the Commandos when Colonel Durnford-Slater sent off a report on the situation to General Haydon. Haydon sent a reply to “withdraw and re-embark the landing force.” Durnford-Slater halted his men in the forward positions along the northern edge of town. He had them prepare hasty defensive positions so they would be ready to meet any German counterattack. At 12:45 pm, Durnford-Slater decided to pull his men back to the landing beach one troop at a time. Leaving Captain Bradley with a small detail to blow up the Firda factory, the remaining men in Group I began to withdraw through the town. Moving through intermittent sniper fire, most of the raiding force reached the landing area by 1 pm.
As the Commandos began boarding the landing craft, flames and smoke from the Firda factory filled the sky. To the Commandos heading back to the waiting transports, it was a signal that their mission had been a success. Durnford-Slater waited for Bradley and his group, then boarded the last landing craft with them and motored away from the enemy shoreline.
During the time it had taken for the Commandos to complete their missions on Vaagso and Maaloy, the naval force protecting them had also fought a battle. The Kenya not only silenced enemy shore batteries on Rugsundo Island, southeast of Vaagso, but—along with the destroyers in the group—she had also been able to sink nine enemy merchant ships. As the fight progressed, an armed enemy trawler called the Fohn ran aground. In it, British sailors discovered code books that contained the call signals, challenges, countersigns, and emergency signals for every German ship stationed in Norway and France, a satisfying prize for British intelligence.
The secondary attack on the Lofotens by Harrison’s 12 Commando continued until the December 28, when a Luftwaffe bombing attack narrowly missed striking the HMS Arethusa. Following the bombing, Admiral Hamilton decided to withdraw the entire Commando and naval force out of harm’s way.
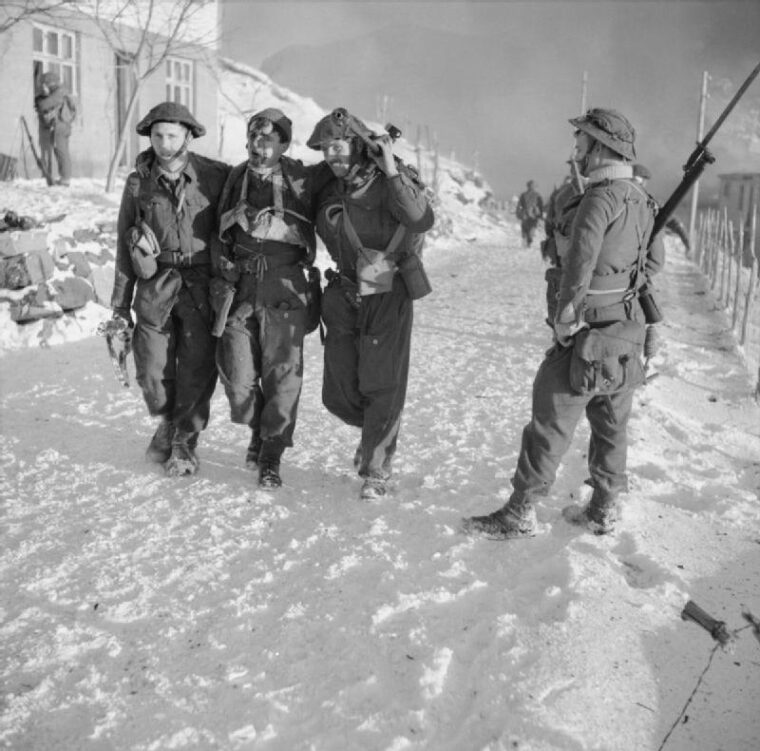
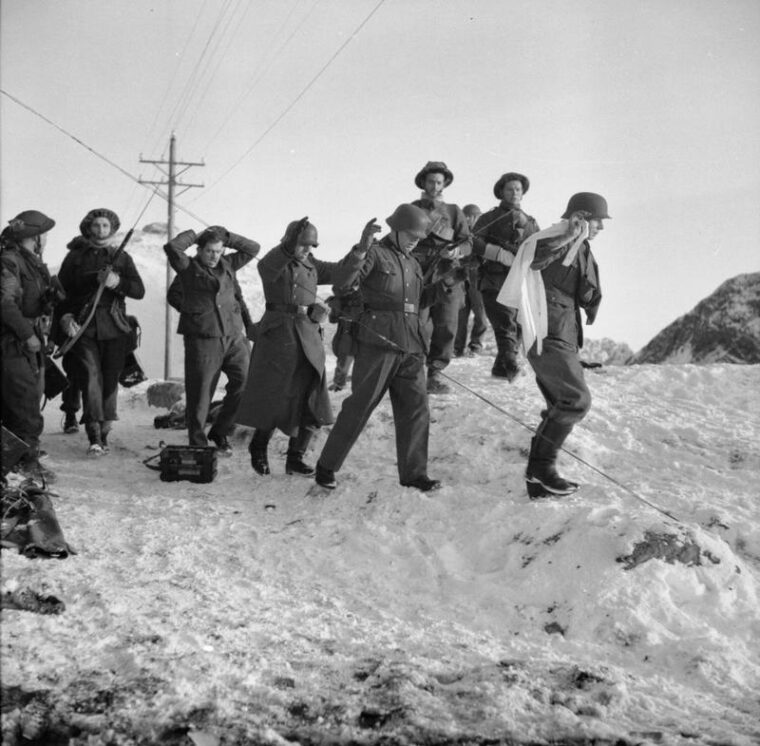
By 3 pm, General Haydon declared the raid a success. The raiders had destroyed every enemy position and installation on Maaloy, along with every factory, the lighthouse, and the communications center on Vaagso. The Commandos had killed nearly 150 German soldiers and captured 98. Colonel Durnford-Slater lost 19 men killed from 3 Commando and 52 wounded.
As the convoy sailed back toward Britain, the commanders were very satisfied with their work. As they had hoped, they demonstrated that a well-coordinated raid by a multiservice force against a defended objective could succeed if sufficient planning and rehearsals were conducted.
A less pleasant outcome of the Commando raid was that it fostered the continued disagreement between Allied strategic planners and the exiled King of Norway, Haakon VII. Haakon believed that these Allied “pinprick” attacks in Norway would not shorten the war. Instead, they would only bring retaliatory attacks against the people in the country. In many ways, Haakon was correct.
German Gestapo leaders realized that the Commandos knew too much about the defenses not to have been given detailed information from the local inhabitants. So they shipped some locals to concentration camps for aiding the enemy.
Misleading Hitler
The “pinprick” attacks did, however, achieve significant strategic results. The raid on Vaagso Island reinforced Hitler’s notion that the Allies were going to use Norway as a springboard for launching an invasion against Germany by way of Scandinavia. Hitler proclaimed to his generals, “Norway is the zone of destiny in this war.” As a result, the German high command began reinforcing Norway with ground, naval, and air forces.
By April, much of the German fleet was concentrated in Norwegian waters. This decision to mass German naval might in Scandinavia played right into British hands. It became much easier for the Royal Navy to keep enemy ships pinned up in and around the Norwegian fjords than it would have been to track them down in the open Atlantic. In the end, one battleship, three heavy cruisers, eight destroyers, four E-boats, and 20 submarines were either sunk during ship-to-ship engagements near Norway or bombed by the RAF Nevertheless, the German buildup in Norway continued. By June 1944, there were some 372,000 German soldiers defending the county’s coastline—staring at nothing while Allied forces swarmed ashore along the Normandy coast.
Lessons Learned
Aside from the strategic value of the Vaagso-Maaloy raid, the tactical lessons were also beneficial to the Allies. The cooperation and conduct between services during the operation had been superb, just as Mountbatten had hoped. Following the raid, naval officers improved disembarking methods and Commando training cadres developed better techniques for street-to-street and building-to-building combat as well. Perhaps the greatest tactical lesson learned from the Vaagso Raid was the affirmation of the concept that allowed commanders great flexibility of means in achieving their objectives.
In addition, keeping a floating reserve to ensure a rapid deployment where it was needed continued to be utilized throughout the war in amphibious operations. Conducting an air attack over the beachhead just minutes before the troops’ landing to divert the enemy’s attention to the sky (which the RAF accomplished at Vaagso with great success) became standard procedure as well.
The success of the Vaagso raid—and one shortly after at the Bruneval radar site in France—boosted Allied morale while demonstrating the value of Commandos. Because there was little Allied success in any other theater of operation at that time, the achievements accomplished by the raids helped to erase much of the traditional anti-Commando sentiment in the military community. As a result, a specialized Commando training school was opened at Achnacarry, Scotland. For the remainder of the war, Commandos would see action in all theaters, proving themselves a vital element in combat operations.
Don Roberts currently teaches social studies at Crystal River High School, Crystal River, Florida.
This would be a great movie.