By Arnold Blumberg
The sun was just rising and the day promised clear skies overhead. Since 5 am maintenance crews had been running the engines, making last minute adjustments, and arming the scores of aircraft sitting on the steel flight deck of the Japanese aircraft carrier Akagi. She had started life as an Amagi-class heavy battlecruiser but had been converted to an aircraft carrier. On February 19, 1942, Akagi served as the flagship of the Imperial Japanese Navy’s First Air Fleet, commanded by Vice Admiral Chuichi Nagumo.
Directly behind Akagi, at a distance of about 8,000 yards, was her sister ship Kaga, the other member of the 1st Carrier Squadron. On Akagi’s port side, 8,000 yards away, sailed the carrier Soryu, flagship of Rear Admiral Tamon Yamaguchi. Behind and equidistant from Soryu and Kaga was the carrier Hiryu. Like Soryu, her partner in the 2nd Carrier Squadron, Hiryu was smaller and a bit faster than Akagi and Kaga. As on the Akagi, the sailors of the Kaga, Soryu, and Hiryu were scurrying on and below the decks readying their warplanes for action.
An array of Imperial Japanese Navy (IJN) vessels supported the carriers. These included the bristling shapes of the heavy cruisers of the 8th Cruiser Squadron: Tone, Chikuma, Maya, and Takao, sporting 10 8-inch guns each, stationed 10,000 yards from each carrier. Between them, in front, and behind, was a screen of nine destroyers from the 17th and 18th Destroyer Divisions, 1st Destroyer Flotilla, under the control of the light cruiser Abukuma. These craft were each armed with six 5-inch guns and eight excellent Long Lance torpedoes.
Objective: Darwin
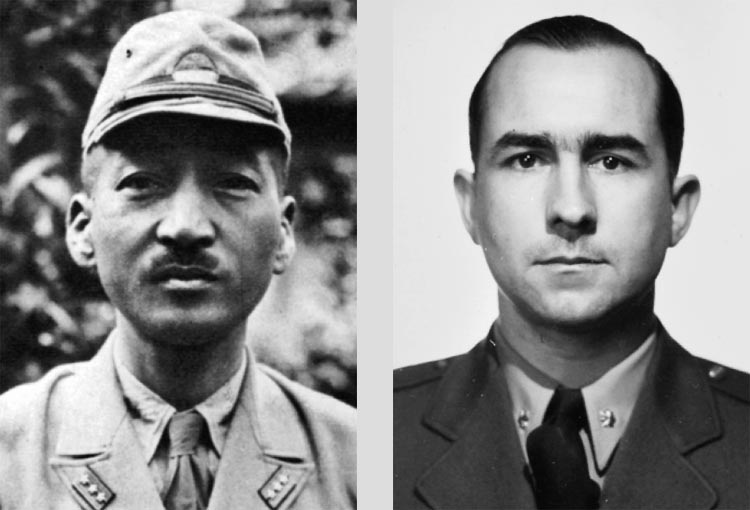
Surveying the frenetic activity of the Akagi’s personnel that morning was Commander Mitsuo Fuchida, the task force air leader. The 39-year-old Fuchida, who had entered the Navy in 1921, was a specialist in horizontal bombing in the naval air arm. His ability as a tactician and administrator led him to command the attack against the U.S. naval base at Pearl Harbor on December 7, 1941. On that fateful day, he coordinated the entire Japanese aerial assault against that bastion of American power in the Pacific. Once again, 10 weeks after he and his comrades had wrought such thorough destruction on the naval might of America, Fuchida would be leading another airborne strike force against the enemy.
At 7:30 am, Fuchida signaled all the carriers that the launching of their planes was to begin. The sea breeze freshened from the northwest, which required that the flattops turn while the aircraft took off. When the fleet reached nine degrees south latitude and 129 degrees east longitude 220 miles northwest of the target, Nagumo ordered reversal to a reciprocal course to bring the carriers into the wind. The other warships also turned, and the entire fleet commenced to steam away from its objective and would continue to do so, though at a reduced speed, until the aerial strike force returned three hours later. Having completed their turns, heading full into the wind, the carriers increased speed until velocity over their flight decks reached 25 miles per hour.
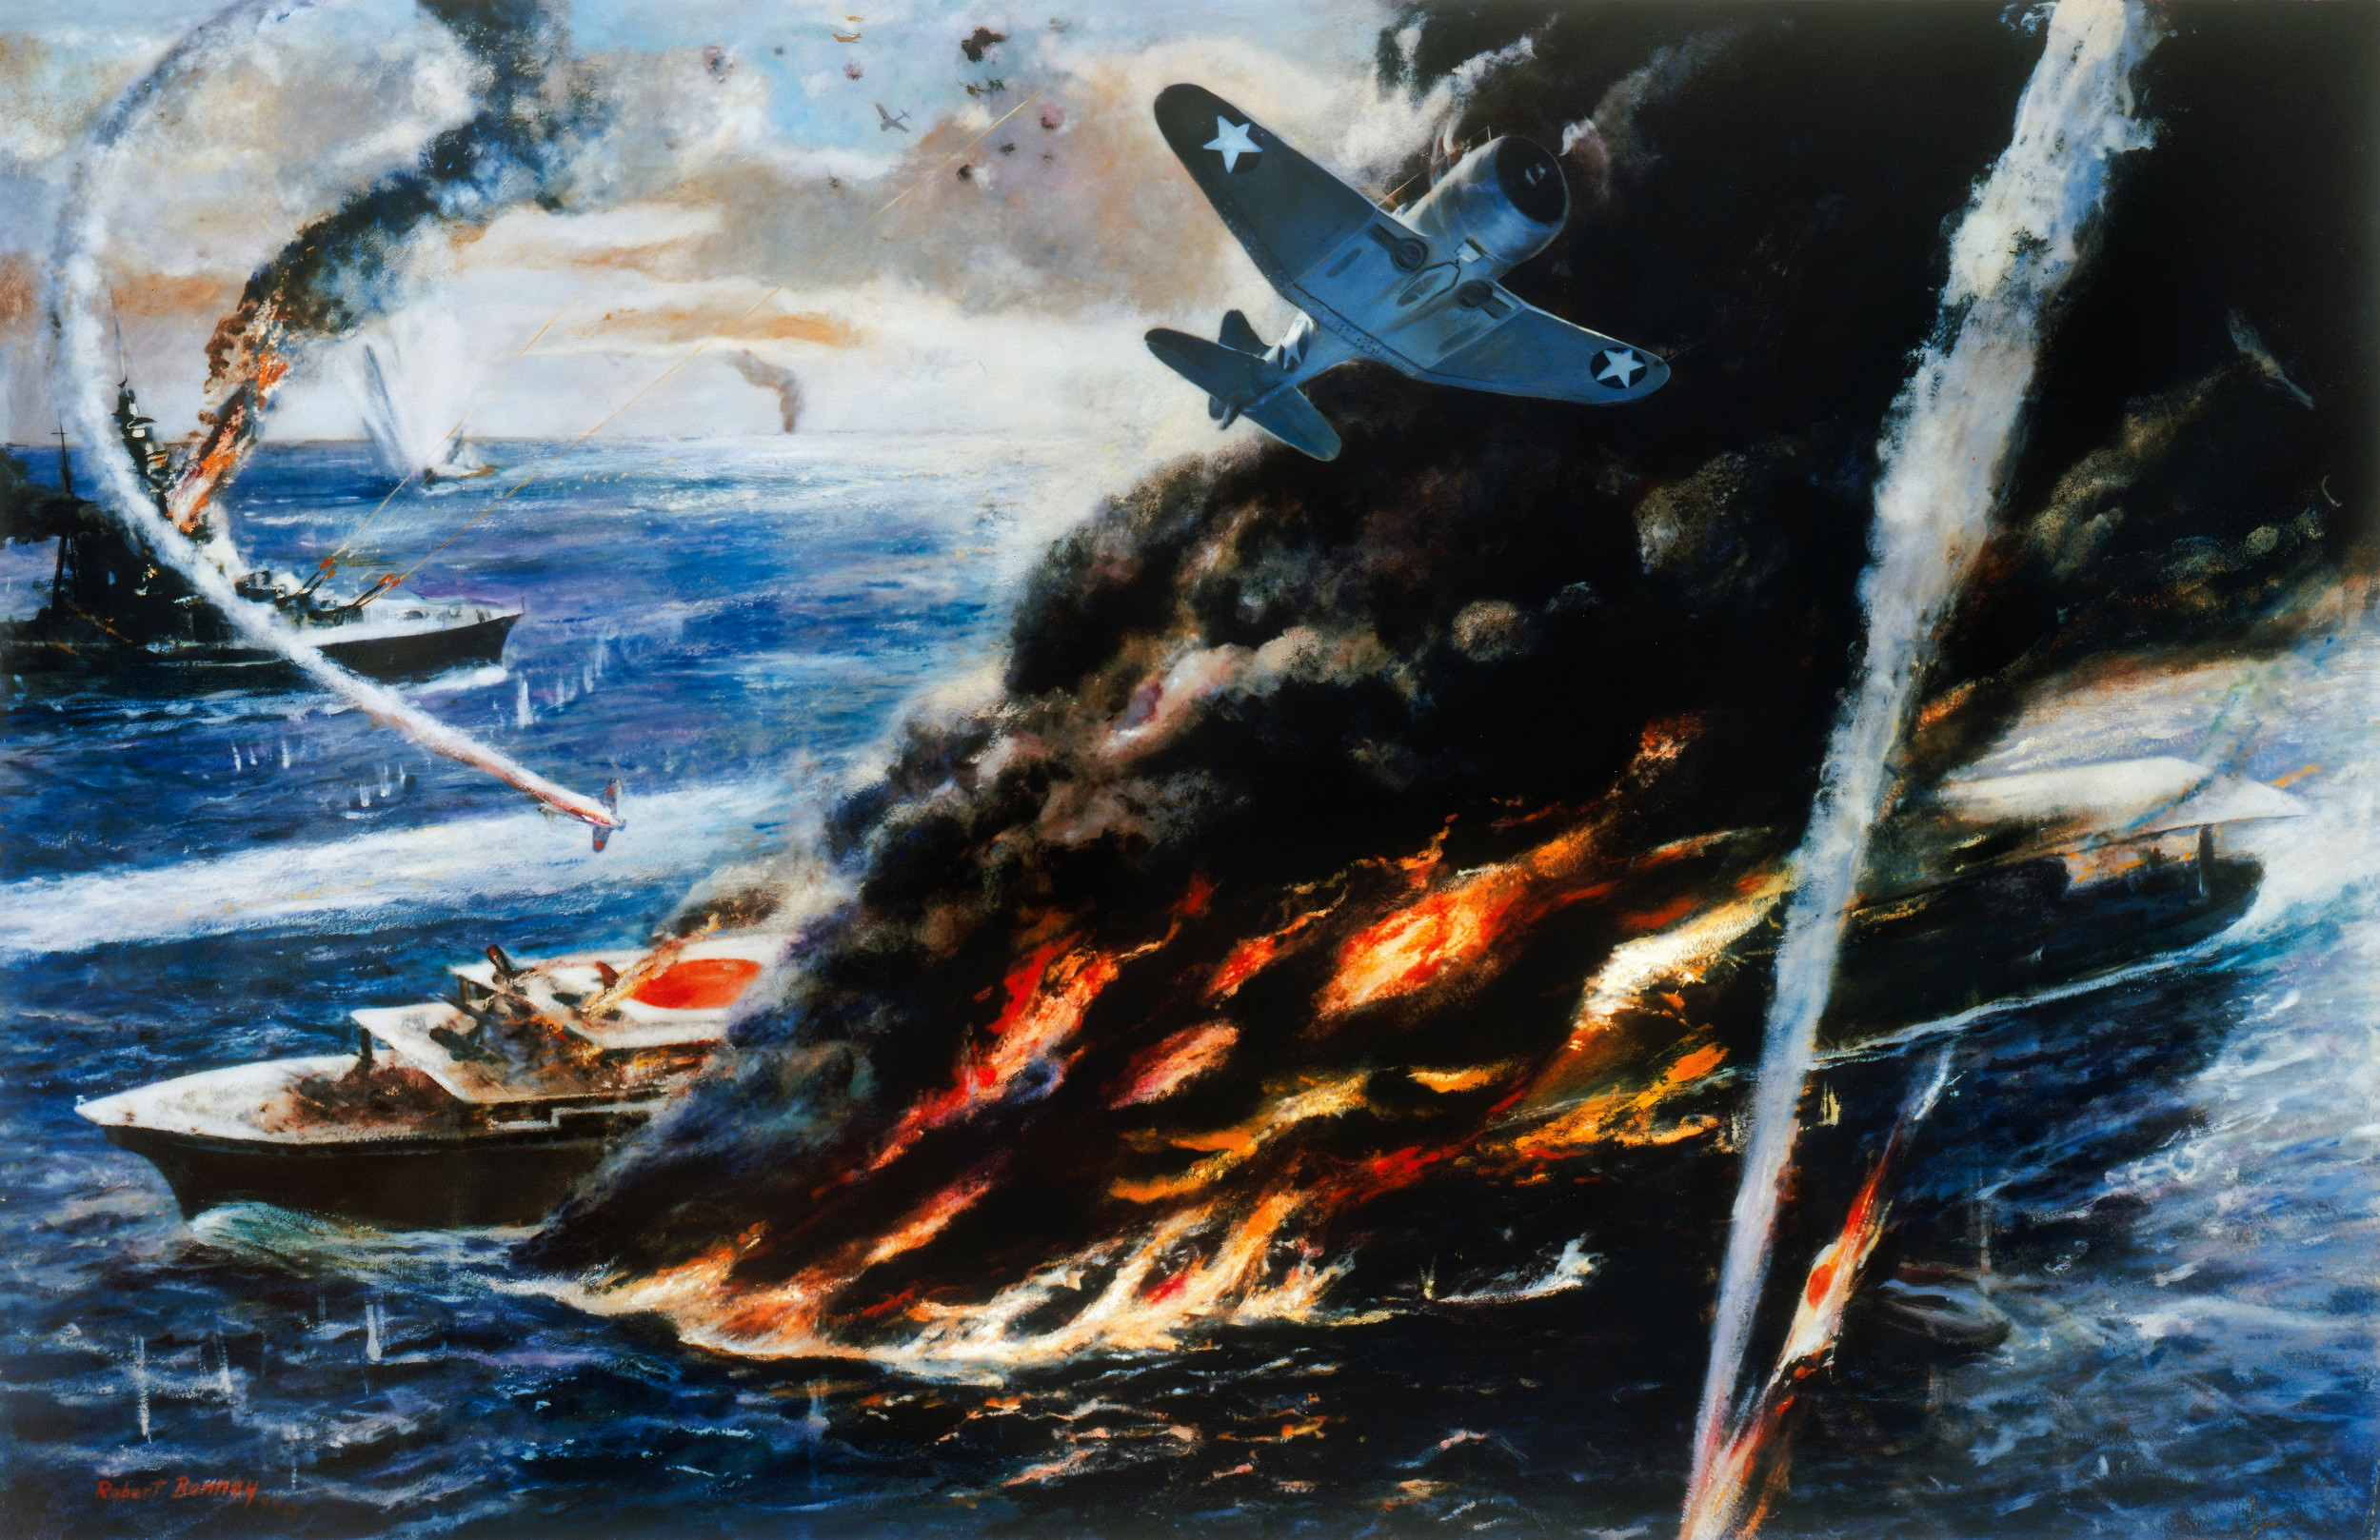
After a final briefing the pilots and their crews climbed into their cockpits. Fuchida and his two crewmen boarded their three-seater Nakajima B5N2 Kate level bomber. When all planes were ready, the Akagi’s skipper, Captain Taijiro, ordered them to take off. Eighteen Mitsubishi A6M2 Zero fighters roared from the flight deck followed by 18 Aichi D3A1 Val dive-bombers, and 27 Kates.
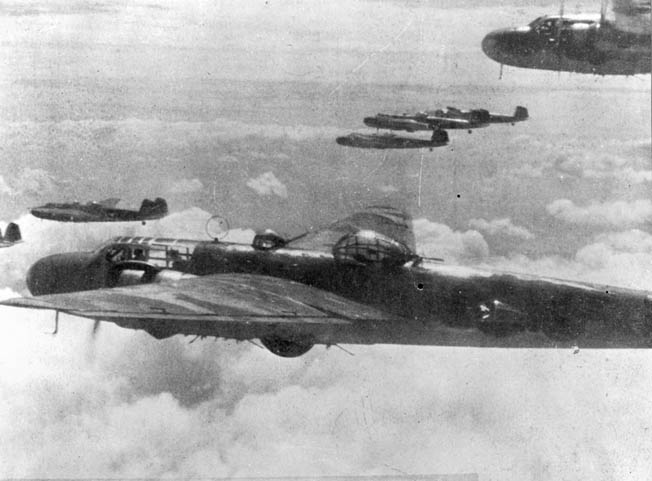
Astern of Akagi the warbirds of the other carriers hurtled into the blue. When all were airborne at 8:45 am, Fuchida brought the attacking force of 188 aircraft, comprised of 36 Zero fighters, 71 Val dive bombers, and 81 Kate high-level bombers, onto a compass bearing of 148 degrees, with the Zeros, flying above and ahead of the others, acting as a protective screen against possible enemy fighter interception. With the prevailing northwest wind the Japanese expected to be over their objective in a little more than an hour. That objective was the Australian port city of Darwin, and the IJN air branch planned to deliver a destructive blow only surpassed by that visited upon Pearl Harbor.
Allied Military Buildup in Darwin
The massive IJN air raid winging its way to Darwin in mid-February 1942 was a response to a joint military command set up by the Allied Western governments designed to stem the Rising Sun’s advance across Southeast Asia. ABDA (American, British, Dutch, and Australian, as the command was named, became operational in January 1942 and established its main supply base at the port of Darwin in Australia’s Northern Territory. From Darwin vital military supplies were funneled to the Dutch East Indies, Singapore, and the Philippines. Further, Darwin was critical to the transfer of Allied fighter aircraft that staged from Timor to Bali, then to Java. Without these air assets Java would fall to the Japanese, and the entire Dutch East Indies, with its vast oil and rubber resources crucial to the Japanese war effort, with it.
The Japanese were aware of the Allied buildup at Darwin, whose prewar population was 5,800, and contemplated attacking it in late January 1942. However, an argument among the high command as to whether Darwin or Ceylon should be struck first postponed any decision to assault the city. The impasse was finally broken by Commander Minoru Genda, a brilliant naval staff officer and one of the chief architects of the Pearl Harbor attack. He advised Admiral Isokoru Yamamoto, commander in chief of the Japanese Combined Fleet: “Darwin poses a threat to current and planned operations in the Netherlands East Indies and recommend it should be the first target.” Genda went on to observe that “there had been a substantial buildup of [enemy] army and air forces in the area and do not want it to be used as an offensive base against us.”
Persuaded by Genda’s logic, on February 9 Yamamoto ordered a carrier strike on Darwin “to annihilate the enemy strength in the Port Darwin area and to intercept and destroy enemy naval and transport fleets….” The attack would also provide support for the Japanese effort to capture the island of Timor and thus cut off Allied air reinforcements to Java. Genda was assigned to plan the operation. He not only crafted the carrier attack but added a second strike to be made by 54th Army Air Force twin-engine bombers based at the recently captured Dutch airfields at Ambon in the Maluku and Kendari in the Celebes Islands. After the war Genda recalled that the Japanese had reliable information about the state of Darwin’s defenses and that as a result, “We did not expect serious opposition.”
Early Warnings of the Raid
Departing Palau (in today’s Indonesia) on the night of February 15, Nagumo’s task force reached Kendari on the 17th and made a highspeed run across the Banda Sea the next day. During the early hours of the 19th, the Japanese entered the Timor Sea, where Nagumo launched his aircraft toward Darwin.
About 9:30 am near Bathurst Island, Lieutenant Thomas Moorer’s U.S. Navy PBY Catalina flying boat, Patrol Wing 22, became the first victim of the large Japanese force heading to Darwin. Pounced on by up to nine Zeros, the PBY was forced into the sea before it could radio an alarm to Darwin. Later, its crew was rescued by a friendly merchant ship.
Some early warnings of the enemy raid were received but were not acted upon. Lieutenant John Gribble transmitted a sighting at 9:15 am, while a few minutes later Father John McGrath, a coastwatcher at the Catholic Mission on Bathurst Island, at 9:37 am radioed Darwin, “An unusually large air formation bearing down on us from the northwest.” Both messages were ignored at the Naval Communications Center at Darwin. Meanwhile, Commander Fuchida’s attack force crossed the east coast of Australia, turned northwest, and headed for the city. Without radar, the port was unaware of the surprise enemy assault, which commenced at 9:58 am.
The Ill-Fated B Flight
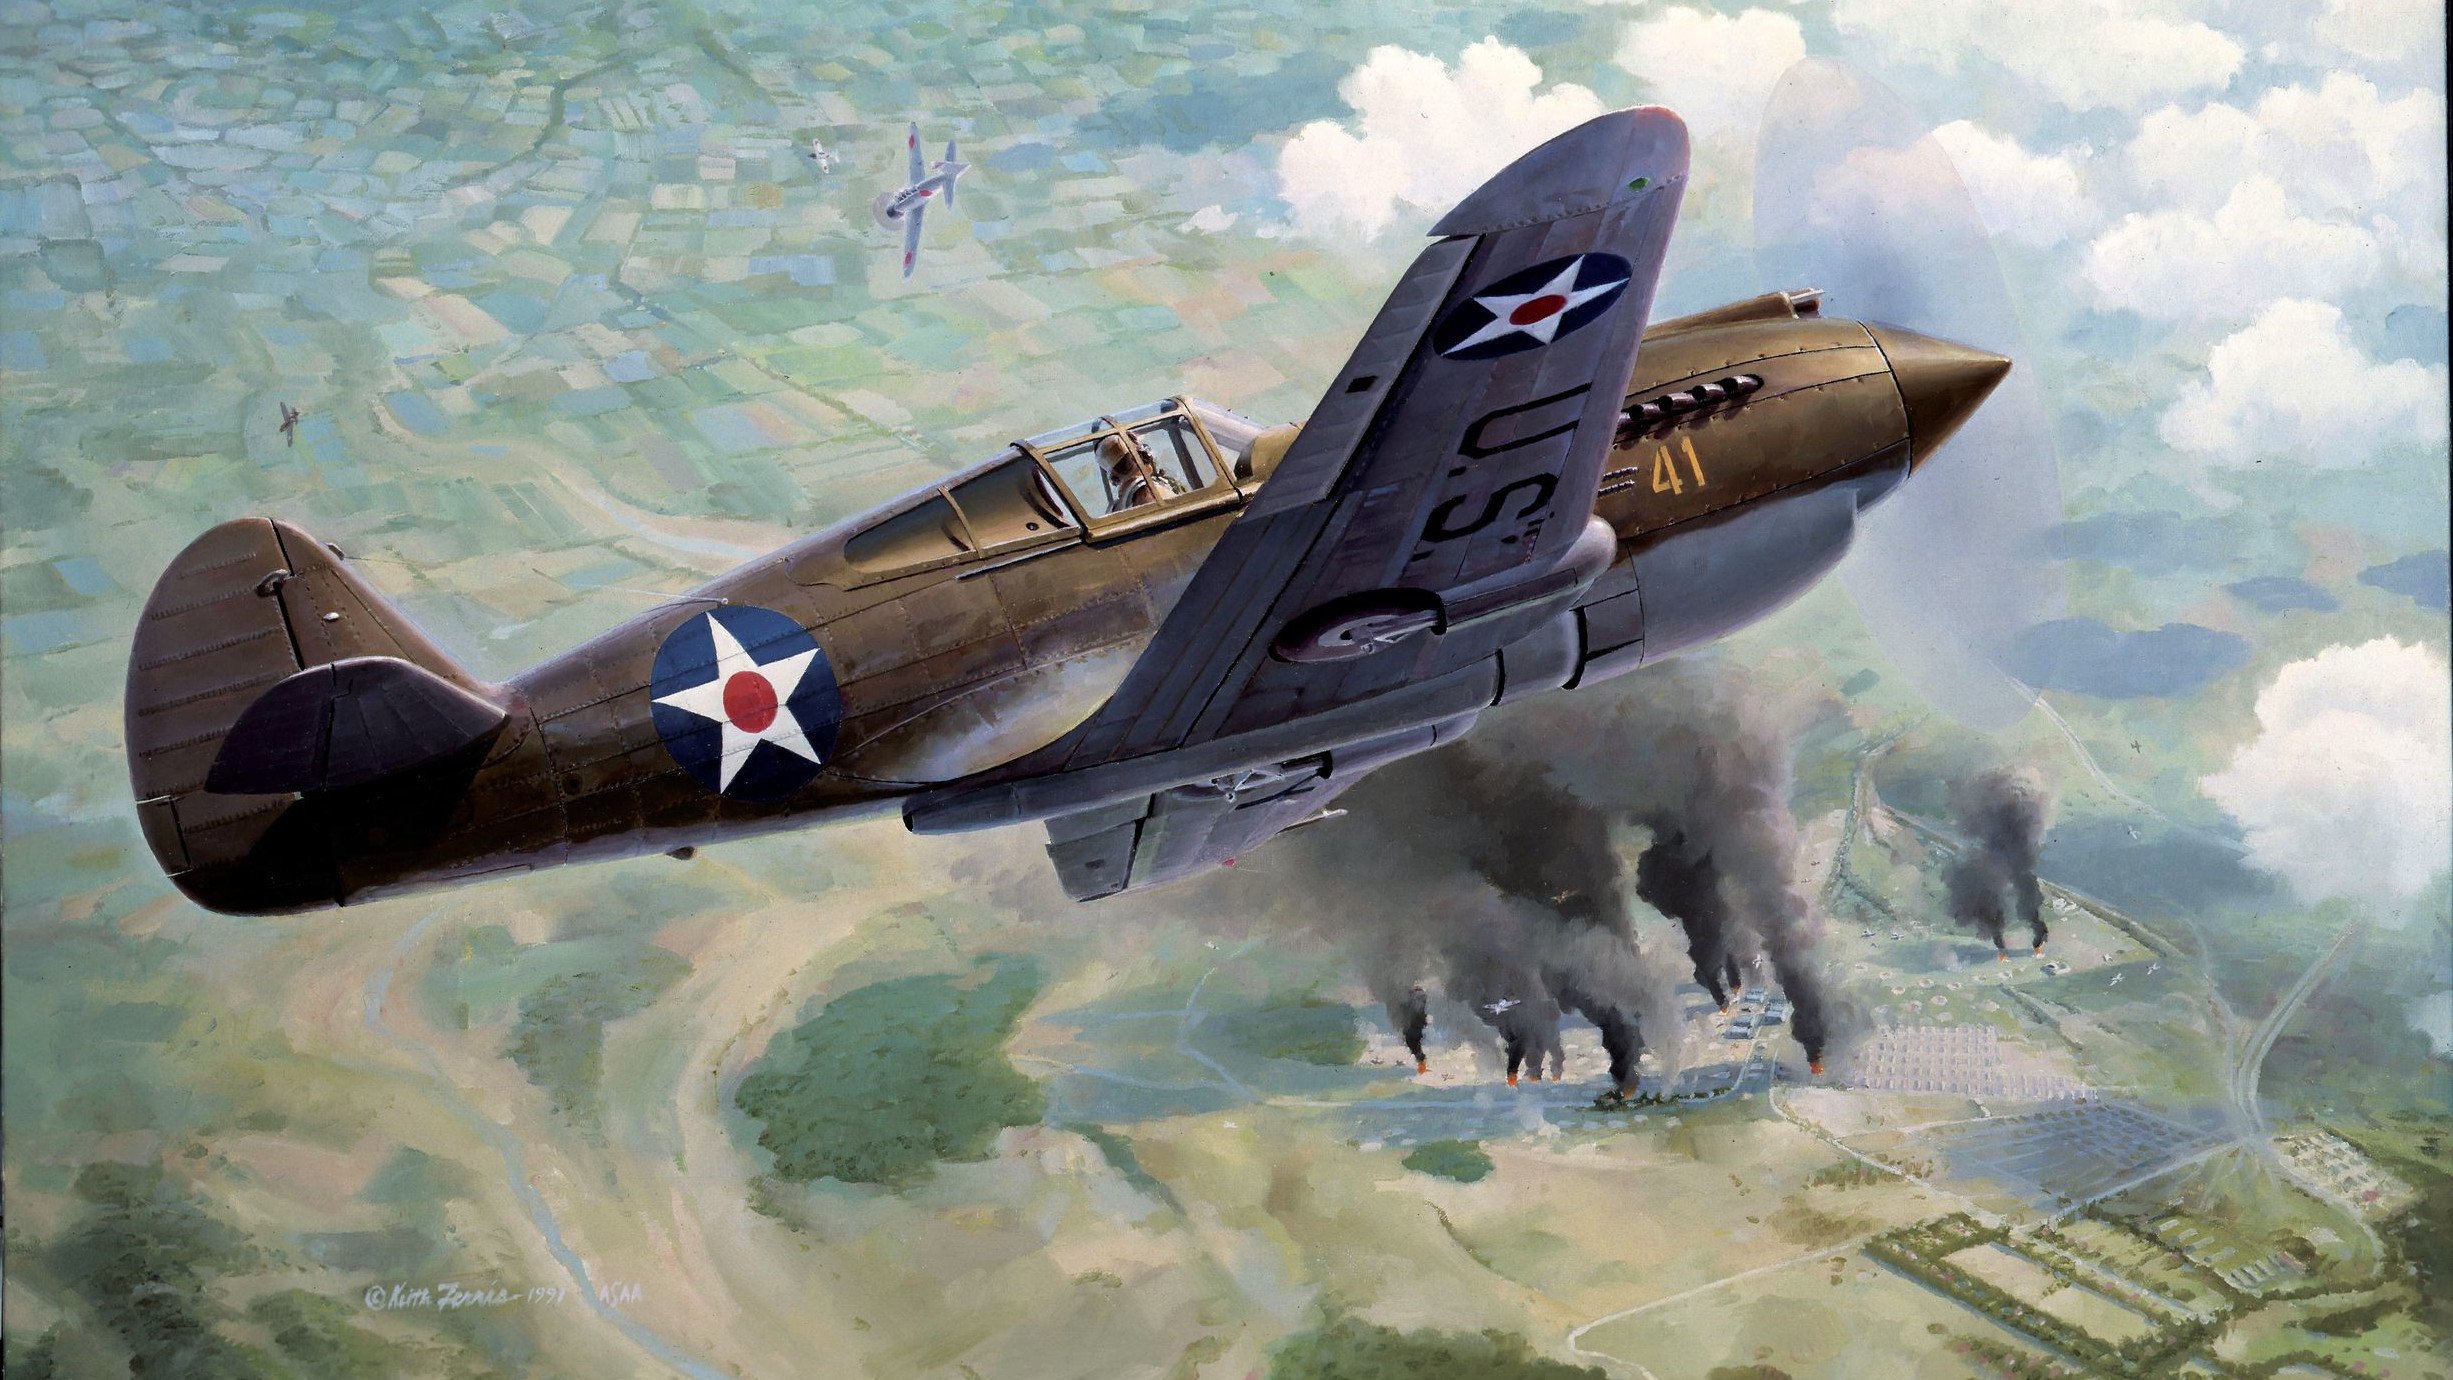
On the morning of the Japanese attack the only air assets defending Darwin were 10 Curtiss P-40B Tomahawk American-built fighters of Major Floyd “Slugger” Pell’s 33rd Pursuit Squadron, Royal Australian Air Force (RAAF). Returning to Darwin after aborting a flight to Java due to heavy rains, Pell ordered five of his command, designated B Flight under Lieutenant Robert G. Oestreicher, to stay aloft at 15,000 feet and act as a combat air patrol over the Darwin area, while Pell landed the five P-40s of A Flight at the Darwin Royal Air Force airfield for refueling. The time was about 9:55 am.
As B Flight, in two two-plane elements with Oestreicher above them, climbed over Darwin harbor, it was attacked from 2,000 feet above by Zeros, which broke the P-40s’ formation. Oestreicher later recalled how Lieutenant Jack R. Peres’s P-40 was hit by cannon fire from a Zero chasing him and seeing Peres’s plane “slowly rolled over and down.” Moments later, Lieutenant Elton S. Perry was shot out of the sky, plunging into the bay.
Oestreicher climbed into the sun and was hit by a passing Zero but managed to get in a burst of machine-gun fire on his attacker. At 12,000 feet he counted 18 enemy fighters “in a lazy circle at … 20,000 feet” waiting for their turn to dive at the hapless and vastly outnumbered P-40s of B Flight. As the flight leader frantically ordered his unit to head for the clouds south of Darwin, Lieutenant William R. Walker, who had been hit in the left shoulder, landed his plane at Darwin RAAF airfield, which was later strafed, bombed and burned to the ground on the runway.

As Walker taxied to the RAAF airdrome, Lieutenant Max R. Wiecks found himself surrounded by “wild and frenzied” air action. His P-40 was soon riddled with bullets and out of control, forcing the 27-year-old pilot to bail out of his stricken machine. He hit the water 10 miles from land.
Of B Flight, only Oestreicher stayed in the air until the raid ended. He shot down two Japanese dive-bombers, the first aerial victories by the Allies over Australia. After he landed at 11:45 am, his plane was being repaired when it was destroyed by the second Japanese air raid of the day. He spent the rest of the 19th hunkered down at the bomb-ravaged RAAF base.
A Flight On the Ground
While B Flight fought and died in the sky over Darwin, A Flight was being destroyed on the ground at the RAAF base by fighters from the Hiryu. Commander Fuchida later commented that as his force flew over Darwin, “There were 20-odd planes of various types on the airfields. Several U.S. P-40s attempted to take off as we came over but were quickly shot down and the rest were destroyed where they stood.” Spotting approaching enemy fighters, Major Pell and the rest of his element attempted to get airborne. While rolling down the runway, he was strafed by Zeros as his plane lurched 80 feet into the air. Pell parachuted and hit the ground, injured but still alive. As he crawled away, he was machined gunned and killed by Zeros making another pass over the airfield.
Following Pell was Lieutenant Charles W. Hughes. He never got off the ground. He was strafed as he gathered speed and crashed and died in his cockpit. Twenty-one-year-old Lieutenant Robert F. McMahon tried to get into the air after seeing his commander sprint to his plane. After almost colliding with the injured Walker’s incoming B Flight plane, McMahon took off, and the next few minutes found him dueling with a score of Zeros over the harbor. Wounded in the leg, his aircraft’s engine on fire, he had to hit the silk, landing in the harbor alive after being machine gunned by the Japanese as he helplessly floated in the air.
Lieutenants Burt R. Rice and John G. Glover were the last of A Flight to lift into the air. Rice was shot down and machined gunned by Japanese Zeros as he swung below his parachute. Viewing Rice’s predicament, Glover sought to protect his helpless comrade. In doing so he downed an opposing fighter before his own plane was critically damaged by enemy fire. Crashing into the airfield, Glover miraculously survived the enemy strafing that followed as he walked away from the wreckage that had once been his aircraft. Rice landed in a swamp and was found several hours later.
Outnumbered and outfought by the more experienced Japanese pilots, B Flight had been wiped out. Some Japanese World War II historians claim that the destruction of the four B Flight planes was accomplished by one Zero airman, Naval Air Pilot 1st Class Yoshikazu Nagahama, who is also credited with shooting down the luckless PBY flown by Lieutenant Moorer.
Nine Vessels Sunk
As Pell’s airmen fought and died in the skies over Darwin, the air force and civilian airstrips in the region were repeatedly bombed and strafed by the Japanese, making them unserviceable. Besides the nine P-40s of 33rd Squadron, 11 other RAAF aircraft were destroyed in the initial Japanese 32-minute raid on Darwin.
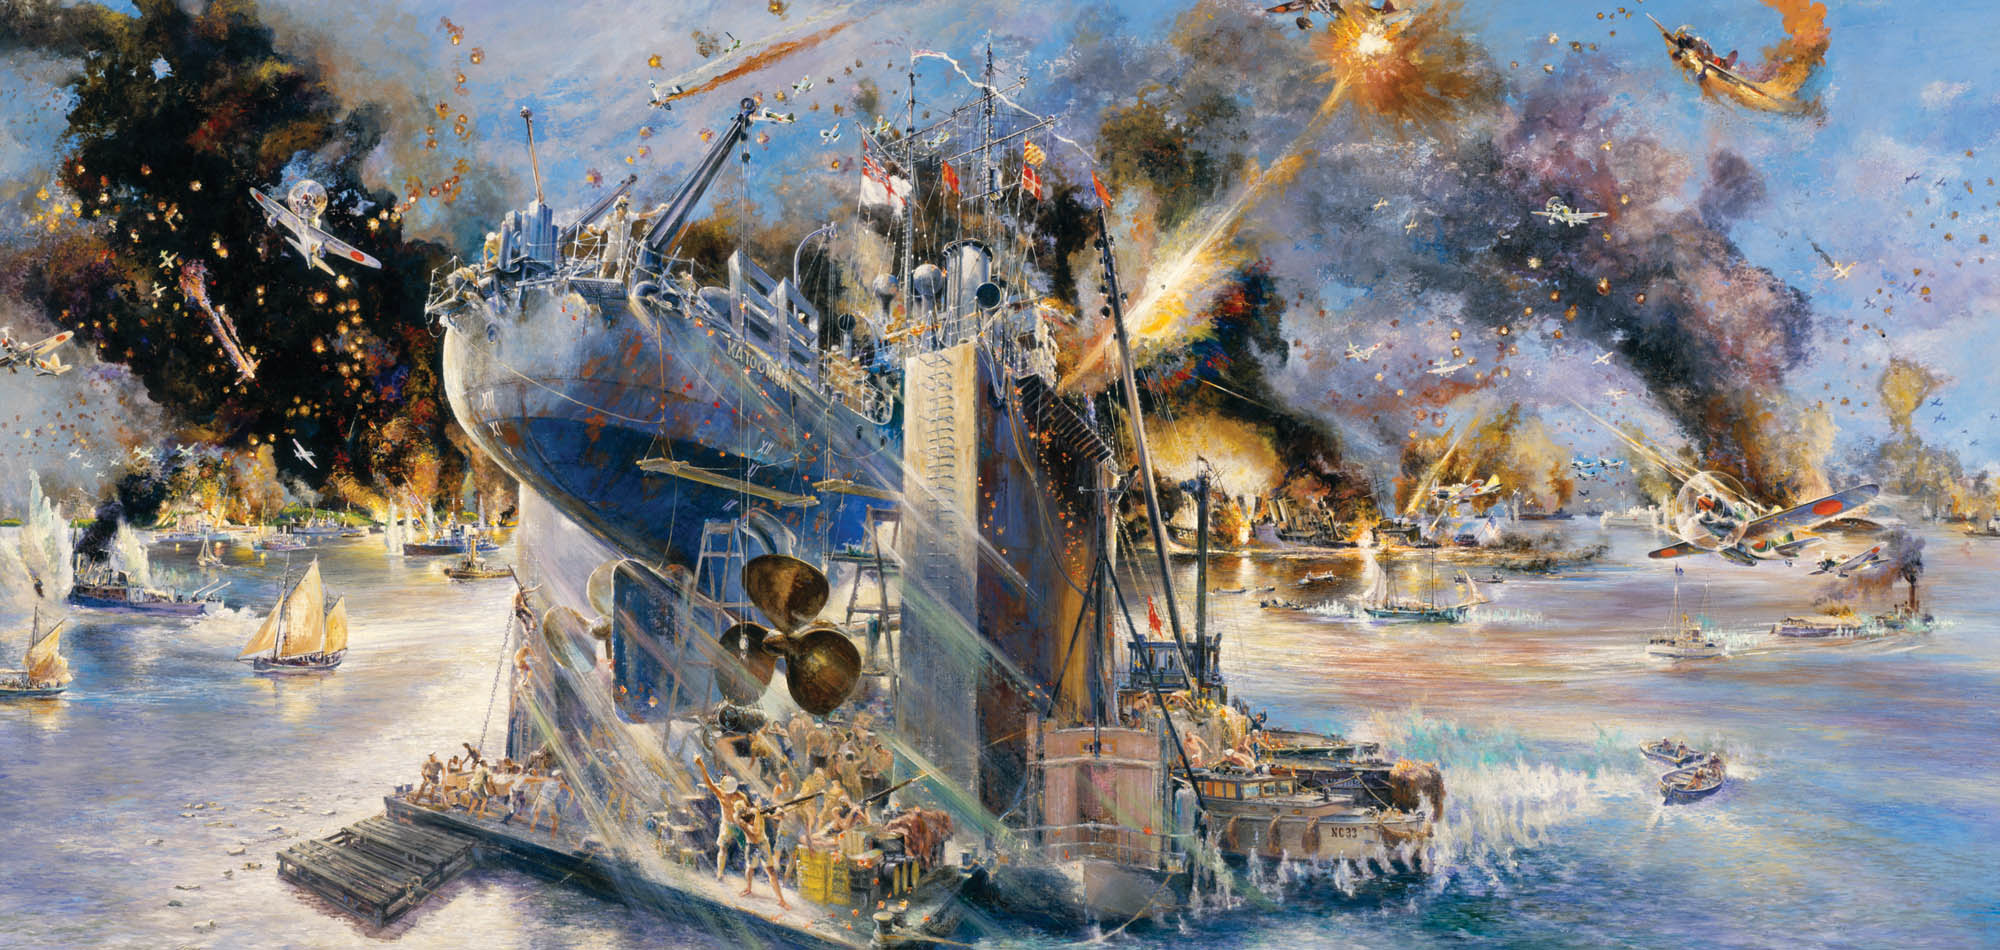
Trailing the Japanese fighters were the Kates and Vals. At 10 am, the former began their runs over Darwin’s harbor at 14,000 feet. Fuchida wrote, “The harbor was crowded with all kinds of ships which we picked off at our leisure.” There were 46 vessels, many of them merchantmen, in port that morning. A cyclone had shut down the port from February 2-10, then a dock workers strike had created a logjam of vessels waiting to unload war material. Their stay had been prolonged even more by the fact that Darwin’s small single wharf could only unload two ships at a time.
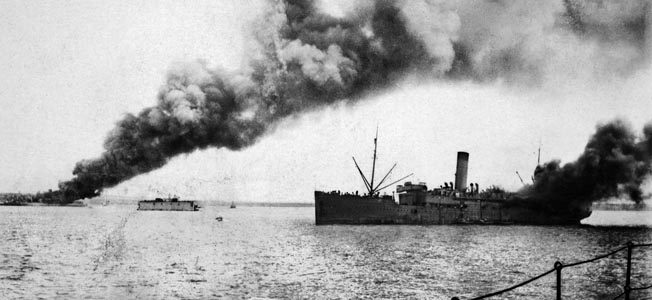
A rain of Japanese bombs wrecked the wharf, water mains, oil pipes, and much of the pier. The destruction slowly moved across the administrative district of the town, demolishing the hospital, post office, and police barracks. Dozens of civilians were killed or wounded and trapped in the rubble. After the war Fuchida declared, “I personally gave orders to the pilots not to attack the town.” Whether this is true or not, civilian eyewitnesses attested to the fact that the Japanese methodically struck the city, adding that the “machine gunning harried the town more than the bombs.”
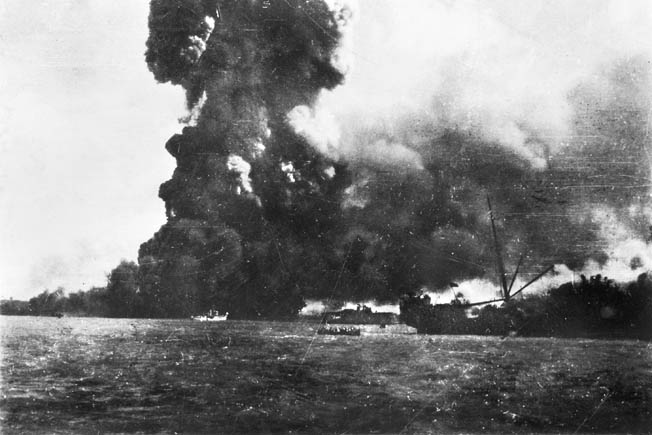
As the Kates completed their fiery work, the Vals, attacking singly, in pairs, or in waves of three, concentrated on the shipping in the harbor. The USS William B. Preston, an American tender, and the Australian sloop Swan got underway and were hit and damaged, losing a total of seven killed and 22 wounded. The USS Peary, a 1,190-ton U.S. Navy destroyer, was buried by five bombs that gutted her engine room and exploded a forward magazine. Peary lost 80 killed, including her captain, Lt. Cmdr. John M. Bermingham, and all her officers. Forty crew members, most of them wounded, survived. By the time the last Japanese carrier planes left the area at 11 am, Darwin harbor had witnessed the sinking of nine vessels with 12 more badly damaged; 25 other ships in the port escaped serious damage or were untouched. Three Catalina flying boats were destroyed in the harbor as well, while two U.S. Navy freighters were sunk northwest of Bathurst Island by Vals from Hiryu and Soryu.
A Sledgehammer to Crack an Egg
When the Japanese bombers began to unload their deadly cargo on the port and the Zeros started strafing the harbor, the defending antiaircraft batteries of the 2nd AA and 14th Heavy AA Batteries, sporting 3.7-inch guns for highaltitude fire, and a small number of Lewis machine guns for low-flying intruders, opened fire from locations at Darwin Oval, Fannie Bay, and other strategic locations around the city. Joined by the 19th Light Horse Machine Gun Regiment, which had mounted its weapons on oil tanks near the port, the Australian guns sent a lot of lead into the air above the harbor but managed to damage only a few enemy planes and shot down one Val. The problem for the gunners was that their pieces were just too slow to effectively engage the attacking aircraft at short range.
Around noon, 27 Japanese Army Mitsubishi G4M1 Betty bombers from Kendari and 27 Mitsubishi G3M1 Nell bombers staging from Ambon appeared above Darwin. Flying at 18,000 feet, the bombers separated into two groups. They ignored the town and port, instead concentrating their attention on the military airfield. While one formation flew in from the southwest, the other roared in from the northeast, both arriving over the base and dropping their ordnance at the same time. They then turned and made a second pass over the field. Two hangars, four barracks, the mess hall, the hospital, and a number of storage buildings were obliterated. The attack also took out six Lockheed Hudson light bombers and damaged another while two P-40 fighters, the ones landed by B Flight, 33rd Squadron after their aerial encounter of that morning, and a U.S. Consolidated B-24 Liberator bomber were blown to pieces. Six RAAF personnel were killed.
After the attacking aircraft were recovered, Admiral Nagumo steered for Kendari, arriving there on February 21. The Darwin operation had been a complete success, topped off by the capture of Timor on the 20th. Both actions severed vital supply lines needed by the Allies to prevent the fall of Java, which was soon invaded from the sea and taken by the Japanese. After the war, Fuchida expressed some reservations about the action, appearing not to want to identify the leader of the Pearl Harbor raid as the leader of the Darwin raid. He candidly admitted that the Darwin blow ”seemed hardly worthy of us. If ever a sledgehammer was used to crack an egg it was then.”
Eliminating Darwin as a Supply Base
Unlike Pearl Harbor, where Nagumo’s airmen failed to hit fuel stocks, repair facilities, and other storage installations, these were thoroughly destroyed in the Darwin raid by 206 bombers dropping 681 bombs. As a result, Darwin was eliminated as an Allied supply and transport base from which aid to the Dutch East Indies could be delivered.
The cost to the defenders of Darwin was 191 killed and more than 400 wounded. About 68 of the dead and injured were civilians. Japanese aircraft losses are in dispute, ranging from two to seven planes, with crew losses totaling seven, of which two were killed, one taken prisoner, and the remainder rescued by friendly forces. Four Japanese aircraft losses, including a Val hit over Darwin that came down in the sea at East Point, a Zero struck over the harbor that crashed on Melville Island, and two divebombers shot out of the sky by Lieutenant Robert Oestreicher, have been verified.
The port of Darwin would later be rebuilt as a major supply depot ringed by numerous new airfields. After the February 19, 1942, raid the Allied navies largely abandoned the Darwin naval base, dispersing their units to Brisbane, Fremantle, and other ports. Darwin would be attacked by Japanese airpower 62 more times between March 1942 and November 1943, the heaviest raid coming on June 16, 1942, when the Japanese inflicted great damage on the harbor oil fuel and railroad yards. However, improved radar along with strengthened antiaircraft and fighter defenses assured that another Australian Pearl Harbor did not occur.

I love these stories of the WWII battles.
Those were P-40E’s, and were USAAF, not RAAF.
It is difficult to understand that after previous surprise attacks on American and British bases, the Australians were not better prepared. I supposed it was considered fortunate that the Japanese did not follow up with a troop landing.