By Arnold Blumberg
From atop the bluff overlooking a ford on the Buffalo River, Captain Alan Gardner, a staff officer in the British Army’s 24th Regiment of Foot, looked down at the chaos and carnage being played out below him. The river was choked with the dead and dying bodies of men and horses. The hillside opposite swarmed with a triumphant enemy out for blood. Groups of British horsemen and foot soldiers raced at breakneck speed down the treacherous rocky face of a hill overlooking the ford in a desperate effort to gain the river and cross it to safety. Close on their heels were fleet-footed African warriors. The British force that had bivouacked at Isandlwana was in total rout. The horrific scene taking place at the ford, which was later dubbed Fugitive’s Drift, better represented murder than honorable death in battle.
Gardner had last seen the men of the 24th Foot falling back slowly in the face of an overwhelming enemy assault at Isandlwana near the Buffalo River. The battle between the British Center Column and its Zulu attackers on January 22, 1879, had lasted for five hours. Gardner reasoned that by the time he reached the ford most of his comrades were dead. He began to think of what the enemy would do after his crushing victory. The detached flying column under Lt. Gen. Frederic Thesiger, 2nd Baron Chelmsford, was at Mangeni with the main Zulu army between it and Isandlwana. As the largest British force in the field, it would have to fend for itself. In the meantime, there were two outposts on the British line of communication to worry about.
The garrisons at Rorke’s Drift and Helpmekaar were in grave danger. They were isolated, lightly manned, and unfortified. The Rorke’s Drift mission station was closest to the looming menace, just about seven miles upstream on the Buffalo River with apparently nothing to prevent the Zulus from descending on it within two hours. Stationed there was a small force of British Army regulars, African militia, and civilians. Helpmekaar was 12 miles southwest of Isandlwana, held by at most two British infantry companies.
Gardner, along with the majority of survivors from the Isandlwana debacle, elected to head for Helpmekaar because going to Rorke’s Drift seemed to be tantamount to committing suicide. As Gardner turned his horse toward what he hoped was the safety of Helpmekaar, he sent a mounted soldier with a note of warning to the friendly garrison at Rorke’s Drift. Gardner was not the only one to warn the garrison at Rorke’s Drift. Other horsemen arrived at the outpost staying no longer than it took to deliver their doom-laden warning, then riding on. In some cases they cantered past the place without stopping, shouting their dreadful omen from a distance. None stopped to make a full report to an officer, thus avoiding any possibility of being ordered to remain.
The Anglo-Zulu War
The Battle of Isandlwana, from which Gardner and several hundred fugitive British regulars and native auxiliaries fled, was just the most recent episode in the complex relationship between the British Empire and its colony in South Africa. Early in the 17th century the English and Dutch established trading posts, notably at Cape Town, and used that port as an interim staging area from which to transport goods to and from India. The British took control of Cape Colony in 1795 to keep it out of the hands of Revolutionary France, which had conquered the Netherlands. Because of their leading role in maritime trade, the Dutch had extensive holdings in South Africa.
Before Great Britain annexed Cape Colony in 1806, the British had minimal interests in the colony. The colony’s main use to Great Britain was as a deepwater port on the shipping route to the Far East. Cape Colony was populated by Dutch settlers known as Boers and hostile natives. The territory had little to appeal to anyone other than the Boers until the second half of the 1860s, when both gold and diamonds were discovered. To protect the empire’s advantages, England annexed the Transvaal, a Boer territory north of the Cape Colony. The independent Boers resented British rule. As for the Zulus, they found both the Boers and British intolerable.
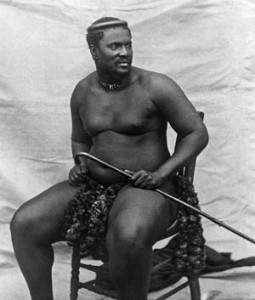
The Zulus and Boers had fought endless skirmishes for control of the lands of the Transvaal. By the 1870s, though, the Zulus were enclosed by British lands to the north in Transvaal, and to the south in Natal. Captain General Theophilus Shepstone, a British administrator of the native tribes, backed the Zulus in their claims of land against the Boers. But Shepstone eventually reversed his position, backing the Boers and leaving the Zulus feeling betrayed. Tension worsened when Cetshwayo took the Zulu throne in 1872. King Cetshwayo was a tyrant who commanded a highly disciplined, well-trained army numbering 40,000 men.
George Herbert, 5th Earl of Carnarvon, who was British Secretary of State for the Colonies, appointed Sir Henry Bartle Frere high commissioner of Cape Colony in 1877. Frere was responsible for the welfare of the tribes within the colony. He set about placing them under a more stable form of government. To achieve this, he planned to disarm the native tribes and administer their resources.
Frere sent Cetshwayo an ultimatum in December 1878 in which he demanded that the Zulu kingdom disband and that the tribesmen obey British law. When no reply to the request was forthcoming, Frere looked to the British military to force the Zulus to comply with the decree. This task fell to Lord Chelmsford, commander in chief of British forces in South Africa. Chelmsford had the impossible job of defending Natal against a large Zulu army along a porous 300-mile border.
To accomplish Frere’s objectives, Chelmsford decided to launch a preemptive strike. His army was composed of 7,000 British regulars, 9,000 native levies, 1,100 militia, and two light artillery batteries. Chelmsford had no mounted units. As for the Boers, they declined to furnish troops. Without the assistance of the Boers and lacking mounted troops to screen his main force and reconnoiter the enemy positions, Chelmsford risked defeat.
Chelmsford divided his army into five columns. He designated three columns for the attack against the Zulu capital at Ulundi where Cetshwayo was based. The other two columns would defend the Natal or the Transvaal against an invasion by a portion of Cetshwayo’s army. The British general hoped to encircle Cetshwayo’s army and crush it. Chelmsford had experience fighting in South Africa, having engaged the Xhosa tribe in battle. The Xhosa had been unable to withstand British firepower, and Chelmsford assumed his regular troops would decimate the Zulus in a similar fashion.
Colonel C.K. Pearson’s right flank column had orders to cross into Zululand via the Lower Drift of the Tugela River. Colonel R. Glyn’s center column, which was accompanied by Chelmsford, was to cross into enemy territory by fording the Buffalo River at Rorke’s Drift. Colonel H.E. Wood’s left flank column was to enter Zululand via the Ncome River.
The two defensive columns would seek to block a Zulu counterattack into Natal. Colonel Anthony Durnford’s column would take up a defensive position near the Middle Drift of the Tugela River, and Colonel H. Rowlands would deploy at Luneburg in the Transvaal. Rowlands was tasked not only with stopping any incursion by the Zulus, but also keeping a sharp eye on the truculent Boers. By the end of the first week of January, the British columns were in their respective positions. Chelmsford issued orders on January 11 for the attacking columns to cross the border into Zululand.
The Horns of the Bull at Isandlwana
Steady rains halted the British columns just inside the frontier. It was not until January 20 that Chelmsford advanced to the base of the tall rocky outcrop known as Isandlwana. He had sent scouts from the Natal Native Contingent to look for the Zulus, and they reported sighting a heavy concentration to the southeast. Chelmsford therefore took approximately 2,500 men and early on the morning of the January 22 marched off to the southeast. He left Lt. Col. Henry Pulleine of the 24th Foot to command the 1,700 men that remained behind at Isandlwana. The British had made no attempt to fortify their position, partly because of the absence of Zulu forces on the frontier and also because they did not plan to stay long at that location.
The Zulus had camped the night before in a valley five miles from Isandlwana. Ntshingwayo KhozaIt led the 20,000 Zulus. He had no specific plans to attack the British that day, but he decided to attack nevertheless.
Pulleine formed his men in an extended line some distance southeast of the camp at Isandlwana. In the mistaken belief that they were encountering a small force of Zulus, he deployed his men in open order that diluted the effect of their lethal firepower. The lightly held British flanks were highly vulnerable to attack.
The Zulus employed their standing attack formation known as the horns of the bull. They first formed up on the ridges northeast of the British camp. The part of the army serving as the chest of the bull charged the center of the British line, while two sizable forces, which constituted the horns of the bull, outflanked the British line. The British soon found themselves encircled.
When the Zulus gained the British rear, a fierce melee ensued that negated the British advantage in firepower. By this time, British regulars had begun to flee to the camp with Zulus close behind. The weight of Zulu numbers led to the wholesale slaughter of the British force. After several hours, only 55 Europeans and 300 African auxiliaries remained from Pulleine’s force.
Afterward, the Zulus plundered the dead and mutilated their bodies. The Zulu reserve known as the Undi Corps, which was disappointed that it had not been allowed to participate in the fighting, disobeyed orders and crossed the Buffalo River into Natal. The intention of the disobedient troops was to ambush a British relief column if one should appear. As they wandered about, they passed Rorke’s Drift. Zulu scouts reported the depot was lightly fortified and manned by a weak garrison. Seizing the opportunity, Dabulamanzi, who was King Cetshwayo’s half brother and the commander of the Undi Corps, decided to attack.
Rorke’s Drift: A Strategic Crossing-Point
The Zulus who marched on Rorke’s Drift during the afternoon of January 22, 1879, did not realize it, but their objective was an important link in the logistical chain supporting the British invasion of their homeland. The supply line ran from Durban through Natal, and the mission station at Rorke’s Drift served as a vital crossing point for men and material over the Buffalo River into Zululand.
The British had several means to transport men and supplies across the Buffalo River at Rorke’s Drift. One method was a prefabricated pontoon cable that spanned the river. It could transport an ox-drawn wagon or half a company of troops. In addition, troops could use a cask ferry made of timber and barrels to transport men and supplies across the river. Both the pontoon and ferry were operated by a hawser. The garrison also used a small boat that could carry about 15 men.
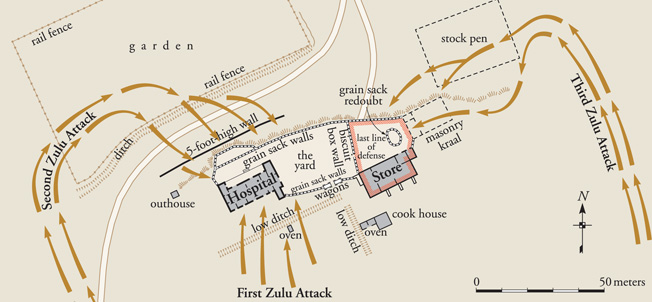
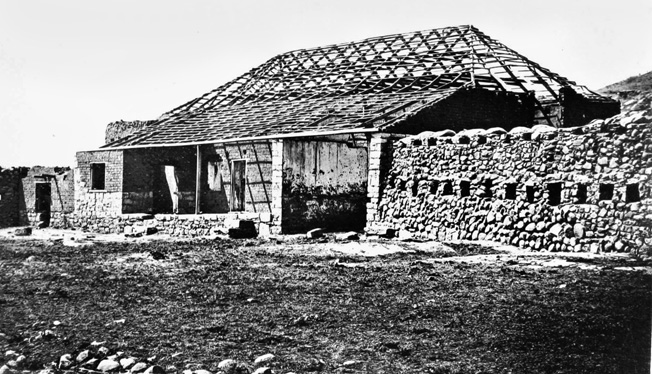
The mission comprised an outhouse, hospital building, storehouse, and a small masonry cattle kraal. Behind the storehouse was a cookhouse, and 10 yards northeast of the kraal was a large stock pen. The complex was nestled beneath the steep slopes of Shiyane Hill. A dirt road ran down to the drift north of the mission, with the Shiyane high ground on its right. On the opposite side of the river the road swung eastward in the direction of Isandlwana. The ground between the hospital and the stone wall was sloped. Just below the road was a stone wall that reached the cattle kraal.
When Chelmsford’s Center Column forded the Buffalo River on January 11, it left behind 94 men of Company B, 2nd Battalion, of the 24th Infantry Regiment to guard Rorke’s Drift. Fresh troops would soon arrive so that the men could rejoin their regiment. The Rorke’s Drift garrison also included 500 native troops; these raw troops were armed with traditional African weapons.
Lieutenant Gonville Bromhead commanded Company B. He had 11 years of service in the British Army. Neither flashy nor ambitious, Bromhead was a seasoned infantry officer who knew his business and was a decent, warm-hearted individual, traits that earned him his men’s loyalty and trust. He was assisted by Color Sergeant Frank Bourne, who was next in command of the regulars.

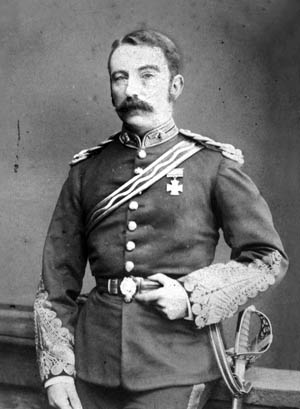
Supply operations at Rorke’s Drift and Helpmekaar were handled by Major Henry Spaulding, a staff officer who had remained behind when the Center Column crossed the frontier. Spaulding, who left for Helpmekaar on the afternoon of January 22, put Lieutenant John R.M. Chard of the Royal Engineers, who had arrived at the drift three days earlier, in command of Rorke’s Drift.
Chard would command the forces at Rorke’s Drift in the battle despite the fact that Bromhead had been in the Army slightly longer and seniority entitled him to command the post. Chard, a graduate of the Royal Military Academy at Woolwich, had no combat experience.
The Defenses at Roke’s Drift
At mid-afternoon on January 22, Bromhead and Walter Dunne, a regular officer of the Army’s supply and transport department, were heading to investigate sightings of the enemy on the opposite bank of the Buffalo River, but their attention was drawn to the hospital building where Private Edward Evans, a mounted infantryman from Center Column, had just ridden into Rorke’s Drift.
“The camp is taken by Zulus!” shouted Evans in reference to the disaster at Isandlwana as Bromhead approached the horseman. Other horsemen rode past the mission post without stopping. Some of them also shouted that the British had been defeated at Isandlwana. One of the riders delivered Captain Gardner’s note before he also galloped off.
Bromhead, Surgeon James H. Reynolds, and Commissary Officer James L. Dalton discussed the distressing news. Dalton, a former regular who had experience constructing field fortifications, suggested the troops use the 200-pound grain sacks and 100-pound biscuit boxes from the storehouse to shore up the defensive perimeter.
Bromhead embraced the idea wholeheartedly. He scribbled a note for Evans to deliver to the commander of the British infantry company at Helpmekaar informing him of the Isandlwana disaster. Neither he nor the others thought of abandoning Rorke’s Drift to the enemy.
Bourne issued each man 70 rounds of ammunition for his single-shot, Model 1871 Martini-Henry rifle. The nine-pound rifle was capable of firing 12 rounds per minute and had an effective range of 400 yards. The rifle also came with a sword-style bayonet useful for close-quarters combat. Bourne had more than 20,000 bullets in reserve. As soon as they received their ammunition, the men began fortifying the perimeter by building a waist-high barricade using the grain sacks and biscuit boxes.
Chard was eating his lunch at the river bank when a message arrived at 3:15 pm from Bromhead requesting that he return at once to the mission post. When Chard reached the post, he immediately inspected the defensive works being erected. He found the preparations satisfactory, although he did make a few minor suggestions for improving the defenses. He then returned to the river and ordered the guards, who had moored the pontoon, ferry, and boat in the middle of the river to prevent them from being used by the enemy, back to the mission.
As the men began barricading the post buildings, Lieutenant Alfred Henderson’s 100-man Natal Mounted Contingent rode up from the river. Henderson and his men had fled the fighting at Isandlwana as the British Army’s battle line began to unravel.
Their arrival boosted the garrison’s morale. The additional troops would strengthen the garrison substantially. Henderson, who sat astride his horse, told Chard that Chelmsford’s force had broken up into small parties of survivors that were making their way back to Natal. Afterward, Henderson and his troopers rode away, leaving Chard and his men to their fate. Meanwhile, the men assigned to the work detail continued to construct a waist-high defensive perimeter between the storehouse and the kraal to the east and the hospital to the west.
The hospital was fully enclosed by the perimeter, but the storehouse remained adjacent to the perimeter but outside of it. The distance between the storehouse and hospital was 35 yards. The hospital contained 11 rooms, and the storehouse had about a half dozen rooms. Both structures had loopholes for rifles and thatched roofs. In the coming battle, 10 patients who were well enough to fire a rifle and six privates would be responsible for defending the hospital.
Unfortunately for the defenders of the post, there was no time to clear the dense scrub that lay between the north wall and the dirt road. Making matters worse, a five-foot-high stone wall bisected the scrub. The wall, which could shelter a large number of men from British fire, was a substantial weakness in the garrison’s defenses.
Zulu Warriors
The Undi Corps that appeared at Rorke’s Drift comprised the iNdluyengwe, uThulwana, uDloko, and iNdlondlo Regiments. The regiments varied in size from 900 to 1,500 men. The men of the Undi Corps could not resist the temptation to sack and loot the lightly defended mission post.
Shortly after the departure of Henderson’s troopers, the native troops that were an integral part of the garrison deserted. They jumped the barricades and dispersed into the countryside. This left Chard with just 154 men, 20 of whom were badly wounded. As a result of their departure, Chard would have to station his men at least two yards apart to defend the entire perimeter. He ordered his men to build a new wall of biscuit boxes to bisect the oval perimeter. The wall ran from the front corner of the storehouse to the north wall. The retrenchment wall created a smaller compound in front of the storehouse intended to serve as a fallback position if the pressure on the full length of the defenses became too great.
The soldiers completed the preparations in 90 minutes. At 4:30 pm the soldiers took their positions and braced for an imminent attack. Private Fred Hitch, who was stationed atop the hospital as a lookout, spotted the approaching Zulus and fired three warning shots before lowering himself to the ground. Just three hours of daylight remained.
The Zulus did not have a professional standing army. The Zulu king required his unmarried warriors to serve him for several months each year before they were allowed to return to their villages. During this time, they were organized into regiments and camped together on the king’s lands. While serving in their ibutho, as a regiment was known, they performed various services for the king and went to war if necessary. When a Zulu warrior married, he was no longer required to perform active service, but he was to remain available to be called up as part of the reserve forces. The degree of peril posed by the British invasion of January 1879 was such that the king called up all reserves to augment his army.
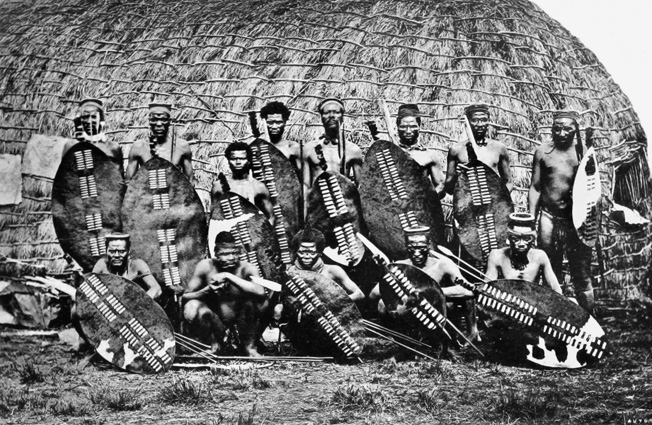
Although Zulu warriors possessed elaborate costumes with feathered headdresses, they did not wear these into battle but instead saved them for special ceremonies. Zulu warriors went into battle wearing a loin covering consisting of a thin belt fashioned from animal hide around their waist with a large patch of cowhide covering their backside and twisted strips of animal skin hanging down from their waist in front. Some warriors wore headbands, and officers placed different feathers in their headbands to signify their rank.
Although the Zulus had rifles, they relied on their traditional weapons—the broad-bladed stabbing spear known as the assegai, light throwing spear, short club known as the knobkerrie, and an oval cowhide shield—for close-range fighting. The Zulus had had easy access to rifles for several decades leading up to the Anglo-Zulu war. The rifles were either smuggled into Zululand from the Natal or obtained from the Portuguese in Mozambique. The rifles, though, were outdated patterns, such as the Brown Bess flintlock. Zulus riflemen carried their shot in leather bags and powder in cowhorns.
The Zululs Begin Their Assault
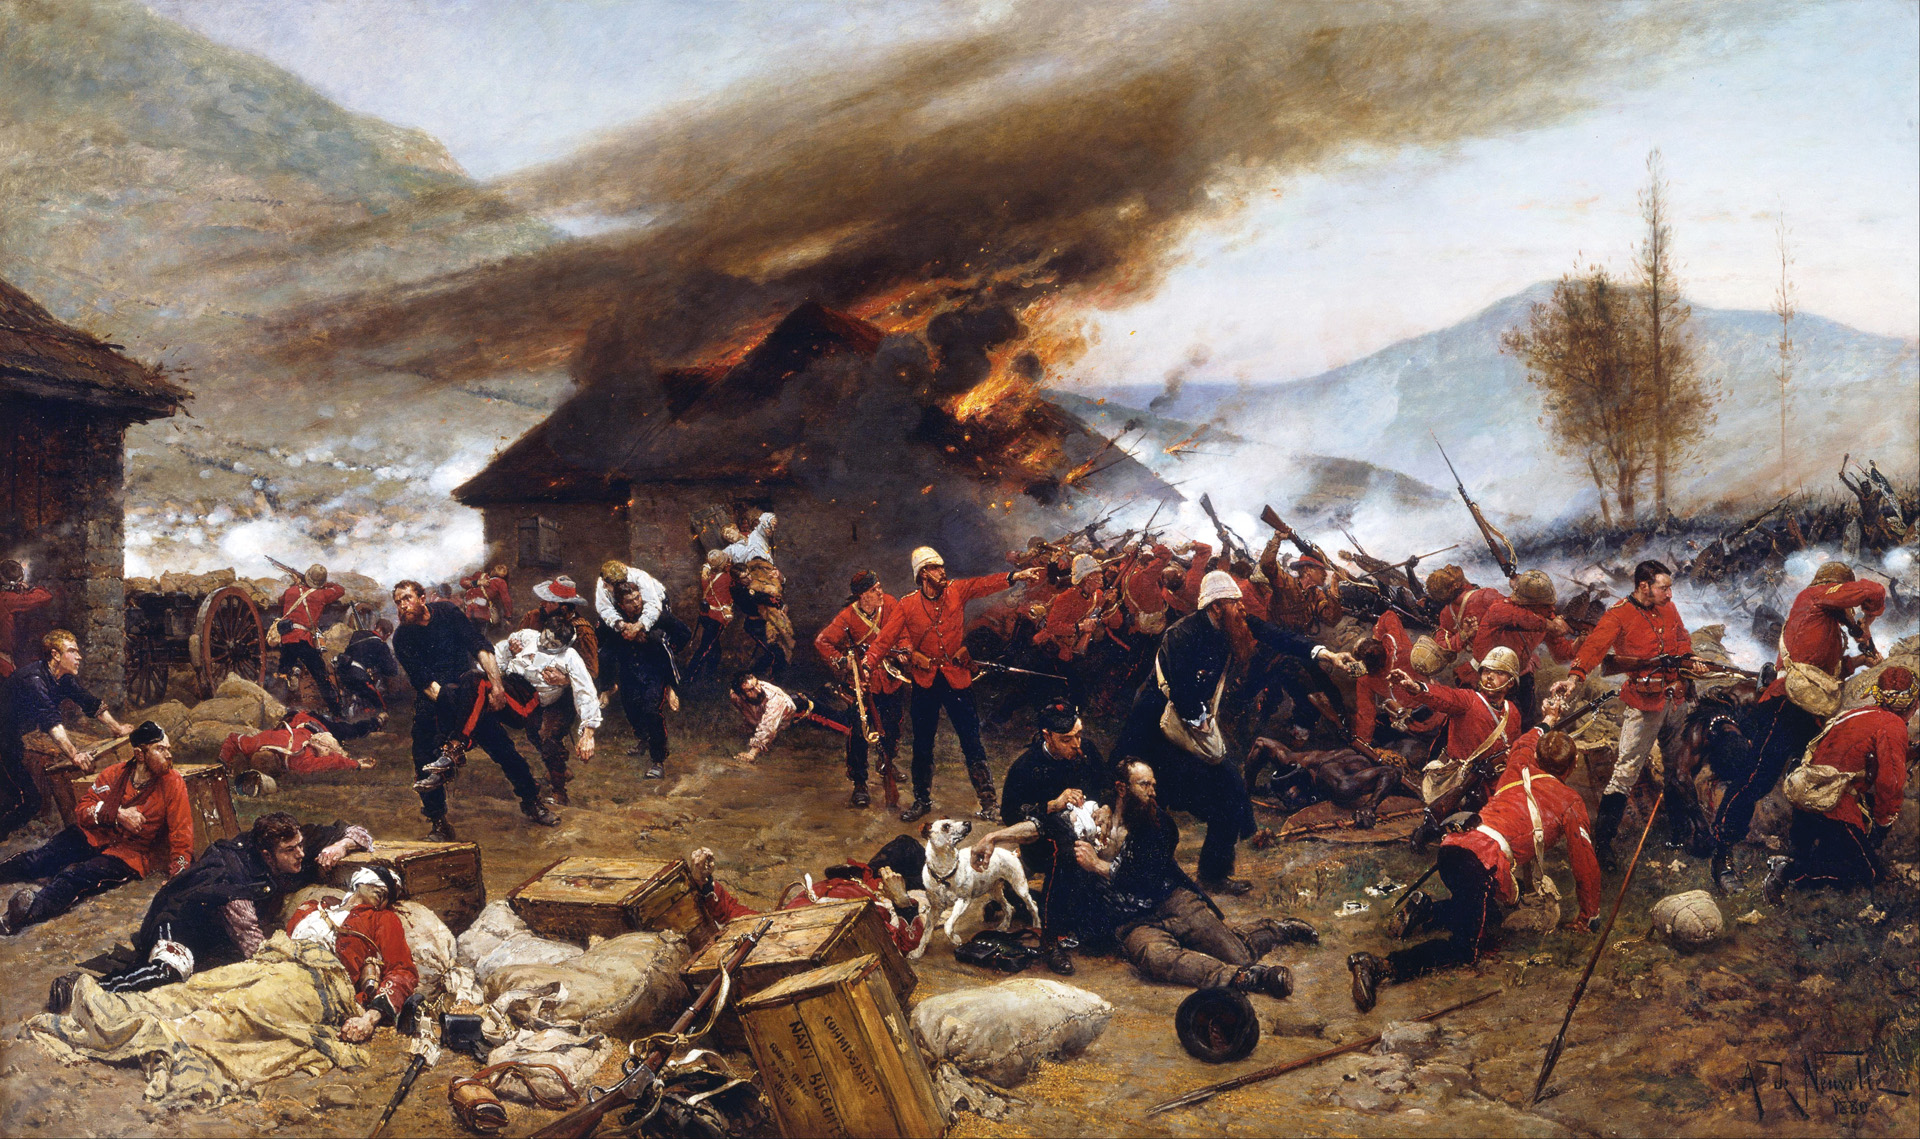
Six hundred Zulus from the iNdluyengwe Regiment armed with black shields swept forward in the initial assault. These warriors attacked directly from their march to the mission post, racing toward the hospital and south wall. Chard gave the order to fire to 30 men behind the south wall when the enemy was 600 yards away. The riflemen maintained a steady fire, which began to tell on the Zulus at 400 yards. The Zulus did not rush headlong across such a broad swath of ground; instead, they darted from one place of cover to the next while continuing to close the distance.
As the Zulus closed to within 200 yards, more British rifles from other sectors of the perimeter were able to bring their fire against the attackers. The Zulus soon found themselves caught in a deadly crossfire from the hospital and the west wall near the storehouse. By the time the Zulus had closed to within 50 yards, their front rank had disappeared. Several dozen Zulus fell every few seconds. Unable to bear the hailstorm of bullets any longer, the iNdluyengwe fighters stayed under cover. The British had successfully weathered the first of what would be many attacks.
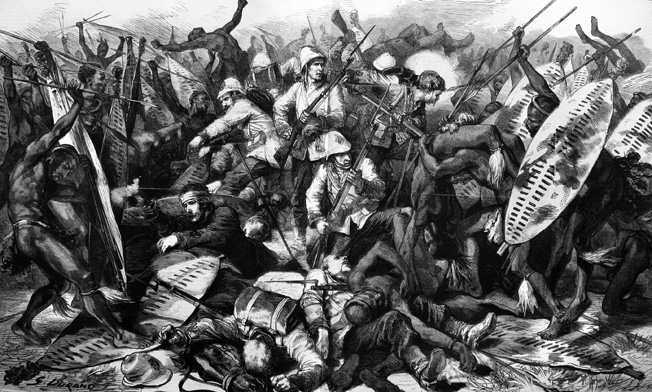
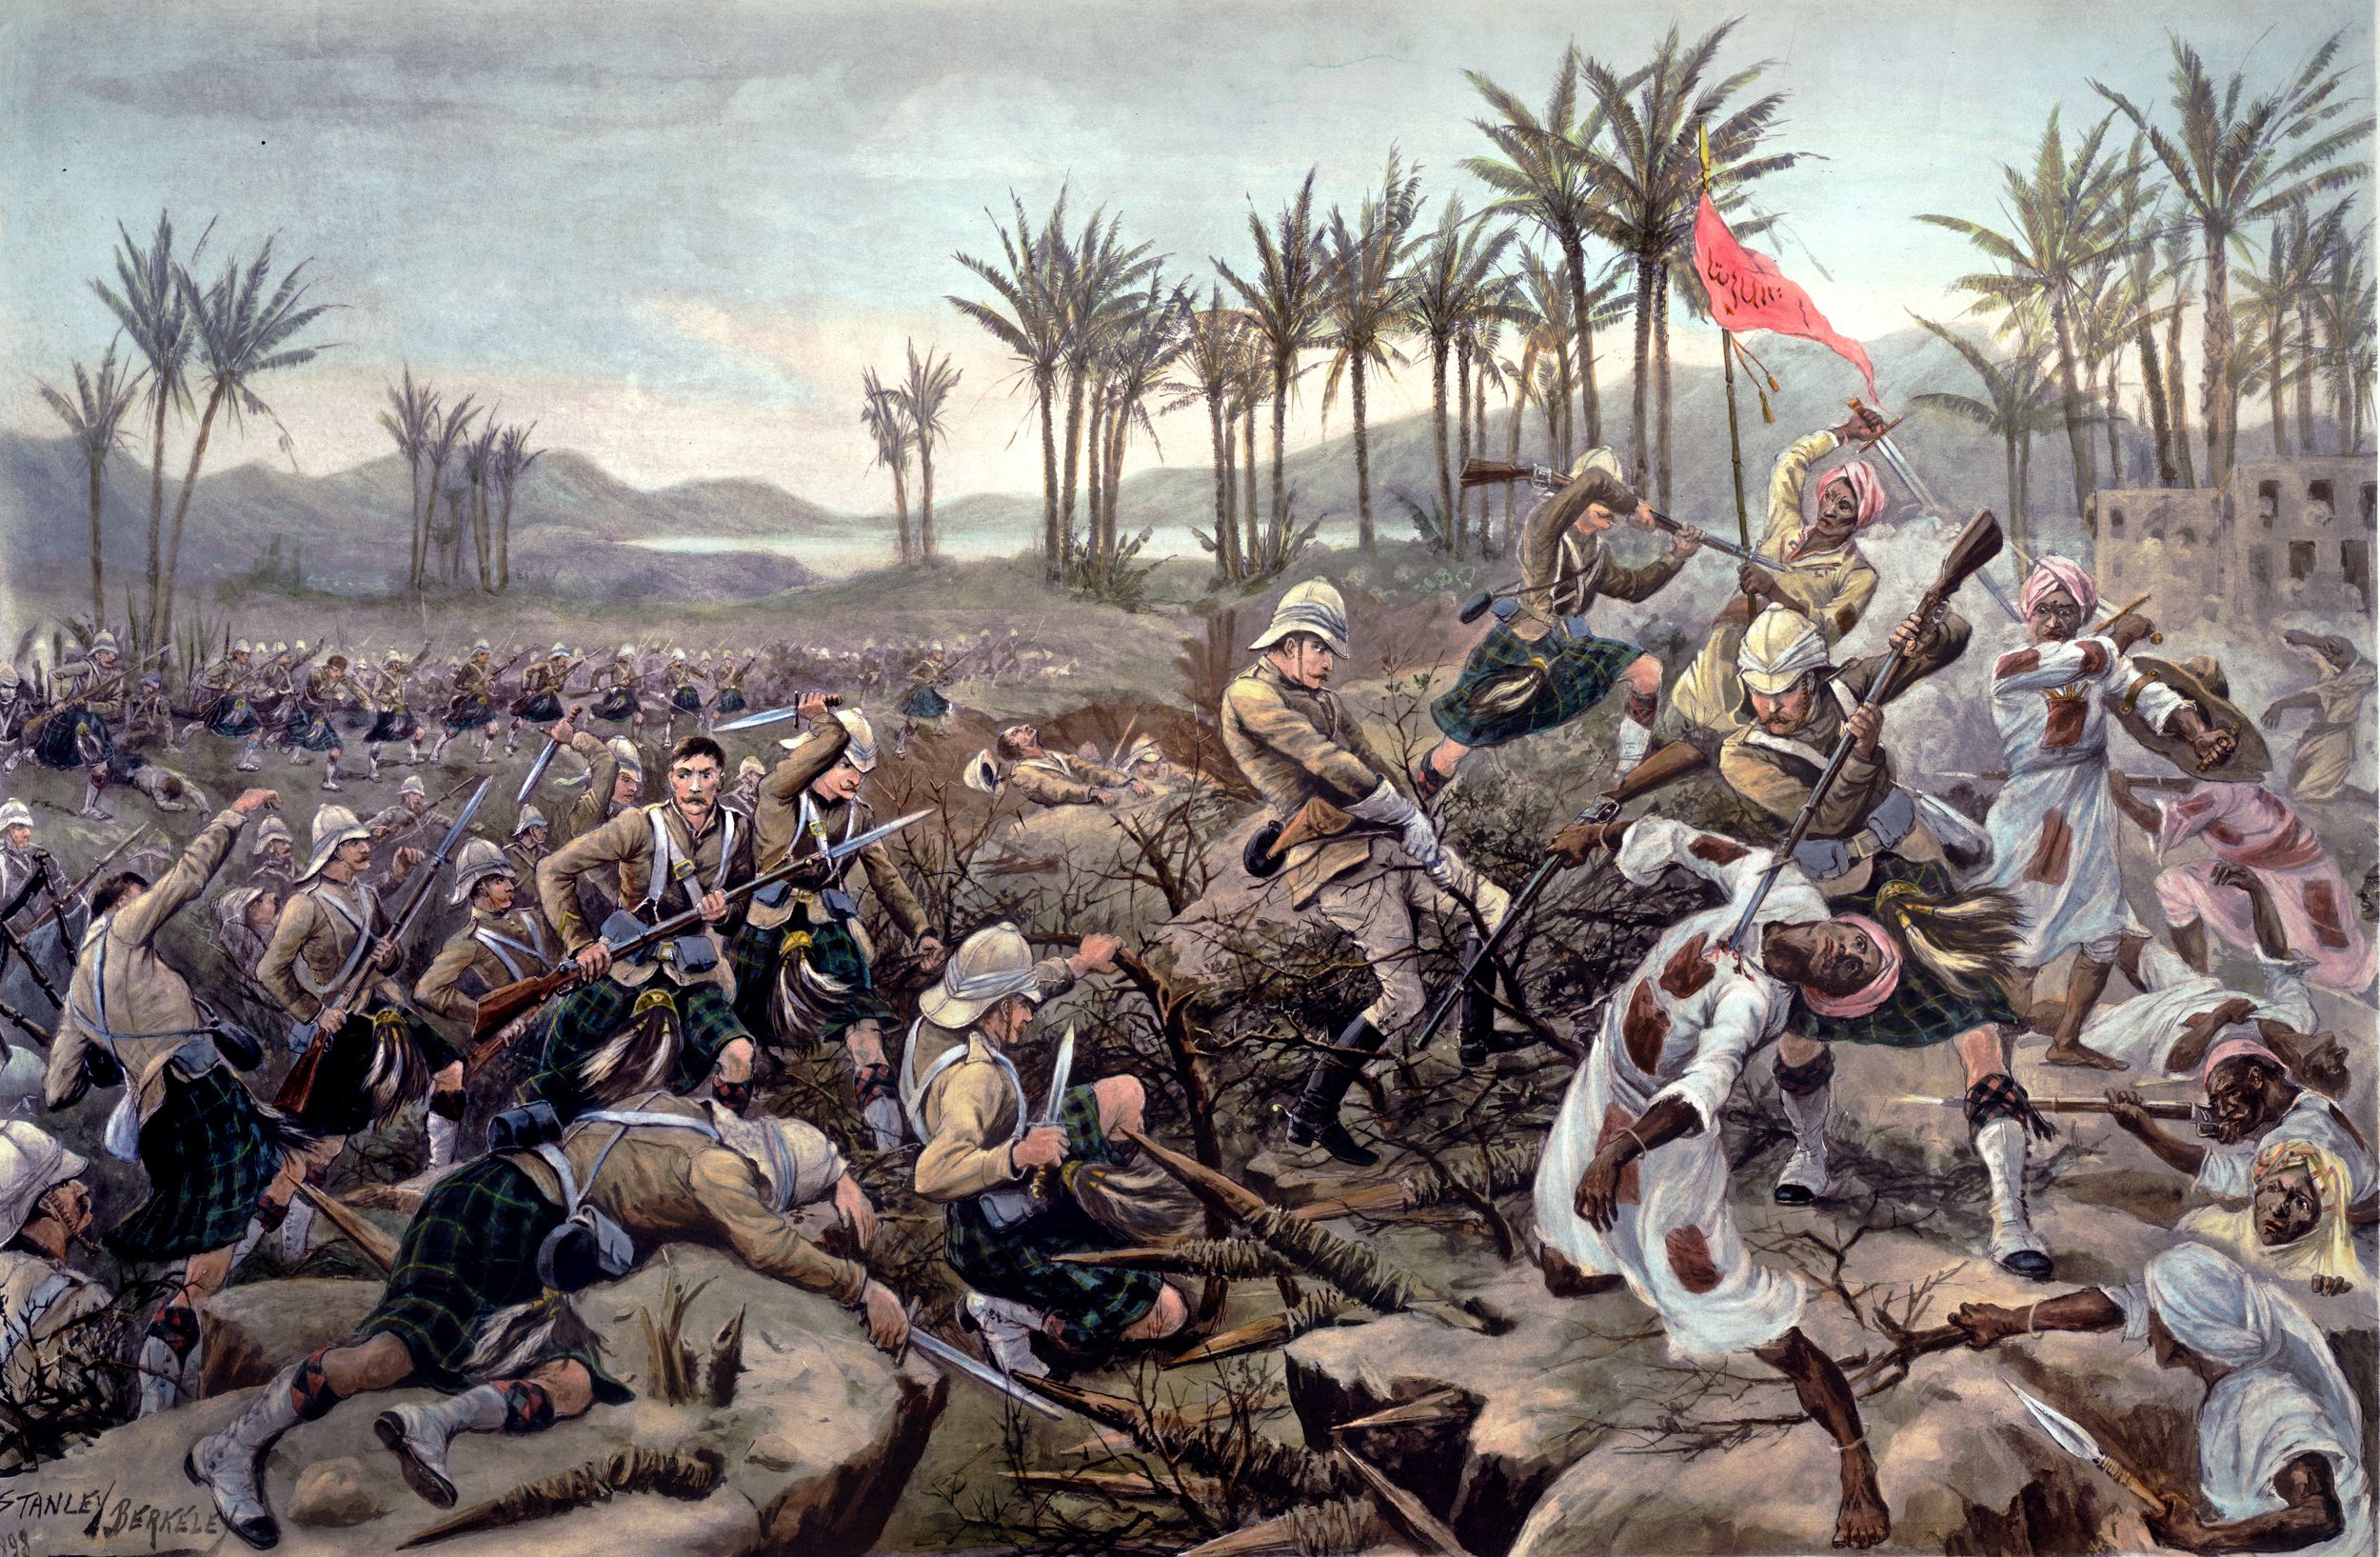
Just as the right wing of the iNdluyengwe offensive was being defeated, the left wing advanced. These warriors had veered around the hospital and taken cover in the dense scrub on the north side. Bromhead, Bourne, and Dalton rushed to the vicinity of the hospital compound to oversee its defense. Their confidence inspired the men around them. The Zulus concentrated their effort on the hospital compound. Through sheer weight of numbers, they threatened to overrun it. The two dozen British defending the compound poured a withering fire into the 200 Zulus making the desperate assault.
The determined warriors climbed the barricade and jabbed their assegais at the defenders. Hand-to-hand fighting occurred as the British jammed their bayonets into the bodies of the attackers. The Zulus’ hide shields were no match for British cold steel and heavy caliber bullets fired at point-blank range. The Zulu tide receded for a few minutes. When reinforcements arrived, the frenzied attackers surged forward again. Their second assault was met by a fusillade of lead and was immediately followed by another round of stabbing and slashing across the barricade. For 25 minutes the iNdluyengwe sustained the fight alone at the hospital, but the stalwart Redcoats fighting in front of the hospital ultimately prevailed.
While they were engaged, though, some Zulus with muskets positioned themselves at the north wall and fired on the British. Although the Zulus generally were not accurate shooters, the British found the Zulus’ rifle fire disconcerting. The Zulus attacked in force across the north wall at 5 pm. It fell to 60 Redcoats to keep them at bay with their bayonets.
The Zulus kept to the areas where they could find cover, taking particular advantage of the cover provided by the stone wall in front of the hospital. The attackers kept clear of the area where the wall extended to the right of the retrenchment barricade because it was open and exposed to British rifle fire. Because of their reluctance to charge over open ground, they were never able to concentrate an overwhelming number of men at any one point to break through the makeshift British defenses.
Like the other assaults that preceded it, the British managed to repulse the attack against the north wall. The fighting fell into a predictable pattern. After the British regulars fired a short burst of fire at close range, the Zulus would charge again. They would step over their dead and dying fellow tribesmen to reach the barricade. Each melee was followed by a firefight conducted at close range. Zulu rifle fire came not only from the north wall, but also from well-protected positions among the rocky outcroppings and shallow crevices of Shiyane Hill. The British regulars manning the south wall returned the plunging fire from the hill.
The Fight For the Hospital
Although Zulu losses continued to mount, the sequence of charge, melee, repulse, and firefight went on unabated. In the first phase of the battle, the heaviest pressure on the British perimeter came from the Zulus attacking from the north. Chard said afterward that he doubted if his men could have held both sides of the perimeter successfully if they had been attacked simultaneously.
Bromhead had established a reserve of 15 riflemen who could counterattack from the dogleg barricade adjacent to the hospital. From that position, the British could not only rake the hospital veranda with their fire, but also launch bayonet counterattacks to sweep the veranda clear of attackers. Bromhead and Bourne ordered counterattacks every few minutes. The result of the relentless British counterattacks was that Bromhead’s men initially managed to fight the enemy to a stalemate in the area around the hospital. To the British, stalemate was as good as victory.
Frustrated at their lack of success at the hospital, the Zulu commanders extended the fight to the front of the storehouse compound where a sudden rush almost resulted in its capture. Only the timely intervention of Chard and Bromhead, who directed a few lethal rifle volleys, saved the position. Concerned by this new attack and what it almost cost the British, Chard decided to withdraw most of his men to the retrenchment barricade even though the move would make it harder to defend the hospital because the front of the building would be behind the rest of the garrison and vulnerable to attack from all sides. But Chard knew that holding the storehouse was more important because it was better fortified than the hospital. Nevertheless, the withdrawal to the retrenchment exposed the 30 British troops remaining at the hospital to serious danger.
Ninety minutes into the battle the British had sustained only two seriously wounded while many others had been cut or grazed. It was near this junction that the intrepid Dalton was wounded in the shoulder and back. Another man was soon killed by enemy gunfire. As for the Zulus, they had lost scores of dead and wounded. The piles of dead Zulu bodies in front of the barricades attested to that stark reality.
At 6:15 pm the Zulus attacked in force against the north wall at its intersection with the retrenchment wall. The frenzied attackers launched repeated sorties that stretched the British perimeter opposite the storehouse. Bromhead repeatedly exposed himself to enemy fire and spear thrusts as he led British riflemen defending that section of the perimeter.
While one group of Zulus was assaulting the north wall opposite the storehouse, another group made a determined attack 15 minutes later on the defenders at the opposite end near the hospital. The agile Zulus climbed atop the thatched roof of the hospital and set the dry material afire.
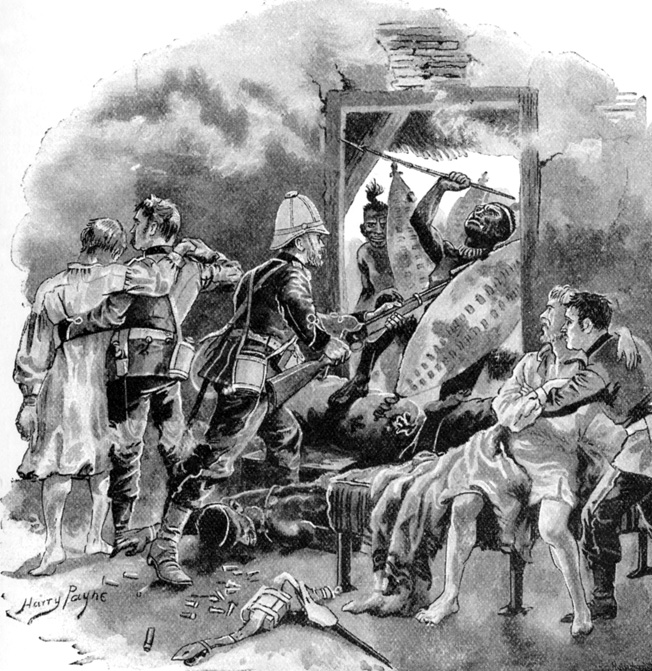
Meanwhile, Zulus battered the front wall of the hospital. British inside the hospital fired from the loopholes, felling a large number of warriors. Fighting raged for another hour at the hospital as the Zulus tried desperately to capture it. Covered by a few brave men who held off dozens of attackers, the British soldiers and patients inside shifted to different rooms within the structure as necessary. Fighting ebbed and flowed throughout the hospital with the British using bayonets and rifle butts against the Zulus’ sharp assegais.
The surviving hospital defenders and patients eventually escaped by exiting the building through a small window. At that point, they had to fight their way through the Zulus to the safety of the opposite end of the defensive perimeter. The Zulus killed six defenders during the savage melee in the abandoned courtyard.
Last Charge of the Zulus
While the men in the hospital were battling for their lives, the rest of the garrison was fighting hard to retain its grip on the storehouse compound. By 7 pm the perimeter consisted of the portion protected by the retrenchment, part of the north wall, the outside walls of the cattle kraal, and the storehouse. The new defensive position was easier to defend; however, Chard had ceded valuable cover within yards of the new perimeter. This made it easier for the Zulus to rush a short distance from their cover to their objectives within the British-held sections of the compound.
The Zulus launched a fresh attack in the gloaming. They assembled behind the walls of the stock pen and rushed the Redcoats defending the kraal. The Zulus dove for cover a few yards from their objective. When they charged the last short stretch, the British were only able to fire one volley. In a desperate bid for victory, the Zulus made multiple assaults, suffering significant casualties in the process.
Responding to the new point of attack, Chard detailed some of the men to build a redoubt from the grain sacks at the northeastern corner of the storehouse. The redoubt constituted the last line of defense for the valiant defenders of Rorke’s Drift. Meanwhile, the Zulus concentrated their attacks on the eastern end of the perimeter where the soldiers in the cattle kraal had to fight as hard as the men in the hospital compound had to a short time before.
Encouraged by their success at the hospital, the Zulus tried to set fire to the storehouse, but every attempt was stopped dead by British bullets. At 8 pm the Zulus launched a heavy attack on the northeastern sector of the perimeter. The British once again repulsed the attack, but only narrowly. Hoping to bring the men in the new redoubt into play and shorten his line, Chard ordered the troops at the kraal to fall back to its inner partition wall.
The combined fire from the two British positions further depleted the Zulu ranks. An hour later, Chard ordered the men defending the inner partition wall to withdraw to the kraal’s nearside wall, which was directly below the redoubt. This meant that any Zulu warrior attempting to breach the British defenses had to expose himself to the deadly rifle fire as he scaled the outer wall, then dashed to the partition wall, and then climbed the partition wall.
The British met each new Zulu charge with a heavy volume of close-range gunfire. The result was that the Africans could not make it across the open ground between the walls and therefore were thwarted in their attempts to reach the British behind their barricade. The British rifle fire took its toll on the Zulus and sapped their determination.
One Thousand Zulu Casualties
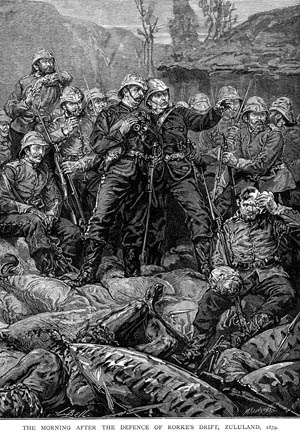
Throughout the night and into the early morning hours of the following day, Chard and Bromhead remained vigilant. They monitored their tight perimeter for any sign that small groups of Zulus might be infiltrating the barricades. The only threat, though, was from enemy snipers.
Chard and Bromhead had no idea whether a relief force would arrive. At dawn they prepared for another wave of Zulu attacks. The two officers urged the men at the barricades to stay sharp. All were prepared to go down fighting rather than shamefully surrender.
The predawn return to the barricades was tense as the garrison watched anxiously for the expected Zulu attack. But it soon became evident that the enemy had withdrawn.
Still, Chard and Bromhead sent out patrols to determine if the Zulus were still in the vicinity and to give warning if a fresh attack was in the making. A large formation of Zulus moved into position at 7 am on the forward slopes of kwaSingqindi Hill two miles south of the mission. These Zulus were later determined to be a regiment serving as the rear guard for the Undi Corps as it marched back to their homeland.
At the same time the Zulus were observing Chard and his men from kwaSingqindi Hill, Lord Chelmsford was marching his force to Rorke’s Drift not knowing whether the garrison was still alive or dead. Amazingly, Chelmsford’s route took him only a few hundred yards from the Undi Corps, which was in the act of withdrawing from Rorke’s Drift.
Although some of Chelmsford’s subordinate commanders urged him to attack the nearby enemy, whose back was to the Buffalo River, he declined. His men were low on ammunition, he was unsure how many enemy he faced, and his troop’s morale was low after news of the catastrophe at Isandlwana. The upshot was that the two antagonists simply allowed each other go on their way in peace.
By midmorning, the head of Chelmsford’s column, made up of Lt. Col. John Russell’s Imperial Mounted Infantry, crossed the Buffalo River and entered the mission at Rorke’s Drift. Chelmsford’s army was in no shape to continue its offensive because the Zulus had destroyed half of the Center Column at Isandlwana, and because the other two columns had retreated to British territory. At that point, the British focused on the short-term objective of refortifying Rorke’s Drift for future operations.
The British suffered 17 killed and 15 wounded at Rorke’s Drift. London bestowed 11 Victoria Crosses on the garrison. The Zulus suffered approximately 1,000 casualties. In the process, they proved themselves to be a worthy adversary of the British. Their indomitable courage was equal to that of the scratch British force that fought them to a standstill at the nondescript South African river crossing.

The film versions of both actions featuring Michael Caine at Rorke’s Drift and Charlton Heston at Isandlwana were quite credible accounts of the battles despite necessary constricture of events to meet the film lengths. It also implied, without being preachy, that colonialism and its policies were not the best way of interacting with lesser developed societies.
What movie featured Charlton Heston at Isandlwana? Somehow I’ve missed that one.
Charlton Heston was in the movie Khartoum (1966) as Lord Gordon. The movie Zulu Dawn (1979) was with Peter O’Tool and Burt Lancaster. Neither was as good as Zulu. A fantastic movie of courage and bravery. And a true story to boot!
As for ‘colonialism’ and ‘lesser developed socities’ – remember it was the Mongal Hords that sacked Rome and destroyed civilization. There was always friction around the world between socities and there still is today. Arm yourself and protect yourself and attempt to be fair. But the world belongs to the strong. It’s the nature of man. To beleive otherwise is to encourage mass suicide.