By Mike Phifer
The drone of a Royal Air Force bomber could be heard overhead in the early morning of August 8, 1918, as it flew up and down the Allied line near Amiens, France. The lone aircraft sought to cover the rumbling and clanking of hundreds of tanks moving forward to the start line to support an imminent attack. The noise of the bomber soon faded as it flew away, only to be replaced with the deafening crash of artillery.
All hell broke loose on the German lines at 4:20 am when a heavy barrage erupted, lighting up the dawn. It was a “terrific racket,” wrote Lt. Col. Andrew McNaughton, the Canadian Corps counterbattery officer, in a letter to his wife. “[The] Boche is getting his now,” he told her. The German guns returned fire, but owing to McNaughton’s counterbattery planning, the enemy’s artillery fire was mostly neutralized.
Through a heavy fog blanketing the terrain near Amiens, soldiers of the 1st, 2nd, and 3rd Canadian Divisions pushed forward. With visibility down to just a few dozen feet, the Canadians followed the rolling barrage that hurled a curtain of death forward in 100-yard intervals. One of the most significant Allied offensives of the Great War was beginning.
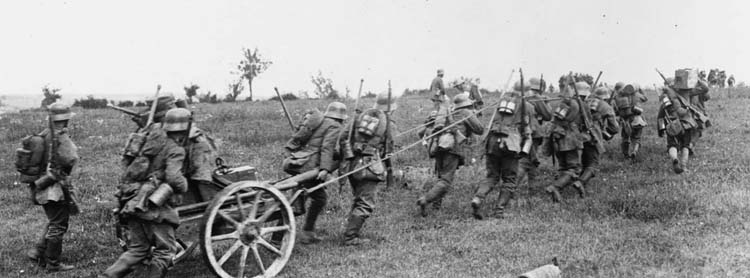
The Allied offensive would be a key turning point, considering the Germans had launched a massive offensive five months earlier. The impetus of the Kaiserschlacht Offensive that began on March 21 was to strike a blow against the British, Commonwealth, and French forces on the Western Front before the men and matériel of the United States turned the tide of battle irreversibly in favor of the Allied powers.
At that point, the Germans had the advantage in numbers because the Treaty of Brest-Litovsk signed March 3 had freed up 50 German divisions previously committed to the Eastern Front. The Kaiserschlacht Offensive would ultimately fail in large part because the German logistic system was unable to support the rapidly advancing German stormtroopers in the early weeks of the offensive. The Germans had come to within nine miles of Amiens in the British sector in early April before they were halted. Although the danger of a German breakthrough to Paris had ended later that month, the Germans continued to make gains. Before the offensive drew to a close in mid-July, the Germans had advanced to within 40 miles of the French capital.While the Germans were still attacking, Allied Generalissimo Ferdinand Foch had approached British Field Marshal Sir Douglas Haig in May about crafting plans for an offensive in mid-June. Haig in turn ordered Fourth Army commander Lt. Gen. Henry Rawlinson to investigate the possibility of attacking east of Amiens. The British assault was to be carried out in cooperation with the French First Army to the south. The plan was temporarily set aside, though, to deal with the continuing German offensive.
Rawlinson had thoughts of renewing the plan when he later met with the Australian Corps commander, Lt. Gen. John Monash. Monash had employed both Australian and American troops, along with British tanks, on July 4 to capture the town of Hamel not far from Amiens. Monash wanted to try something bigger and told Rawlinson his Australians could push up to five miles. Rawlinson inquired if he could go farther. Monash replied that he could as long as he received adequate support on his right flank so that it was not vulnerable to counterattack. Rawlinson suggested a few different corps, but none was to Monash’s satisfaction until the British Fourth Army commander mentioned the Canadians. The Canadians had proved in previous battles that they were tough fighters, and they were much sought after for difficult missions. Monash quickly became enthusiastic about the idea.
Foch suggested to Haig on July 12 that he launch an offensive in Flanders. Haig did not like the suggestion. He favored an attack east and southeast of Amiens. The concept was not unlike what Rawlinson had in mind. In a meeting with Haig, Rawlinson explained his plan. He proposed having the Fourth Army attack south of the River Luce where it might punch through the old Amiens Outer Defense Lines, which were held by the British during the Battle of the Somme in 1916. To do this, Rawlinson wanted the Canadian Corps of the British First Army. Haig liked the idea and told Rawlinson to continue planning the attack.
Six days later the French struck the Germans on the Marne, thereby moving up the timetable for the British Fourth Army offense. Foch held a conference at Melun with the top British, French, and American commanders on July 24. Foch was optimistic. He believed an Allied victory was possible no later than the summer of 1919. The current operations against the Germans would continue driving them back from the Paris-Chalons-Toul-Avricourt railway. A second offensive launched from Amiens would remove the German threat on the Paris-Amiens railway. This area was a major rail center, and controlling it would be crucial for future offensives. A third offensive was to be launched against the Saint-Mihiel salient, freeing the eastern part of the Paris-Avricourt railway line by the just formed First American Army. This attack was to be delayed until the American army was fully assembled.
Haig eventually was given overall command of the French First Army under General Marie-Eugene Debeney, which was to operate on his southern flank. The reorganized British Fourth Army for the Amiens offensive consisted of Lt. Gen. Charles Kavanagh’s British Cavalry Corps, Lt. Gen. Richard Butler’s British III Corps, Lt. Gen. Arthur Currie’s Canadian Corps, and Monash’s Australian Corps. The combined arms offensive was designed to stun the Germans long enough to make considerable territorial gains. To achieve its objectives, the Fourth Army would use tanks, armored cars, armored troop carriers, horse cavalry, aircraft, artillery, and infantry.
The offensive, which was scheduled to begin on August 10, was moved up two days. The Canadian Corps, which was positioned 30 miles north of its starting point, would have the enormous task of moving from one zone to another while keeping the Germans deceived as to where they were going. Secrecy was of key importance to the operation. The soldiers received a stern warning in their paybooks to keep silent and not to talk about any preparations for an attack to soldiers from other units, strangers, or in public places where they might be overheard.
The Canadians had been planning an attack on Orange Hill, east of Arras, which the Germans had taken in their earlier offensive. The Allied high command canceled the operation. Nevertheless, Currie continued his preparations for the attack to deceive the Germans. To fool the enemy and draw its attention to another sector, he sent two battalions and several support units to the Ypres salient. In addition, the Royal Air Force increased its activity over the salient.
The rest of the corps began to move out of the Arras sector on July 30. Traveling by trucks, trains, buses, and on foot, the troops headed north. They would soon shift direction and head south by night. The more direct routes were avoided as the troops moved quickly through the short hours of darkness. The Canadians were told they were going into the General Headquarters Reserve to be able to support either the French First Army or the British Fourth Army. The divisional commanders and senior administrative officers had been informed of their true destination just a day earlier. Fortunately for the Allies, the weather cooperated. The overcast weather and foggy conditions on the ground concealed the high volume of traffic on the roads.
The 51st Australian Battalion, positioned astride the Amiens-Roye Road on the morning of August 4, reported alarming news. Five of the battalion’s soldiers had been captured during a German raid. The Australians were under orders to transition control of their sector to the Canadians by August 6. This process already had begun and Canadian artillery was by that time deployed behind the Australians.
It was unclear, though, how much the Australian prisoners knew of the offensive. If the Germans learned that a major offensive was afoot, it could conceivably prove disastrous to the entire operation. It turned out, however, that the Germans had learned nothing of the preparations underway at the time.
The Canadians had the advantage of larger battalions than the British. The British were forced in early 1918 to reduce their division strength from 12 battalions to nine. The extra men brought the remaining battalions up to strength.
The British had recommended that the Canadians do the same, but Currie had refused. If he had, the four Canadian divisions in the field, along with the 5th Division in England, would have increased to six divisions, enabling them to have two corps and an Army Headquarters. But Currie did not want to do anything to reduce the Canadian Corps’s esprit de corps. Instead Currie broke up the 5th Division and distributed the men to his other divisions. As a result, the Canadian battalions were 100 men or more overstrength.
As the buildup continued, Haig met with Debeney, Rawlinson, and Kavanagh on August 5. Haig informed his corps commanders that Foch had decided to include the French Third Army in the operation. They would go into action to the right of Debeney’s army. The size of the operation was now much larger and the emphasis was now on exploitation rather than consolidation. Three British divisions were to be held at Headquarters Reserve ready to take advantage of any success. The Fourth Army was to push forward to the Roye-Chaulnes Lines, which had been held by the British until the Germans withdrew to the heavily fortified Hindenburg Line in 1917.
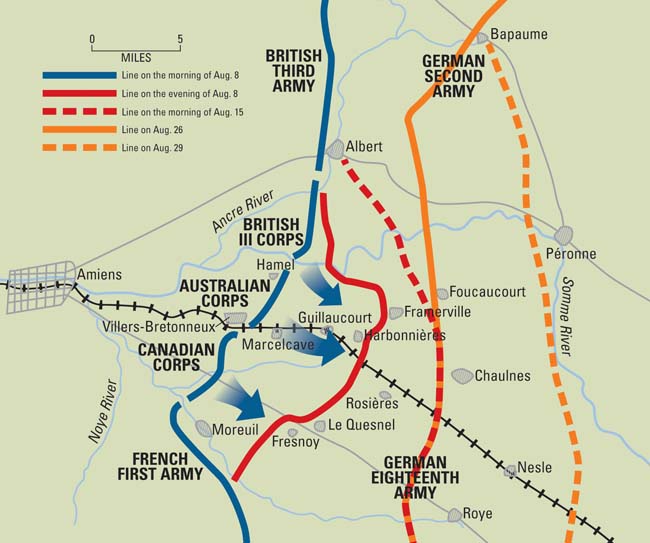
With a frontage of 8,500 yards, the Canadian Corps had the task of delivering the main blow on the Fourth Army’s right. On the corps’ right flank at the Amiens-Roye Road was the French First Army, while the Australians were on their left at the Amiens-Chaulnes railway. To the left of the Australians was the British III Corps attacking north of the Somme.
The Canadians had three objectives: the Green Line, the Red Line, and the Blue Line. In the first two lines, support element troops would leapfrog and push onto the final objective, the Amiens Outer Defense Lines, designated the Blue Line, which was located about eight miles from the Canadian starting point. The British 3rd Cavalry, which included the Canadian Cavalry Brigade, would push onto the Roye-Chaulnes Line. Acting as liaison between the foot soldiers and the cavalry, as well as protecting the troopers’ right flank, was the Canadian Independent Force. This mobile unit consisted of a couple of motor machine-gun brigades, nine Lewis gun detachments of the Canadian Corps Cyclists Battalion, and two trench mortars mounted on trucks.
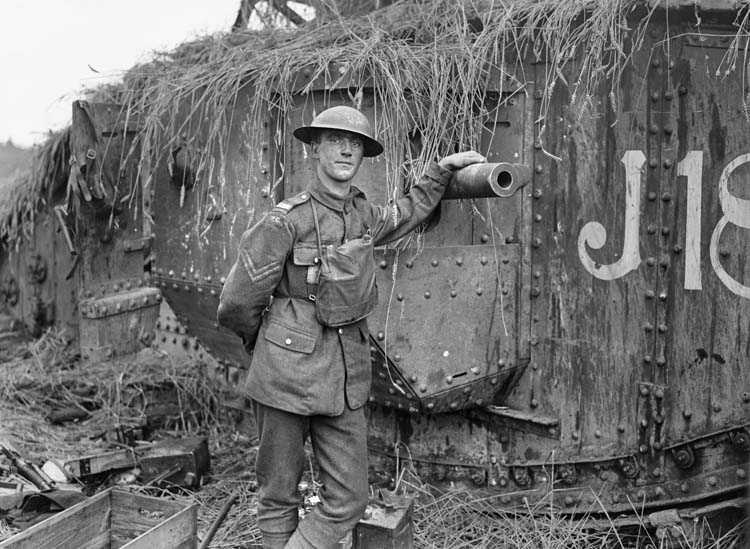
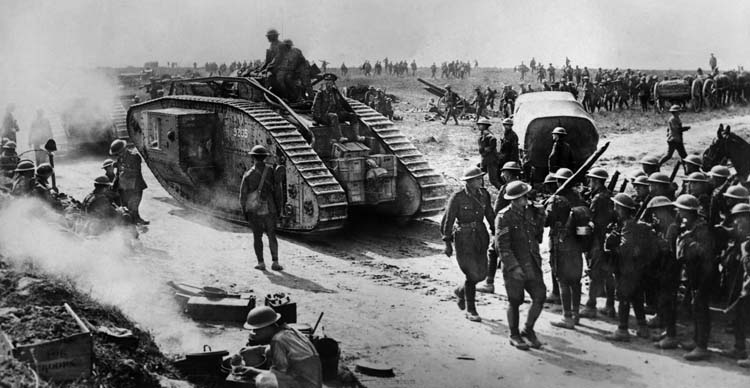
The British 4th Tank Brigade assigned 42 fighting tanks to each Canadian division, except for the 4th Division, which received just 36 tanks. Most of these were the 29-ton Mark V tanks, which were classified as either males (meaning they were armed with two
six-pounders and four machine guns) or females (meaning they were armed with six machine guns).
In addition to the Mark V tanks, there also were Mark V Star tanks, which were six feet longer than the earlier version. This gave the tank more mobility in crossing trenches. Besides it crew of eight men, the Mark V Star was also able to carry 13 men armed with two Lewis guns and a Vickers machine gun. These heavily armed teams were to be dropped off on their objective and entrench until help arrived.
A faster tank than the Mark Vs, the smaller Whippet weighed in at 14 tons. With a crew of three men, the tank was armed with four machine guns. The Allies also planned to use aging Mark IV tanks that had been converted to carry supplies, such as trench mortars, ammunition, drinking water, and shovels. In total, the 4th British Army planned to employ 612 tanks in the offensive.
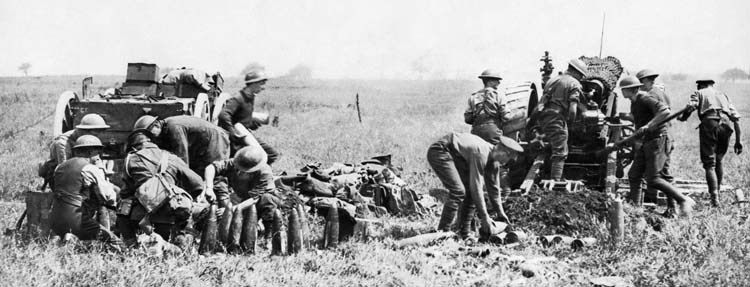
The 4th British Army had 2,000 field guns, howitzers, and heavy guns. The French fielded 1,600 guns. There was to be no preliminary bombardment before the attack for the Canadian soldiers, or the Australians and British. For the most part, the tanks were expected to deal with the barbed wire and German machine guns.
In preparation for the attack, Canadian engineers worked in the dark in the marshes around the River Luce where part of the 3rd Canadian Division would cross. The engineers built mats and footbridges across the 300 yards of marshes and the river. This had to be done in silence as the far side of the river was not held by infantry in strength, but rather patrolled every hour. Enemy machine-gun fire and shelling did not make the task any easier.
On August 6, two days before the attack was to be launched, the Germans struck first. A heavy barrage crashed down on the British III Corps. The German 27th Wurttemberg Division recaptured the Brick Beacon Ridge, recently lost to the Australians, and pushed up to 1,500 yards behind the front line. This put them near the huge ammunition dumps ready to supply the upcoming attack. The Germans had managed to reach the gun line where they had taken prisoners. The British counterattacked, driving the Germans back to the old Australian line. The Germans tenaciously clung to their positions. The British III Corps tried to dislodge the Germans the following day, but it failed to retake the ridge.
Holding the line across from the British 4th Army was the German 2nd Army, under the command of General Georg von der Marwitz. This army consisted of 10 divisions in the front line, with another four in reserve. Facing the Canadians were the German 225th Division, 117th Division, and part of the 41st Division. The 117th was considered an excellent division, with its regiments at full strength. They were new to the line, having just replaced the 109th on the night of August 7.
Like the British, the Germans had no choice but to reduce the size of their battalions to keep the same number of units at the battlefront. The motivated stormtroopers that produced considerable success for the German Army at the outset of the Kaiserschlacht Offensive had by that point been used up.
The German defenses facing the Canadians consisted of three lines of trenches poorly wired. There were other trenches behind these, including the abandoned Inner Amiens Defense system constructed by the French in 1915 and the Amiens Outer Defense Lines constructed in 1916. They had strong belts of wire, but they were facing the wrong way. The numerous machine-gun posts were the strongpoints in the 2nd Army’s defense.

First Quartermaster-General Erich Ludendorff, second in command of the German military, believed the German defenses were strong. “We should wish for nothing better than to see the enemy launch an offensive, which can but hasten the disintegration of his forces,” he informed his troops on August 4.
But Ludendorff was expecting only local attacks. German intelligence reported that the Canadians were in Flanders, but the Germans had no inkling that the Allies were planning a major offensive. Lt. Col. Wilhelm Wetzel, chief of the Operations Section, was skeptical. He believed that the Allies might attack on the Somme front. German frontline troops also knew that something big was afoot when they heard increased vehicle traffic. For the most part, the German high command neither took the rumors seriously nor heeded the warning signs. They would pay a heavy price for their complacency.
The Canadian troops surged forward on the morning of August 8, following the rolling barrage. On the Canadian right the 43rd Battalion, 9th Brigade, 3rd Division attacked the Dodo Wood, which was situated on a steep hill. The 43rd got hit by German artillery fire at its jumping off point, but fortunately it did not last long. Four companies moved forward into the fog and took the German position with few casualties. The tanks, on the other hand, had some difficulty, with three getting stuck in the swamps while a fourth one stopped due to gas fumes.
The 43rd Battalion reached the Dodo Wood by 5:30 am. From there, it pushed on to capture a smaller wooded tract. The woods were in Canadian hands less than two hours later. In the process, the 43rd had captured 400 prisoners and a German battery. The battalion reached the Green Line having suffered 194 casualties in the process.
Fighting on the left flank of the 43rd was the 116th Battalion whose objective was the Harmon Wood. The lead company was hit hard losing 60 men and all its officers before it outflanked the wood, giving the remaining three companies an easier task in taking the German position. By 7:30 am they had taken their objective.
Another unit from the 9th Brigade, the 58th Battalion had its lead company underway at dawn. Their objective was the village of Demuin, located along the south bank of the River Luce, as well as Courcelles, southeast of Demuin. The infantry and tanks worked well together, knocking out German machine-gun posts as they pushed toward Demuin.
Major Henry Rose’s company also had trouble with an enemy machine-gun nest. When the company became pinned down by machine-gun fire, the major assembled 30 men for the purpose of outflanking the enemy. When he was reconnoitering the enemy position, the Germans threw stick grenades at him. Rose took cover in a shell hole to avoid the deadly blast. The force the explosions were so great that he was thrown out of the shell hole. He unloaded his pistol at the Germans to buy himself time until his men could assist him. They killed the Germans, but not before Rose had received eight wounds.
The 58th finally battled its way into Demuin, taking the village at 6:30 am, and pushed onto Courcelles, capturing it 35 minutes later. The battalion achieved all of its objectives at the cost of 10 killed, 147 wounded, and one missing.
The rest of the Canadian attack continued like clockwork. Next to the 9th Brigade, the 8th Brigade of the 3rd Division attacked. This brigade was composed of four Canadian Mounted Rifle battalions that had been converted to infantry in 1916. These foot soldiers moved through the fog toward the village of Hangard to Cemetery Copse. Once past the destroyed village, they took machine-gun fire from the top of a large gateway leading into the cemetery. Return fire from the Lewis gun failed to silence the German machine-gun nest. Some of the Canadian soldiers put their helmets on the ends of their rifles and held them up, which was a previously agreed signal to indicate they required tank assistance. Although six tanks were out of action by that point for a variety of reasons, one working tank came to the Mounted Rifles assistance, rumbling over the enemy machine-gun nest. The attack ground on.
The 2nd Canadian Mounted Rifles then leapfrogged over the 1st Canadian Mounted Rifles. They pressed on to secure the bridge crossing the Luce at Demuin. They soon discovered the bridge had been blown up, but the river was crossed anyway when a tank brought up crib fascines.
In the intervening time, the 3rd Brigade of the 1st Division attacked to the right of the 3rd Division. The 1st Division faced the tough German 117th Division. Going was tough for the 16th Canadian Scottish Battalion on the 3rd Brigade’s right flank. The ground was rough and the fog heavy. As the troops moved across no-man’s land the fog eventually began to lift.
A company of the 16th Battalion (Canadian Scottish) found that it had gone too far north. To correct its bearing, it marched southeast and stumbled upon a ravine full of German artillery batteries. German artillerymen streamed out of a dugout and began preparing their guns for action.
With a loud cheer, the Canadians rushed down the embankment toward the Germans. The enemy gunners withdrew to another position farther up the valley where they took cover in their dugouts. The Canadians gave chase, but ran headlong into heavy fire from German machine guns. Other troops came to their assistance, though. Some of the Canadians scooped up bombs designed to be used against the Allied tanks and flung them into the dugouts. The Canadians flushed out the survivors and took them prisoner.
Other elements of the 16th Battalion succeeded in achieving their Green Line objectives. They also managed to bag an enemy regimental commander and his staff of the 157th Regiment, 117th Division. The other two battalions in the 3rd Brigade, the 13th and 14th, also had great success. However, the 13th Royal Highlanders had the misfortune of suffering 30 casualties from friendly fire. Nevertheless, they pushed on to reach their objective. Two members of the 13th Battalion received the Victoria Cross. Private John Croak single-handedly knocked out an enemy machine-gun nest. Although seriously wounded, he directed his platoon as it captured three more machine-gun positions. He received a second wound that proved fatal.
The other Victoria Cross recipient from the 13th was Corporal Herman Good. He succeeded in knocking out several machine-gun positions by himself. Afterward, Good and three of his fellow soldiers encountered a German battery of 5.9-inch guns. Good figured the German gunners would not be trained in hand-to-hand combat, so he and his mates charged the battery and compelled the Germans to surrender.
The tanks supporting the 14th Battalion moved along the German trenches firing into the enemy soldiers and knocking down their parapets in a number of places. When the tanks rumbled on, the Germans from the 117th returned to their stations and opened up on the Canadians. The Canadians were forced to flank the Germans. White flags soon popped up. Some of the soldiers from the 14th moved forward to accept the surrender and were shot down by the Germans instead. Angered by this treachery, the men from the 14th opened fire, and when more white flags appeared they were ignored. The Canadians then mounted a bayonet attack and did not bother taking any prisoners. By 8:15 am the two battalions had taken their Green Line objectives.
Meanwhile, the 4th Brigade of the Canadian 2nd Division also was having success. Despite suffering 150 casualties, the 18th Battalion had reached its objective by 7:45 am. Fighting to its left was the 19th Battalion, which was flanked on its right by the Australians. At one point during the advance, the 19th was held up by German machine-gun fire, but two men charged the position. Although one was gunned down, the other succeeded in killing the German machine-gun crew.
Supported by the 21st Battalion, the 19th attacked Marcelcave after the village was hammered by a barrage at 6:23 am. The town quickly fell to the Canadians who also captured another German regimental headquarters. Casualties for the four battalions of the 4th Brigade were more than 500 men. The Canadians had met all the Green Line objectives. Now troops headed for the Red Line.
After the barrage was lifted at 8:20 am, the Allied troops moved their artillery forward so that it could effectively support the troops engaged against the enemy. With the mist evaporating, Allied air support began bombing and strafing enemy targets.
Pushing past the 8th and 9th Brigades, the 3rd Division’s 7th Brigade moved forward on a three-battalion front. The 49th Battalion advancing on the left flank passed through grain fields and reached its Red Line objective at 10 am, having met little German resistance. The 42nd in the center, with four tanks, overran two German batteries, and after crossing the plateau of Hill 102, reached its Red Line objective 20 minutes later than the 49th Battalion. Meanwhile, the men of the Royal Canadian Regiment, also with a few supporting tanks, advanced toward their objective, clearing the Germans from two wooded tracts.
With the capture of the Red Line objectives on the Canadian right flank, much of the German 225th Division was in a perilous position. The Canadians had overrun the division’s guns, its frontline positions, and its support battalions. The German division was informed at 10 am that the 376th Regiment of the 109th Division was on its way from Cayeux to aid them. Additionally, Regiment Bellmann, made up of three battalions from the 192nd Division, was preparing to go into action from its position in the forest southeast of Beaucourt. Meanwhile, the 1st Reserve Division from the 18th Army was ordered along the Roye-Amiens road to stop the Canadians in the Beaucort-Fresnoy area.
The 1st Brigade of the 1st Canadian Division pushed forward. The brigade’s 2nd Battalion had already taken a number of prisoners during the advance to the Green Line. Despite having no tank support, which was still far behind them, the 2nd took their Red Line objectives by 11 am.The 4th Battalion of the 1st Brigade also attacked without tank support. The troops took their Red Line objectives at the cost of 135 casualties. Fighting alongside them in their three battalion front was the 3rd Battalion. Because of its heavy casualties, the battalion did not begin its attack until 8:40 am. Aided by a single tank, the 3rd Battalion took its objective later in the morning. In the process, the battalion captured 450 prisoners and 11 artillery pieces at a cost of 200 casualties.
The 2nd Division also continued its advance with the 26th and the 24th Battalions and tank support. With the Australians on their left flank, a platoon of the 24th fought on the Australian side, while a platoon of the Australian 57th Victoria Battalion served with the Canadians. The Australian liaison officer was concerned that the Canadians would not be able to keep up with them. A Canadian lieutenant said they would and then offered to race them to the Red Line. The Australians took them up on their offer.
At 8:20 am the 24th kicked of its attack. Enduring heavy machinegun fire the Canadians took Pieuret Wood with tank support. Wiencourt fell at mid-morning, and a short time later Guillaucourt fell as well with the assistance of Australian covering fire and nine Whippet tanks. Hard fighting followed as the 24th pushed on toward its Red Line objective. Two hours later the 24th had reached its objective at the cost of 189 casualties. A few minutes later the Australian 57th reached its Red Line objective to discover they had lost to race to the Canadians.
With the Red Line reached, Kavanagh committed his troops. The infantrymen had advanced from their assembly area southwest of Villers-Bretonneux around 7 am. The 1st Cavalry Division followed the Australian 2nd and Canadian 2nd Divisions, while the 3rd Cavalry Division moved behind 1st and 3rd Canadian divisions. Thirty-two Whippet tanks advanced in their support.
At 10:30 am the Canadian Cavalry Brigade made contact with Brutinel’s Independent Force, which in its armored vehicles had been pushing ahead on the Amiens-Roye road. The horsemen of Lord Strathcona’s Horse Regiment advanced along the road with the Royal Canadian Dragoons on its left. Before the Blue Line objective could be reached, the villages of Beaucourt-en-Santerre and Le Quesnel had to be taken. Machine-gun fired erupted from Beaucourt, causing the vulnerable horsemen to gallop away from the Whippets and bypass the village. The soldiers quickly overran some German positions and rounded up 40 prisoners.
Two troops of the Lord Strathcona’s Horse then swung into the French sector and captured Fresnoy-en-Chaussee and 125 prisoners. Soldiers from the German 1st Reserve Division were soon moving toward the village and nearly circled the two troops of cavalry, which escaped just in time. The Germans were back in control of the village and would cause the Canadians grief for the rest of the day with enfilading fire.
Beaucourt fell to the Royal Canadian Dragoons and Fort Garry Horse aided by the Royal Canadian Horse Artillery. The horse soldiers swept up 300 prisoners and pushed onto the eastern side of the village where they came under heavy fire from three battalions of the German 192nd Division at Beaucourt Wood. Because they were unable to take the wood, the Canadian horsemen fell short of their Blue Line objectives.
The infantrymen of the 4th Canadian Division were two hours behind the cavalry. They crossed the Red Line at 12:40 pm but had to halt 50 minutes later to let the Mark V Star tanks go by. Transporting infantry in these lumbering beasts was not working as well as had been hoped. The heat and fumes were causing many of the soldiers to become sick and even faint. These tanks ran into trouble south of the Beaucourt Wood where two German guns concealed by stacks of grain knocked out 10 guns.
Heavy fire coming from northeast of Le Quesnel, which the Germans had been reinforcing to plug the hole in their line, forced the tanks to pick up their infantry and pull back. The tanks moved in beside the Royal Canadian Dragoons and waited for help from the 4th Division.
The 11th Brigade of the 4th Division soon arrived on the scene. Two of its battalions, the 54th and 102nd, moved past the pinned-down cavalry troopers and attacked Beaucourt Wood. Casualties were heavy, but the Canadians managed to reach the woods and clear out the Germans by 4:30 pm.
Another unit of the 11th Brigade, the 75th Battalion, was not doing as well. Heavy fire from Le Quesnel and Fresnoy across the flat terrain had caused it to call off the attack until the next day when heavy artillery could support it.
The 6th British Cavalry, north of the Canadian cavalry, encountered little opposition as it reached its Blue Line objective at 1 pm. An hour and half later they had cleared the south side of the River Luce. At midafternoon the 12th Canadian Brigade of the 4th Division arrived to reinforce the British cavalry’s gains. Although the countryside ahead seemed free of enemy soldiers, the British cavalrymen of the 6th and the 7th Brigades refrained from advancing farther.
The 12th Battalion had met little opposition in its advance, except at the northern end of Beaucourt Wood where the 78th Battalion came under heavy fire. Lieutenant James Tait of the 78th Battalion took matters into his own hands during the advance when a German machine-gun halted his company. Tait snatched up a rifle and rushed the machine gun, killing the gunner. Inspired by his actions, the rest of his men charged forward and captured 12 machine guns and 20 prisoners. Tait, who did not survive the war, was posthumously awarded the Victoria Cross.
The 72nd Battalion passed through the 78th Battalion, reaching its Blue Line objective at 6:15 pm. Meanwhile, the 85th Battalion leapfrogged the 38th Battalion. With the exception of Le Quesnel, which was strongly held by German reserves, the 4th Division achieved all of its remaining Blue Line objectives.
The 1st and 2nd Divisions also met their Blue Line objectives. During the bloody fighting, they suffered 1,036 men killed, 2,803 wounded, and 29 captured. The Canadians had succeeded in driving the Germans back eight miles.
To the Canadians’ right, the French did not fare so well. They lacked tanks, having lost them in previous battles, and therefore had to rely on a 45-minute preliminary bombardment of the German positions to their front. The Canadians gave them assistance whenever possible; for example, the Canadians sent armored cars to assist the French at Mezieres. The horsemen of Lord Strathcona’s Horse also crossed the line into the French sector and secured Fresnoy. The French advanced five miles.
The Australians, like the Canadians, had a better time of it. They advanced seven miles at the cost of 2,000 casualties. The British III Corps, on the other hand, advanced only two miles and suffered an estimated 700 casualties. When it was over, the Fourth Army had suffered 8,800 casualties. It had been a hard day on tanks with only 145 available for action the following day.
The Germans lost 700 officers and 12,000 men. They also lost 30,000 troops who were captured. The Allies had destroyed 400 German artillery pieces.
Fighting would continue in the following days. The Canadians would advance another six miles before they began to be withdrawn by the night of August 19. By then the Allied advance has stalled. The Germans had stiffened their defenses; as a result, the Allies sustained heavier casualties. When the offensive was over, the Canadians Corps returned to the British First Army.
The Allied victory at Amiens “was the blackest day of the German Army in the history of the war,” said Ludendorff. Most importantly, the British Fourth Army’s victory at Amiens broke Ludendorff’s will. Although the Germans remained capable of maintaining a determined and well-coordinated defense up until the armistice was signed on November 11, Amiens spelled the beginning of the end for the Germans.