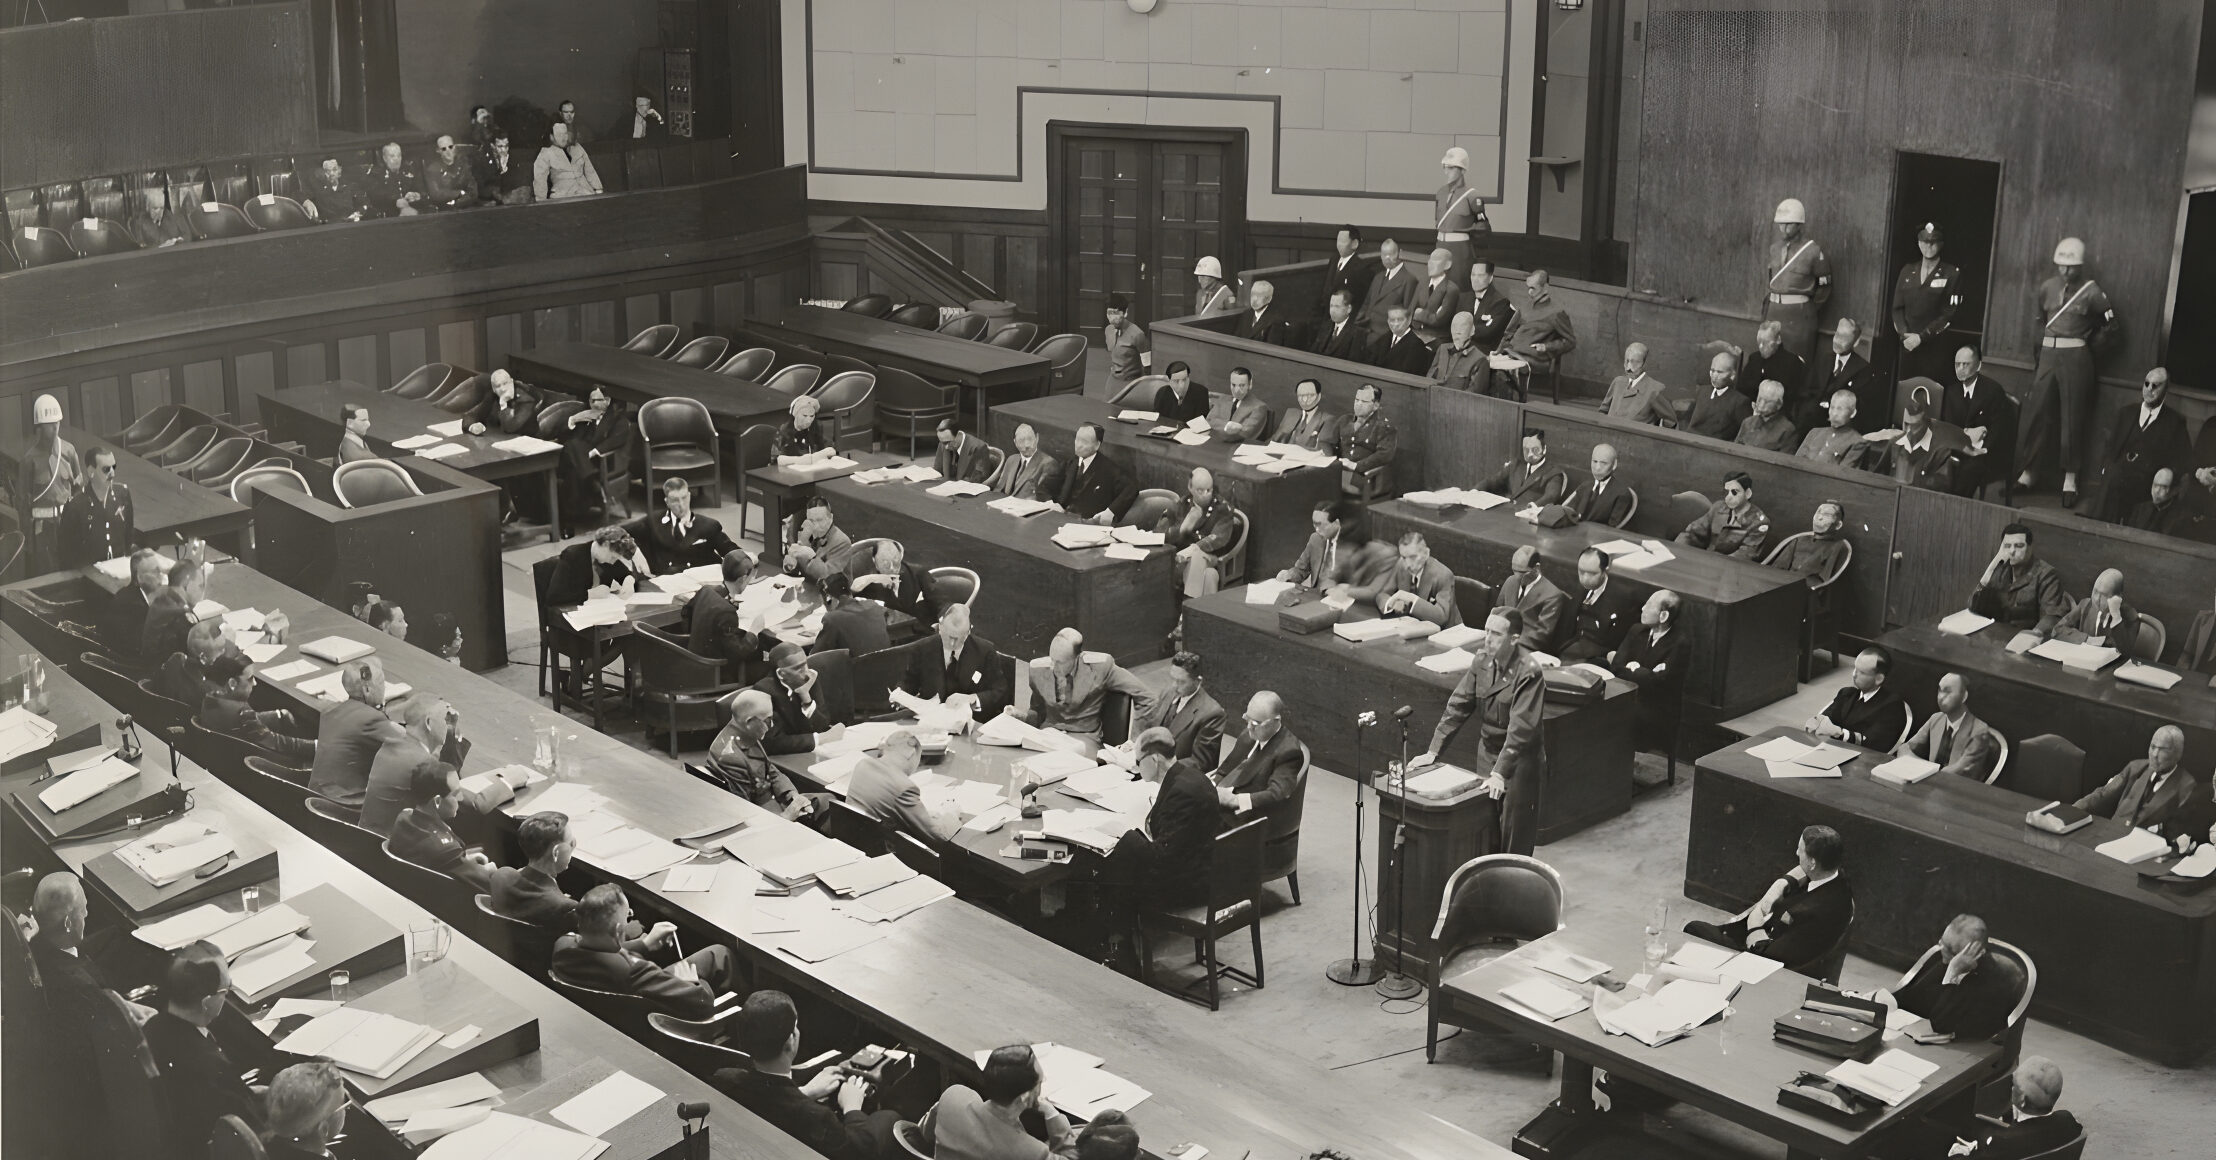
By Jon Diamond
Look at a map of Holland. At the extreme southwest corner, connected to the mainland by a narrow causeway, is a peninsula known as Walcheren Island jutting into the North Sea. Think of Walcheren Island as a bowl, with raised edges and a depressed center (in this case, below sea level).
Flowing south of Walcheren Island is the estuary of the River Scheldt that leads to the huge, deep-water port of Antwerp, Belgium. The port of Antwerp is and was one of Europe’s largest, with 10 square miles of docks, 20 miles of waterfront, 600 cranes, and the capacity to handle 1,000 ships at weighing up to 19,000 tons each at a time. Ever since overrunning Holland in the spring of 1940, and knowing the island’s importance, the Germans had held Walcheren Island. And they had had plenty of time to heavily fortify i
At the end of August 1944, after the calamity of Normandy, the Falaise Pocket, and the disintegration of the German Western Front, Hitler relieved General Helmuth von Salmuth of command of the Fifteenth Army, replacing him with General Gustav-Adolf von Zangen.
Wehrmacht headquarters on Walcheren were in Middelburg, the island’s capital, while the navy’s (Kriegsmarine) command center was in Flushing. The remaining German defense in Walcheren consisted of the second-class 210th and 810th Battalions of the 70th Infantry Division, commanded by Generalleutnant Wilhelm Dasser, a 60-year-old static coastal division commander in Normandy prior to the invasion there, along with various naval and antiaircraft units manning casemated batteries and other weapons. Elements of the 1019th and 1020th Regiments were headquartered in Flushing and Oostkapelle, respectively.
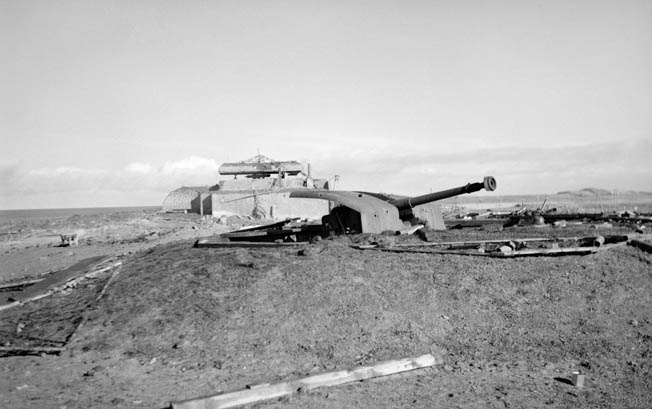
Walcheren’s west coast defenses were a formidable chain of heavily constructed coastal batteries encased in concrete casemates behind the sea wall to prevent a forced naval assault into the Western Scheldt. All were sited for direct seaward fire; however, Battery W17, located northeast of Westkapelle near Domburg, was in open casemates and could also fire across the island.
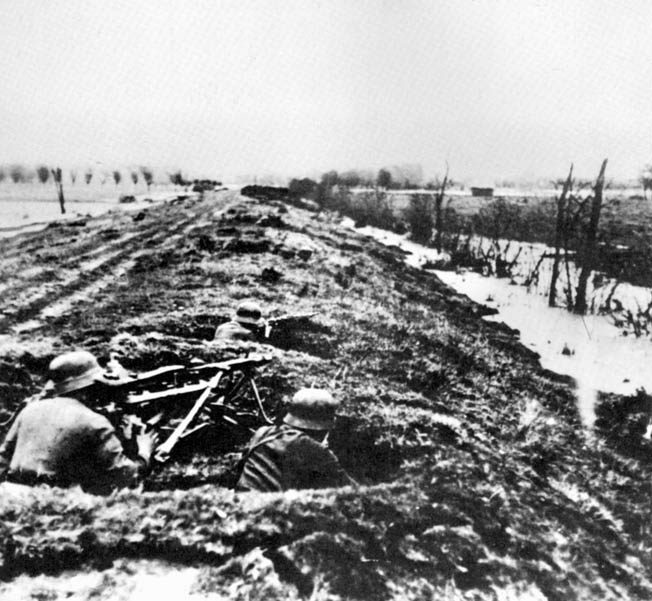
The batteries comprised up to 50 artillery pieces ranging from 75mm to 220mm and manned by members of the Kriegsmarine. These guns were supported by infantry trenches, antiaircraft guns, flamethrowers, rocket projectors, searchlights, thick belts of barbed wire and antipersonnel minefields, and beach obstacles similar to those at Normandy which exploded on impact, making each battery a self-contained strongpoint and providing an almost continuous line of defenses along the dunes. The Kriegsmarine officers were well aware of the absence of major infantry support units for the shore batteries, which was the weak link in the defense.
Between May and June 1944, the Germans laid over 1,700 contact mines at the mouth of the Scheldt and its seaward approaches. Another 600 were laid in the Western Scheldt as far east as Antwerp. A flotilla of explosive motorboats was docked in Flushing to attack any Allied shipping in the Western Scheldt. Much of Walcheren is below sea level with many sand dunes along its shores; the intervening gaps are closed by dikes, the largest and oldest of which runs along the island’s western coast for three miles and is 200-250 feet wide at Westkapelle.
Flushing, on the southern coast of Walcheren Island, had been transformed into a fortress bristling with many different types of artillery pieces, pillboxes, concrete bunkers, gun positions, street obstacles, and land mines around its perimeter. The port’s streets were manned by 8,000 Germans in tenacious defensive works.
However, Dasser’s division was disorganized by frequent troop redeployments, causing “the men [to be] completely apathetic, an undisciplined mob.” The German sea commandant of South Holland wrote, “If this is not set right by energetic leadership, I foresee a black future for the defense of Walcheren.”
The German high command knew the peril Walcheren was in from an infantry manpower standpoint since Hitler, by scattering his infantry to garrison innumerable points along the Channel coast rather than concentrating them on major ports, had squandered any chance of reinforcing the 70th Infantry Division.
THE NEED FOR ANTWERP
After the Normandy invasion and during the autumn of 1944, as the British and American armies advanced eastward across France and Belgium toward Germany, the Allies’ supply lines were stretched to the breaking point as they tried to keep up with the fighting forces. The overworked, temporary Mulberry harbor that had been installed at Sword Beach at Arromanches, was now too far to the rear.
The Germans, in their withdrawal from Upper Normandy, had wrecked or continued to hold the ports of Le Havre, Dunkirk, Boulogne, and Calais, rendering them unusable by the Allies. Therefore, the seizure of the port of Antwerp was vital if the British and American push was to continue at something faster than a snail’s pace.
Without Antwerp, the victors of Normandy had to be supplied over ever-lengthening truck routes running to Belgium and eastern France (See “Red Ball Express,” WWII Quarterly, Fall 2021). Replacement formations of up to five Allied divisions still remained in Normandy as their motor transport was confiscated and turned into supply convoys.
On September 3, Field Marshal Bernard L. Montgomery ordered the Second British Army, under Lt. Gen. Sir Miles Dempsey, to exploit the gap between the German Fifteenth and Seventh Armies. At the time, the Second British Army held positions along the Albert Canal, running southeastward from Antwerp.
The British 11th Armoured Division reached Antwerp on September 4, and soon Allied troops controlled the port with many of the docks and extensive wharves intact. Opening the Scheldt so that Allied ships could actually reach the port was now the next order of business.
If, instead of turning eastward toward the Ruhr, the Second British Army had continued its advance 20 miles to the northwest, it would have cut the German Fifteenth Army’s escape route to the east at the South Beveland isthmus, which separates the Western from the Eastern Scheldt. But the Allies missed a great opportunity to strangle the escape route and seize the isthmus.
After Antwerp fell, von Zangen knew he was trapped by the Western Scheldt and drew up plans on September 5 for an escape route between Antwerp to the north and Brussels directly to the south, to reach the Rhine River north of Cologne.
But Hitler countermanded those orders and directed von Zangen to reinforce the ports and establish a bridgehead south of the Western Scheldt covering the port of Breskens, secure Walcheren and South Beveland Islands, and bring the main body of his army in northern France and Belgium across the Western Scheldt to Flushing (called Vlissingen in Dutch) on Walcheren Island.
Von Zangen tried to comply. Using his 245th, 711th, and 70th Infantry Divisions, along with the fresh 64th Infantry Division from Germany, he made a defensive bridgehead running from Zeebrugge on the North Sea to the Western Scheldt at Terneuzen, between Breskens and Antwerp.
Additionally, von Zangen appointed Lt. Gen. Eugen-Felix Schwalbe to command the escape across the Western Scheldt from Breskens to Walcheren using Dutch merchant ships and river barges. Despite strong antiaircraft batteries at Breskens and Flushing, Allied fighter bombers were able to partially interdict the 45-minute crossing between the two ports. However, German antiaircraft batteries shot down more than 40 Allied aircraft.
Despite the Allied air attacks, von Zangen and Schwalbe were able to transport 86,000 men, 600 guns, more than 6,000 vehicles, and 4,000 horses across the Western Scheldt from September 4-26.
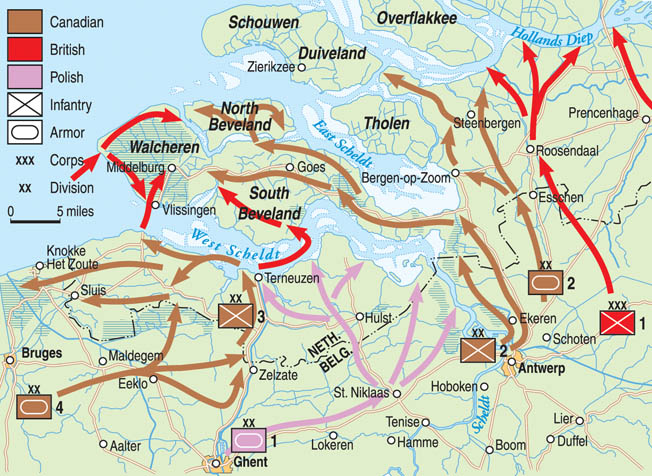
With Antwerp in Allied hands, and with the need to open it to sea traffic, Montgomery directed the First Canadian Army to advance to the northwest of the city and clear the Western Scheldt estuary of enemy forces.
The First Canadian Army intelligence officers concluded that by September 24, “His [German] withdrawal across the [Western] Scheldt … was a tremendous feat for a defeated and trapped enemy.”
On September 9, Canadian intelligence also presciently forecast that the Germans would block the seaward approaches to the newly acquired prize of Antwerp by holding Walcheren and South Beveland. Many of the Germans who had escaped from Breskens to Flushing, mainly the 70th Infantry Division, would contest the coming Allied assault on Walcheren.
Field Marshal Sir Alan Brooke, chief of the Imperial General Staff, would write in his diary, “I feel that Monty’s strategy for once is at fault. Instead of carrying out the advance on Arnhem, he ought to have made certain of Antwerp.”
OPERATION INFATUATE
To open the Scheldt, the Allies devised Operation Infatuate, which was divided into two phases. Infatuate I would be the landing at Flushing on Walcheren Island’s southern tip, while Infatuate II would be a landing at Westkapelle on Walcheren’s west coast. The operation was scheduled for late October 1944.
Walcheren Island was like the cork in the neck of a bottle. As long as the Germans held it, the mouth of the River Scheldt was closed to the Allies’ supply ships. The cork had to be removed. And the II Canadian Corps, along with British Royal Marine and Commando units, was selected by Mongomery to be the corkscrew.
The II Canadian Corps consisted of the 2nd and 3rd Canadian Infantry Divisions, 4th Canadian Armoured Division, and the 1st Polish Armoured Division. The corps commander, Lt. Gen. Guy Simonds, believed that the capture of Walcheren Island would be “a great and decisive victory” that would seal the fate of the Third Reich.
BATTLE OF THE BRESKENS POCKET
As the 1st Polish and the 4th Canadian Armoured Divisions advanced eastward from Brussels, Belgium, toward the Breskens Pocket, the country became increasingly unsuitable for armor, with much of it being at sea level or below—polder—big open fields drained by a maze of waterways and prone to becoming inundated with seawater.
Several major canals—the Leopold, the Ghent, the Hulst, and the Canal de la Deviation among others—crossed this area. Roads ran across the flat fields on raised, exposed embankments. It was dangerous country for tanks to become bogged down, and Allied infantry would have to contend with the enemy, who was fighting with renewed determination.
On September 17, the Allies launched Operation Market-Garden farther east––a bold move to leap across the Maas, Waal, and Lower Rhine. Seven days later, as MarketGarden had run out of steam, the 2nd Canadian Infantry Division, commanded by Maj. Gen. Bruce Matthews, attempted to cross the Antwerp-Turnhout Canal northeast of Antwerp but was unsuccessful. Von Zangen’s LXVII Corps (comprised of the 346th and 711th Divisions) held firm.
Two days later, at Simonds’ suggestion, the 2nd Canadian Infantry and 1st Polish Armoured Divisions moved to drive the last of the enemy from the greater Antwerp area and cut the base of the South Beveland isthmus.
By now, everything south of Antwerp and the southern coastline along the Western Scheldt—except for the Breskens Pocket enclosed by the Leopold Canal—was in Allied hands. The Breskens Pocket was unsuccessfully assaulted by the Canadians on September 22 and October 5 and would not fall until October 22. The Canadians described the German 64th Division defending Breskens as the “best infantry division we have met.”
Thus, one month after capturing Antwerp, 70 miles from the sea, the great port’s maritime approaches remained closed to Allied shipping because of extensive German minefields in the Western Scheldt, not to mention the casemated German gun batteries on Walcheren Island.
General von Zangen, however, was worried. He wrote, “After overrunning the Scheldt fortifications [on Walcheren], the English would finally be in a position to land great masses of material in a large and completely sheltered harbor … [and] with this material they might deliver a death-blow at the North German plateau and at Berlin before the onset of winter.”
On September 16, the 10th Dragoons of the 1st Polish Armoured Division crossed the Hulst Canal, halfway between Terneuzen and Antwerp. The next day the Germans counterattacked furiously and wiped out the Polish advance. The Poles took heavy losses.
Two days later, the Polish 3rd Infantry Brigade renewed the attack, bridged the Hulst Canal on the following morning, and approached to within five miles of Terneuzen, capturing many vessels used during the German escape from Breskens to Flushing.
On September 21, elements of the 4th Canadian Armoured Division reached the Western Scheldt near Terneuzen; the Poles then mopped up all resistance between Terneuzen and Antwerp.
South of the Western Scheldt, only the Breskins Pocket, the country enclosed by the Leopold Canal, remained in German hands—and they were determined to hold it.
On September 27, a major change in Montgomery’s plans was brought on by the failure of Market-Garden. Rather than continuing to rigidly adhere to his previous thoughts of maintaining his advance eastward into Germany north of the Ruhr, he started to acquiesce to the strategic opinions of others. British Admiral Bertram Ramsay, for one, said, “The opening of the port [Antwerp] is absolutely essential before we can advance deep into Germany.”
THE ALLIED FORCES’ PLAN
Opening the Western Scheldt estuary required clearing the Germans from the Breskens Pocket on the south bank and from South Beveland and Walcheren Island covering the north bank. All of the approaches were largely polder protected by massive walls and earthworks and recently extensively flooded on Hitler’s orders. The Canadians had no choice but to destroy, capture, or neutralize the German defenses.
The task was given to II Canadian Corps under Lt. Gen. Guy Simonds, who also was placed in temporary command of the First Canadian Army during General Harry Crerar’s absence due to illness. Simonds, upon reviewing the situation, identified three phases of operations.
The first was Operation Vitality I—the 5th Brigade of the Canadian 2nd Division’s attack westward against South Beveland’s isthmus from the mainland early on October 24, with the intent of seizing the shipping canal that bisected the isthmus and separated the Eastern and Western Scheldts. The 2nd Division would be aided on its right flank by the 1st Polish Armoured Division.
Second was the clearance of the Breskens Pocket on the southern shore of the Western Scheldt estuary by Maj. Gen. Bert Hoffmeister’s 3rd Canadian Infantry Division.
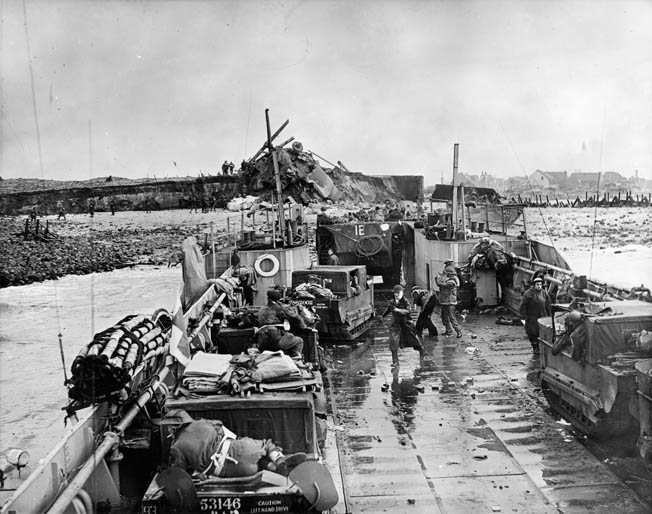
Finally would come a British amphibious assault on Walcheren Island by Brigadier B.W. Leicester’s 4th Special Service Brigade, comprising Nos. 41, 47, and 48 Royal Marine Commandos.
Attached to the 4th Special Service Brigade was Lt. Col. Peter Laycock’s No. 10 Inter-Allied (IA) Commando made up of French, Belgian, and Norwegian soldiers. It would land at Westkapelle, while No. 4 Commando of the British Commandos and the 155th Brigade of the British 52nd (Lowland) Division embarked from Breskens (once captured) to assault Flushing. These amphibious forces would be landed by the Royal Navy.
After receiving a lengthy letter from the Supreme Allied Commander, General Dwight D. Eisenhower, on October 15, Montgomery replied the next day, “I have given Antwerp top priority in all operations in 21 Army Group and all energies and efforts will be now devoted towards opening up that place.”
D-day for Operation Infatuate was set for November 1, 1944. Some of the Allied commanders—such as Admiral Bertram Ramsay, who had commanded the vast Allied fleet during the Normandy invasion—were enthusiastic.
If successful, the operation would isolate Walcheren from the mainland. However, by October 25, the Canadians had advanced only three miles against stiff German opposition; it would take four more days to capture the South Beveland shipping canal.
In Operation Vitality II, on October 26, the 156th and 157th Brigades of the British 52nd Division crossed the Western Scheldt from Terneuzen and landed on South Beveland’s southern coast to the west of the shipping canal, which was still being contested.
The Scottish troops would be transported eight miles in LVTs (Landing Vehicle, Tracked), called Buffaloes by the British, of Maj. Gen. Percy Hobart’s British 79th Armoured Division. After landing on South Beveland, the Scots were to quickly advance toward the Sloedam Causeway that connected Walcheren Island and South Beveland to prevent German reinforcements from interfering with the Canadians’ South Beveland assaults.
BREAKING THE DIKES
Simonds urged that all of Walcheren below sea level be completely flooded by having the sea walls broken by heavy bombers; this would hamper German troop and supply movements and also confine the enemy garrisons to high ground, which could be subjected to around-the-clock bombing to destroy their will to fight.
Despite protests from RAF Bomber Command that the dikes could not be broken, Eisenhower endorsed Simonds’ plan; training for the combined operations began at Ostend in early October.
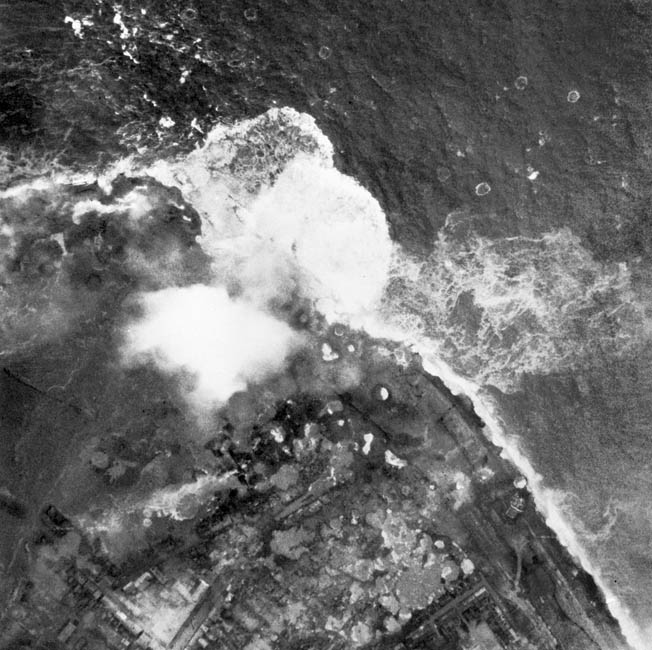
RAF Bomber Command’s aerial assault to smash the Westkapelle dike on Walcheren began on October 3. Using 1,000- and 4000-pound bombs, more than 200 Avro Lancaster heavy bombers blew a 100-yard gap in the dike, causing a rapid influx of seawater to flood Westkapelle’s fields.
Four days later, two more gaps were made by Bomber Command, resulting in more extensive flooding. The first was at Nolledijk, just northwest of Flushing; seawater also flooded toward Middelburg, situated on the Walcheren Canal that extends from Flushing in the south to Veere in the north.
The second gap was blown at Ritthem, east of Flushing, near the Sloe Channel, which separates South Beveland from Walcheren. After the initial bomber sorties, Veere was flooded on October 11 as 60 more Lancasters hit the dike outside that town’s boundaries at Oostwatering.
As Simonds envisioned, more than 2,500 tons of explosives had made the Wehrmacht’s positions in the polder untenable and forced them to higher, drier ground. German reserves were immobilized, and many of the field batteries were now submerged. In fact, virtually every part of the island was under water except for the raised areas of Flushing and Middelburg.
The flooding now isolated the line of coastal batteries such that each no longer had support from the others and could be attacked piecemeal. The inability to reinforce threatened areas also deprived Dasser of the essence of a tactical defense to stage counterattacks as the Germans had shown in the Breskens Pocket, as well as many other successful defensive locales. Additionally, the Flushing waterfront, which the Germans were strenuously reinforcing, was attacked by fighter bombers on October 31.
By October 31, the last German had been driven out of South Beveland; however, the way into Walcheren from the east was not yet open since the western end of the Sloedam Causeway, which connected the two islands, was heavily defended by the Germans on the island.
BATTLE FOR THE SLOEDAM CAUSEWAY
The Sloedam Causeway was 1,200 yards long and 50 yards wide, carrying a rail line along with a main road and a bicycle path. It had sodden, reed-grown mudflats on both sides. The Canadian brigade commander was of the opinion that wheeled or tracked vehicles would enter a “killing ground” if they attempted to cross the western end of the causeway, so the infantry was ordered to assault it first.
Major General Matthews’s Canadian 2nd Infantry Division attacked the causeway on October 31, 1944. The assault was led by the Canadian 5th Infantry Brigade’s Black Watch Regiment, which was soon halted by heavy enemy gunfire. The Calgary Highlanders then sent a company forward, which was also forced to ground halfway across the causeway.
Another attack by the Highlanders the following morning managed to gain a precarious foothold, and a day of bitter fighting ensued; the depleted Highlanders were relieved by Le Regiment de Maisonneuve, which fought to maintain the tenuous bridgehead. The “Maisies” were then relieved by a battalion of the Glasgow Highlanders of the British 52nd (Lowland) Division. By November 2, after much hard fighting, the rest of the 52nd finally crossed the blood-soaked causeway to Walcheren Island.
In five weeks of fighting and enduring the harsh conditions of campaigning on the Dutch polder, the 2nd Canadian Division suffered more than 3,600 casualties and was relieved by the 157th Brigade of the British 52nd Division, which had made the amphibious crossing of the Western Scheldt as part of Vitality II.
Operations Vitality I and II had been criticized for gaining limited territory at the expense of casualties; however, the German 70th Infantry Division on Walcheren was now threatened from the east, and the Scottish and Canadians’ presence distracted their attention from the third part of Simonds’ plan, the amphibious assault known as Operation Infatuate.
THE AMPHIBIOUS ASSAULTS BEGIN
On November 1, Operations Infatuate I and II were simultaneously launched to assault Flushing, with a British brigade group sailing from Breskens across the Western Scheldt (Infatuate I) and by a seaborne attack at Westkapelle (Infatuate II) by a Special Service brigade group embarking from Ostend. Allied artillery now in South Beveland and on the Breskens coast, along with additional tactical fighter bomber sorties, providing support.
Captain H.P.G.J. van Nahuijs, a former town of Flushing police inspector and now a Dutch officer, led No. 6 Troop in an attack 110 yards southeast of Flushing’s center, codenamed Uncle Beach. Barbed wire, wooden stakes, and steel tetrahedron landing obstacles, as well as infantry in pillboxes and light antiaircraft guns, were just above the shoreline to either side of Uncle Beach.
Farther inland were the Inner Harbor and Outer Harbor as well as the Scheldt shipyard, just to the northwest of the landing area. All of these areas possessed antiaircraft, antitank, and coastal guns in concrete or open emplacements, light guns in casemates, infantry rifle pits, and machine-gun pillboxes.
More than 300 Allied guns opened up on Walcheren’s southern shores and ranged as far north as Domburg. While the Flushing operation depended on surprise with a predawn landing under cover of a bombardment lasting from 4:45 to 5:40 am, the landing at Westkapelle employed a sizable armada of ships and vessels of all sorts, including a support squadron and a bombardment squadron.
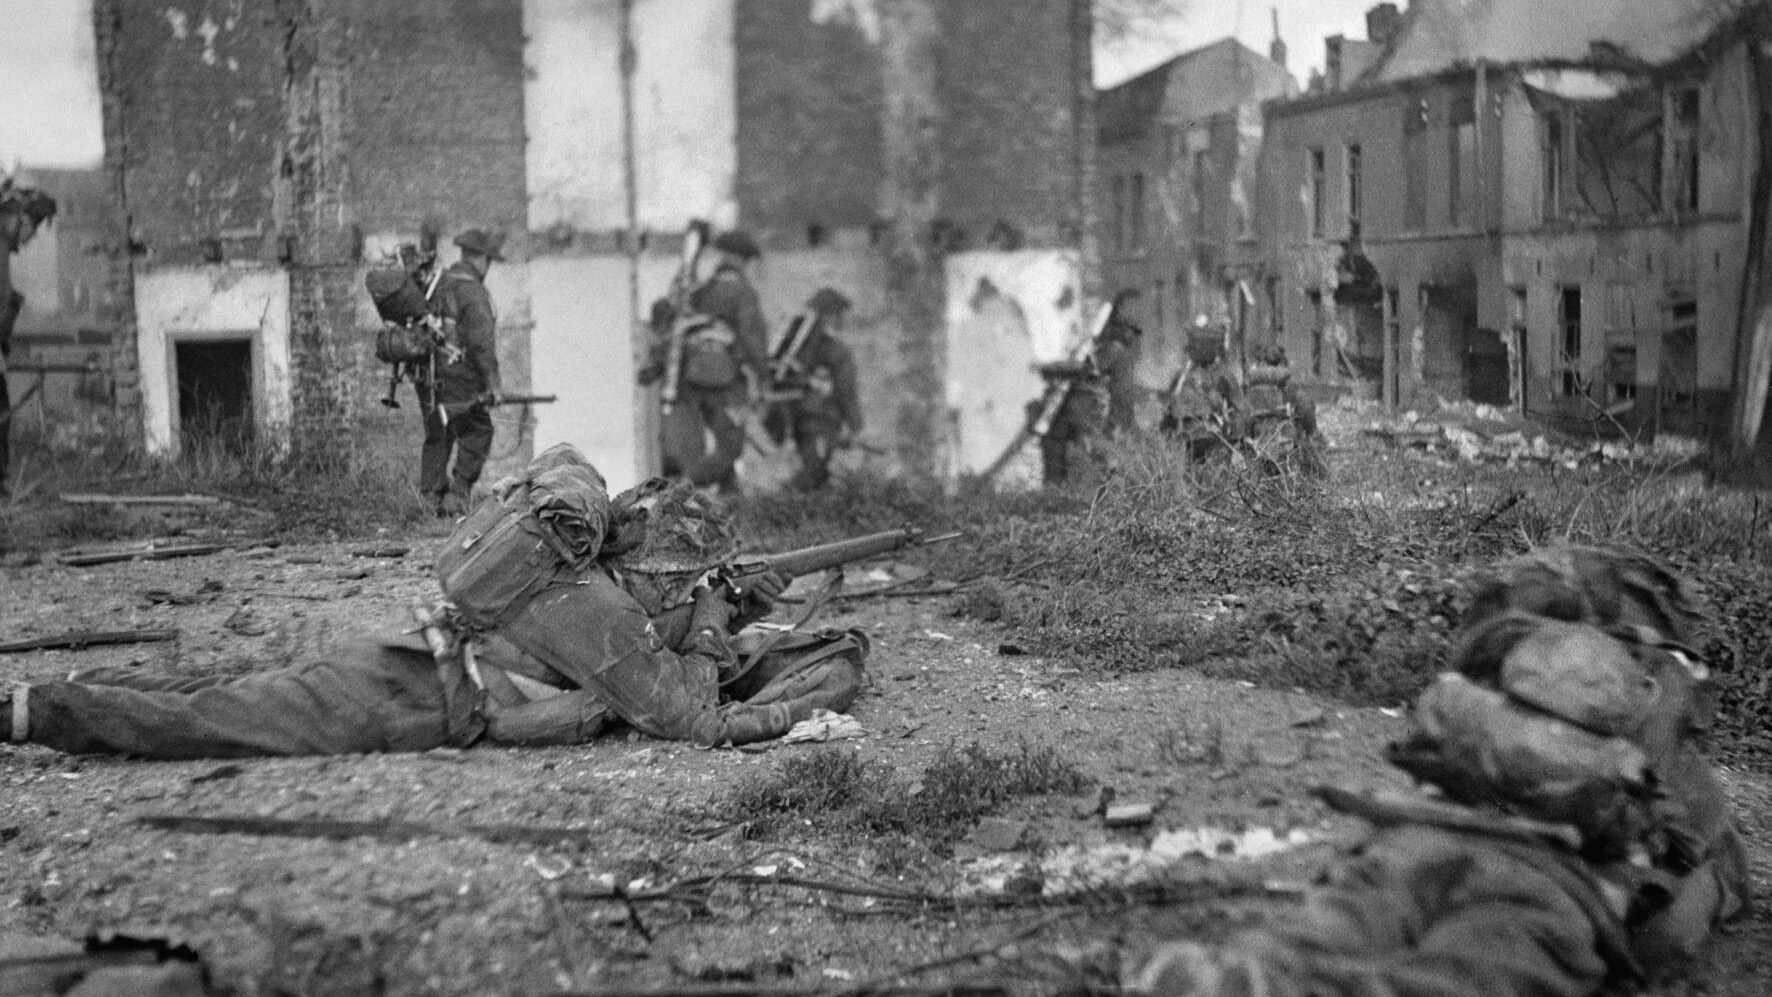
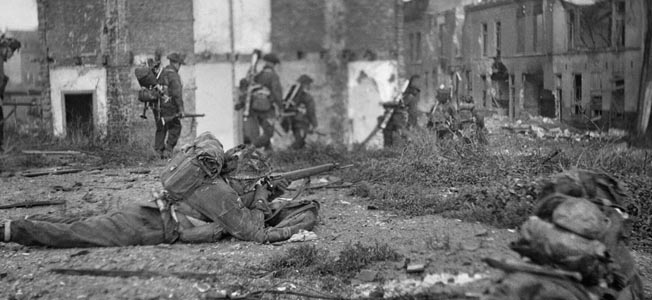
The landing on the fortified seafront at Flushing by six troops of the British No. 4 Commando took place at 5:45 am.
Inclement conditions had canceled the heavy bombing scheduled for the dockyards at Flushing. However, de Havilland Mosquito fighter bombers with their cannon and 500-pound bombs roared in to attack.
The initial seaborne landing met little opposition, and some German prisoners and guns were captured. The Kriegsmarine’s minefields made very little impact on the shallow-draft landing craft.
Dasser stated after the war that the combination of Allied bombing, artillery barrage, and flooding kept the Wehrmacht artillery from opposing the initial predawn landing more forcefully. However, by 6:30 am considerable machine-gun and 20mm cannon fire met the other No. 4 Commando troops’ assault craft on the flanks of Uncle Beach. Undeterred, the commandos disembarked against somewhat dazed and ineffective defenders.
By 7:30, Uncle Beach was able to accept landing craft, and the 4th King’s Own South Borderers (KOSB) of the British 52nd Division’s 155th Brigade, coming from Breskens, began to land. The various commando troops, after securing Uncle, then fanned out to secure a bridgehead at Flushing to allow the Scottish infantry to pass through and secure the town.
The first companies of the 4th KOSB came ashore without much opposing gunfire, but by the time later companies arrived the Germans were saturating the area with heavy fire from seafront batteries and mortars just inland from the beachhead.
Several landing craft were hit by the defenders’ accurate mortar barrages; one Landing Craft, Assault (LCA) sank with more than 20 men on board. Communications with Breskens and between the different companies of the 4th KOSB ceased, and the Scottish infantry just barely landed their heavier assault ordnance before German northeastern coastal batteries prevented further reinforcements from disembarking.
Despite the resistance, the 4th KOSB cleared the beach by 8 am, and the last companies of the battalion trekked farther into the town’s outskirts against opposition. Companies A through D, 4th KOSB, either went through their preceding commando troops onto their respective targets or reinforced them if they were meeting heavier opposition. By 9 am, No. 4 Commando, supported by the 4th KOSB, had established an effective blocking position at the entrance to Flushing’s Old Town area.
Rugged determination on the part of the British commandos and the Scottish infantry assault forces, along with the timely appearance of RAF fighter bombers, tilted the battle’s favor to the Allies by late morning despite persistent German opposition.
Because of continued German artillery fire and too few troops to mount a westward attack along the seawall’s esplanade, the beachhead remained stationary for the night as additional British reinforcements arrived. German POWs were pressed into service to manhandle supplies across the mud and treacherous surface below the high water mark.
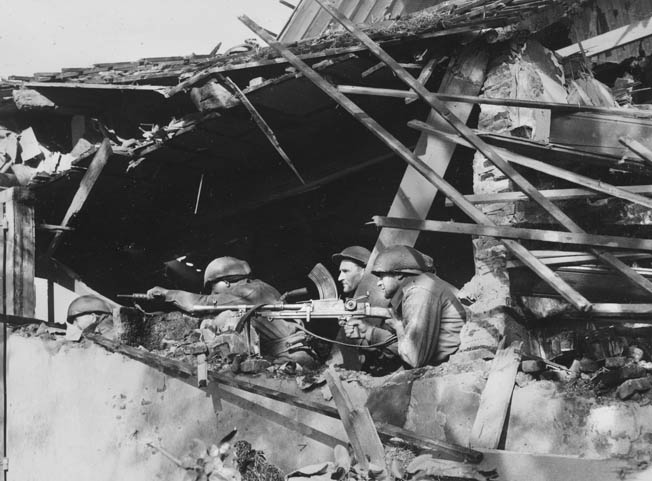
By 10 pm on D-day, the assault on and seizure of parts of the town of Flushing inland from Uncle Beach were deemed a success. However, the most difficult task on this day was the clearance of Flushing, since the Germans of the 1019th Grenadier Regiment used warehouses, rooftops, and docked ships as strong defensive positions. Furthermore, the town was a maze of dockyards and confined thoroughfares, the latter of which had free-flowing currents of floodwaters.
The following day, elements of No. 4 Commando took another objective, code-named “Dover,” a seafront strongpoint situated just beyond the landing craft-obstructed shoreline at a junction of two Flushing streets. Also early on November 2, three companies of the just landed 5th KOSB advanced northward from the dockyard gate into the newer part of the town. By midday, additional companies of the 5th KOSB followed them and veered eastward, reaching the Walcheren Canal north of the dockyard in Old Town.
By evening of D+1, the dock area objectives across the canal to the east—code-named Haymarket, Strand, and Piccadilly—remained in German possession. These objectives were situated in the Inner Harbor east of the Walcheren Canal and were taken on D+3 by the 5th KOSB despite numerous well-defended bunkers.
Early on November 5, under the cover of rocket-firing Hawker Typhoons and artillery firing across the Western Scheldt, the 5th KOSB crossed into the eastern dock area, clearing the German defenses while taking more than 100 POWs.
Elements of the 7th/9th Battalion, The Royal Scots, an amalgamation of two Territorial battalions, were the last of 155th Brigade’s troops to cross the Western Scheldt. They slogged through knee-deep mud during the predawn hours of D+2 to assault Flushing’s Hotel Grand Britannia, the Germans’ command bunker that had been turned into a final redoubt. The hotel’s defenses included trenches, pillboxes, and gun emplacements all camouflaged to looke like the fronts of houses. A 20mm antiaircraft gun was perched on the hotel’s roof.
After a skirmish lasting all morning, the 7th/9th Battalion captured the hotel and devastated the defenders’ communications. The garrison commander, Oberst Eugen Reinhardt, who expected his troops to fight to the last man, learned after his own surrender that 600 Germans already had been captured from other areas of Flushing by noon of D+2.
THE FIGHT FOR WESTKAPELLE
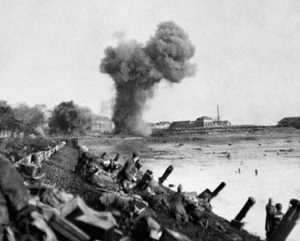
At Westkapelle, Operation Infatuate II’s amphibious assault against the west coast began at 9:45 am, following the naval bombardment at 8:15. The armada (Naval Force T), commanded by Captain Anthony F. Pugsley aboard the frigate HMS Kingsmill, comprised over 150 different types of vessels escorted by the two dozen gun and rocket-firing craft of the support squadron.
To these were added the 15-inch guns of the three bombardment squadron Royal Navy vessels: the battleship HMS Warspite and two Royal Navy monitors, HMS Erebus and HMS Roberts. It was already known that only 15-inch naval guns or a 500-pound aerial bomb could penetrate the reinforced concrete casemates that housed most of Walcheren’s coastal batteries.
Since sandbanks mitigated any deep-draft vessels from approaching the shoreline to provide direct fire support, a squadron of shallow-draft Royal Navy gunboats and rocket-firing craft accompanied the assault waves, while the Allied artillery in Breskens commenced its barrage at 8:35 am.
The landing force was Leicester’s 4th Special Service Brigade, consisting of Royal Marines (No. 41, 47, and 48 Commandos) and elements of No. 10 (IA) Commando. Leicester had led this force during the Normandy invasion and had experience in planning amphibious operations as a staff officer.
Nos. 41 and No. 10 (IA) Commandos were charged with the capture of the town of Westkapelle and the neutralization of the W15 battery at the shoreline in front of the town. Once accomplished, both groups were to continue northeastward along the sand dunes to assault the W17 coastal batteries, then continue on to the coastal town of Domburg.
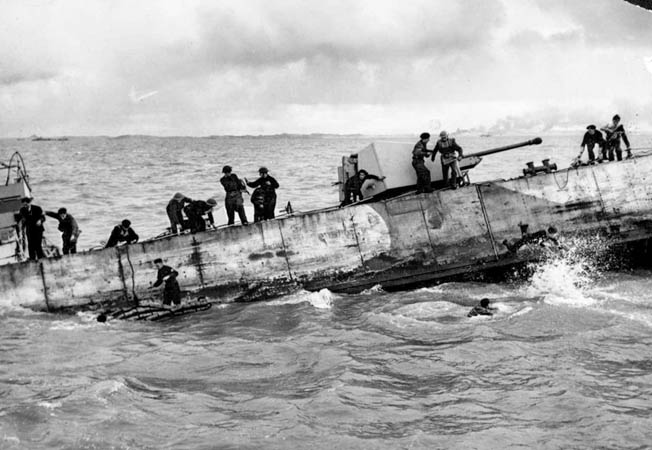
Number 48 Commando, under Lt. Col. James Moulton, was to secure its assault point and then turn south to capture the W13 battery, which comprised four 150mm and two 75mm guns in casemates. This German position also had three 20mm flak guns that raked the landing craft as they approached.
German artillery batteries at Westkapelle, W15 and W13, opened fire when the troop-laden assault craft were spotted within five miles of the intended landing zone, sinking a support squadron vessel south of the gap.
Other British gunboats from this southern support group soon fell victim to enemy artillery fire, either catching fire or sinking. At the northern edge of the gap, another German battery, W17, comprising four 220mm French guns in concrete encasements and a solitary 150mm field gun, severely damaged or sank many other British support craft.
The bombardment squadron was tasked to fire at W15 and W13, which were both closest to Westkapelle, and then shift their fire to W17 to the north near Domburg and W11 (housing four 150 mm guns) to the south near Dishoek. However, two of the Warspite’s 15-inch turrets were out of commission, and the monitor Erebus had a temporary turret failure, limiting its bombardment to 53 shells fired that day. In the absence of air spotting, the Roberts fired only 58 shells, but most of them were in the vital two hours before H-hour.
A timely sortie by RAF Typhoons stationed in Belgium aided the amphibious assault immensely since 80 percent of the naval support squadron craft had been disabled by the accurate German battery fire.
The craft of the support squadron were not designed to deal with heavy concrete defenses. They were intended to give close support against strongpoints, while rocket-bearing gunboats were to drench a beach with high explosives, thereby eliminating hidden infantry entrenchments. Ultimately, the support squadron was prepared to sacrifice itself to draw the batteries’ fire away from the troop-laden landing craft.
Fortuitously, the guns of W13 went silent after 10 am, having exhausted their heavy caliber ammunition supply. An after-action report identified this as a stroke of fortune since the W13 battery had not been hit by the bombardment squadron and could have sunk all the support squadron vessels before turning its attention to the troop assault craft.
This same report stated that the German artillerymen made a “grave tactical error of using up the ammunition on the support craft to which they were not vulnerable [in their casemates], instead of holding their fire for use on the landing craft, the important targets.”
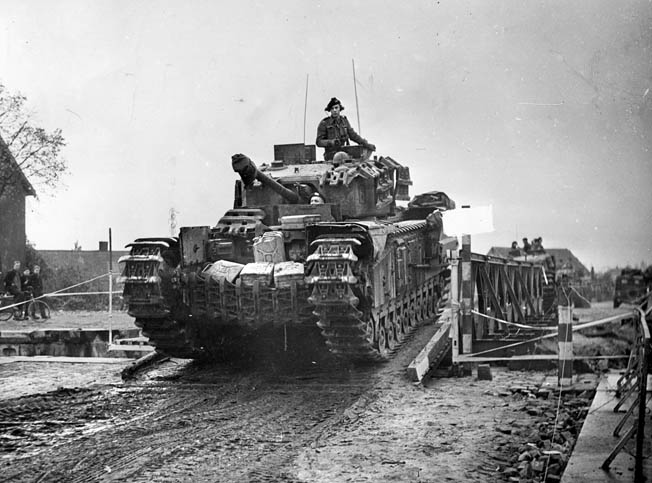
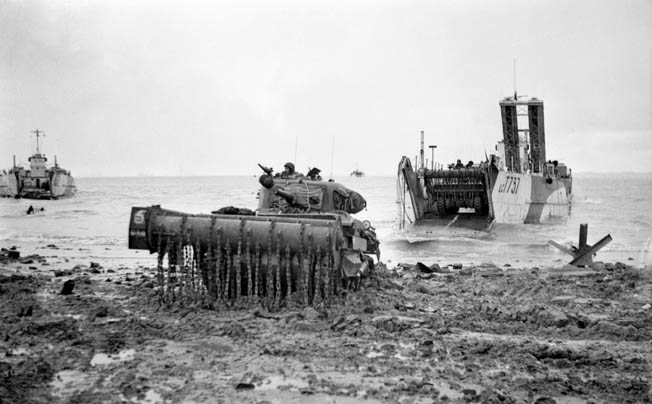
At 10:30 am, the main assault of Nos. 41 and 48 Commandos, with elements of the No. 10 (IA) Commando, began. These units landed on the northern shoulder of the gap and secured the left flank of the beachhead (Red Beach). At Red Beach, all three LCIs successfully grounded, although two had been damaged by German artillery.
Although the W15 casemates had been shelled by HMS Roberts that morning, the German gunners opened up on four LCTs carrying the Royal Engineers of Hobart’s
79th Armoured Division, who were scheduled to land at Red Beach along the sea wall to the north of the gap.
Two LCTs carrying armored breaching teams approached the beach at approximately 10 am. One of the LCTs was hit six times by 3-inch shells from W15, forcing it to withdraw with most of its tanks damaged and still on board.
Another LCT was hit in the engine room and turned back without beaching. With Red Beach becoming unsuitable for further LCT landings, two others managed to beach farther south at 11 am on White Beach.
The LCTs that did beach were now among the soft clay and sand strewn with large blocks of masonry from the broken dike. Several armored vehicles became mired in the polder with only a few able to reach firm ground without assistance.
Disembarking commandos rapidly secured this northern shoulder against light opposition and proceeded toward Westkapelle, engaged the W15 battery with small-arms fire as there was no protective German infantry, and captured the battery by 12:30 pm, taking more than 100 prisoners.
STRUGGLE AT WESTKAPELLE
Shortly after 10 am at Green Beach, at the southern end of the gap, Moulton’s No. 48 Commando, with the help of additional fighter bomber sorties, the bombardment vessels, and accurate artillery fire across the Scheldt from Breskens, landed. These troops came ashore in Buffaloes and M-29 Weasels that swam out of their LCTs.
None of the LCTs moving steadily toward the beach were hit, and only a few shells fell near them. The troops of 48 Commando, with their Buffaloes firing their 20mm Polsten guns at the dunes, quickly overran their objectives, which included two pillboxes on the south shoulder of the gap and the radar station.
Most of Westkapelle was clear of the Germans by 11:15 am, by which time the commandos had secured a footing in the south dunes, ready to advance on the W13 battery. Thirty minutes later, they headed southeastward and received enemy small-arms fire from the pesky W13 battery, which stopped their advance.
Throughout the morning of the landing, Captain Pugsley’s support squadron blasted shore emplacements while receiving intense German artillery fire. Of the 27 vessels in the support squadron, only seven remained capable of sustaining action; Pugsley withdrew them to Ostend. The 1,000 seamen and Marines of the squadron had sustained a heavy butcher’s bill with 17 percent killed and 20 percent wounded, but they enabled the landings to occur and most of the main objectives to be secured.
In the mid-afternoon, Lt. Col. Eric C.E. Palmer’s No. 41 Commando maneuvered northwest through the sand dunes toward Domburg to neutralize the W17 battery with its four 220mm French artillery pieces. They lacked armored support but had Royal Artillery bombardment cover.
At about 12:30 pm, Lt. Col. C.F. Phillips’ 47 Commando, which had been held offshore as a floating reserve, headed for the beach in four LCTs along with the 4th Special Service Brigade headquarters detachment, some Royal Engineers, and Medical Corps personnel. On their run to shore, the men of No. 47 Commando observed the punishment that the support craft were receiving, watching one explode and passing another floating hull up.
In the last few hundred yards German shells hit three of the four assaulting vessels. The landing time for this Commando coincided with the damage inflicted on the support squadron, thus the LCTs taking 47 Commando also caught the attention of the German guns. B Troop of 47 Commando lost about half its men when the leading LCT was hit.
Phillips’ No. 47 Commando was to land south of the gap in the dike, but either because of the confusion caused by the shelling, unclear orders, or tidal changes, the surviving LCT lowered its ramp at the gap in the dike, allowing the amphibians to swim out instead of beaching just clear of the gap to the south as 48 Commando had done.
The rest of the landing did not go well. S Troop had only one mortar and one machine gun left, while A, B, and X Troops were soaked after swimming ashore in the cold water. Most of the Weasels sank or were abandoned in Westkapelle, and much equipment was lost—all of this without 47 Commando directly combating the Germans ashore.
It was not until dusk that 47 Commando would reassemble south of the gap because its Weasels could not swim the gap and many of the Buffaloes went in the wrong direction.
Although 48 Commando was spared from the accurate German W13 battery fire that ravaged 47 Commando and the support squadron, it incurred a casualty rate of over 26 percent since landing and could not continue southeastward to Flushing.
Just after 3 pm, the 15-inch guns from HMS Warspite took W17 under fire; however, it was RAF Spitfire sorties with their 500-pound bombs and strafing cannons that both assisted the Royal Marine advance and silenced the battery’s 220mm guns.
As No. 41 Commando advanced on W17, the Germans emerged from their trenches and dugouts fairly quickly with hands up; prisoners were gathered up 20 to 30 at a time. At 5:45 pm, 41 Commando entered the outskirts of Domburg and the W17 battery surrendered. Thirty minutes later, the commandos controlled the main Domburg crossroads.
Meanwhile, a coordinated assault with naval gunfire, fighter bomber attacks, and 48 Commando’s advance was assembled, and by 6:30 pm the entire W13 battery and its gunners were captured.
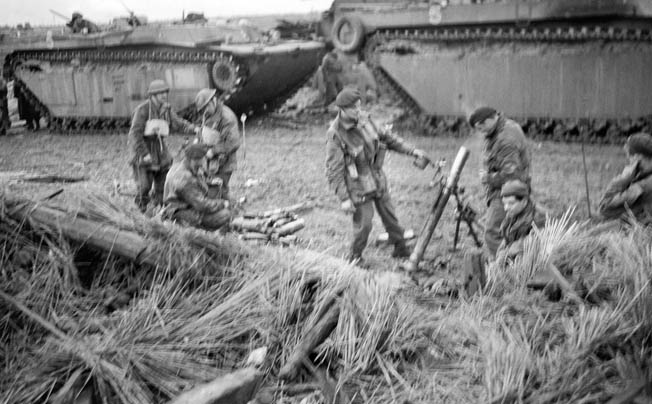
With darkness, the commandos cleaned their weapons, hauled ammunition, and prepared to advance again at dawn.
At dusk on November 1, the 4th Special Service Brigade possessed six miles of sand dunes. All three Royal Marine Commando battalions and the two troops of No. 10 (IA) Commando were ashore and, despite casualties, were ready and eager for action the following day.
During the day, after much effort at White Beach, a total of eight vehicles—two Shermans, three mine-clearing flail tanks, two AVREs (engineer vehicles) and an armored bulldozer—made it through the polder toward Westkapelle. Nine others had to be abandoned to the rising tide and seven withdrew to Ostend.
That night, however, the tide drowned the three flail tanks in Westkapelle. Additionally, most of the specialized armored assault teams had been lost on landing, with only a single Sherman having fired at targets in Westkapelle.
Due to 47 Commando’s late landing, the attack on W11 by Phillips’ men did not start until 5 pm, became disorganized, and had to be pulled back and reassembled south of the Westkapelle gap because of darkness and mounting casualties. A second attack was planned for the next morning.
A British priority for D+1 was to knock out the last remaining coastal battery, W11, with its four 150mm guns to allow Royal Navy minesweeping to commence to the northwest of Flushing in the Wielingen Channel. On November 2, RAF Typhoons and the monitor HMS Erebus neutralized German coastal strongpoints and engaged the W11 battery itself.
No. 47 Commando, after passing through 48 Commando, was to move southeast to clear the Dishoek dunes and link up with 4 British Commando heading west from Flushing. Elements of 47 Commando and 10 (IA) Commando, plus a troop of 48 Commando giving enfilading fire, attacked W11 between 8:30 and 9 am on three axes.
By noon on D+2, November 3, the Germans at W11 surrendered in large numbers, many visibly shaken after taking more than 25 hits during the aerial and naval bombardment of the battery the previous day.
No. 47 Commando, by late afternoon on D+2, then headed farther southeast and seized the last centers of German resistance on Walcheren’s western coast—Batteries W4 and W3, northwest of Flushing in the vicinity of Nolledijk. A few hours later, these Royal Marines reached the Nolledijk gap and linked up with British forces coming from Flushing.
COMPLETING THE CAPTURE
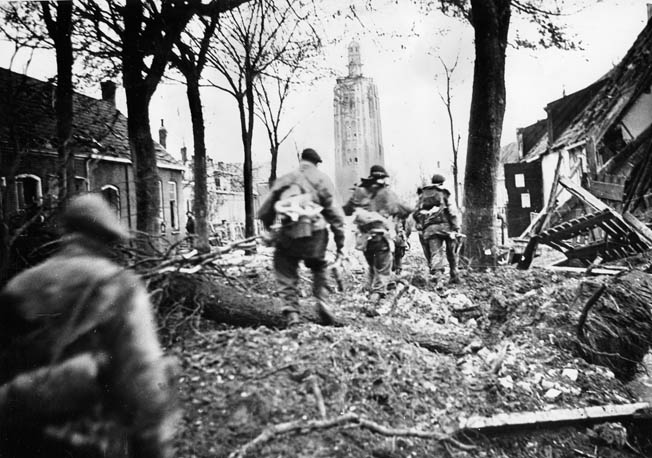
The 4th KOSB was able to reach Middelburg from Flushing to the southwest on the night of November 4 by crossing the flooded airfield beyond Souburg. The next day at 12:30 pm, 11 available Buffaloes, along with accompanying infantry from elements of the 7th/9th Royal Scots and 7th Manchester Regiment on board, swam into the floods and outflanked the pillboxes that had been holding up the advance of the 4th KOSB from Flushing.
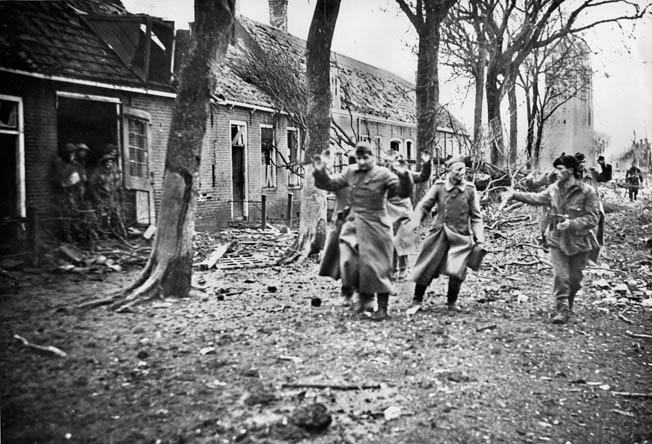
After one Buffalo was destroyed by a mine and another returned to Flushing with wounded soldiers, the remaining nine LVTs entered the center of Middelburg unopposed. There General Dasser surrendered to the rather small force from the 155th Brigade.
At Walcheren’s northern end, in partly wooded dunes between Veere on the east coast and Domburg on the northwest coast, there were two remaining casemated batteries, W18 and W19, along with the remainder of the German 1020th Infantry Regiment. On November 5, No. 41 Commando took W18.
The next morning, No. 41 Commando and No. 10 (IA) Commando made slow headway through the minefields in front of W19. RAF fighter bombers and the three surviving tanks of the original armored assault teams of the 79th Armoured Division assisted the British infantry in the capture of a strongpoint called Black Hut, located in the dunes to the southwest of the W19 battery.
At 3:30 am on November 6, leading elements of the 157th Brigade of the British 52nd Division, after crossing the Sloedam Causeway from South Beveland, entered Middelburg. Simultaneously, the 52nd Division’s 156th Brigade moved north to Veere and captured the town. Veere had been functioning as a German escape route to Schouwen, the next island eastward.
Also on the 6th, the 4th KOSB arrived from Flushing along with a company of the 7th/9th Royal Scots and more than 2,000 German prisoners. Except for those killed and wounded in the mined Buffalo, Middelburg was taken without a single British casualty.
On November 7, No. 41 Commando pushed toward the Oranjebosch water-pumping station in the northeast corner of the island. At 8:30 the next morning, D+7, No. 4 Commando, having taken over the lead from No. 41 Commando, met German officers in the Overduin Woods outside Vrouwenpolder, the extreme northeast tip of Walcheren, to discuss terms of surrender. The W19 battery surrendered with the rest, and the Royal Engineers destroyed its guns. Shortly thereafter, all German resistance on Walcheren ceased.
OUTCOME
The Official History of the Canadian Army in the Second World War refers to Operation Infatuate as “a Cinderella battle,” taking a “backseat” to both MarketGarden and the later Battle of the Bulge. But there was no glass slipper accompanying this battle, just the bloody and gritty tally of two armies trying to kill each other.
In the end, Allied casualties for Operation Infatuate were heavy, given the battle’s weeklong duration. British, Canadian, and Allied casualties were reported by General Simonds as 703 officers and 12,170 other ranks killed, wounded, and missing.
In addition, all 24 armored vehicles with the armored assault teams were lost, including numerous amphibians (Buffaloes and Weasels). The Royal Navy had 17 of its 27 gunboats destroyed or put out of action. The landing force lost just over 50 percent of its LCTs and 42 out of 72 LCAs.
The Germans lost 300 of their concrete bunkers and associated heavy ordnance and the 70th Infantry Division was removed from the Wehrmacht’s order of battle. At least 40,000 Germans were captured and hundreds killed or wounded. The Dutch civilian population, caught in the crossfire, also suffered heavy casualties.
With the “cork” at last removed from the Scheldt Estuary, the river was swept for mines; it was not until November 28 that the first large ships were able to use the port. By December 14, though, 19,000 tons of supplies were being unloaded at Antwerp daily. The opening of the port did not come a moment too soon, for the German Ardennes counteroffensive, called the Battle of the Bulge in the West, was launched on December 16.
Walcheren Island itself was devastated, with almost 90 percent of its landmass left underwater. Land mines and booby traps had to be cleared for both the safety of the Allied soldiers and the Dutch civilian population. The dike repair started in earnest but was not compeleted until the winter of 1946.
Many of the battlefield’s sites remain today, such as the dunes and a restored observation bunker. However, there are few remnants of the German batteries that covered the watery minefields of the Western Scheldt Estuary, the opening of which was the primary reason for Operations Infatuate I and II.
General Guy Simonds quipped after the war, “If Walcheren had been a defeat, it would have been as famous as Arnhem,” acknowledging that Operation Market-Garden had eclipsed his own Operation Infatuate—the last, large-scale, seaborne assault in Europe.
Afternoon,
I am writing my grandfathers stories of the war and I know for a fact that he was involved in this assault. He was a Royal Engineer attached to Candians or a British Division, I am waiting for his records to be sent to me by the MOD. He mentioned that he had to hide in a farm house and was hidden in an attic with his comrades. Some fleed as the Germans were or did plan a counter attack somewhere however, I cannot see anything regarding a counter attack from another island or nearby?
He managed to get some eggs which he boiled in his helmet for food until the coast was clear and he escaped back to allied lines. Does this sound familiar at all?
Thanks
Hi Tom,
Respect for your grandfather and what he did for our freedom. I live in this area and doing some investigations about the 1940 German invasion and the effects of the battle of the Scheldt in 1944. If you have questions i can try to help you. I can visit places and make pictures if needed.
Kind regards
Lars van Lier
Great article. One small error. Major General Dan Spry commanded 3rd Canadian Division not Major General Bert Hoffmeister as stated in the artile. Hoffmeister commanded 5th Canadian Armoured Division which was in Italy at the time and did arrive in Europe until early 1945 to participate in the liberation of Holland.