By Vincent P. O’Hara & Enrico Cernuschi
On May 9, 1936, four days after Italian troops entered Ethiopia’s capital, Addis Ababa, Mussolini appeared on a balcony of Rome’s Palazzo Venezia to proclaim Victor Emmanuel emperor of the newly created Italian East Africa. Never again were fascism and Mussolini so popular.
Italian East Africa symbolized Italy’s aspiration to great-power status. It lay beyond the Mediterranean prison that Mussolini felt confined his nation and enjoyed a potentially strategic position with its long coastline extending down the southern third of the Red Sea, interdicting the crucial British sealane between India and Suez.
A Feet of Survival
Following the Munich conference in 1938, Great Britain began to study ways to resolve the Italian problem in the Middle East. The foreign office believed the swift conquest of Italy’s new empire might decisively undermine Mussolini’s power base at home. However, Mussolini himself did not seem to attach much importance to holding the colony. In October 1936, he sacked his deputy minister of war for warning that if war came East Africa would fall as quickly as it had been taken unless Il Duce immediately invested money in its defense infrastructure.
The Italian Navy, for its part, toyed with the tantalizing idea of creating an oceanic strike force consisting of diesel battleships, aircraft carriers, supply ships, and tropicalized men-of-war to sail from a network of newly built bases along the Somali coast. However, this plan’s price tag made its fulfillment little more than a fantasy.
By June 1940, when the anticipated war with the British Empire finally began, Massawa was the only base along the lengthy coastline of Somalia and Eritrea with a naval presence. At this Red Sea port, Italy deployed eight modern submarines, seven destroyers, two old torpedo boats, five World War I-era motor torpedo boats, and the large colonial sloop, Eritrea. This was hardly the oceanic strike force Italy’s maritime strategists envisioned, but Great Britain nonetheless regarded these ships as a knife pressed against the throat of Suez.
In the eyes of Rome, however, the Red Sea Squadron’s inadequate stocks of fuel and ammunition limited its role to one of survival and sea denial for the duration of what the government hoped would be a short war.
A War of Intelligence
On June 10, 1940, Rear Admiral A.J.L. Murray commanded the British Red Sea Force based at Aden. Murray mustered the New Zealand light cruiser Leander and the Australian Hobart. In the weeks leading up to war, especially after Great Britain read Italy’s orders for the “immediate and secret mobilization of the army and air force in east Africa,” the British Admiralty dispatched the old cruiser Carlisle; three sloops, Auckland, Flamingo, and Grimsby; and the modern ships of the 28th Destroyer Division, Kandahar, Kingston, Kimberley, and Khartoum, to supplement Murray’s command. The Red Sea Force had multiple missions: to prevent Italian reinforcements, to engage the Massawa squadron, to blockade the coast of Italian Somaliland, to protect the vital shipping lane up to Suez, and to defend Aden from surface attack.
Rear Admiral Carlo Balsamo commanded Italy’s squadron. His missions were less ambitious: to dispute passage of the Red Sea and preserve his force. The submarines were his principal offensive weapon. On June 10 they occupied or were en route to their patrol stations, but their forewarned enemy had halted all mercantile shipping to the Red Sea since May 24, and the submarines enjoyed scant success. Galilei sank the Norwegian tanker James Stove (8,215 tons) 12 miles off Aden on June 16. The hulk of that freighter burned for three days with grim effect on the city’s native population. As a matter of fact, the Royal Navy took the threat of the Italian submarines so seriously that it attributed even the loss of the Indian sloop Pathan (661 tons), sunk off Bombay on June 23 presumably by a floating mine, to the submarine Galvani.
In exchange Italy lost four submarines. Crew poisoning caused by a leak of methyl chloride (used as a cheap substitute for freon in the air conditioning system) caused Macallé to be stranded and wrecked on June 15. Four days later misguided doctrine betrayed Galilei off Aden. Up until 1942 Italian submarine commanders trusted their guns and surface speed and did not hesitate to fight enemy ships on the surface if conditions appeared to warrant it. On that day the sloop Shoreham and the 650-ton armed trawler Moonstone found the Italian boat on the surface. She dived, but after undergoing a depth charge attack, Galilei battle-surfaced and manned her guns.
Ten minutes into the ensuing action Moonstone landed two 4-inch shells on the submarine’s conning tower from very close range, killing the captain, gun crew, and all the other officers except a lone midshipman. Moonstone swiftly launched a boat, and before the young officer understood what was happening, British sailors had boarded. He dropped the codes overboard, but the British discovered general operational orders that allowed the sloop Falmouth to track down the submarine Galvani at the entrance of the Persian Gulf.
In this night action of June 24, Falmouth caught the Italian boat on the surface, damaged her, and then, with Kimberley; standing by, forced her to surrender and scuttle herself. Italian sources, however, deny Galilei carried such valuable information on an operational mission and suggest her capture provided a convenient cover to protect other intelligence sources.
After the end of the campaign in eastern Africa, the Italians discovered, with dismay, that the very professional civilian barman at the officer’s mess in Massawa was not Sicilian, as supposed, but a Maltese infiltrated there in 1938. The same intelligence (whatever the source) led to the interception of Torricelli, the fourth Red Sea submarine lost in the war’s first fortnight.
Sinking of Torricelli
On June 14 Torricelli, under Corvette Captain Salvatore Pelosi, relieved Ferraris after she also suffered a case of methyl chloride poisoning off Djibouti. On June 21, Shoreham, Kingston, and Khartoum encountered and slightly damaged Torricelli. Pelosi aborted his mission and began the long trip back to Massawa. The most dangerous point in this passage was Bab el Mandeb—the Gate of Tears—the heavily patrolled 15-mile-wide choke point between the Gulf of Aden and the Red Sea.
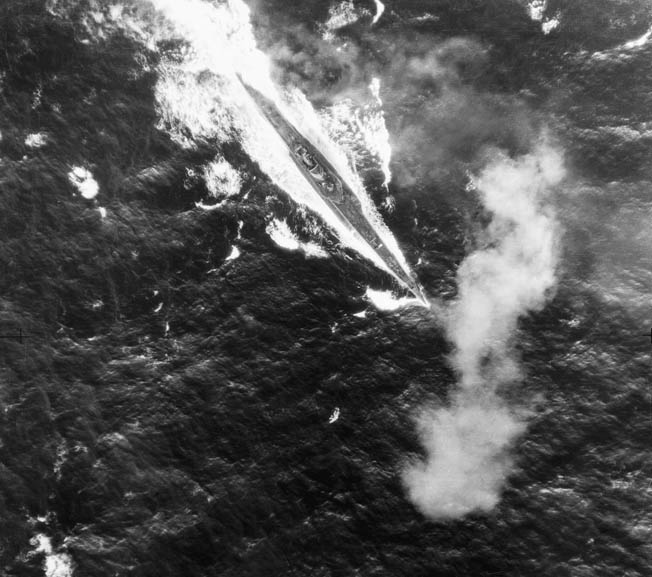
Shoreham spotted Torricelli off Perim Island early on the morning of June 23. The Italian submarine submerged briefly but found no security in the clear, shallow water. Pelosi surfaced, preferring to outrun the British sloop rather than submit to a depth-charge attack. He did not know Shoreham formed just one end of a search line that included the destroyers Kandahar, Kingston, Khartoum, and the Indian sloop Indus.
At 5:30 am, Torricelli initiated the action with her 3.9-inch conning tower gun from a range of 5,500 yards, and her second salvo scored a lucky blow, damaging Shoreham’s bow and causing her to turn away. Indus appeared, but she was no faster than the submarine, and it momentarily seemed to Pelosi his boat might pull away. But when the column of three destroyers hove into view, his hope swiftly vanished. Kingston, in the lead, opened fire with her forward guns at 5:36.
Torricelli launched four torpedoes back at the British destroyer, which Kingston dodged. As she closed, Kingston opened fire with her machine guns and 40mm “pom-poms,” trying to clear the submarine’s bridge so boarders could capture her like Galilei. However, one of Kingston’s 40mm shells accidentally struck an aerial lead and wounded eight of her crew.
For a half hour the chase dragged on. The other destroyers engaged as they came in range, and the submarine fiercely replied. In growing frustration, the three British warships switched from trying to capture to sinking their enemy. They expended nearly 700 rounds before, at 6:05, a shell destroyed Torricelli’s steering gear and rendered further resistance impossible. Five minutes latter the crew abandoned ship, and Torricelli sank at 6:24.
The British Take Casualties
After rescuing 60 members of the submarine’s crew, the British force split up. According to the British account, Khartoum, with prisoners, set off for her Perim patrol zone. However, at 11:50 a torpedo in her after quintuple mount suddenly exploded for no apparent reason, igniting a huge fire in the after lobby. The crew could not control the conflagration, and Khartoum ran for Perim harbor seven miles distant.
There, her men abandoned ship, swimming for their lives. At 12:45, No. 3 magazine blew up, destroying the ship. This incident is one of the most controversial events of the campaign. Italian and some British writers relate that, in fact, Pelosi’s boat sank the much larger warship. “During the engagement Khartoum sustained one hit from a 10-cm shell which burst near the after bank of 21-in torpedo tubes. A splinter caused the air vessel of a torpedo to explode.”
The last submarine-versus-surface ship engagement occurred after Perla, victim of another poison gas leak, was stranded off Ras Cosar on the evening of June 26 following a depth-charge attack by Kingston. About noon the next day, Leander, Kandahar, and Kingston returned to document the sinking Kingston had incorrectly claimed. Perla fired just one shell at the British warships before her gun jammed. The cruiser’s Supermarine Walrus seaplane took off and dropped several bombs. Then Leander opened fire, observing four straddles and claiming several hits. Despite their optimistic claims, however, splinters from near misses caused the only damage inflicted by the British onslaught.
Two Italian bombers arrived. A British observer recorded that their “attacks, which lasted about half an hour, were pressed home resolutely in face of heavy antiaircraft fire. There were three near misses close to one destroyer. In the final attack by the one remaining aircraft, a bomb missed abreast the Leander’s bridge by about 25 yards, the column of water and some splinters sweeping inboard.” The British warships withdrew under this pressure. A tug rescued Perla and towed her to Massawa where, after seven months of repairs, she returned to duty.
Convoys Through the Red Sea
Great Britain started convoying merchant ships through the Red Sea at the end of June. With the Mediterranean effectively closed to the Allies, the Red Sea passage was critical for supplying and holding Egypt. The Italian command saw this as clearly as the British, but in the first two weeks they had to face the fact that wherever their submarines went a host of British warships appeared. Their destroyers experienced similar frustration. On six occasions in July, August, and September 1940, they sortied in response to reports of Allied vessels sailing between Aden and Suez, failing in every case to make contact.
The approximately 50 Italian bombers available, mostly SM.81s, were slightly more effective, seriously damaging the freighter Mathura in Aden harbor on July 28, 1940, and inflicting splinter damage on Hobart in August during the British evacuation of Berbera. Bombers also damaged the armed boarding vessel Chakdina on August 8, while the Italians seized the little tug Queen and renamed her, somewhat bombastically, Stella d’Italia. She became, for a time, the only armed Italian ship beyond the Bab el Mandeb.
Guglielmotti torpedoed the Greek tanker Atlas on September 6, while high-level bombers damaged the steamship Bhima on September 20.
These slight successes were mere pinpricks, but nonetheless the Admiralty fed Admiral Murray a steady diet of reinforcements. By the end of August he had four light cruisers, Hobart, Leander, Caledon, and Carlisle; three destroyers, Kimberley, Kingston, and Kandahar; and nine sloops, the British ships Flamingo, Auckland, Shoreham, Grimsby, and Falmouth, the Indian ships Clive, Indus, and Hindustan, and the Australian Parramatta. Other warships, including battleships, aircraft carriers, and heavy cruisers, passed through his station on their way to and from Alexandria, often escorting convoys along the way.
Driving the Italian Fleet Back
By October, Great Britain had won the Battle of Britain, Hitler had postponed Operation Sealion, and it became clear the war was going to continue far longer than Mussolini had hoped. Although the Italian Air Force inflicted splinter damage on at least two British freighters between September and October, the lack of gasoline and suitable ordnance (the East African depots stocked only general purpose 50 and 100-kilo bombs) forced the central command in Addis Ababa to concentrate the bombers on Red Sea harbors rather than convoys until the final confrontation in the spring of 1941.
Balsamo’s ships, by now alone, also faced a growing crisis of postponed maintenance, mechanical breakdowns, and crews increasingly demoralized by the rigor of service in such an extreme climate. Fuel oil had become so scarce the Italians even had to switch off their air conditioning systems in August when the average temperature is 96 degrees Fahrenheit. Nonetheless, the Navy continued to fulfill its sea denial mission, keeping three to four ships at best serviceable at all times.
On the evening of October 20, the destroyers Pantera, Leone, Sauro, and Nullo weighed anchor to search for BN 7, a convoy of 32 ships that aerial reconnaissance had spotted bound for Suez protected by Leander with Captain H. E. Horan commanding; the covoy included Kimberley; the sloops Auckland, Indus, and Yarra, a recent arrival; and the minesweepers Derby and Huntley.
Convoy BN 7, timing its progress to pass Massawa in the middle of the night, had reached a point 35 miles north northwest of Jabal-al-Tair Island, itself 110 miles east northeast of Massawa. The sea was calm, and haze limited visibility. Yarra led the way, zigzagging in company with Auckland. Then the Australian sloop sighted fluorescent bow wakes— two vessels approaching at high speed. These were Pantera and Leone commanded by Frigate Captain Paolo Aloisi. The Italians had spotted the convoy at 11:21 pm. Their plan called for the slower and more heavily armed Pantera and Leone to lure the escort away while Sauro and Nullo slipped in behind to torpedo merchant ships.
Yarra challenged as Pantera fired a pair of torpedoes at 11:31 and then another at 11:34. The Australians saw the flashes from broad on the port bow and turned toward the enemy. Meanwhile, the Italian ships came about, firing toward the convoy with their aft mounts. Auckland broadcast an alert and returned fire at an estimated range of 4,000 yards.
Yarra joined in as torpedoes rushed past, narrowly missing. Kimberley, trailing the convoy, rang up 30 knots to close the action. Leander, sailing on the port beam, altered course to the southwest assuming the attackers would make for the South Massawa Channel. The sloops and minesweepers refused the lure and stuck with the convoy.
After the gunfire died out, Leander’s Captain Horan turned north, deciding to cover Harmil passage instead. This fortunate decision took him smack across the course of Sauro and Nullo at 1:48 am as they maneuvered to attack the merchant ships. The cruiser fired star shell trying to silhouette her targets and then aimed her 6-inch guns at Sauro. The rushing crack of cannon fire erupted across the calm sea, and red and green tracers crisscrossed overhead.
Sauro, her careful approach disrupted, hurriedly launched a pair of torpedoes at 2:07, claiming a hit on a steamer, and then turned away. As suddenly as it started, the action ended. At 2:20 am, the searching cruiser’s spotlights fastened on Nullo. She had suffered a steering malfunction and lost contact with her sister. The cruiser opened fire at 4,600 yards, and the two ships traded salvos for about 10 minutes before Nullo vanished in the haze.
The Italians enjoyed one big advantage. They used flashless powder, whereas the muzzle blast from the British cannons broadcast their position each time they fired. Lightly damaged in this exchange, Nullo managed to restore steering and full speed as she turned for Harmil Channel. During her brief action, Leander fired 129 rounds of 6-inch ammunition.
Ambushing Nullo
As in any night action, with limited visibility and ships maneuvering individually, lookouts had difficulty distinguishing friend from foe. At 3 am, Leander challenged another contact, but this proved to be Kimberley. The two ships searched for the enemy for another five minutes before Leander turned back “appreciating,” as Captain Horan noted, “that the enemy was drawing away at the rate of seven knots and that the convoy might be attacked.” Kimberley, however, set course for Harmil, hoping to ambush the Italians as they returned to Massawa.
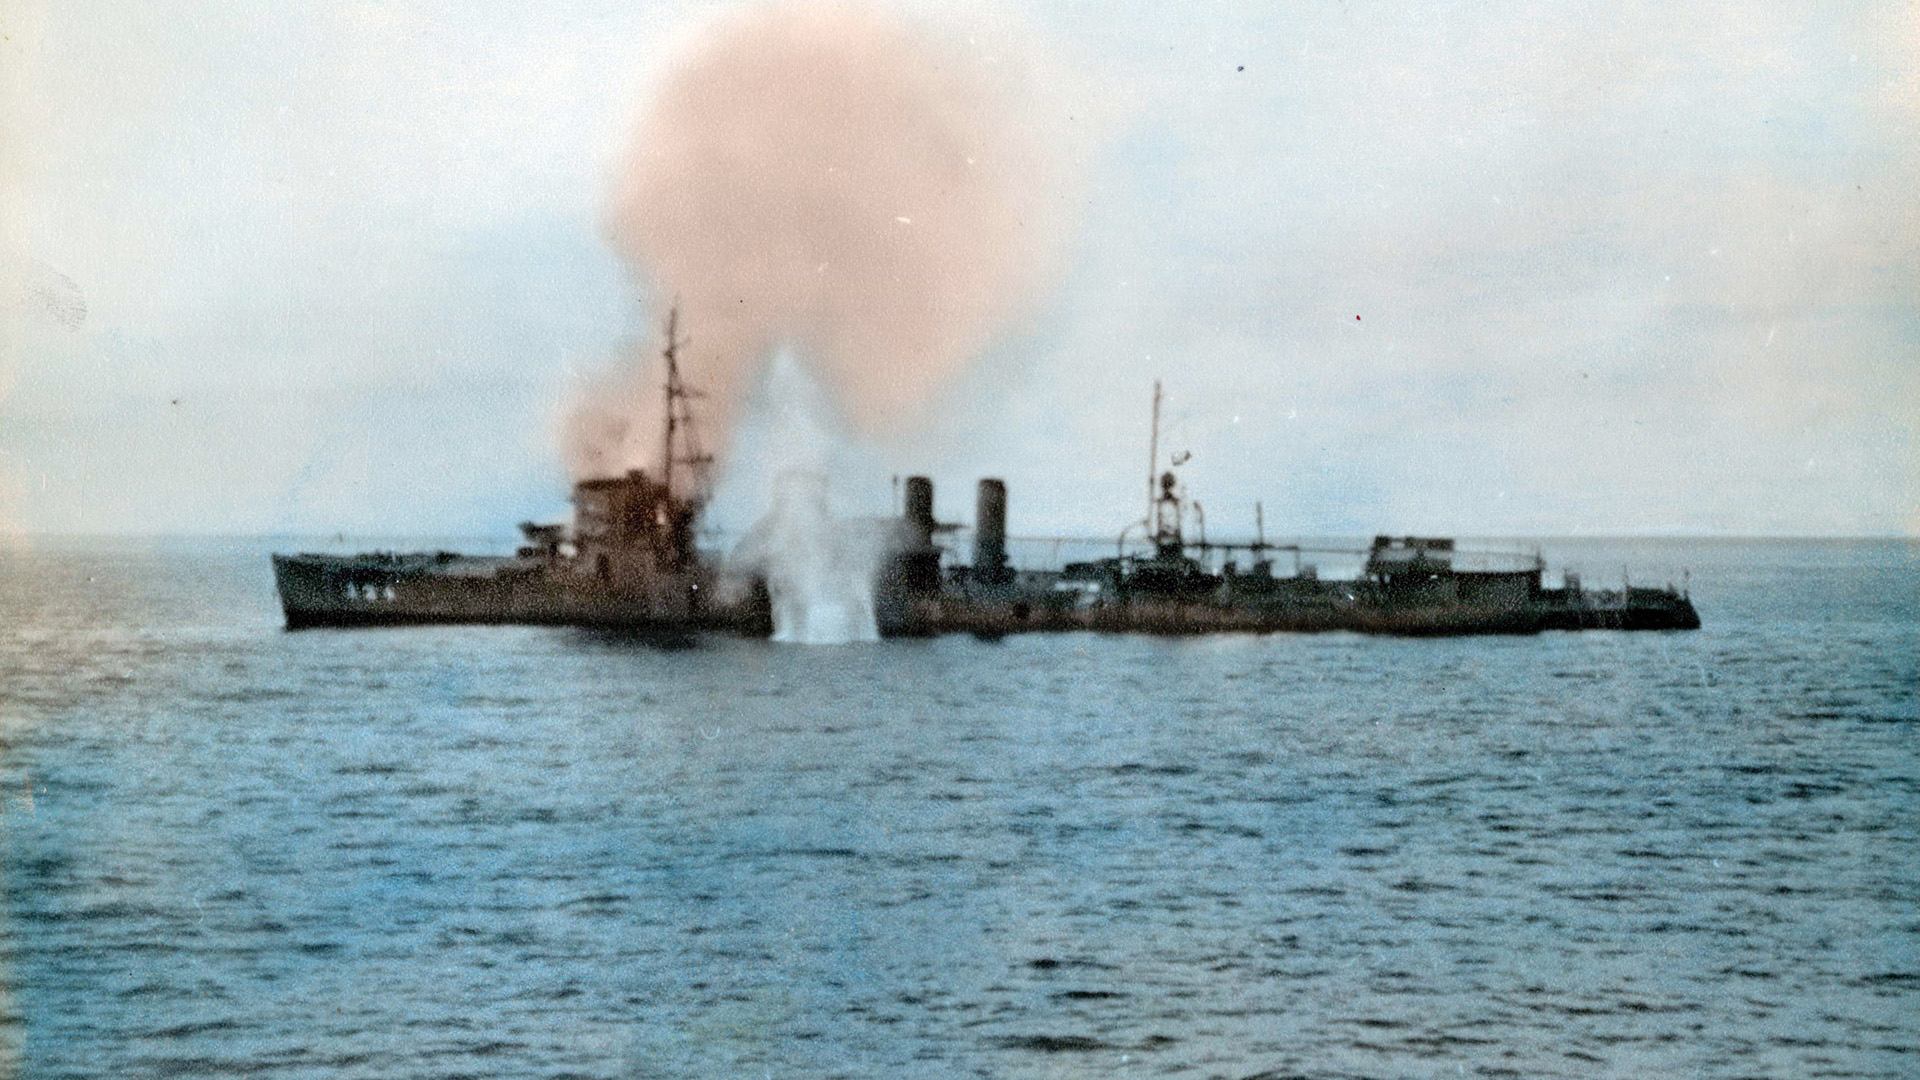
The British destroyer arrived off Harmil Island before dawn (she enjoyed, theoretically, a seven-knot advantage in speed over her adversary). At 5:40 her lookouts reported a contact, and she closed to investigate. She found Nullo, and at 5:55 Kimberley opened fire with her forward mounts from 12,400 yards. The Italian replied at 5:57. By 6:11 the range had closed to 10,300 yards, and Kimberley observed salvos striking home.
Harmil Island’s shore battery of four 4.7-inch guns joined the action at 6:15 from a range of 18,000 yards; at the same time Kimberley turned north emitting black funnel smoke causing Nullo’s gunners to think they had damaged their adversary. At 6:20 while chasing salvos, Nullo struck a coral reef, ripping her hull and damaging her propellers; she lost way and a minute later two shells struck home. Smoke began pouring from her bridge. Nullo managed to limp to shore and run her bow hard aground, still working her aft mount until the list grew too great.
Kimberley fired a torpedo and missed, so she closed range and launched another. This exploded on target at 6:35, breaking the stranded destroyer in two. At the same time the Harmil battery finally found the range, and a shell struck Kimberley’s engine room, wounding three men. Splinters sliced the steam pipes, and the British destroyer drifted to a halt. While trading salvos with the battery, her crew frantically patched the damage and restored power so their ship could retire at 15 knots. This got her out of range, but then Kimberley lost steam pressure once again.
Finally, Leander arrived and towed the crippled warship to Port Sudan. During the battle Kimberley fired 596 semi-armor-piercing and 97 high-explosive rounds. Three Bristol Blenheim bombers destroyed Nullo’s wreck on October 21. Kimberley originally reported there was nothing visible of her foe above water, and after the Blenheims reported that they had hit an Italian destroyer one mile east of Harmil Island the British concluded two ships had been damaged in this action. The Italians salvaged Nullo’s guns and armed a shore battery with them.
No Luck for the Red Sea Squadron
The Red Sea Squadron made a fruitless sortie in December 1940, and aborted a mission planned for early January after a British air attack damaged one of the destroyers. On January 24, the Italians sailed again without results. On the night of February 2, 1941, Pantera, Tigre, and Sauro departed Massawa to conduct a sweep in search of a large convoy known to be at sea.
It was a moonless night as Convoy BN 14, including 39 steamships escorted by a cruiser, a destroyer, and five sloops, made its way north. Sauro, sailing independently, spotted the concentration of ships, made a sighting report, and immediately maneuvered to attack. She launched three torpedoes at a group of steamships and then a minute later at another dimly seen target marked by a large cloud of smoke. She then turned away at speed. Her two companions did not receive the report, but about 10 minutes later Pantera stumbled across the enemy as well. She also fired torpedoes. The Italians heard explosions and later claimed “probable” hits on two freighters. Tigre never made contact.
On her return to Massawa’s south channel, Sauro sighted Kingston from the escort. Because she was out of torpedoes, she retreated at full speed. Fearing the British might attempt another ambush like the one that got Nullo, the Italian squadron concentrated on Sauro and radioed for air support at dawn. The planes never showed up, but all three destroyers safely made port the next morning. Despite their claims, all their torpedoes missed.
Port of Sudan Raid Debacle
Meanwhile, the Allies invaded Italian East Africa. On January 19, the 4th and 5th Indian Divisions and the Sudan Defence Force began advancing east for Massawa. Italian and Eritrean troops, utilizing the difficult terrain, conducted a spirited defense, stopping the Allied column for two months in front of Keren. However, this position finally fell and Indian troops entered Asmara on April 1. Within the next several days British spearheads began probing Massawa’s perimeter.
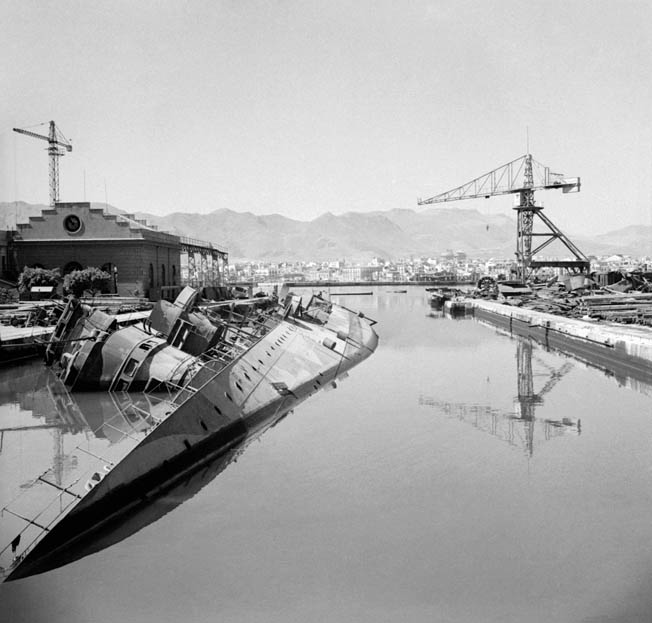
After fresh personnel and key spare parts arrived from Italy by air and the tanker Niobe delivered a much-needed supply of oil from Assab to Massawa, Rear Admiral Mario Bonetti, Balsamo’s replacement from December 1940, received permission to attempt a last grand gesture—a foray by the three largest destroyers, Leone, Pantera, and Tigre, against the shipping at Port Suez, some 500 miles north —and a concurrent raid by the smaller destroyers Battisti, Manin, and Sauro against Port Sudan.
The Port Suez venture ran into problems at the beginning when Leone struck an uncharted rock 45 miles out of Massawa while treading a narrow, reef-bound passage the Italians used to avoid British detection. Flooding and an engine room fire forced her abandonment; her two sisters sank her with gunfire and then returned to port as the accident cost too much time for them to continue their Suez venture.
On the afternoon of April 2, the remaining Italian destroyers sailed once again, this time with Port Sudan, 265 miles north, as their target. British aircraft ineffectively attacked this suicide squadron two hours out of port. Then Battisti suffered engine problems and had to drop out, heading for the Arabian coast where her crew scuttled her. The other four continued at top speed through the night, and by dawn they lay only 30 miles short of their objective.
However, air attacks began with daylight. The carrier Eagle had flown off two squadrons of Fairey Swordfish torpedo bombers to Port Sudan, and they intervened decisively, sinking Sauro by 7:15. The other ships headed for the opposite shore under attack by Blenheims and Vickers Wellesleys of No. 14 and No. 223 Squadrons. Bombs brought Manin to a halt at 8:45. She eventually capsized and sank about 100 miles northeast of Port Sudan.
Pantera and Tigre made it to the Hejaz coast, where the crews scuttled their vessels about 12 miles south of Jeddah. Caught off guard by the Italian sortie, British naval forces rushed north. Kingston arrived at the scene of Pantera and Tigre’s demise at 5 pm. The bombers from No. 223 Squadron had already worked over the two ships, but Kingston shelled Pantera’s hulk for a few minutes and then torpedoed it just to be sure. The Saudis allowed the sailors from the stranded Italian destroyer (along with some other sailors and aviators who arrived later) to depart for Italy in groups over the next two years, with the last ones arriving home during the spring of 1943.
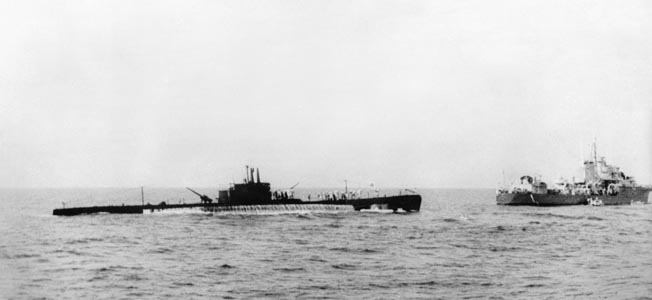
Despite the failure of the Port Sudan raid, the Italian Navy still had teeth. On April 8, Indian troops breached Massawa’s defenses and began advancing into the city. The 14-ton motor torpedo boat MAS213, a World War I relic, sneaked out of harbor before dawn and encountered the light cruiser Capetown escorting minesweepers in the North Massawa Channel about 40 miles north of the port. She crept in at low speed unseen by her target. The roar of her engines coming to life just 300 yards away signaled the tiny boat’s attack.
By then, it was too late for Capetown to take evasive action. One torpedo slammed into the cruiser’s hull, nearly sinking her. Her repairs required more than a year, and she served out the rest of the war as an accommodation ship. When the Allies finally took possession of the port, Parramatta’s captain, Commander J.H. Walker, recalled it “presented a strange sight, as scuttled merchant ships lay in fantastic positions in the various fairways and the harbours.”
Limited Successes from a Limited Force
When war began the Italian Navy had envisioned a three- to six-month campaign. In fact, the campaign lasted 10 months. The first three weeks saw Italy’s submarines strike out in seas empty of all targets but full of hunters swarming wherever they patrolled. This was a victory of intelligence that decapitated Italy’s offensive hopes from the very beginning.
However, while Italy did not achieve any spectacular victories, it always maintained a credible threat. The Allies ran just one large convoy a month, passing Massawa during the period of greatest dark. Italian destroyers sortied against nearly every one, and this was enough. It was more important to sustain the threat than to destroy a merchant ship or two at the risk of irreplaceable destroyers.
At the campaign’s start, the Allies deployed two modern cruisers, four modern destroyers, and eight sloops in the Red Sea. These major surface warships totaled 35,000 tons against 8,800 tons of Italian vessels. By April 1941, Allied strength had increased to five cruisers, one destroyer, and 18 sloops, a total of 39,025 tons against 6,225 for the Italians, not to mention a considerable auxiliary force.
Nevertheless, as long as it had a base, the heavily outgunned and outnumbered Italian Navy fought under extremely difficult conditions, without reinforcements and hardly any resupply. It accomplished its principal objective of disputing Allied use of the critical sea route between India and the Middle East, straining the British Empire’s resources. The Allied conquest of Italian East Africa came just in time. Germany invaded Greece on April 6, 1941, and disaster was about to descend upon Great Britain’s Mediterranean Fleet in the waters off Crete.

Join The Conversation
Comments
View All Comments