By Arnold Blumberg
British naval operations in the Far East in World War II started badly and went downhill from there. Years of underfunding in defense meant that Britain simply did not have the means to defend its huge empire, and for 18 months prior to the Japanese attack on the American naval base at Pearl Harbor, Hawaii, it had stood alone against Nazi Germany.
The Royal Navy was primarily committed to the Battle of the Atlantic, keeping open the all important sea lanes upon which the island nation’s survival depended. In the Far East, there were only token naval forces available to meet the Japanese attack, and in that part of the world Britannia’s claim to rule the ocean waves was immediately exposed for the empty rhetoric it had become.
After December 1941, what remained of the Eastern Fleet retreated into the Indian Ocean for three years. Only in 1945, with Germany on the verge of defeat and the Nazi U-boat threat virtually eliminated, was Britain secure and strong enough to send a fleet back into the Pacific to join the United States in the war against the Japanese Empire.
The new British fleet was the largest single force the Royal Navy had ever assembled, and it arrived in time in theater to play an important part in the battle for Okinawa and in the preparation for the invasion of Japan. It operated alongside the U.S. Navy, which by then had grown into a force of colossal size and power.
The Royal Navy was, naturally and inevitably, in the position of a valued but very junior partner in the struggle against Japan. Nevertheless, it returned there in time to fight and be there at the finish, which was the outcome the politicians wanted. But, because it was late on the scene and totally overshadowed by the massive U.S. Navy its contributions have been largely forgotten—despite the fact that by VJ Day most of the Royal Navy was in the Pacific, and poised to take part in the final battles against Japan.
The new realities of naval warfare came home to the British with a vengeance with the destruction of Britain’s Force Z in the South China Sea only a few days after the Japanese air raid on Pearl Harbor. In October 1941, the British decided to send a naval task force to deter Tokyo from attacking British-held Malaya and Singapore. The main elements of Force Z were meant to be the aircraft carrier HMS Indomitable, the battleship Prince of Wales (a King George V-class battleship), and the battle cruiser Repulse. These vessels were all that London could spare from the defense of the United Kingdom at that stage of the war.
Clearly, sending this small contingent against the Imperial Japanese Navy was a grave risk, driven by the political need to make a demonstration of intent rather than an assessment of the military realities. In fact, the risk became a gamble after the Indomitable was damaged in an accident and could not join the force being dispatched. When the Japanese invaded Malaya, the Prince of Wales and Repulse left Singapore to confront the new enemy.
Along with them sailed just three destroyer escorts; no fleet air cover was available. The Admiralty hoped that ground-based Royal Air Force squadrons would be able to defend the ships, but this early on proved to be merely wishful thinking. The British planes were too few in number in the area and too busy with supporting Commonwealth troops in the ground war in Malaya to provide even a modicum of maritime air cover.
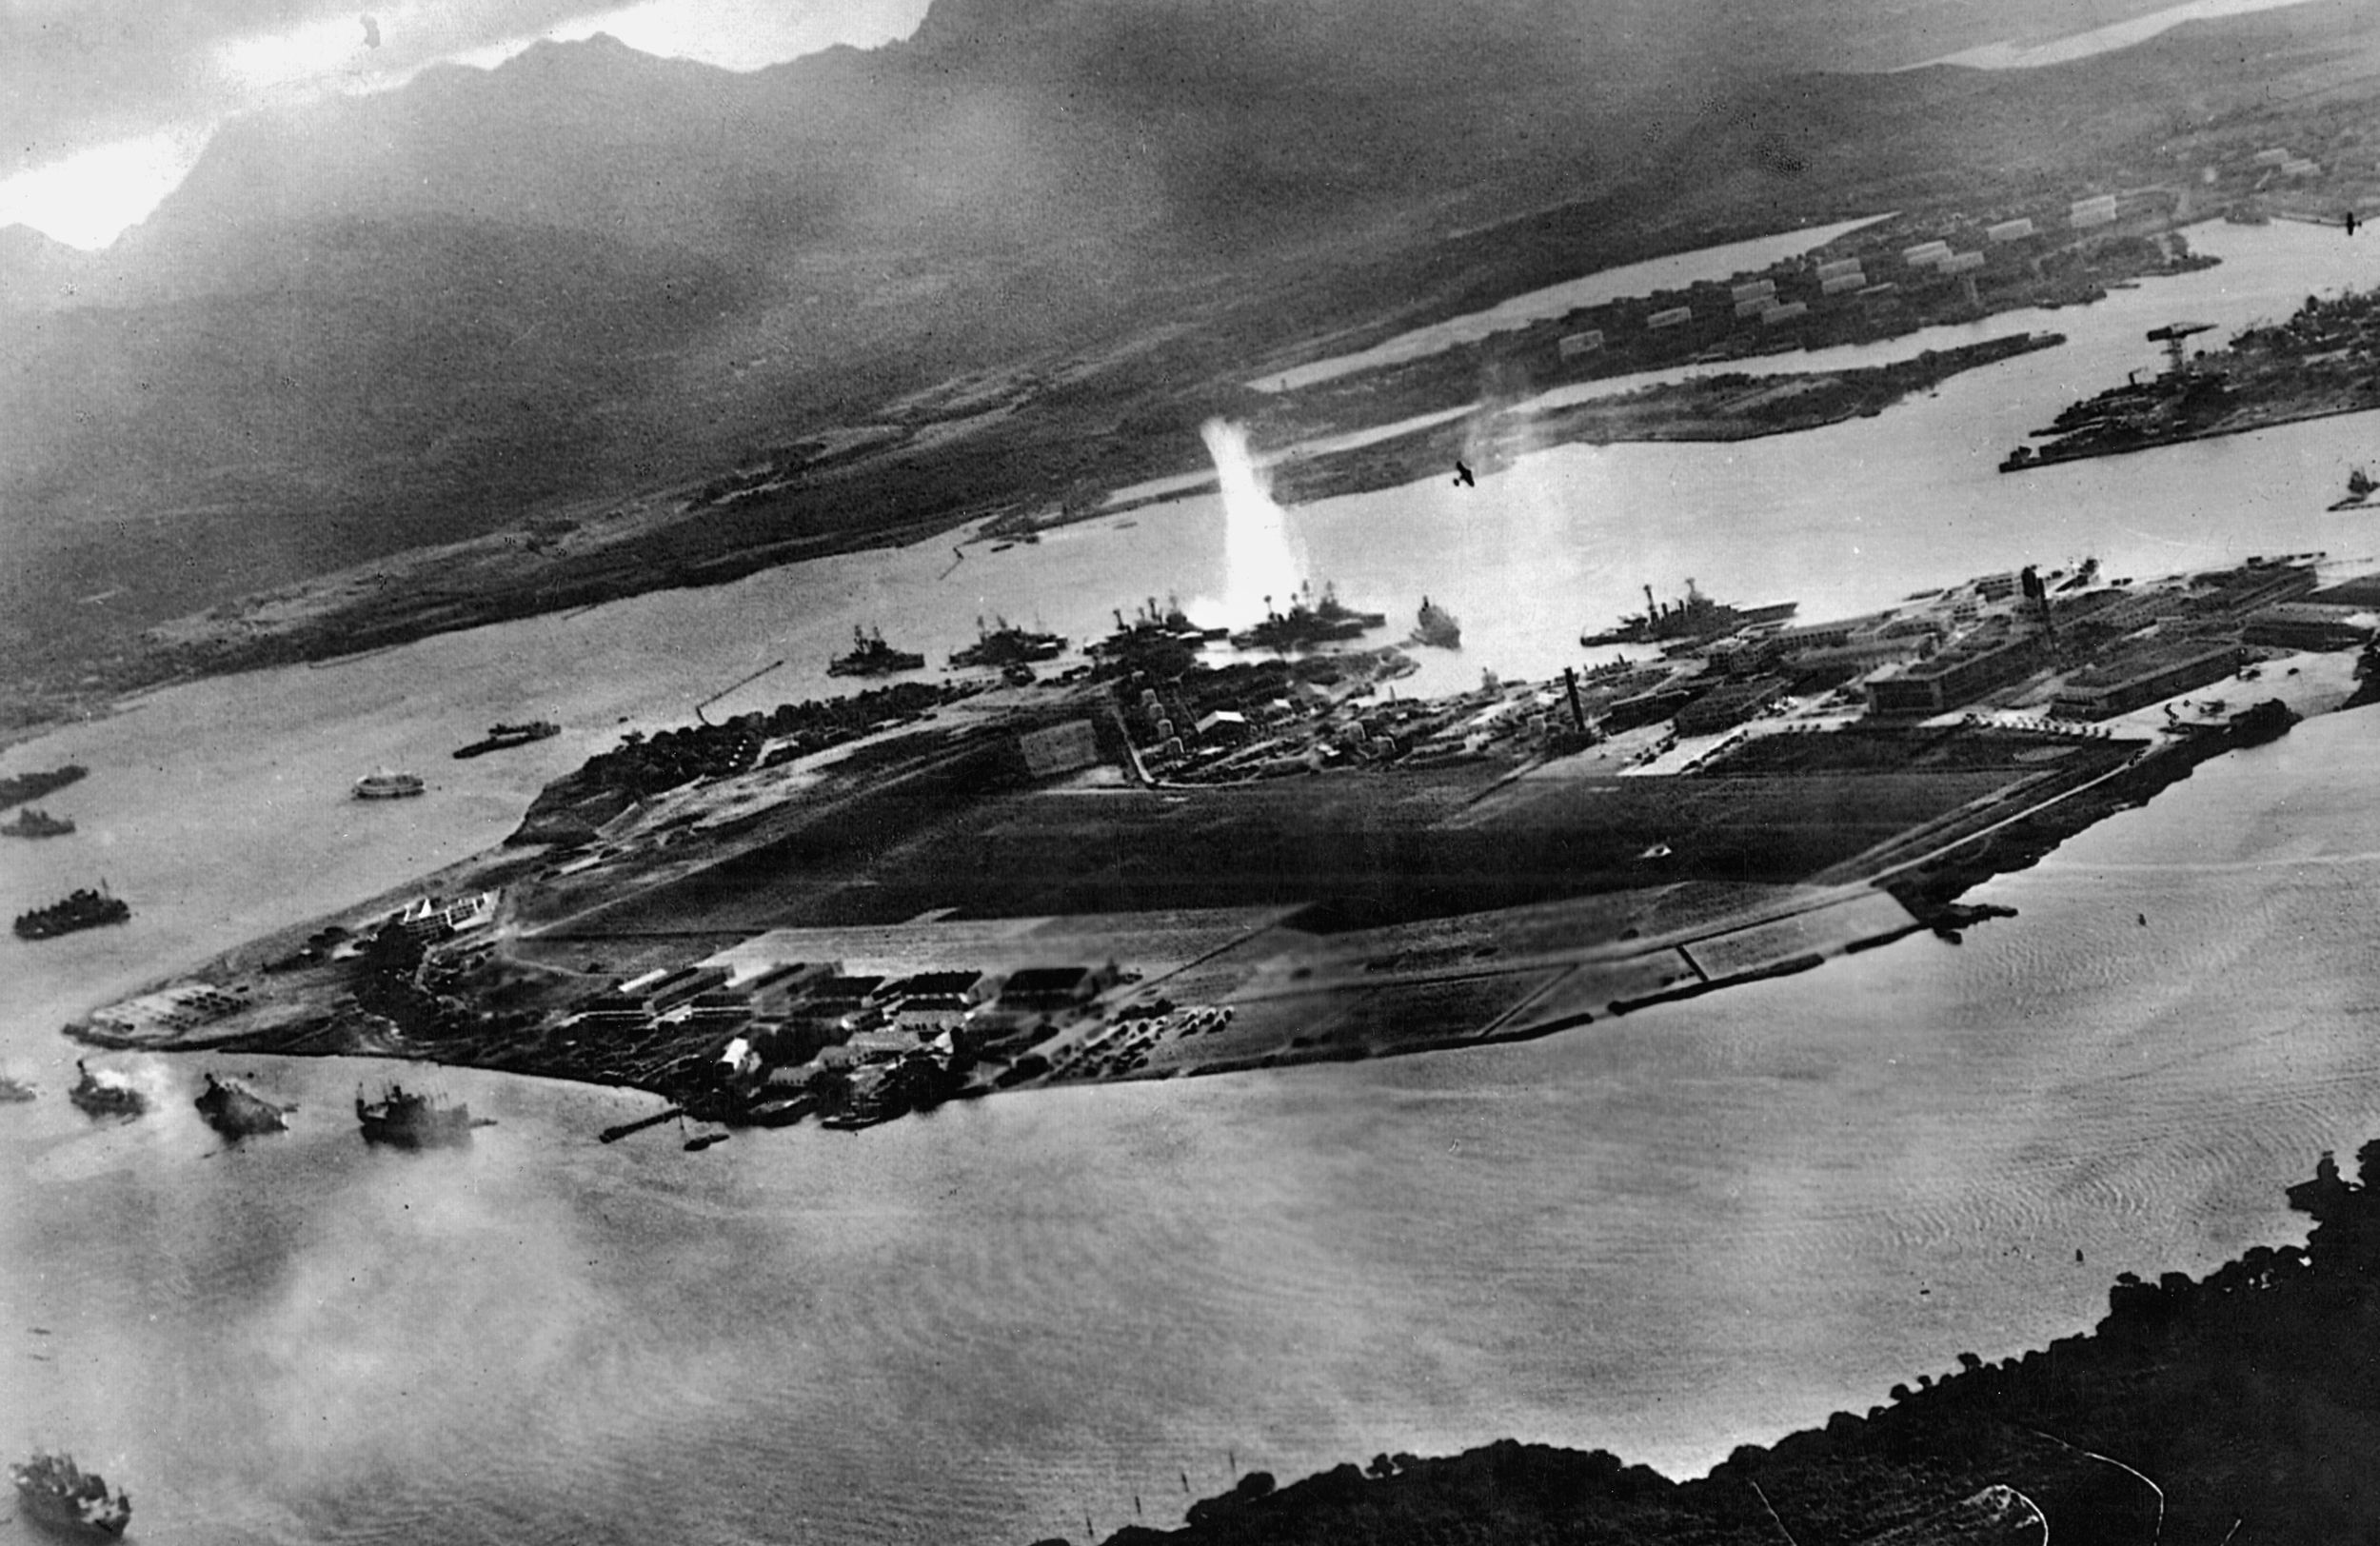
Force Z was spotted by the Japanese submarine I-165 on December 9, 1941, and attacked by the submarine I-156 in the early hours of December 10. For the moment, Force Z was lucky. All the Japanese torpedoes missed their targets. However, a few hours later an enemy reconnaissance aircraft discovered them, and, at 11:15 amplanes from Admiral Matsunaga Sadaichi’s First Air Force based in French Indochina attacked. Up to that time the British ships had maintained radio silence.
For some reason, unknown to this day, no emergency message was sent out by the small fleet until almost noon, too late for the British to organize any air support from their land bases to aid their doomed fleet.
War correspondent Cecil Brown, aboard the Repulse, was a witness to the Japanese aerial assault. He recorded: “At 11:45 hours the [Japanese twin engine] torpedo bombers are coming in. We are putting up [a] beautiful [antiaircraft gun] barrage, a wall of fire. But the bombers come on, in a long glide, from all angles, not simultaneously but alternatively. Some come head-on, some astern and from all positions on both sides of the ship. They level out; the torpedoes seem small, dropping flat into the water sending up splashes, then streaking towards us. The bombers are so close you can almost see the color of the pilots’ eyes … machine gunning our decks as they come in.”
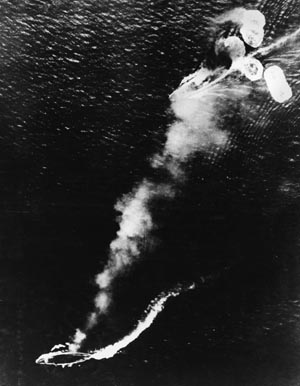
By 11:51, the Prince of Wales was dead in the water, her steering gear and propellers smashed. As the battleship absorbed its death blows, the Repulse and the accompanying destroyers circled the flagship in a vain attempt to shield it from further damage. Then a second wave of enemy aircraft appeared and homed in on the stricken man-of-war “like a pack of wolves on a wounded buck,” recalled one British survivor of the battle. The same eyewitness noted the end of the battle wagon: “I saw one plane drop a torpedo. It fell nose-heavy into the sea and churned-up a thin wake as it drove straight at the immobile Prince of Wales. It exploded against her bows. A couple of seconds later another hit—and another.”
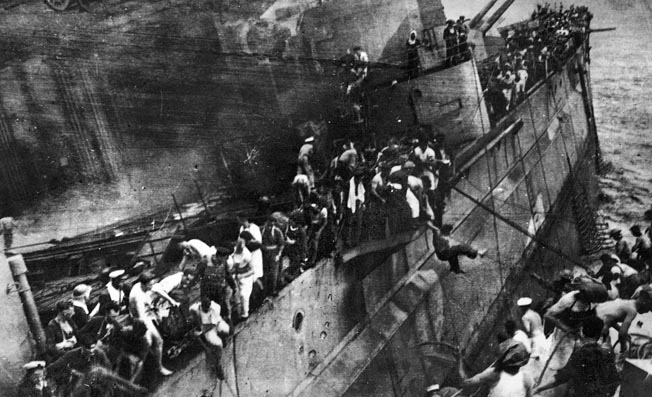
Vice Admiral Sir Tom Phillips, Force Z commander, and Captain John Leach, commander of the Prince of Wales, went down with the ship. Last seen on the bridge, Captain Leach was heard to call out to his crew, “Goodbye. Thank you. Good luck. God bless you.” The Repulse sank at 12:33 pm. The Prince of Wales finally went down 50 minutes later; 840 British sailors lost their lives.
The two ships were among the best and most modern in the Royal Navy inventory, and their demise was a body blow to British morale. A commentator in Singapore soon wrote of the tragedy that it caused a “chill sense of calamity” as well as a feeling of vulnerability: “For the first time, we had an inkling of the true balance of factors in this Pacific war … blown away at one fell swoop was one of the main pillars on which our security rested.”
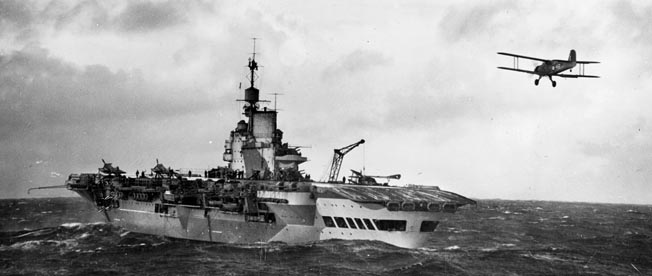
The December 1941 sortie made by Force Z from Singapore was the Royal Navy’s last major operation in the Pacific for the next three years. After the fall of Singapore in February 1942, the British maintained only a small oceangoing force in the Indian Oceanfor defensive purposes. This naval element, named the Eastern Fleet, was headed by Admiral Sir James Somerville. It was composed of one modern and four obsolete battleships, two fleet and one light aircraft carriers, six cruisers, and about 12 destroyers. In addition, attached to the Eastern Fleet was the antiaircraft cruiser Heenskirk, the remnant of the Royal Dutch Navy operating in the Far East at the start of the Pacific War.
On taking command, Somerville quipped, “So this is the Eastern Fleet. Never mind. There’s many a good tune played on an old fiddle.” He went on to say, “I considered making a revised will as I reckoned that if the old battleship met a Japanese fleet we would be in for it.” Almost immediately, the British intention to carry out defensive operations using the Eastern Fleet changed to one of exclusively carrying out evasive actions.
After driving the British out of Southeast Asia, the Japanese considered their options. The Navy favored an invasion of Ceylon in the hope that a major defeat there would destroy the entire position of the British in India. They were probably on the mark since London’s authority in the subcontinent was extremely fragile at the time. However, the incursion was never sanctioned and the Army refused to provide any troops for such an operation.
This failure of the two branches of the Japanese military to cooperate was one of many examples of interservice squabbling during World War II, which time and time again marked and derailed Japanese strategy. The Navy settled instead for a raid on the island, which occurred in April 1942. Six aircraft carriers accompanied by four battleships forayed into the Indian Ocean, attacked bases in Ceylon, and shelled a number of towns on the Indian coast.
Admiral Somerville, very sensibly, did not desire a full-scale engagement against such an overwhelming enemy force, but he felt he had to do something to respond to the Japanese move. His riposte to the Japanese raid on Ceylon was to send his fleet out in hopes of tracking the Japanese and inflicting some measure of damage on them through torpedo attacks delivered at night.
But the British aircraft carrier’s planes were obsolete and no match for their Nipponese opponents in an open-water fight. Fortunately for the British, the two antagonists did not find each other on the high seas. The Japanese, however, did manage to catch and sink two British cruisers, one destroyer, and the HMS Hermes, an old light aircraft carrier, as well as 19 tankers and supply freighters.
The Japanese raid on Ceylon convinced the British admiral that his long-term aim should be to keep his motley force intact so that it could continue to defend the vital and numerous supply lines between India, the Middle East, and South Africa. This important task was humbling but necessary. It was akin to the “fleet-in-being” concept that had traditionally been the last resort of lesser naval powers that might regard their fleet as too precious to risk in battle (Nazi Germany also came to that conclusion).
Following his distasteful but only sound course of action in the face of his enemy’s sea power, Somerville withdrew his Eastern Fleet to naval bases in East Africa, where it would be out of harm’s way from Japanese surface ships and naval air threats. His deputy noted, “In all, we had lost control of the Indian Ocean, except perhaps the area around Ceylon. However, the bulk of the Eastern Fleet had been preserved.”
With the exception of a commando raid on Phuket and two air raids on Sumatra and Java, all of which occurred in 1944, the Eastern Fleet remained on the defensive until the last year of the war.
When the Royal Navy finally returned to the Pacific Ocean in 1945, it was no mere token force, despite being dwarfed by the American Pacific Fleet. There had been much politicking over the last three years as to where it should operate and how and under whose control.
In September 1944, at the Allied Quebec Conference, Prime Minister Winston Churchill offered to send British forces to take part in the proposed invasion of mainland Japan. Churchill promised that English and Commonwealth forces would move to the Pacific Theater as soon as they could be spared from the war against Nazi Germany.
However, there were some in Washington who were less than enthusiastic about British naval participation in the Pacific Ocean when they learned that the British were coming. There was also some dissent in London to the idea of committing major British Empire forces to the Pacific War; it was correctly argued that it would require a massive logistic undertaking. The British minister in charge of transport expressed misgivings as to whether it could even be done.
Ultimately, it was Churchill’s political drive that saw the effort through—and he was right. The restoration of British influence in Asia, and especially influence in the shaping of the postwar world, depended on her playing a significant role in the final defeat of Japan. The senior Allied political leaders mostly accepted that fact, and, at the fleet level relations between the American and British combat heads were respectful, even warm.
Logistics was the key issue for the Royal Navy regarding conducting any meaningful operations in the Pacific. It would never be completely independent of the America support chain, but the aim was that it should be as self-sustaining as possible, for practical as well as political reasons. This did create some problems. The sensible choice for a fleet base was Sydney, Australia, because of its large dock and repair facilities. But Sydney was about 2,000 miles from Okinawa, so forward naval bases were also required.
At various times the fleet, now being called Task Force 57 to fit in with the U.S. Navy order of battle, used the Admiralty Islands and the massive U.S. bases at Ulithi Atoll in the Caroline Island chain and Leyte Gulf in the Philippines. This did not solve the supply problem; keeping the force at sea, on station, and in line with the frenetic tempo of American naval operations was a real challenge for the Royal Navy. For a variety of reasons, it never quite made it. The situation might have improved with the arrival of a second British task force, but that force turned up only in time for the Japanese surrender.
The Royal Navy’s supply difficulties stemmed in part from the sort of navy it was and partly from the totally inadequate resources it possessed. Historically, it had been designed to operate from fixed bases and, because of the size of the British Empire, it could do that and still have a virtual global reach. This meant that the Royal Navy was a long way behind the Americans in the techniques of replacement and replenishment at sea.
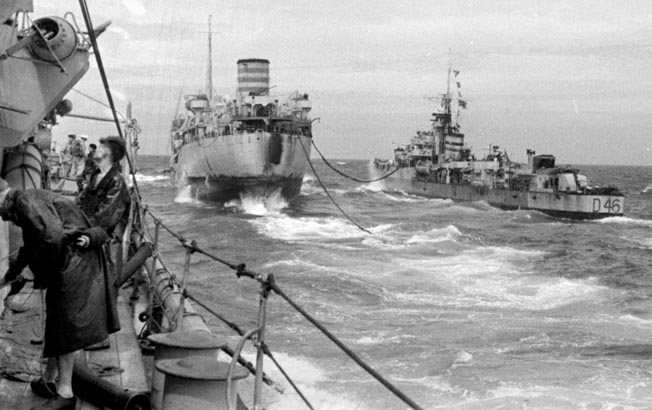
Also, the Pacific Ocean had never been a main operating area for the Royal Navy, so it was not geared or experienced for that sea’s vast distances in the way the U.S. Navy was; its vessels did not have the same cruising ranges and could not remain on station as long as the Yanks. So Task Force 57 started its operational life at a distinct disadvantage. This was compounded by having an inadequate supply fleet.
Its “fleet train” was not only too small, it was also a rather motley collection of vessels cobbled together from a variety of sources. Replenishment at sea often took an embarrassingly long time to complete.
On one occasion, the force had to refuel from two oilers, neither of which had carried out this complex and demanding maneuver before. To add insult to injury, one of the oilers was a clapped-out craft capable of making a speed of only seven knots. The British did learn and improve quickly, but their supply systems and procedures never matched the scale, professionalism, and efficiency of their American counterparts, which had had three years of experience supported by almost limitless resources to build up to that level.
Because of the nature of the war it had been fighting in the Atlantic, the Royal Navy also had relatively little experience in large-scale carrier operations against land targets, which were the bread and butter of the U.S. Navy. For that reason, Task Force 57 practiced against targets in Sumatra when en route to the Pacific to gain experience and at the same time wreck some Japanese oil refineries.
For the Americans the issue was how best to employ Task Force 57 in the next battle against Japan, which would be for the island of Okinawa. The ideal solution would have been to allow the task force to operate more or less independently from the main American fleet. This was considered the best idea because of the separate logistical setups the two fleets used and because it was desirable for the British to perform a mission considered both creditable and important enough to satisfy British sensitivities and make the most of a valuable naval asset.
In this vein, Admiral Chester W. Nimitz, the senior American naval officer in the Pacific, gave Task Force 57 a gracious welcome, signaling, “The British Carrier Task Force and attached units will increase our striking power and demonstrate our unity of purpose against Japan. The U.S. Pacific Fleet welcomes you.”
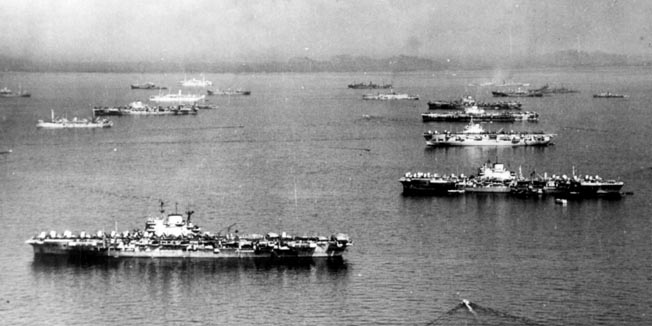
It was certainly not a token contribution. The combat elements of Task Force 57 at that time comprised four fleet carriers embarking 207 combat aircraft, two battleships, five cruisers, and 11 destroyers. There were also six escort aircraft carriers guarding the fleet train and ferrying replacement aircraft.
Commanding this formidable naval armament was Vice Admiral Sir Henry B.H. Rawlings. He and Admiral William F. “Bull” Halsey, at the helm of the American Fifth Fleet and directly in charge of all naval forces at Okinawa, worked well together.

Since the exact command relationship for operations against Japan was a politically sensitive issue, the two senior commanding officers came to an effective agreement early on. Rawlings accepted an offer to put the British fleet close to the main action against the enemy. He had no qualms about taking direction from Halsey, although his orders had to be described as “suggestions.”
The main task—or “suggestion”—given to Rawlings by Halsey was to cordon off and isolate the Sakashima Gunto Islands which lie midway between Okinawa and Formosa (modern Taiwan). The operation, dubbed Operation Iceberg I, commenced on March 26, 1945. The two main islands in the group had three airstrips that the Japanese used as staging posts, allowing planes from Formosa to operate over and bring reinforcement to Okinawa.
Neutralizing the island was, therefore, an important mission. Achieving it meant keeping all six airfields out of commission for as long as possible. However, two major problems soon became apparent. First, the airfields were all defended by strong antiaircraft artillery assets. Second, the Japanese proved adept at repairing damage around the clock to the airfields and getting them operational once more.
The pilots of Task Force 57 were also surprised at the enemy’s talent for deception. Mock-ups, decoys, and well-camouflaged installations made both effective targeting and battle damage assessment more difficult than anticipated.
The British had no night-flying capability because there had been insufficient time to train air crews in the skills required, and no “blind-landing” aids were fitted, although all the British carriers had flight-deck lighting. Unworried about night attacks, enemy engineers were able to repair the runways as soon as it grew dark.
The fleet’s only counter to this was to use a mixture of fuses, both immediate and delayed action, so that the latter would continue to detonate throughout the night and interfere with the repair work. Unfortunately, this attempt to prevent the timely maintenance of the Japanese airdromes had little effect.
In addition to the regular air raids, for several days the force bombarded the islands without provoking much response from the Japanese. However, that all changed on April 2, 1945, the day after American troops stormed ashore on Okinawa.
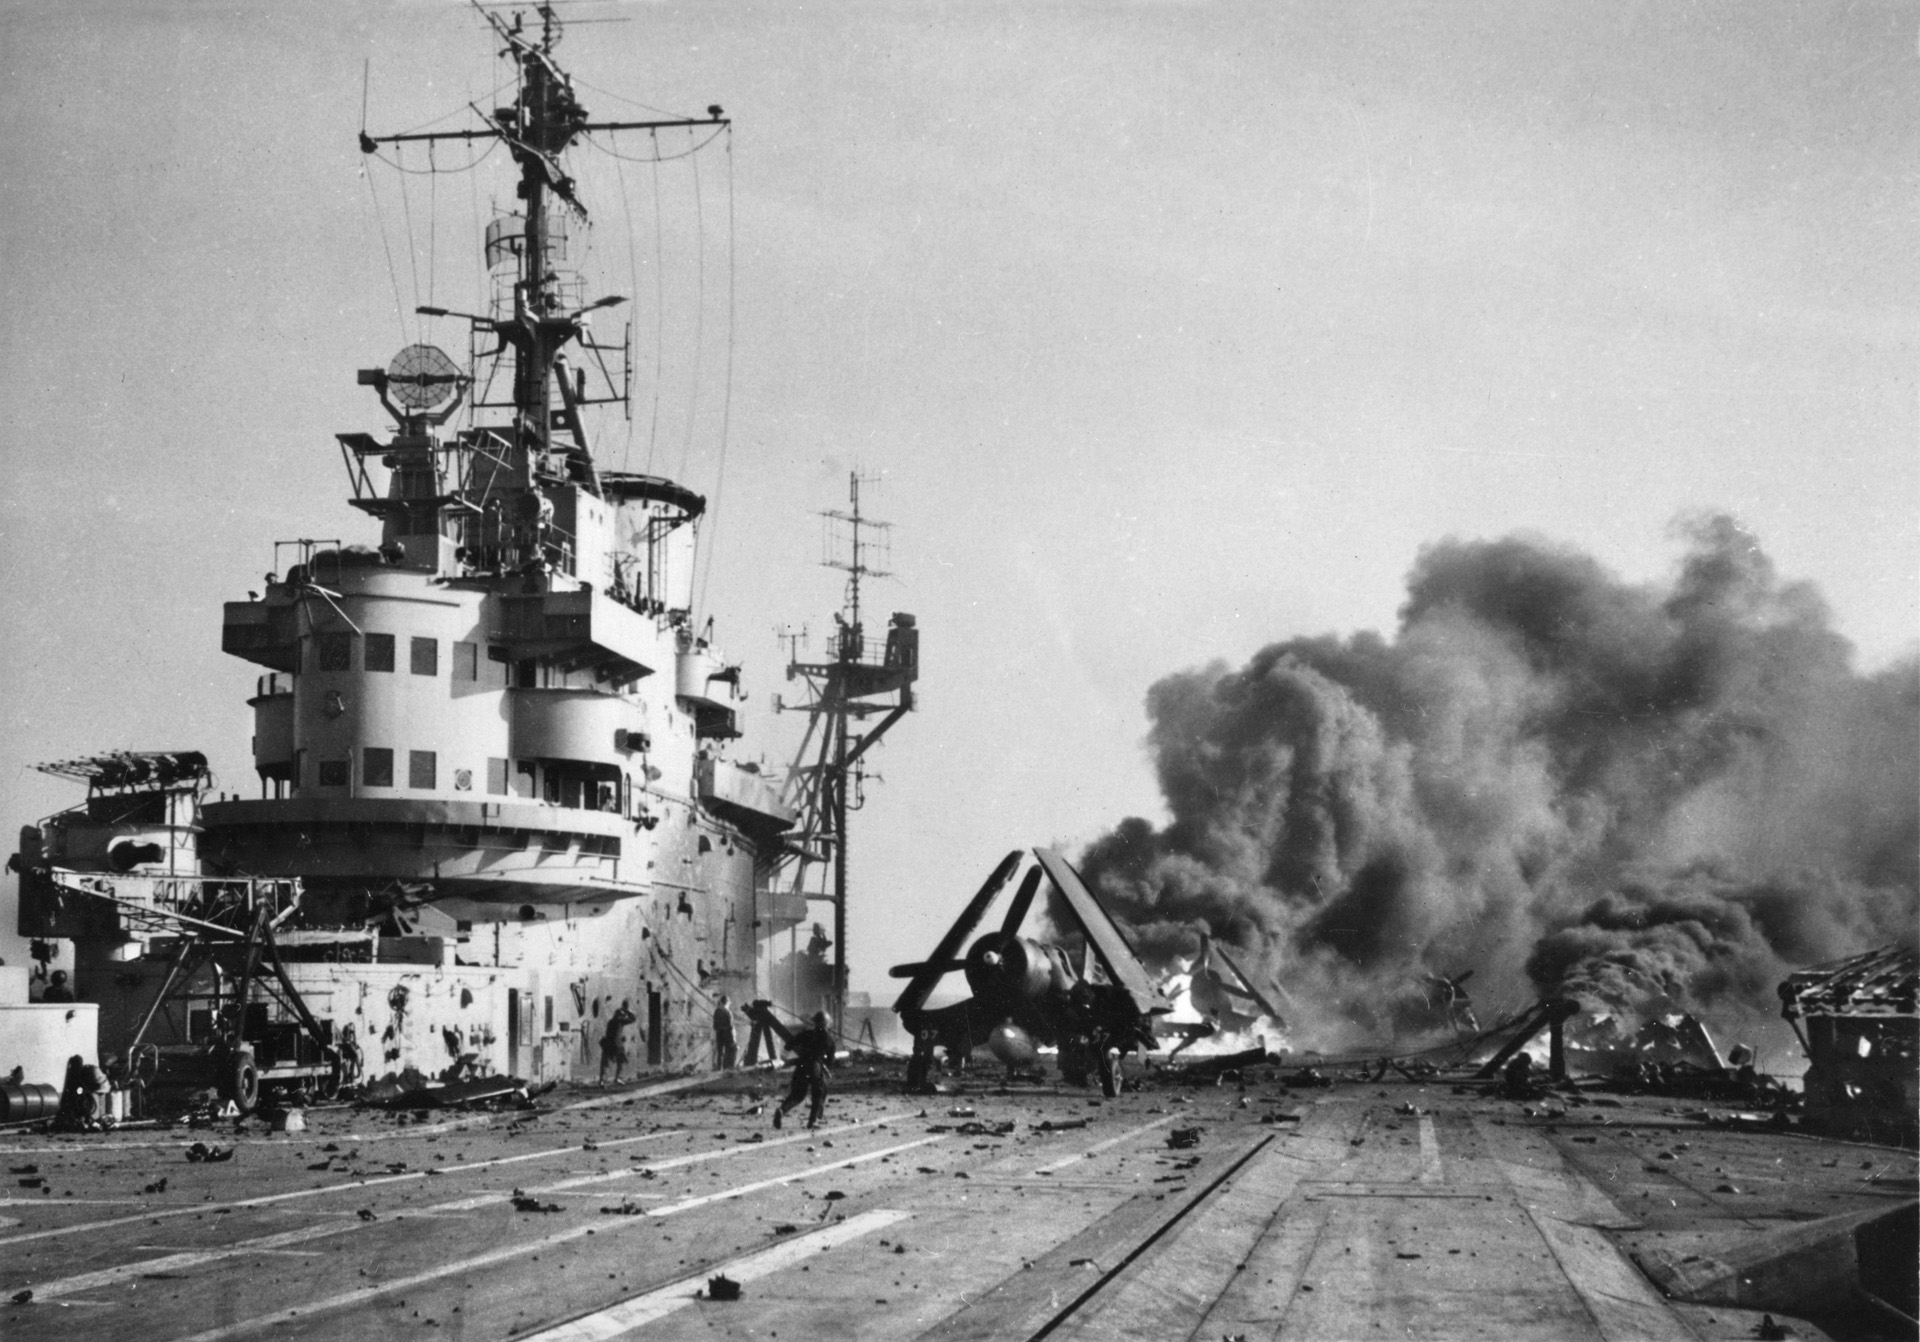
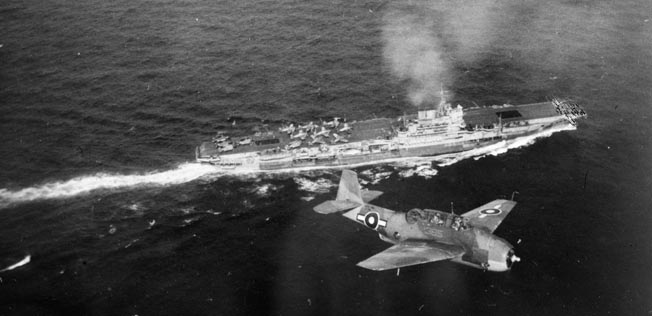
Operational routine called for a preliminary fighter sweep over the target area before the bombers went in. The fighter sweep had just taken off when the destroyers on radar picket duty detected an enemy air attack coming in. The British fighters were recalled and directed onto the attackers. The Japanese planes broke formation about 40 miles out and four Japanese bandits were shot down, but several more got through to the carriers. One passed over the HMS Indomitable, raking the ship’s flight deck with machine-gun fire before strafing the upper works of the battleship HMS King George V. The damage was slight, but the next attacker proved to be a dreaded kamikaze.
After a near vertical dive, the suicide aircraft smashed into the aircraft carrier HMS Indefatigable, hitting the base of the ship’s command and control island and killing 14 crew members. The Flight Deck Officer, Lt. Cmdr. Pat Chambers, was seriously wounded in this strike. He later reported, “The picture I retain of the scene is quite vivid; the starboard wing of the Japanese plane burning on the island aft of the funnel and a great gap from there to the flight deck where the whole lot had blown up, leaving a hole about eight feet long in the island sickbay. Our kamikaze had a bomb of about 250 pounds on him.”
What followed brought the carrier design philosophies of the British and American navies into stark contrast and amazed the U.S. liaison officers who were stationed aboard the Indefatigable. An attack of that nature would normally have put an American carrier out of action. But the Indefatigable was operational again within minutes of being hit by the Japanese plane.
The reason was that all American carriers had wooden flight decks, whereas the British carriers employed armored flight decks. This meant that Royal Navy carriers, size-for-size, could carry fewer aircraft, but by the end of the Okinawa campaign, although all of Task Forces 57’s fleet carriers had been struck by kamikazes, all were still fully operational.
April 2 proved to be a busy day for Task Force 57 as a second kamikaze broke through the protective screen surrounding the fleet. Once again going for a carrier, the Japanese plane dived for HMS Victorious, which was taking evasive action in a hard turn. The kamikaze clipped the flight deck and spun into the sea.
The carrier was undamaged, but apparently its flight deck was littered with body parts of the enemy pilot and pieces of his aircraft. The debris included the dead aviator’s briefing notes, which confirmed what all American and British naval leaders in the region had assumed: the British and American carriers were the top priority targets of the Japanese air attacks.
Although that revelation may not have been surprising to the Allies, it was noteworthy that so many of the attackers chose instead, in the heat of the moment, to assault smaller targets, especially Allied destroyers on radar picket duty.
Supply problems came to the fore for the British again on the following day when the force broke off to rendezvous with the fleet train and refuel. This was delayed by bad weather and by what had now become the usual “problems” for the British Pacific Fleet.
After three frustrating days trying to take on fuel, ammunition, and provisions, Admiral Rawlings set course for the combat zone again with some of his vessels only partly refueled. It was a calculated risk on the admiral’s part driven by the need to honor his promise to be back on station by April 6.
During the first day of renewed attacks against Sakashima Gunto, another Japanese aerial counterattack was broken up by the fleet’s antiaircraft fire ably supported by combat air patrols; only one plane penetrated the fleet’s protective screen. This kamikaze went after the carrier HMS Illustrious; a combination of evasive maneuvering and antiaircraft fire put the enemy pilot off his aim. One wing of his plane clipped the ship’s island before he crashed into the ocean.
Meanwhile, off the coast of Okinawa the U.S. fleet was being pummeled by 700 Japanese aircraft, about half of which were kamikaze attackers, the other half conventional air strikes. Several destroyers were lost and more than 30 U.S. Navy ships were damaged.
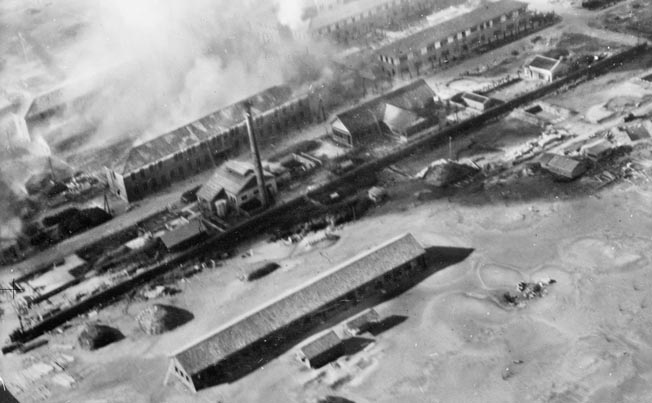
On April 10, 1945, the Royal Navy’s mission in the Pacific changed. It was then known that the Japanese were flying directly from Formosa to Okinawa. American land-based aircraft had tried to interdict this air traffic by strafing and bombing the airfields on Formosa with little success. Task Force 57 was then asked to tackle the job, and it started operations against Formosa on April 12.
Two busy days of combat followed with British planes strafing and bombing anything they saw on the island before the force was ordered back to Sakashima Gunto. After a month of activity there, Task Force 57 sailed to Leyte to take on needed stores.
When the British Pacific Fleet departed Sakashima Gunto on April 20, 1945, it had spent 12 days in action out of the 26 that it had spent in the combat zone and had flown a total of 2,444 aircraft sorties. Of these, 1,961 were by fighters and 483 by Grumma Avenger bombers. Aircraft had dropped 412 tons of bombs on the airfields and fired 315 rockets at a variety of targets.
The final total of enemy aircraft destroyed or damaged in Iceberg I was 134, including those due to air-to-air combat and those destroyed on the ground. More than 100 enemy sampans and other small coastal boats were sunk or critically damaged. Against this loss to the Japanese, the fleet suffered 68 planes lost and 34 aircrew killed.
The verdict on Task Force 57’s actions so far was generally considered “not bad.” The British were on a steep learning curve, getting used to a type of operation for which they were not properly equipped or trained. It had to refuel and resupply more frequently than the U.S. Navy and were still having serious problems with replenishment at sea.
Another serious issue was the Royal Navy’s main strike fighter aircraft: the Supermarine Mk XV Seafire, the maritime version of the Spitfire, It was not performing well. Mechanical problems and a lack of spare parts for repairs prevented them from getting into the air to perform combat missions.
Further, the Seafire’s long nose, which blocked the pilot’s vision, made strafing, bombing runs, and carrier landings a challenge. Most of the other airplane types Task Force 57 was operating were American models: the Vought F4U-1D Corsair and Grumman F6F-5 Hellcat fighters and the Grumman TBF-1 Avenger Torpedo Bomber. These were reliable, simple, sturdy, and effective machines.
Nevertheless, Admiral Nimitz fiercely resisted a proposal offered by Washington to have Task Force 57 move to support the Australian landings in Borneo. He wanted to keep it where the main action was since the British armored carriers had clearly and repeatedly shown their worth.
As a result, Task Force 57 returned to Sakashima Gunto on May 4 to resume operations against enemy airfields and installations there; this new mission was called Operation Iceberg II. The kamikazes were waiting for them. Whether by accident or design, a Japanese aerial group managed to penetrate the defensive ring surrounding the British fleet when the task force’s battleships, with their heavy antiaircraft artillery batteries, were away from the rest of the fleet on a coastal bombardment mission.
Upon the approach of the enemy, the fleet went to “Flash Red” alert just as a kamikaze hit the fight deck of the carrier HMS Formidable, causing an explosion that penetrated the ship’s armored deck and tore through a number of parked airplanes and putting the vessel’s radar out of action. Eight men were killed and 47 others were wounded in the blast, and because it had blown a gaping hole in the deck the explosion sent shrapnel and metal splinters into several internal ship compartments, including the central boiler room.
Within three minutes, two more suicide planes came in, heading for the nearby Indomitable. One attacker was brought down by gunfire less than 30 yards from the carrier, but the other plane held its course through an awesome barrage of antiaircraft shot and shell. Fortunately, its drive was too shallow, and it skidded across the flight deck and over the other side of the ship before exploding. The damage was slight.
It took 90 minutes to bring the fires on the Formidable under control, but within six hours she was operating her aircraft again normally, the hole in her flight deck having been filled with steel plate and cement. An impact of that force and nature would have put an American carrier out of action for months and would have caused absolute carnage below decks.
On May 9, after a break to refuel and because of adverse weather, Task Force 57 was back in action and facing the kamikaze once again. This time the Victorious was hit. The attacker kept coming,even though his airplane was disintegrating around him as a result of repeated and devastating strikes from antiaircraft weapons.
The pilot managed to strike the carrier’s forward elevator, holing the flight deck and putting the elevator motors out of action, as well as destroying the catapult and gun turret. Firefighters were hard at work containing the resulting blaze when a few minutes later a second kamikaze appeared.
This one was much less effective than the first attack; deflected by antiaircraft fire, the single kamikaze hit the deck at such a shallow angle it skidded over the side of the vessel after smashing through some parked planes.
Soon two more kamikazes dived on the Formidable. One was cut to pieces by flak from the battleship HMS Howe. However, the second marauder passed through the barrage even as parts of the burning plane were falling into the sea. The Japanese aviator managed somehow to steer his dying machine into the deck of the carrier and into a group of parked planes. Although the resulting explosion did not penetrate the ship’s flight deck, it did manage to incinerate 25 British fighters and bombers.
The only casualty of this enemy attack was a petty officer gunner. He stayed at his post even as the enemy flew directly at him. As the plane passed over the sailor, one of its wheels decapitated him a split second before the aircraft impacted the ship’s deck.
Both the Formidable and Victorious were back in action the same day as the attack, albeit at a somewhat reduced rate of effectiveness.
Task Force 57 completed Operation Iceberg II on May 26 in support of the American capture of Okinawa. During the operation the British planes had flown 4,893 sorties, of which 2,073 had been strikes, 202 had been forced to return to their carriers before their mission was completed, and the rest were fighting combat air patrol sorties.
A further 470 flights had been flown by combat air patrols and carrier replenishment sorties. Aircraft had dropped 958 tons of bombs and fired 950 rockets. British aircraft losses amounted to 160 from all causes, including 26 planes shot down and 72 more damaged by operating accidents. Royal Navy aircrew losses were 41 killed and missing, with another 44 men killed and 83 wounded in various ship companies.
Finally in late May 1945, Task Force 57 broke off after 62 days at sea, returning to base to refit, resupply, and repair battle damage. Its first major missions of the Pacific War were over. There would be more action to come, including Operation Inmate (June 14-16), involving air attacks on the main Japanese naval bastion at Truk in the western Caroline Islands, as well as raids on Japan itself in the run up to the planned invasion.
The British raids—both by air and shore bombardment—continued right up to August 15, 1945, and the Japanese surrender to the Allies; the second British task force, built around another four fleet carriers and one battleship squadron, arrived too late to take part in the fighting. By VJ Day, the Royal Navy Pacific Fleet had 80 principal warships (including nine large and nine escort aircraft carriers), 30 smaller combat vessels, and 29 submarines.
Had the invasion of the Japanese home islands been carried out by the Allied powers, there can be little doubt that this fleet would have played a significant role in any naval operations.
Task Force 57’s wartime activities sometimes had touches of farce on the logistical side of the equation since the Royal Navy clearly was not designed to operate for long periods of time or distances from its established bases—a vital prerequisite for any war-making capacity in the Pacific Ocean. It had also been trained and geared for the very different forms of warfare that prevailed in the Atlantic Ocean and Mediterranean Sea.
Regardless, it acquitted itself well during the last year of the war in the Pacific. Whether its relatively small contribution in that theater gave Britain a position of greater honor at the end of the conflict in Asia is a moot point. The fact remains that the officers and sailors of Task Force 57 did exactly what was asked of them. The U.S. Navy is given credit for winning the war in the Pacific, but their British ally was there—and was with them at the end.
Join The Conversation
Comments
View All Comments