By John Brown
In the early hours of October 12, 1899, Commandant-General Piet Joubert and 15,000 Boers crossed the border between Transvaal and Natal near Laing’s Nek in southern Africa. Joubert’s main force, led by General Daniel Erasmus’s 2,000-man commando, followed the railway line south through Newcastle toward the township of Dundee. Paralleling him on his left was General Lucas Meyer’s 3,000-man commando. General Johannes Kock, with his Johannesburg commando and German and Dutch volunteers, came in from the corner of the Orange Free State south of Majuba and advanced on Dundee. London Times reporter Leo Amery vividly described the Boers’ departure as “an endless procession of silent misty figures, horsemen, artillery, and wagons, filing past in the dark, cold night along the winding road that led to where the black shoulder of Majuba stood up against the greyer sky.”
The Brits and Boers go to War
The Boers were setting out to punish the British for taking the side of their emigrant countrymen, the so-called Uitlanders, who had flocked into the gold-rich Boer republics of Transvaal and the Orange Free State throughout the past two decades. After an abortive raid on Johannesburg by English guerrillas in 1896, relations between the Boers and Great Britain continued to worsen. Transvaal President Paul Kruger gave the British an ultimatum—stop building up British forces in the colonies of Cape Colony and Natal, or face the consequences. Kruger’s ultimatum had expired—unanswered—at midnight on October 11.
Major General Sir Penn Symons, a headstrong fire-eater, was commander in chief of British forces in Natal. For defense against a Boer attack, he had some 10,000 troops in Ladysmith and had positioned Brig. Gen. James Yule’s 8th Brigade at Dundee, 70 miles northeast of Ladysmith. The brigade comprised four battalions—the 2nd Dublin Fusiliers, the 1st Royal Irish Fusiliers, the 60th Rifles, and the 1st Leicesters. There was also one cavalry regiment, the 18th Hussars, and three batteries of field artillery armed with six 15-pounder guns.
By separating his forces, Symons had left himself in a dangerous position. It was completely against the advice of General Sir Redvers Buller, who was on his way from England with a 47,000-man army corps and had strongly warned Symons that British forces in Natal should not be pushed too far northward, but instead should be concentrated on the defensive along a line behind the Tugela River. Symons did not take the warning.
Battle of Talana Hill: a ‘Comical’ Beginning
Meyer’s commando reached Talana Hill, a steep ridge two miles east of Dundee, at dawn on October 20. In the valley below, Symons had his four battalions on parade in full battle gear. They were facing north toward Mount Impati, a few miles north of Dundee, from which point they knew Joubert’s main army was advancing. Suddenly, some of the troops noticed movements in the mists on Talana Hill and were able to make out Meyer’s commandos hauling three field guns into position. Some of the British troops broke into laughter; the idea of a couple of thousand Boers attacking an entire British brigade was comical. A few minutes later, a barrage of 75mm shells wiped the smiles from their faces.
All three of Symons’s artillery batteries went into action, and for 10 minutes there was a brisk exchange of shells, but no one, at least on the British side, was injured. Even before the exchange ended, Symons had issued orders. Meyer’s commando coming from the east must not be allowed to link up with Joubert’s main army coming from the north. That link could come in just a few hours. Meyer’s commando must be defeated immediately.
Taking the Hill
Talana Hill was in fact twin hills, 600-foot Talana to the north and 550-foot Lennox Hill to the south. At the base of Talana was a eucalyptus wood and Smit’s Farm, consisting of a number of farm buildings and fields ringed with stone walls. This was the place, Symons decided, from which to launch a concentrated infantry attack. He would use the tactics of the time, the tactics all regular armies were trained to follow—first, an artillery barrage; second, an infantry attack; and third, a cavalry charge to cut off the enemy’s retreat.
Some of Symons’s officers were alarmed by his belief in the virtues of close-order, concentrated attack. To them, an open-order formation was the only tactic to use against magazine rifles. But Symons had made up his mind. His artillery would deal with the southern part of the ridge, Lennox Hill, and his infantry would concentrate in the few hundred yards covered by the stone walls and the eucalyptus wood directly below Talana, before storming the hill in overwhelming strength. There was no time for maneuvering—it was to be a knockout blow before Meyer could link up with Joubert. Symons told his cavalry commander, Lt. Col. B.D. Moller, not to wait for the infantry but to act on his own if he saw a chance. At about 7 am, Moller rode off to the back of Talana Hill to cut off Meyer’s line of retreat.
The infantry assault began at 7:30. In the lead was the 2nd Dublin Fusiliers, followed by the 60th Rifles and the 1st Royal Irish Fusiliers, who would charge straight through to take the final objective, the summit. The battalions gradually worked their way up the hill in the face of intensive fire from the Boers’ German-made Mauser rifles, but as they reached the top, shrapnel from their own artillery caused severe casualties and halted them. The Boers retreated down the other side of the hill, mounted their horses, and rode away. The artillery did not fire on them, thinking the riders were the 18th Hussars. The Hussars had, in fact, ridden round the back of Mount Impati, where two days later they were surrounded and forced to surrender. The attack had cost the British 51 dead, including the CO of the 60th, and 203 wounded, including Symons, who died a few days later.
The Boers Close in on Ladysmith
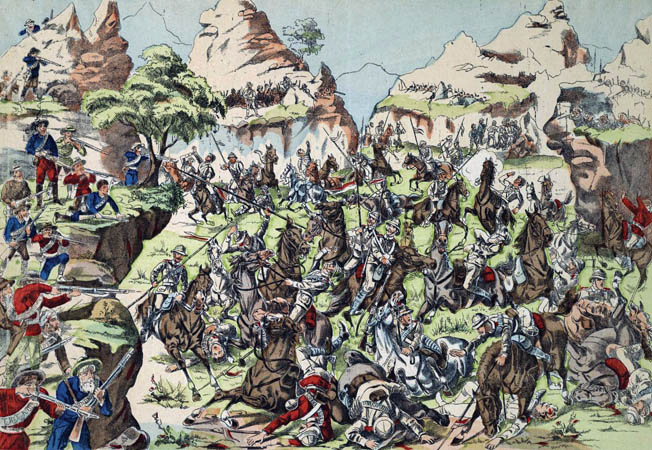
The British garrison at Ladysmith celebrated Talana Hill as a victory, but General Sir George White was more concerned with Joubert’s main force, some of whom were reported to have occupied Elandslaagte, 15 miles up the railway line from Ladysmith. The Boer troops were Kock’s commando, which had diverged from Joubert’s force. White sent the 7th Brigade, comprising 1,630 infantry, 1,314 cavalry, and 552 gunners with 18 guns and commanded by Colonel Ian Hamilton, by train to Elandslaagte. They found the 1,000-man commando with three 75mm guns occupying a small ridge south of the railway station. Hamilton ordered an immediate attack.
It was afternoon and a storm was approaching when the British attack went in against volleys of rifle fire. The battalions involved were abruptly brought to a halt. The storm broke over them, giving the battalions an opportunity to renew the attack and clear the crest of the ridge. The cavalry charged as the Boers withdrew, killing some 60 of them, including Kock. British casualties in the action were 50 killed and 213 wounded.
A new threat to Ladysmith was now developing from the west, with Boer Commandant Henrik Prinsloo coming along the railway from Harrismith. On October 24, White tried to prevent a junction of Prinsloo’s commando and Joubert’s forces by personally leading three battalions of infantry and the 5th Lancers and 5th Dragoon Guards to occupy some hills northwest of Ladysmith. The attempt failed—the Boers had gotten there first.
“This has not been a successful day”
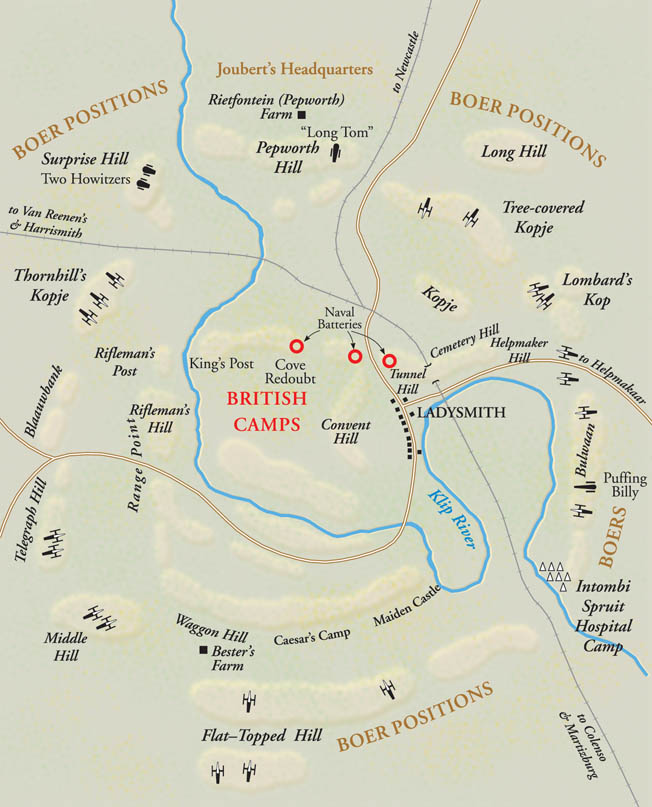
Meanwhile, at Dundee, Yule’s brigade was coming under increasing artillery bombardment, including a much-dreaded “Long Tom,” a Creusot 155mm gun throwing a 94-pound shell. Yule sought White’s permission to withdraw to Ladysmith by the one route still open to him. White agreed, and the brigade began a forced march that brought them into Ladysmith on October 26. This increased White’s numbers to 13,745 soldiers and 5,400 civilians, including 2,400 African servants and Indian camp followers. The next day, Joubert’s forces were reported closing in from the north. One commando had occupied Pepworth Hill, four miles northeast of Ladysmith, where it was hastily building a platform for a Long Tom. White decided to attack Pepworth Hill.
He would use two brigades. The 8th Brigade would make a night march around to the eastern flank of the hill and attack from that direction at dawn on October 30, while the 7th Brigade created a diversion by advancing directly toward the hill. Artillery support would be by 15-pounders and a recently arrived naval gun detachment of four 12-pounders and two 4.7-inch guns. The cavalry would then sweep around the eastern flank and drive the fleeing Boers up against two battalions of infantry that had night-marched around the western flank of the hill.
The ensuing operation was a disaster. The Boers, whose scouts had warned about a coming attack, had moved their positions to three nearby hills. The British brigades launched their attacks against empty defenses and immediately came under Boer rifle and artillery fire from the three hills. They panicked and retreated, along with the cavalry. The two battalions that had marched around the western flank of Pepworth Hill were isolated and forced to surrender. Lt. Col. Sir Henry Rawlinson described the debacle somewhat mildly in his diary: “This has not been a successful day. Now we shall have to sit down in Ladysmith and stand investment and bombardment, which is very unpleasant. Ladysmith is one of the most indefensible localities I ever came across. It is like the bottom of a tea cup with one side broken out and a large basin outside the tea cup.”
After the setback, White could still have withdrawn to the Tugela, although he would have had to abandon or destroy a huge amount of stores and supplies at Ladysmith. But he was too depressed to make the decision; he did nothing. Three days later, on November 2, Boer commandos cut the railway and telegraph lines south of Ladysmith. All communication with the outside world would now depend upon African runners or carrier pigeons.
Drive to Durban
On November 9, Joubert held a council of war outside Ladysmith. As he saw it, there were three options open to the Boers: they could launch an all-out attack on Ladysmith, divide their forces between Ladysmith and the Tugela line, or drive directly south in the hope of reaching Durban before British reinforcements could arrive. It was decided that they would drive directly on Durban.
To Relieve Ladysmith
Meanwhile, Buller had arrived in Cape Colony, where he would assemble his corps of 47,000 with the intention of defeating Boer forces while advancing on and occupying Bloemfontein, the capital of the Orange Free State, and Pretoria, capital of the Transvaal. With that accomplished, the presidents of both republics would be forced to surrender. But Buller found, to his consternation, that White was not holding Natal as he had assumed, but had allowed himself to be besieged in Ladysmith, with no intention of trying to fight his way out. Buller decided to take Lt. Gen. Sir Francis Clery’s 2nd Division and, with himself in command, undertake the relief of Ladysmith and the clearing of all Boers from Natal. Clery’s 2nd Division began disembarking at Durban on November 12.
The leading brigade of the 2nd Division, commanded by Maj. Gen. Henry Hildyard, reached Willow Grange, 10 miles south of Estcourt, where Joubert’s force had concentrated. Hildyard immediately attacked. He inflicted few casualties on the Boers, but Joubert, who had been injured when thrown from a horse, decided to withdraw and set up defenses on the Tugela at Colenso. The Boers withdrew, taking with them 2,000 horses and cattle. The young Louis Botha took Joubert’s place as commandant-general.
Attempting a River Crossing
Buller arrived in Natal to find that Botha and his Boers were occupying positions astride the demolished rail bridge over the Tugela at Colenso. He established himself at Frere, 10 miles south of the river, with 19,000 men in four infantry brigades, two regiments of cavalry, and some locally raised mounted troops. From Frere, he attempted reconnaissance of the area to Colenso, but fast-riding, sharp-shooting Boer patrols frustrated all such attempts. Lacking information on Colenso’s defenses and the numbers of Boers manning them, Buller decided on a wide flanking move to the west. He would cross the Tugela at Potgieter’s Drift, 15 miles upstream of Colenso, and come in behind the Colenso defenses close to Ladysmith. Buller informed White of his plan by heliograph on December 11.
Buller’s immediate problem was how to get across the river. Only three drifts were known to be fordable at the time: Old Wagon Drift half a mile upstream of the demolished railway bridge at Colenso and just downstream of the iron road bridge that was still intact; Bridle Drift four miles upstream; and Robinson’s Drift, another three miles upstream. All three were stoutly defended, as were Colenso and the hills behind it.
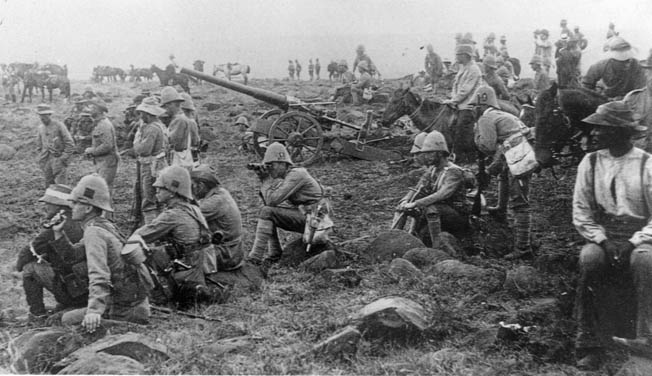
Buller’s plan of attack was for his cavalry and mounted infantry to cover the flanks of the attacking infantry with those on the right flank to try to occupy Hlangwane Hill south of Colenso. Hildyard’s 2nd Brigade was to attack at Wagon Drift while Maj. Gen. Fitzroy Hart’s 5th Brigade attacked at Bridle Drift. The other two brigades, the 4th and 6th, would be held in reserve. The attacks would open up with a bombardment by a dozen 15-pounders, four naval 12-pounders, and two naval 4.7-inch cannons, all commanded by Colonel Charles Long.
The 2nd and 5th Brigades advanced at dawn on December 15, but Long, anxious to get his guns into action as far forward as possible, went ahead of Hildyard’s 2nd Brigade and sited two batteries east of Colenso station, only 1,000 yards from Boer positions north of the river. The six naval guns came in behind him. On the left, Hart marched his brigade in close order toward Bridle Drift. But Hart was using an inaccurate map and that fact as well as a misunderstanding by his African guide and interpreter caused him to direct the brigade into a loop made by the river and a spruit, or stream, where the brigade came under Boer artillery and rifle fire.
Buller saw all this from his headquarters on Naval Gun Hill, two miles south of Colenso, and sent gallopers to tell Hart to extricate himself. Buller could also see that Long’s guns were under intense Boer fire and that Hildyard’s brigade had not even started its approach to Colenso. Then the guns ceased firing, the crews killed or taking cover in a nearby gully. Buller rode out to check on his remaining guns and to see Hildyard. Even if Hildyard got across the river without artillery support, he would be in a precarious position because of Hart’s failure to cross the river upstream and turn the Boer flank. Buller ordered the action aborted and as many guns and crews as possible withdrawn.
“A Serious Reverse”
Buller then rode to a large donga behind the gun positions while Hildyard led two battalions into Colenso looking for guns and any British troops still there. Buller was hit in the side and badly bruised by a bullet as he asked some troops to go forward to help with the gun rescue. Some complied, including three of his personal staff—Captains H.N. Schofield and Walter Congreve and Lieutenant Frederick Roberts, son of Field Marshal Lord Frederick Roberts. Schofield managed to bring two guns back, but Congreve and Roberts were wounded while trying to recover the other guns. Roberts died later in the day. All three officers were awarded the Victoria Cross. (Congreve and Roberts were two of only three pairs of fathers and sons who were awarded the VC. Roberts’s father was awarded it in the Indian Mutiny in 1858, and Congreve’s son was awarded it in France in 1916.)
Further attempts to rescue guns led to more casualties, and Buller called off the effort. During the afternoon, Hart’s battered brigade was extricated from the loop. British casualties in the action at Colenso were 143 killed, 755 wounded, and 240 missing, mostly captured. It was by no means a disaster but, as Buller described it in a cable to the War Office in London, it was “a serious reverse.” In another cable to the secretary of state for war, the Marquis of Lansdowne, Buller said: “My failure today raises a serious question. I do not think I am now strong enough to relieve White. Colenso is a fortress that, if not taken in a rush, could only be taken by a siege. My view is that I ought to let Ladysmith go, and occupy good positions for the defense of South Natal.”
Lord Roberts Takes Command
Lansdowne, in collusion with other politicians, persuaded Prime Minister Lord Robert Salisbury to appoint Roberts commander of all British forces in South Africa, with Buller to remain in Natal as his subordinate and Maj. Gen. Lord Horatio Kitchener as Roberts’s chief of staff. By appointing popular heroes Roberts and Kitchener, the Salisbury administration hoped to escape most of the criticism caused by the failures at Colenso and the battles of Magersfontein and Stormberg that same week, which quickly become known across Great Britain as “Black Week.”
Roberts’s plan of campaign was to abandon attempts to relieve Kimberley and Mafeking and approach Ladysmith by a turning movement. Roberts assumed that Buller, having been reinforced with Lt. Gen. Sir Charles Warren’s 5th Division, would hold an “entrenched camp” at Chievely and use the rest of his force to turn the enemy position on the Tugela. If that succeeded, Roberts reasoned, “I imagine it would be desirable to evacuate Ladysmith and hold the line of the Tugela.”
The Boers Continue the Offensive
After the Boer victories of Black Week, President Kruger urged his commanders to take the offensive and attack the isolated British garrisons at Mafeking, Kimberley, and Ladysmith, with the first blow falling on Ladysmith. Ladysmith had been under siege for six weeks, with White seemingly content to sit and do nothing until he was relieved. For the troops and civilians inside the garrison, the monotony was broken only by sporadic Boer gunfire. Some officers tried to persuade White to take the offensive. He agreed only to mount limited raids on Boer guns threatening the town. In the early hours of December 8, 600 men of the Imperial Light Horse and Natal Carbineers attacked a Boer Long Tom and a 4.5-inch howitzer on Gun Hill, two miles east of the defenses, and blew up both guns. Three days later, an attack by men of the 2nd Rifle Brigade on a howitzer to the northwest of the defenses was less successful; the gun was blown up, but the raiding party lost nine killed and 52 wounded before fighting its way back to Ladysmith.

The Boer guns continued their destruction, and daytime temperatures soared to between 100 and 105 degrees, making life miserable for the British defenders. Illness and fevers, particularly enteric fever, reduced the forces capable of manning the defenses. Buller’s failure at Colenso was a severe blow to morale in the town.
After a relatively quiet Christmas at Ladysmith, some 2,000 Boers, on the night of January 5, 1900, attacked the southeast corner and eastern end of the 150-foot steep hill called Platrand, and by dawn they had driven the British from the crest of the hill. Rawlinson and Maj. Gen. Sir Archibald Hunter organized a counterattack and stabilized the position, but suffered heavy casualties every time they tried to drive the Boers from the crest of the hill. The next day, the Boers attacked the naval gun emplacement but were driven off. The British attacked Platrand again and reached the crest, but the Boers fought on until darkness fell and then disappeared into the night. British casualties in the action were 17 officers and 152 soldiers killed, and 28 and 221 wounded. Boer casualties were unknown but more than 50 bodies were found on the battlefield.
Roberts agreed to a proposal by Buller that he again try to relieve Ladysmith. He planned to have Maj. Gen. Neville Lyttelton’s 4th Brigade distract Botha by a feint attack at Potgieter’s Drift on the Tugela, while Warren, with 10,600 infantry, 2,200 mounted troops, and 36 guns, would cross the river seven miles higher up at Trikhardt’s Drift and capture the hills beyond. Then Buller, with 7,200 infantry, 400 mounted troops, and 22 guns, would attack the hills beyond Potgieter’s, which were believed to be more strongly defended. Once they were through the hills, only 15 miles of open plain, with no easily defended obstacles, lay between them and Ladysmith.
The Battle of Spion Kop
There was nothing wrong with Buller’s plan; the flaw was in giving the principal part to the newly arrived Warren. Warren took two days to move the five miles to Trikhardt’s Drift, two more days to cross the river, and two more days to launch his first attack, on January 20, against the Rangeworthy Hills, which were his main objective. Warren’s orders included breaking the Boer line west of a 1,500-foot-high, flat-topped hill named Spion Kop (Lookout Hill).
British maps of the area were rudimentary, and no one really knew what shape the hill actually was or what lay immediately beyond it. Warren dithered over the problem and decided that he would attack Spion Kop itself. If the kop was taken and held and heavy guns were installed on it, the Boers would be driven back to the plain. Buller agreed that Warren should attack the hill; as soon as the attack succeeded, Buller would push his own force forward from Potgieter’s.
On the night of January 23, Maj. Gen. E.R.P. Woodgate led an assault group of his 11th Lancashire Brigade up a steep spur to the top of the kop and drove off the Boer picket. The troops then dug in as best they could on the sloping, stony plateau they thought, in the dark and mist, was the crest of the hill. As far as they could tell they were masters of the mountain. Woodgate sent one of his officers back to brief Warren and Buller and ask for naval guns and more of his brigade to be sent up.
When the sun came up next morning and the mist began to clear at about 8 am, the Lancashires found that Spion Kop was not as they had supposed. The small triangle of the summit, about an acre in extent, was overlooked by two knolls. As soon as there was enough light, Boer defenders unleashed almost point-blank rifle fire at the British troops. Boer artillery soon found the range and pom-pom and heavier shells began to explode among the Lancashires in the long, shallow, crescent-shaped trench they had dug in the dark. They had taken the mountain, but they were now trapped upon it.
The morning wore on with some 2,000 soldiers packed within a perimeter about a quarter mile around. As the sun rose higher and hotter, the soldiers, without water or food, suffered badly. The Boers, too, were suffering from lack of water and food and were becoming increasingly demoralized. Their attack on the kop, at heavy cost, had only half succeeded, and the large groups of Boer horsemen on the plain below were refusing to join in the battle. Hopelessness began to take hold of the Boers on the kop, and after midday some began abandoning the positions they had seized with such heroism a short time before. Confusion and demoralization set in among the survivors on both sides; the atmosphere was described by an English war correspondent as “that acre of massacre, that complete shambles.” That night the British withdrew under cover of darkness, leaving behind 243 bodies piled three-deep in the grisly trenches.
Buller’s Push to Relieve Ladysmith
Buller, anxious to restore his tarnished reputation, decided to try again to break through to Ladysmith. Having tried to break through the Boers on the right and center of their position, he decided now to break through on their left, at Vaal Krantz. On February 5, following a feint attack that did not deceive the Boers, Buller’s main force began crossing the Tugela at the exact point where the Boers expected them. Then, when the brigade leading the attack had crossed the Tugela, Buller inexplicably halted the attack, leaving the brigade across the river to attack by itself. When the brigade reached the crest of Vaal Krantz, Buller ordered Lyttelton, their commander, to withdraw. Lyttelton ignored the order at first, but, realizing the attack was failing, he withdrew the next day and returned to Chieveley. The brigade had taken 400 casualties.
In Ladysmith, morale had sunk even lower, if that was possible. The siege had now lasted for 100 days. Medical arrangements were bad—some 563 soldiers had died of sickness, 393 from typhoid. By January 30, White’s hopes of using his cavalry had vanished, and the horses were eaten by the starving garrison. Meanwhile, Buller had come to the conclusion that his next attack must use different tactics. Instead of throwing in all his forces to gain a swift victory, he would try a gradual and more methodical advance, each step supported by the largest possible number of guns. The terrain northeast of Colenso lent itself to this method, being dominated by a series of hills leading up to the southern bank of the Tugela.
Buller’s next attack began on February 12 with the temporary occupation of Hussar Hill, four miles east of Colenso. From this hill, Buller could view the Boer positions on the series of hills running northwest for three miles to the river. These would provide the stepping-stones that would lead Buller to a position from which he could tackle the formidable gorge through which the railway ran on the north bank of the river to Ladysmith.
Colonel Lord Dundonald’s brigade occupied Hussar Hill on February 14. The next day, the 6th Fusilier Brigade took Green Hill, and three days later the Boers abandoned all their positions south and east of the Tugela. Colenso was reoccupied. From the summit of Monte Cristo Hill, Buller could see the outskirts of Ladysmith lying below. Inspired, he ordered a pontoon bridge across the river north of Colenso, below Hlangwane. While it was being built, he ordered Lt. Col. Alec Thorneycroft’s Mounted Infantry across the river to occupy Fort Wylie. When the pontoon bridge was completed on the 21st, Buller sent the 11th Lancashire Brigade across it to take the two hills on the far side.
On the 23rd, Hart’s 5th Irish Brigade passed behind Wynne’s Hill to attack the hill to its right. To get to the hill, he led his three battalions—the Inniskillings, Connaught Rangers, and Dublin Fusiliers—along a narrow gorge and across a railway bridge. There they came under heavy Boer fire and Hart, impatient and headstrong, ordered his battalions into the attack, one after the other, up a steep, rocky hillside in heavy rain. It was a near disaster. Hart suffered 500 casualties, the majority in the Inniskillings, which lost 72 percent of its officers, including the CO, and 27 percent of its men. Two reinforcing battalions from the Durham Light Infantry and Rifle Brigade stabilized the situation by digging in on the lower slopes. They were unable to help the wounded Irish left on the summit.
A Change of Plans
The next day, February 25, was a Sunday, and Buller arranged a six-hour truce to recover the wounded and bury the dead. He now made a significant change to his plan. He would relocate the pontoon bridge farther downstream, below Hart’s Hill, and send the 5th Division across it to attack the three hills astride the railway as it led away from the river toward Ladysmith. The attacks would be heavily supported by artillery. Confident his plan would succeed, Buller on December 26 signaled White: “I hope to be with you tomorrow night.”
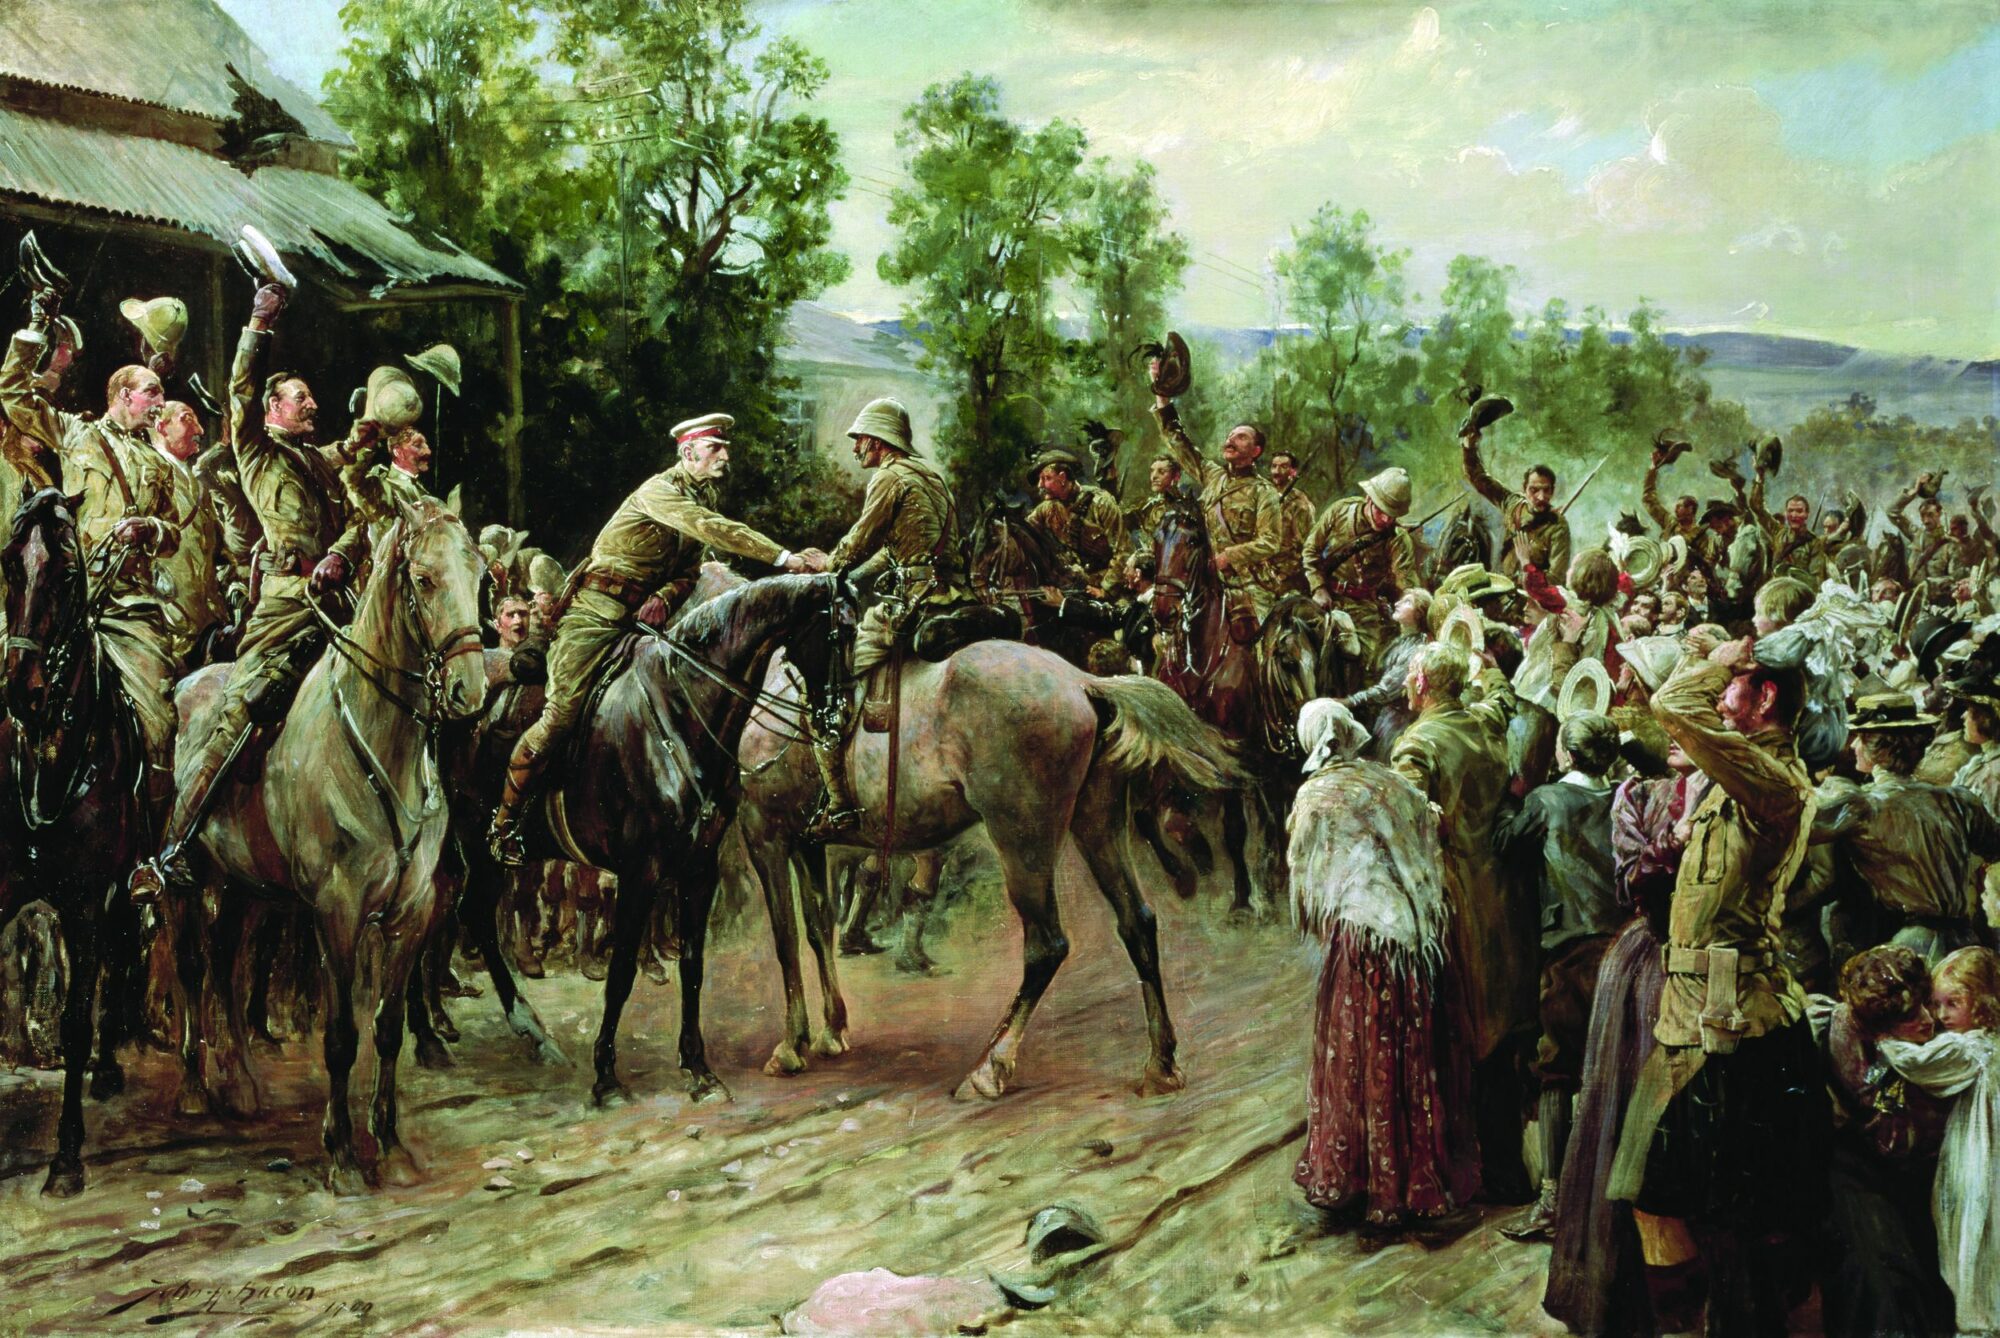
The next morning the 6th Brigade attacked Pieter’s Hill and cleared it of Boers by the afternoon. The 5th Brigade attacked Railway Hill and cleared it as well, and the 4th Brigade drove the Boers off Hart’s Hill. Early the next day, British forces crossed the Tugela and, meeting only little resistance, pushed on across the plain. In Ladysmith that morning, the 118th day of the siege, people saw a long column of Boers trekking away to the northwest. At 1 pm, White received a message from Buller: “I beat the enemy thoroughly yesterday and am sending my cavalry to ascertain where they have gone to. I believe the enemy to be in full retreat.”
The Boers were indeed in full retreat. G.S. Preller, a Boer artillery officer, wrote: “All the best efforts did not avail, we had lost the battle—hopelessly lost—we had to retire. The enemy were masters of the bloody battlefield and we had to flee. God, how I have prayed never to see this. All was lost here. Back for home.” The cavalry moved ahead, breaking into a gallop as they neared Ladysmith. They galloped past the hospital and on across the Klip River. At 6 pm, two squadrons of cavalry, one of the Imperial Light Horse and one of the Natal Carbineers, rode into Ladysmith amid scenes of emotion and jubilation. They stopped opposite the jail, where White and his staff were waiting. White, stooped over and looking 10 years older, was a pathetic figure. “Thank God we kept the flag flying,” he told the assembled crowd, adding in a faltering voice, “It cut me to the heart to reduce your rations as I did. I promise you, though, that I’ll never do it again.”
“One of the Most Mournful Pageants”
Three days later Buller, unaware of the tension between relievers and relieved, reluctantly led a ceremonial march through the town. White’s force did not conceal their resentment at the slowness of the relief, and Buller’s force in turn resented how fit the garrison looked and how little it had done to help itself. The bitterness was apparent on both sides. Lt. Col. G.H. Sim called it “one of the most mournful pageants that could have been devised by idiotic generals.” Years later, General Warren “could not bear to think of it, the march of 20,000 healthy men triumphant and victorious, through the ranks of the weary and emaciated garrison, who were expected to cheer us and who actually tried to do so—it was an ordeal for me and many others.”
For his part, White was embarrassed and insulted after hosting Buller at a celebratory luncheon. Buller joked ungraciously that there seemed to be a lot of food, which White had been hoarding for just such a special occasion. One of White’s staff recalled later: “Buller himself arrived and made himself as unpleasant as he could. We had saved up a few stores and used up everything giving him a good lunch. The ungrateful ruffian now goes about saying the Ladysmith garrison lived like fighting cocks and that stories of hardships are all nonsense.”
On that less than collegial note, the relief of Ladysmith ended. White was refused another command in southern Africa and was invalided home. Astonishingly, he eventually became a field marshal and governor of Chelsea Hospital. Buller, nicknamed “Sir Reverse” for his South African misadventures, remained despite all his reverses the most beloved British general of the war. Although his soldiers often laughed at him and nicknamed him the “Tugela Ferryman” because he had led them back and forth across that river so often, they never let him down. Returning to England, he resumed his command at Aldershot, but a year later he was dismissed from the army after a public argument with Roberts over whether or not he had ordered White to surrender Ladysmith. Buller remained a popular national figure until his death in 1908, hot-tempered, bibulous, and jolly to the last. In his hometown of Exeter, admirers erected a statue to him; it said simply: “He saved Natal.”
Join The Conversation
Comments
View All Comments